
How to hang a book shelf
Hanging a book shelf is a straightforward DIY task and is a great way to not only add some additional storage space, but also to improve the decorative look of a room.
This section will guide you through the whole process, including marking out the shelf position, drilling the holes, and finishing off.
This section will guide you through the whole process, including marking out the shelf position, drilling the holes, and finishing off.
Please note: We will accept no responsibility for any damage or injury as a result of following this guide.
For further information please see our disclaimer, a link to which can be found at the bottom of this page.
For further information please see our disclaimer, a link to which can be found at the bottom of this page.
Wooden book shelf overview

To the right is a typical wooden bookshelf.
We have pointed out the main parts of the shelf:
Other shelves have different types of brackets, metal right angle brackets are common. This tutorial should suffice for most types of wooden book shelf, whatever the type of brackets used.
We have pointed out the main parts of the shelf:
- The Wall Plate (A in fig 1.1)
- The Supporting Arm (B in fig 1.1)
- The Shelf surface (C in fig 1.1)
Other shelves have different types of brackets, metal right angle brackets are common. This tutorial should suffice for most types of wooden book shelf, whatever the type of brackets used.
Advertisements
Positioning the first wall plate (or shelf bracket)
The first thing we need to do is to position the shelf in the right place, and at the right height. Be aware of possible electrical cables or pipes running behind the wall.
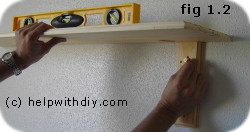
Place the spirit level on the shelf surface to ensure it is level, then hold one of the face plates (or brackets) up against the shelf surface.
Use a screw, by turning it, to mark the wall in one of the screw holes (see fig 1.2) in the face plate.
Place the spirit level on the shelf surface to ensure it is level, then hold one of the face plates (or brackets) up against the shelf surface.
Use a screw, by turning it, to mark the wall in one of the screw holes (see fig 1.2) in the face plate.
Fixing the first wall plate (or shelf bracket)
Now we are going to mark the first wall plate (or bracket) for drilling.
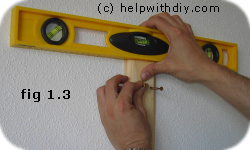
Position the face plate so one screw lines up with the mark on the wall you made in the last step.
Place the level on top of the face plate to ensure it is level, then mark the wall in the next screw hole, again by turning the screw until it bites into the wall (see fig 1.3).
Mark any remaining screw holes while keeping the wall plate firmly in position.
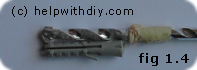
Now choose a suitable drill bit (masonry or the right type for the surface). It should be the same width as the wall plug to be used.
Get to hand one of the wall plugs, and place it against the tip of the drill bit (see fig 1.4). Place a piece of masking tape on the drill bit to use as a guide, this will ensure you don't drill too deep.
Get to hand one of the wall plugs, and place it against the tip of the drill bit (see fig 1.4). Place a piece of masking tape on the drill bit to use as a guide, this will ensure you don't drill too deep.
Advertisements
Now drill the wall where you have marked it, try and keep the drill straight and level as you drill. Variable speed drills are the best option as they allow you to start off slowly ensuring accuracy.
Once you have drilled your holes, insert the wall plugs ensuring they are flush with the surface.
Attach the supporting arm to the face plate (if needed), then hold the face plate (or shelf bracket) in position lined up with your holes. Insert all of the screws into the wall plugs and give them a few turns until they are just over halfway in.
Place the spirit level onto the wall plate (or shelf bracket), ensure it is level, then tighten the screws.
Marking the second wall plate (or shelf bracket)
Before you continue attach the second supporting arm to the second face plate. You may have to remove it again after you have made your mark, but attaching it now will ensure that the shelf is sitting level.
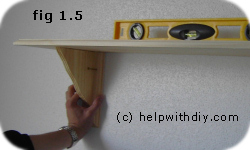
Place your spirit level on the shelf surface, and place the second face plate (or bracket) roughly the same distance away from the end of the shelf as the first bracket.
Place one screw into the first hole as before, and then mark the wall by turning the screw until it bites (fig 1.5).
Follow the same method to make your marks and fix it to the wall as you did for the first wall plate.
Positioning the shelf surface
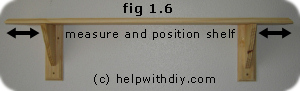
Once you have fixed the second wall plate (or bracket), place the shelf surface into position. Get your tape measure and centre the shelf surface on the brackets (see fig 1.6).
Then fix the shelf surface into position with the tacks (or screws) provided.
Then fix the shelf surface into position with the tacks (or screws) provided.
Advertisements