|
| |
Hanging Wallpaper Part 2 - Pasting and Hanging the Wallpaper |
This is a two part tutorial, in this part we will cover pasting and hanging the lengths.
To return to part one of this tutorial click here.
|
|

|
|
This page is © Copyright 2001-2011 helpwithdiy.com |

Before you follow this guide you must read the terms of our disclaimer.
Pasting the wallpaper lengths
If you are using a pre-pasted wall covering, then follow the manufacturer's instructions for preparation.
When your paste is ready, position one of the lengths of wallpaper face down on your pasting table, take your pasting brush and apply the paste to the first length. Starting at the bottom, work the paste evenly over the paper working from the middle to the edges (see Fig 1.3), gently fold the bottom over into a concertina (ensuring not to crease), this will make the paper easier to work with.
Allow the paper to soak for as long as instructed (see label) before hanging.
|
Fig 1.3
|
back to top | © Copyright 2001-2011 helpwithdiy.com
Hanging the first length
When the first length of wallpaper is ready for hanging, hold it by the top and place it loosely up against the wall, leaving about 5cm surplus at the top and align the edge with your vertical guideline.
Unfold the concertina and let the paper hang loosely while you check the positioning, when you are happy with the position work your way down from the top, smoothing the paper onto the wall with your paper-hanging brush, ensuring to disperse any trapped air.
|
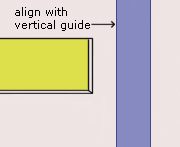
Fig 1.4
|
back to top | © Copyright 2001-2011 helpwithdiy.com
Trimming
When the length is in position and you have removed any trapped air, run the back of your scissors into the crease between the wall and ceiling.
Gently pull the paper away from the wall, enough to let you trim the surplus at the top using the crease as a guide, then smooth the paper back onto the wall with your paper-hanging brush.
To trim the bottom, use the same technique as the top.
|
|
back to top | © Copyright 2001-2011 helpwithdiy.com
Hanging subsequent lengths
When the next length is ready for hanging, hold it in the same way as before and place it loosely up against the wall, butt it up against the previous length and ensure the pattern is matched exactly.
When you are happy with the match and the position, again work your way down from the top smoothing the paper onto the wall with your paper-hanging brush, and brush out any trapped air.
Trim the top and bottom in the same way as the first length, and then use your seam roller (unless the wallpaper is embossed) to smooth the edges between the two lengths.
|
back to top | © Copyright 2001-2011 helpwithdiy.com
Papering into the corner
You should always trim the paper when you reach a corner and start a new run of lengths for each wall, this will stop the paper running at an angle due to unlevel walls.
To trim into the corner, run the back of the scissors down the length to make a loose crease, then gently pull the paper away from the wall and trim the paper about 2 cms from the crease (to create a surplus of 2cm see Fig 1.5). Then trim the top and bottom as before, and finally smooth the wallpaper back onto the surface with your paper-hanging brush.
|
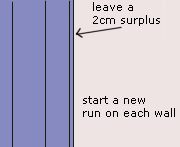
Fig 1.5
|
back to top | © Copyright 2001-2011 helpwithdiy.com
The awkward parts
See our guides for the best way of dealing with the awkward parts of the room:
|
© Copyright 2001-2011 helpwithdiy.com
|
|
