How to tile a wall
Welcome to our illustrated guide to tiling a wall.
One of the most transforming home improvement projects for any bathroom or kitchen is the application of fresh tiles. Although creating that perfect finish can require some patience the rewards are immense.
The actual job of getting the tiles onto the wall is very straightforward, but, as with most DIY jobs, the key to a great finish is in the preparation and planning.
This guide will take you through the processes step-by-step, including preparing the surfaces, marking-out, creating your battens and then laying the tiles.
Please note: We will accept no responsibility for any damage or injury as a result of following this guide.
For further information please see our disclaimer, a link to which can be found at the bottom of this page.
For further information please see our disclaimer, a link to which can be found at the bottom of this page.

When working with ceramic tiles always wear safety goggles and thick work gloves!
Ceramic tiles can be extremely sharp when trimmed or cut.
Ceramic tiles can be extremely sharp when trimmed or cut.
Related: See also our tile calculator to estimate the amount of tiles required.
Preparing the surface for tiling
Preparation is the key to achieving a great finish for your tiling project and getting the walls prepared is a vital part of this preparation.
Advertisements
Preparing plastered brick or block walls
Ensure all surfaces are clean, dry and free from dust/debris. Repair any cracks or blemishes using a suitable filler, always allow time for the filler to dry completely.
Remember to check for any dips or bumps in the wall's surface as this can become a problem when fixing the tiles later on. For instance, some prominent bumps/dips can cause a tile to kick out on one edge or corner.
If the plaster is new then ensure it has had enough time to dry (10-14 days depending on manufacturer), also read the tile adhesive manufacturer's guidelines as the new plaster may need a coat of primer.
Tiling on top of other tiles
If you want to tile straight on top of the existing tiles, then remove all of the grease and dirt with a suitable detergent and score the tiles vertically and horizontally with a tile scriber to facilitate a bond between the existing tiles and the new ones.
There are special adhesives available designed specifically for tiling over tiles, these adhesives can sometimes be used without scoring the existing tiles.
One thing to bear in mind when considering tiling straight over existing tiles is that the new tiles will be at least a tiles thickness proud. This can cause problems when tiling up to edges like door frames.
In the majority of cases it is better to remove the old tiles first, it makes the project more time consuming but the results can be worth the extra effort.
Creating the guide rods
As with a lot of DIY tasks, the setting out of a tiling project is extremely important and shouldn't be rushed. One of the easiest ways to set out your tiles is to make yourself a guide rod out of a piece of wooden batten, this can then be used to mark out the tile positions and give you a preview of how the tiling project will look when finished.

If your tiles are taller than they are wide then make another guide rod in the same way except place the tiles length ways with their side against the batten (remember to place tile spacers inbetween). Mark this batten as height and mark the batten you made earlier as width.
- Divide the wall width by 2 and subtract 4cms (1.6 inches) write down this figure as A.
- Get a straight piece of batten, cut to the length of A (see above) and lay it on the floor.
- Get to hand several tiles and some tile spacers.
- With the batten in front of you mark the width of a tile spacer from the left edge of the batten.
- Now place the top left edge of a tile against the mark you just made.
- Leave that tile where it is and butt up another tile with another tile spacer in between.
- Repeat step 5 until you have placed tiles along the whole length of the batten (see fig 1.1).
- Next ensuring the tiles and spacers are tight against each other mark the batten with a felt tip pen (or similar) on both edges of each tile.
- Then using a set square, mark along the whole width of the batten with a pen (see fig 1.2).
- Now mark your batten in the middle of each tile with a different colour pen (see fig 1.2).
- Next trim the batten at the mark of the last tile on the right (no spacer).

If your tiles are taller than they are wide then make another guide rod in the same way except place the tiles length ways with their side against the batten (remember to place tile spacers inbetween). Mark this batten as height and mark the batten you made earlier as width.
Finding the horizontal and vertical centres
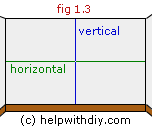
The next step is to find the horizontal centre of the wall. Measure the wall from top to bottom to find the centre, mark the position and then use your level to mark the position across the whole surface (see fig 1.3).
Do the same for the vertical centre, measure from left to right and mark the centre position, then use the level to mark the entire surface from top to bottom (see fig 1.3).
Do the same for the vertical centre, measure from left to right and mark the centre position, then use the level to mark the entire surface from top to bottom (see fig 1.3).
note - You can also find the centre spot of a wall by running string or a chalk line from the top left corner to the bottom right corner, then the top right corner to the bottom left corner. Where the two meet in the middle is the centre.
Checking the horizontal tile positions
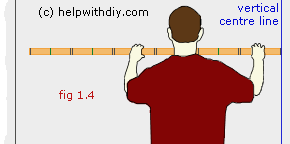
Now with your guide rod (horizontally) butt the right end (with no spacer gap) up against your vertical centre line, ensure the guide rod is level (see fig 1.4 below).
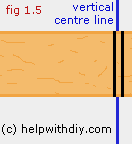
If your guide rod is more than a tile width short of the adjoining wall then mark the left hand edge of the guide rod. Slide the rod to the left and butt one of the other tile marks (excluding spacer) up against the mark you just made (see fig 1.5 above).
You can now see how much you will have to cut off the last tile on the left, if you find the gap on the left is too small then try aligning one of your tile centre lines on your guide rod with the vertical centre line on the wall.
When you are happy with the horizontal positioning of the tiles mark each tile edge on the wall.
Checking the vertical tile positions
Advertisements
To find the ideal vertical positioning you can use the same method as you just used for the horizontal positions (using a different guide rod if your tiles are taller than wide).
When you are planning your tile positions bear in mind that most floors are slightly uneven, it can cause problems if you position your tiles based on a full tile at the bottom.
Because the bottom row of tiles is one of the last rows to complete, you can get around this problem by leaving the space for the bottom tile smaller than the height of the tile, this allows you to trim each individual bottom tile to the exact size later.
For example, if your tile was 30cm (11.8in) tall then you would make the gap for the bottom tile 26cm (10.2in), leaving you 4cm (1.6in) to play with if the floor around the room runs unlevel.
Fixing the horizontal batten to the wall
When you have marked out the best tile positioning both vertically and horizontally get to hand two pieces of perfectly straight edged batten.
One piece of batten about 10cm (8in) shorter than the surface width, and the other about 10cm (8in) shorter than the height of the surface to be tiled.
To fix the batten to the wall you can either use nails or screws and plugs, usually it is better to use screws as it is more sturdy to support the tiles until the tile adhesive has hardened sufficiently.
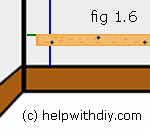

Place the batten you made for the width directly on and under the horizontal line you made for the bottom row of tiles earlier (see fig 1.6), use your spirit level to ensure you get a nice level line off the batten.
Screw the batten securely to the wall at regular intervals (around every 30cm (1ft)) always ensuring the batten is level.
Screw the batten securely to the wall at regular intervals (around every 30cm (1ft)) always ensuring the batten is level.
Vertical batten placement
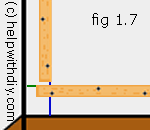
The next step is to fix the vertical batten to the wall. Take a piece of batten about 10cm (8in) shorter than the height of the wall and place it against the vertical line you made for the first tile in the row (see fig 1.7).
Screw the batten securely to the wall at regular intervals (around every 30cm (1ft)) using your spirit level to ensure the batten is perfectly vertical.
Screw the batten securely to the wall at regular intervals (around every 30cm (1ft)) using your spirit level to ensure the batten is perfectly vertical.
Applying the tile adhesive
Before mixing your tile adhesive you should calculate how much you will need (guidance to the coverage is usually given on the manufacturer's instructions) and try not to make too much at a time.
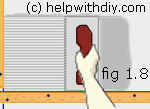

Mix your tile adhesive according to the manufacturer's instructions. When ready, apply the adhesive to the wall using your tile trowel, try to ensure an even coat. Use the teeth on the tile trowel to create ridges of adhesive (see fig 1.8).
Apply the adhesive to an area about 2 and a half tiles wide and 3cm (one inch) higher than the top of the tile's height.
Apply the adhesive to an area about 2 and a half tiles wide and 3cm (one inch) higher than the top of the tile's height.
Installing the first ceramic tile
This step should not be rushed as the first tile will dictate the run of the rest of the tiles.
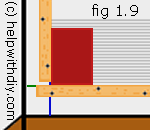

To install the first tile, sit it tight into the corner you have made with your battens (see fig 1.9) then push it against the wall firmly, use your level to ensure it is perfectly placed.
Another important check is to place your spirit level vertically on the face of the tile to ensure it is sitting up straight. If you are not happy with the placement then it is better to upseat the tile, clean the area of adhesive and then start again.
Another important check is to place your spirit level vertically on the face of the tile to ensure it is sitting up straight. If you are not happy with the placement then it is better to upseat the tile, clean the area of adhesive and then start again.
Laying the second ceramic tile
Place another tile on the wall next to the first, if you are using tile spacers then insert them inbetween the 2 tiles to space evenly.
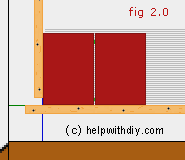

Ensure the tile is pressed gently against the wall. Check your horizontal and vertical levels, place your spirit level across the top edge of both tiles to check they are running level.
By placing your level across the faces of both tiles together at the top and the bottom will ensure they are both sitting upright.
When you are happy with the positioning apply more adhesive to the surface, enough to allow you to lay the rest of the tiles in this row.
By placing your level across the faces of both tiles together at the top and the bottom will ensure they are both sitting upright.
When you are happy with the positioning apply more adhesive to the surface, enough to allow you to lay the rest of the tiles in this row.
Laying the rest of the ceramic tiles in the row
Advertisements
Continue laying the tiles in the same way (using spacers if required). As you work along, use your level to check each tile's placement individually and with its neighbouring tiles as you lay them.
Don't forget to check for skewing by placing the spirit level across the faces of the tile you are laying and its neighbouring tiles.
If you find that a tile has sunk too much compared to its neighbour then use your trowel to gently pull the tile away from the wall. Repair the area with your tile trowel to even out the adhesive and remove any adhesive from the back of the tile.
Place a small blob of adhesive onto the back of the tile in the area that is sitting too shallow, then place it back into position to check (may take a few attempts to judge the amount of extra adhesive to use).
Laying the remaining rows of the ceramic tiles
When you have finished laying the final full tile in the row, use your tile trowel to remove any excess tile adhesive from the wall on the right of this row of tiles and get to hand a piece of straight batten.
Hold it against the face of the tiles to ensure they are all uniform and then place it along the top edge of the row to check the tiles are level. If the height of a tile needs adjusting use a tile spacer or a piece of card to lift it slightly from the batten.
When applying the adhesive to the surface you can put on just enough for however many tiles you feel comfortable in laying in one time, although you shouldn't finish for the day halfway through a row.
When you have finished all of the rows of the full tiles take advantage of the adhesive still being pliable to check and correct any tiles that may have slipped out of position.
Allow the tile adhesive to set (see manufacturer's instructions) before removing the battens.
Hold it against the face of the tiles to ensure they are all uniform and then place it along the top edge of the row to check the tiles are level. If the height of a tile needs adjusting use a tile spacer or a piece of card to lift it slightly from the batten.
When applying the adhesive to the surface you can put on just enough for however many tiles you feel comfortable in laying in one time, although you shouldn't finish for the day halfway through a row.

Use your tile trowel to apply adhesive to the area ready for the next row of tiles and continue laying them. If required, use the tile spacers to make the grout line between this row and the first.
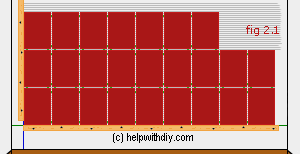
After completing each row remove the excess adhesive at the right edge (see fig 2.1).
Use your batten to align the tiles on the right edge as you do each row.
After completing each row remove the excess adhesive at the right edge (see fig 2.1).
Use your batten to align the tiles on the right edge as you do each row.
When you have finished all of the rows of the full tiles take advantage of the adhesive still being pliable to check and correct any tiles that may have slipped out of position.
Allow the tile adhesive to set (see manufacturer's instructions) before removing the battens.
Measuring & marking the top tiles
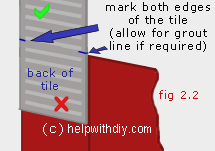
Each top tile must be measured individually to ensure a perfect fit, take a new tile and place it face down on top of the tile in the row beneath (see fig 2.2).
Slide the tile up to the top of the surface, if you want a grout line at the top then lower the tile a spacer's width from the top, also, if you are using spacers between your rows (grout lines) then leave enough space when marking the tile.
When you are happy with the position of the tile, use a felt pen to mark the edge of the tile on both sides using the top of the lower tile for a guide (see fig 2.2).
Notice we have placed a tick on the piece of tile which is to be used and an X on the piece to discard, this can avoid getting the tile pieces mixed up.
If you are measuring and cutting all of the tiles before you start laying them, then it is a good idea to number them so you know where each piece of tile goes when you come to lay them.
Measuring & marking the edge tiles
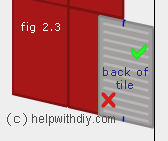
Like the top tiles, the edge tiles must be measured individually to ensure a perfect fit, take a new tile and place it face down on top of the full tile at the edge of the tile field (see fig 2.3). Slide the tile over to the adjoining wall, check the tile is level and then mark the back of the tile (allowing a spacer's width if required) in two positions, using the adjacent tile as a guide (see fig 2.3).
To mark the piece for the opposite side of this row of tiles, simply do the reverse of the above.
To mark the piece for the opposite side of this row of tiles, simply do the reverse of the above.
Measuring & marking the bottom tiles
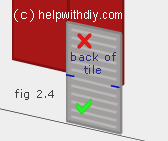
The bottom tiles also need to be measured individually, place a new tile face down on the tile in the row above.
Lower it to the bottom of the wall/surface, if you want a grout line then lift the tile a spacer's width back up.
Mark the tile on the back in the two positions showed in fig 2.4 (allowing the extra space for a grout line if required).
Again we have added a tick and an X to distinguish between the two pieces of tile once they have been cut.
Lower it to the bottom of the wall/surface, if you want a grout line then lift the tile a spacer's width back up.
Mark the tile on the back in the two positions showed in fig 2.4 (allowing the extra space for a grout line if required).
Finishing off the markings
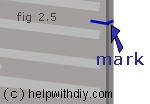
Once you have made your initial marks, use the pen to follow the marks around from the back of the tile to the edges, then mark round to the face of the tile.
Take a straight piece of batten or a steel rule and join the two lines together across the face of the tile, which should give you a precise cutting line.
Take a straight piece of batten or a steel rule and join the two lines together across the face of the tile, which should give you a precise cutting line.
