
Building an outdoor fire pit on your concrete patio can seem challenging without proper guidance. Many homeowners struggle with foundation issues, block placement, and adequate concrete mixing techniques.
This guide will show you exactly how to construct a safe, durable fire pit directly on your concrete surface. You’ll learn professional techniques used by masonry experts, including proper footing preparation, block setting methods, and heat-resistant finishing materials.
By following these detailed steps, you’ll create a stunning centerpiece for your outdoor space. This article covers everything from initial site preparation and concrete mixing to final stucco application and maintenance tips.
You’ll also learn which materials work best and common mistake/s to avoid during construction.
Why Choose Concrete Patio Fire Pits?
Concrete patios provide excellent foundations for fire pit construction. The solid base eliminates concerns about ground settling or drainage issues. Your existing patio already offers the stability needed for heavy masonry work.
Fire pits built on concrete surfaces offer several advantages over ground-level installations. Temperature control becomes easier with the proper use of insulation techniques.
Maintenance remains simple since you won’t have to deal with grass or soil cleanup around the structure.
Professional contractors often prefer concrete base construction because it allows for precise measurements and level installations. The finished result appears cleaner and integrates more seamlessly with existing outdoor living spaces.
Step-by-Step Fire Pit Construction Guide
Essential steps for building a durable and safe fire pit, from site selection and material preparation to final assembly and safety checks.
Fire Pit Construction Tools and Materials List:
| Tools Required | Materials Needed |
|---|---|
| Steel stakes | 60-pound concrete bags |
| String lines | Concrete blocks |
| Rubber mallet | Mortar mix |
| 2-foot level | Clay additive |
| Concrete mixer | Red brick pavers |
| Trowel | Stucco mix |
| Green sponge float | Plastic sheeting |
| Measuring tape | Masking tape |
Step 1: Site Preparation and Layout

Start by selecting the perfect location on your concrete patio. Consider wind patterns, proximity to structures, and local fire regulations. Measure your available space carefully to ensure adequate clearance on all sides.
Mark the outer edges of your rectangular fire pit using steel stakes and string lines. Position stakes slightly outside your planned dig area to avoid interference with excavation work. This method keeps your layout lines intact throughout the entire construction process.
Materials needed in this step:
- Steel stakes
- String lines
- Measuring tape
- Chalk or marker
Instructions: Set stakes at each corner of your planned fire pit location. Run string lines between stakes to create a clear rectangular outline. Double-check all measurements and ensure corners form true right angles before proceeding to excavation.
Step 2: Foundation Excavation and Footing
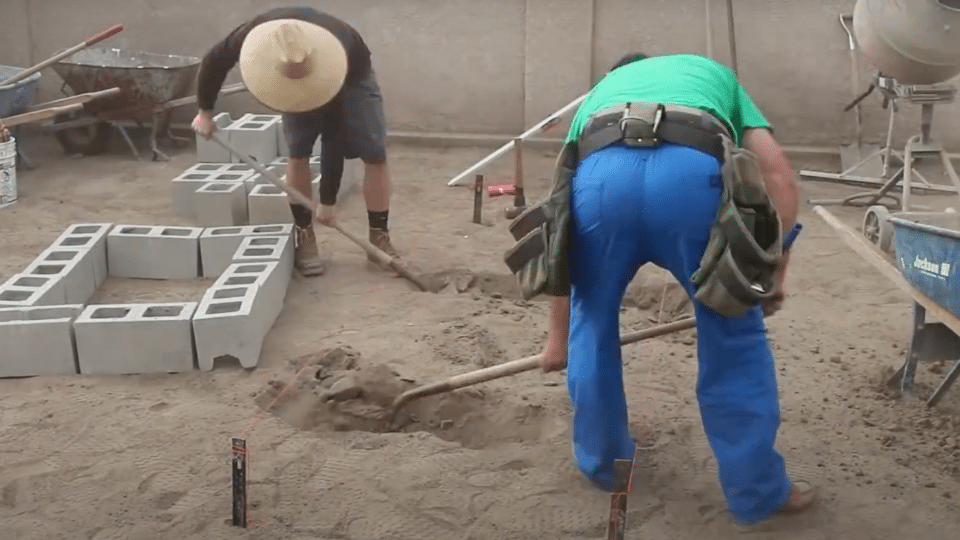
Dig a shallow trench around the perimeter where your first course of blocks will sit. The trench depth should accommodate both concrete footing and proper block elevation. Keep the excavation neat and follow your string line guides precisely.
Remove all debris from the trench and level the bottom surface. A solid foundation prevents future settling and ensures your fire pit remains stable for years to come. Take time to make this base as level as possible using your tools.
Materials needed in this step:
- Shovel or small excavator
- Level
- Hand tamper
- A wheelbarrow for debris
Instructions: Excavate to approximately 4-6 inches deep, following your string line boundaries. Compact the soil base firmly and check for level across the entire foundation area. Clean out any loose material before adding concrete.
Step 3: Concrete Mixing and Pouring
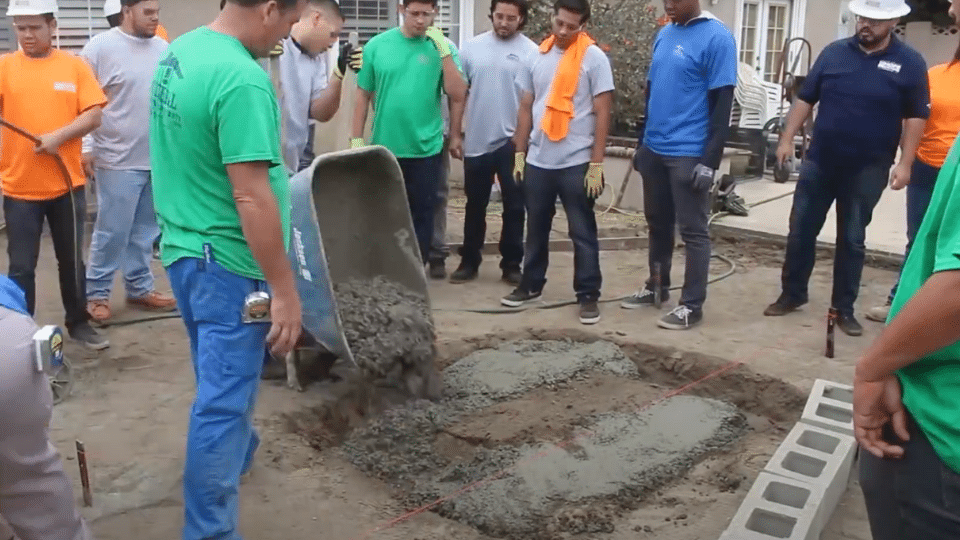
Mix your 60-pound concrete bags in a portable mixer for consistent results. Add water gradually while mixing to achieve proper consistency. The concrete should hold together when squeezed but remain workable for easy placement.
Pour mixed concrete directly into your prepared trench. Work quickly, as concrete begins to set within 30-45 minutes. Fill the entire footing area and level the surface using a screed board or trowel.
Materials needed in this step:
- 60-pound concrete bags
- Concrete mixer
- Water source
- Screed board
- Float or trowel
Instructions: Mix concrete according to package directions, adding clay additive for heat resistance. Pour concrete into footing trench and work out any air bubbles. Level the surface and allow initial set before placing blocks.
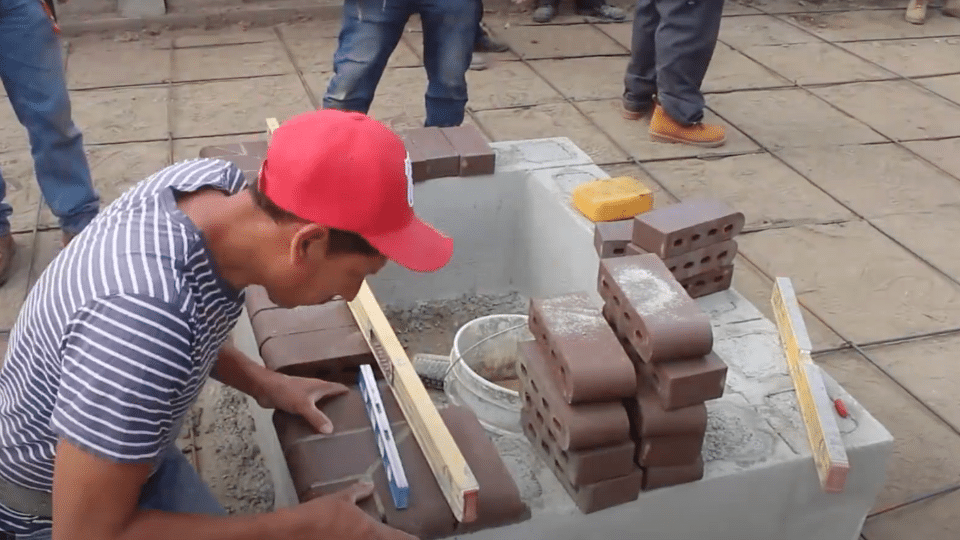
Step 4: First Course Block Placement
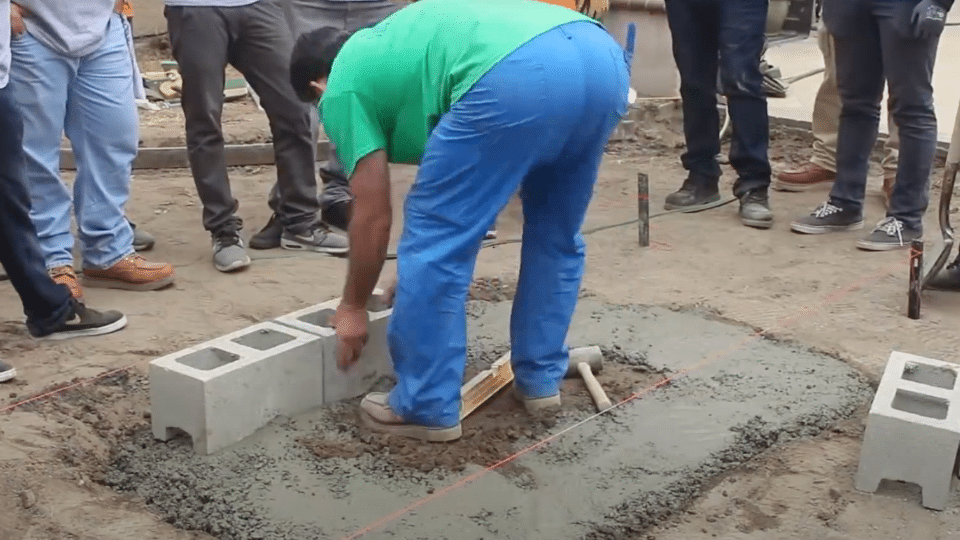
Begin setting your first course of blocks while the concrete footing remains slightly wet. This creates a strong bond between the foundation and the blocks. Use a rubber mallet to adjust block position without causing damage.
Check each block for level in both directions using your 2-foot level. Make fine adjustments by gently tapping the blocks with the rubber mallet. Maintain consistent spacing between blocks for uniform mortar joints.
Materials needed in this step:
- Concrete blocks
- Rubber mallet
- 2-foot level
- Mortar mix
- Trowel
Instructions: Place blocks carefully on the wet concrete footing, checking alignment with string lines. Tap blocks level using rubber mallet, ensuring each unit sits plumb and true. Leave space for mortar joints between adjacent blocks.
Step 5: Mortar Application and Additional Courses
Apply mortar to the top surface of your first course blocks using proper trowel techniques. Spread mortar evenly across the entire block surface, maintaining consistent thickness throughout. Remove excess mortar that squeezes out during block placement.
Continue building additional courses, checking level and alignment frequently. Each course should align perfectly with the one below. Work systematically around the entire perimeter before starting the next level.
Materials needed in this step:
- Mortar mix
- Trowel
- Level
- Water for mixing
- Clean cloth for cleanup
Instructions: Apply mortar bed approximately 3/8 inch thick on top of each course. Place subsequent blocks firmly into the mortar bed, tapping level with a rubber mallet. Clean excess mortar from block faces immediately.
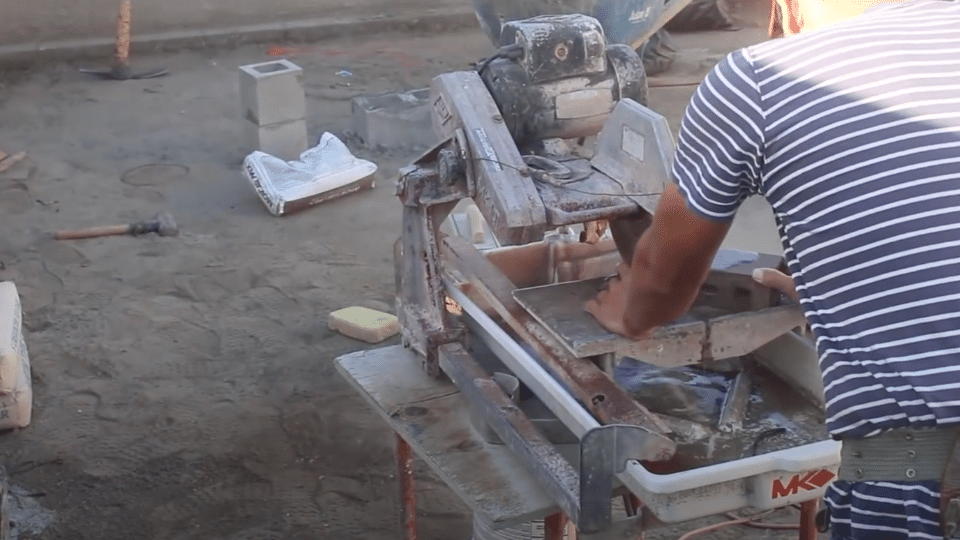
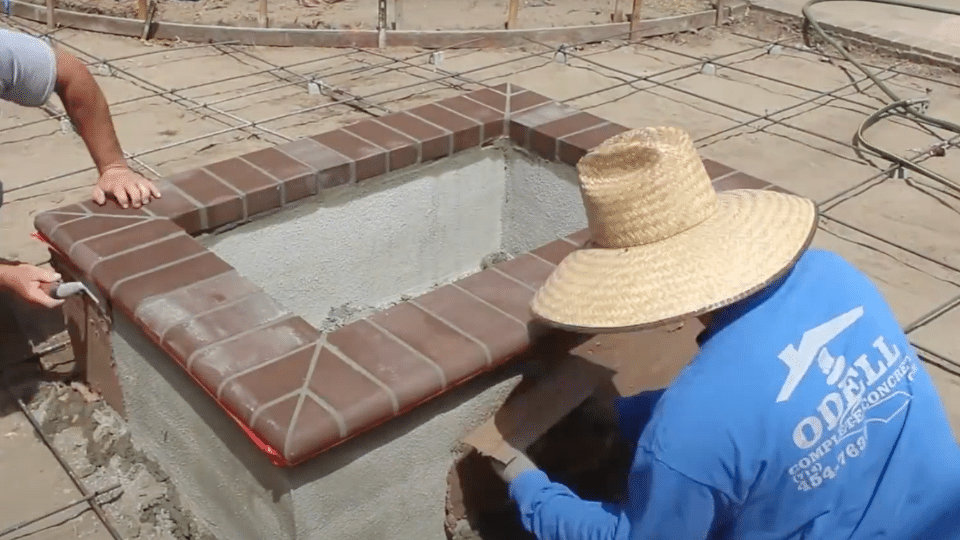
Step 6: Cap Installation and Corner Preparation
Create corner caps by cutting bricks at 45-degree angles to form neat corner joints. Pre-build these corner assemblies on cardboard or plastic sheeting away from the fire pit. This technique ensures a perfect fit and professional appearance.
Use quick-setting mortar to secure the corner pieces together while working on a flat surface. Allow corners to set completely before lifting and placing on the fire pit structure. This method eliminates the difficulty of building suspended corners in place.
Materials needed in this step:
- Red brick pavers
- Quick-setting mortar
- Cardboard or plastic sheeting
- Brick cutting tools
- Safety equipment
Instructions: Cut corner bricks to create 45-degree miter joints. Assemble corners on flat surface using quick-setting mortar. Wait for complete cure before transporting assembled corners to fire pit location.
Step 7: Final Stucco Application and Finishing
Apply a base coat of stucco to both interior and exterior surfaces of your fire pit. Mix clay additive into interior stucco to provide heat resistance and prevent concrete damage from high temperatures. Use proper trowel techniques for smooth application.
After the base coat sets, apply your final colored stucco finish. Work in sections to maintain consistent texture and color throughout the project. Use a sponge float to create the desired surface texture that matches your existing outdoor features.
Materials needed in this step:
- Stucco mix
- Clay additive
- Colored stucco finish
- Trowel
- Sponge float
- Masking tape
Instructions: Mix base coat stucco with clay additive for interior surfaces. Apply evenly with trowel, maintaining consistent thickness. After the base coat cures, apply the final colored finish and texture with a sponge float for professional results.
Video Tutorial
I’d like to acknowledge Odell Complete Concrete for the insightful video, which was a key reference in putting this guide together.
Fire Pit Maintenance and Care Tips
1. Regular Cleaning and Inspection
Clean your fire pit weekly during the use season by removing ash and debris with a soft brush. Check mortar joints monthly for cracks that could allow water damage. Address small repairs immediately to prevent bigger problems later.
2. Weather Protection
Cover your fire pit with breathable tarps during winter months. Apply masonry sealer before cold weather to prevent freeze damage. Remove covers during use and avoid plastic materials that trap moisture.
3. Heat Management
Monitor interior surfaces for signs of heat damage or concrete spalling. Avoid using the fire pit during extremely hot summer days when temperatures exceed 90 degrees. The clay additive helps protect against heat damage.
4. Joint and Surface Repairs
Inspect and repair damaged mortar joints twice yearly using high-temperature mortar. Clean and patch stucco cracks promptly to prevent water infiltration. Match repair materials to existing colors and textures.
5. Safety Monitoring
Check structural stability monthly by testing for loose blocks or movement. Watch for new cracks in joints or surfaces that indicate settling. Ensure the connection to your concrete patio remains solid and secure.
Mistakes to Avoid in Fire Pit Construction
| What to Avoid | Why It’s Problematic | Better Alternative |
|---|---|---|
| Skipping the clay additive | Concrete can explode from heat | Always add clay to interior concrete |
| Using plastic covers | Traps moisture, causing damage | Use breathable tarps for protection |
| Building in high winds | Affects fire safety and control | Wait for calm weather conditions |
| Ignoring local codes | Legal and safety violations | Check permits and regulations first |
| Poor foundation prep | Causes settling and cracks | Take time for proper excavation |
| Mixing mortar too wet | Weak joints and poor adhesion | Follow the manufacturer’s mixing ratios |
| Rushing the curing process | Compromised structural integrity | Allow proper cure time between steps |
Conclusion
Building a fire pit on your concrete patio creates a lasting outdoor feature that brings family and friends together. This project requires meticulous planning, high-quality materials, and meticulous attention to detail throughout the construction process.
The techniques presented in this guide adhere to professional masonry practices employed by experienced contractors. Proper foundation preparation, correct mortar application, and the use of heat-resistant materials ensure your fire pit will provide years of safe enjoyment.
Regular maintenance keeps your fire pit looking great and functioning safely. Weekly cleaning, seasonal inspections, and prompt repairs prevent major problems that could require expensive reconstruction.
Remember that safety should always be your top concern when building and using any fire feature. Check local building codes and fire regulations before starting construction.
Your completed fire pit will become the centerpiece of outdoor entertaining for many years. Take time to build it right the first time, and you’ll enjoy countless evenings gathered around the warm glow with people you care about most.
Frequently Asked Questions
Can you Put a Fire Pit on Top of Concrete Pavers?
Yes, concrete pavers provide an excellent stable foundation for fire pit construction, similar to solid concrete patios.
How Do I Protect My Concrete from Fire Pit Heat?
Add clay additive to your concrete mix and apply heat-resistant stucco with clay to create a protective barrier against high temperatures.
What to Put in the Bottom of a Fire Pit on a Concrete Patio?
Place a layer of firebricks or heat-resistant concrete with a clay additive in the bottom to protect the concrete surface from direct heat damage.
