
What if your shower could feel luxurious and still save up to 80% of water?
That’s the promise of the Rainstick Shower: a revolutionary system designed for eco-conscious homeowners who don’t want to sacrifice comfort for conservation.
Traditional showers waste gallons of water daily, but the Rainstick uses a smart recirculating system to filter, reheat, and reuse water in real-time.
In this blog, we’ll explain everything you need to know about it: how it works, how to install it, how to use it, what materials you’ll need, and where to buy it from.
What is a Rainstick Shower?
The Rainstick Shower saves water by collecting, filtering, and reusing it instead of sending it down the drain, maintaining pressure while using less.
The system is caught through a micron screen, heated to your selected temperature, and sent back through the showerhead, repeating this process.
Smart controls enable the tracking of water usage and switching between modes. The Rainstick offers homeowners who care about the environment a way to reduce bills without sacrificing comfort.
How Does a Rainstick Shower Work?
The Rainstick Shower merges smart technology with water conservation for a comfortable, eco-friendly experience.
- Water Recycling System – Uses a closed-loop method to collect, clean, and reuse shower water instead of letting it drain away.
- Filtration Process – Water passes through micron filters to remove soap and particles before being heated to your chosen temperature.
- Smart Controls – Includes sensors to monitor water quality and temperature, with options for water-saving mode and normal flow.
How to Install a Rainstick Shower
Many homeowners want to upgrade their bathroom with a rainstick shower but worry the installation might be too complicated.
Materials Required
Before starting the installation process, gather all necessary components and tools:
1. Primary Shower Components and Water System
| Material/Component | Purpose/Use |
|---|---|
| Rainstick Shower Unit | Main appliance for shower installation |
| Handheld Shower Head | An optional flexible shower option |
| Foot Spout | Bottom water outlet connected to Rainstick |
| Pump Intake and Micron Screen | Draws and filters recycled water |
| Water Supply Hoses (Gray/Silicone) | Delivers water between the pump, reservoir, and showerhead |
| Quick Connectors (Hose Fittings) | To easily connect water supply lines |
2. Installation Support and Safety Components
| Material/Component | Purpose/Use |
|---|---|
| Utility Bracket | Guides and supports plumbing and electrical connections |
| Wall Anchors and Screws | For securing the Rainstick unit to the wall |
| Screws for Showerhead/Arm | Attaches final plumbing fixtures securely |
| ¾” Plywood Sheet | Raise the subfloor to the reservoir level |
| Rubber Gasket and Anti-Tear Ring | Ensures a watertight seal at the drain |
| Plumber’s Putty | Seals drain components |
| P-Trap | Connects the reservoir drain to the household plumbing |
| Sloped Shower Tray | Directs water toward the reservoir |
| Tape or Paint (for Protection) | Covers reservoir edges during construction |
Tools Required
- Ceramic Hole Saw (1″) – For drilling holes in tile for utility connections
- Tile Drill Bit (½”) – For anchor points in tile
- Measuring Tape and Level – For accurate placement and alignment
- Power Drill – For securing anchors and screws
- GFCI-Protected Electrical Circuit – Required for safe power supply
Step-by-Step Installation Guide
Properly installing your new rainstick shower ensures you’ll enjoy its full benefits for years to come. This simple process takes about 30 minutes and requires just a few basic tools.
1. Mark the Center Points on the Wall and Subfloor
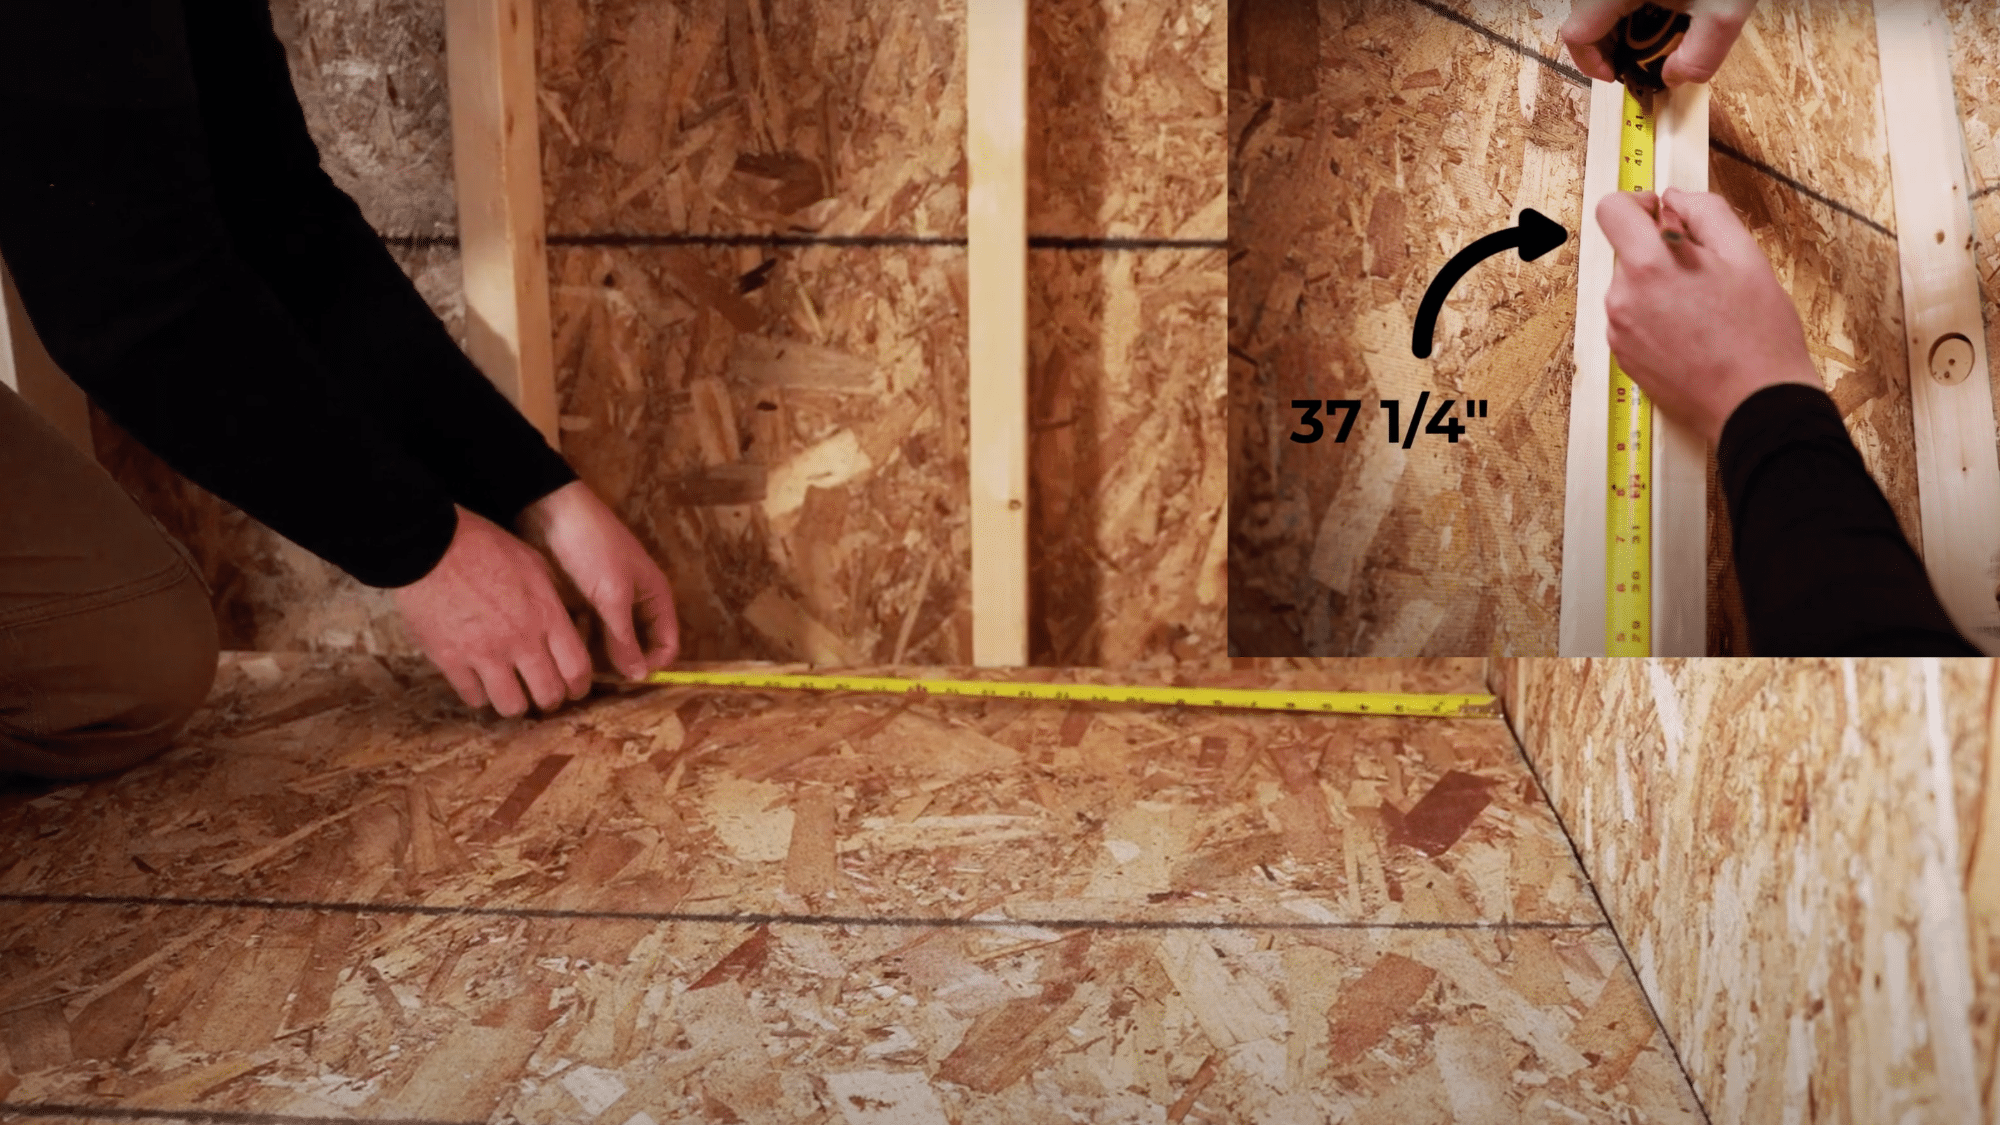
Mark the exact center points where the rainstick unit will be mounted using measuring tape and a level. Precise measurement at this stage prevents problems later in the installation process.
2. Install Wall Support and Route Utilities
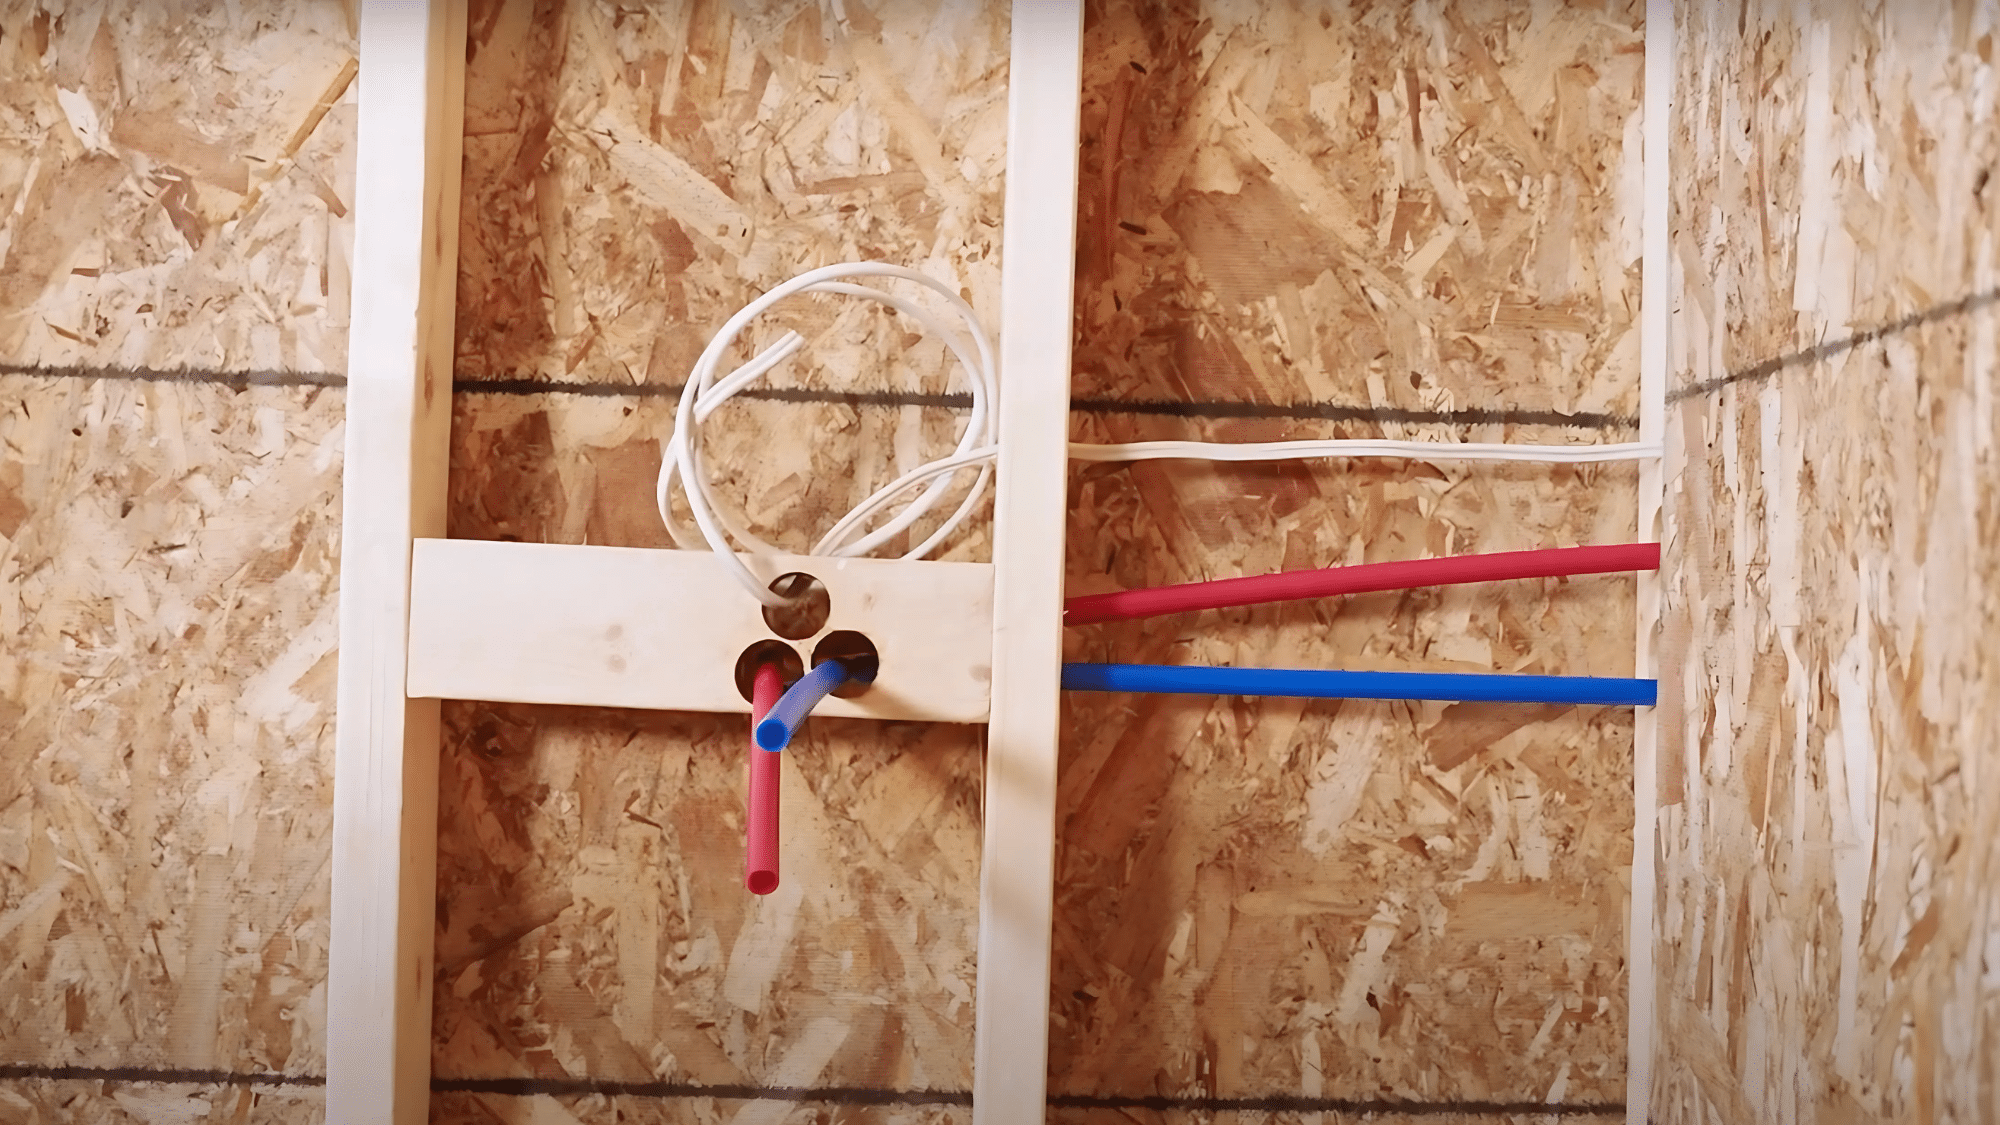
Secure the utility bracket firmly to the wall studs. According to local building codes, create openings for water lines, drain connections, and electrical supply to ensure safe and proper operation.
3. Water Management System Installation

Position the water collection reservoir at the marked location and build up the surrounding subfloor to create a proper drainage slope.
Install a sloped shower base directing water to the intake point, then apply a complete waterproof membrane system extending up the walls to protect the structure from moisture damage.
4. Tile and Prepare Surface Access Points
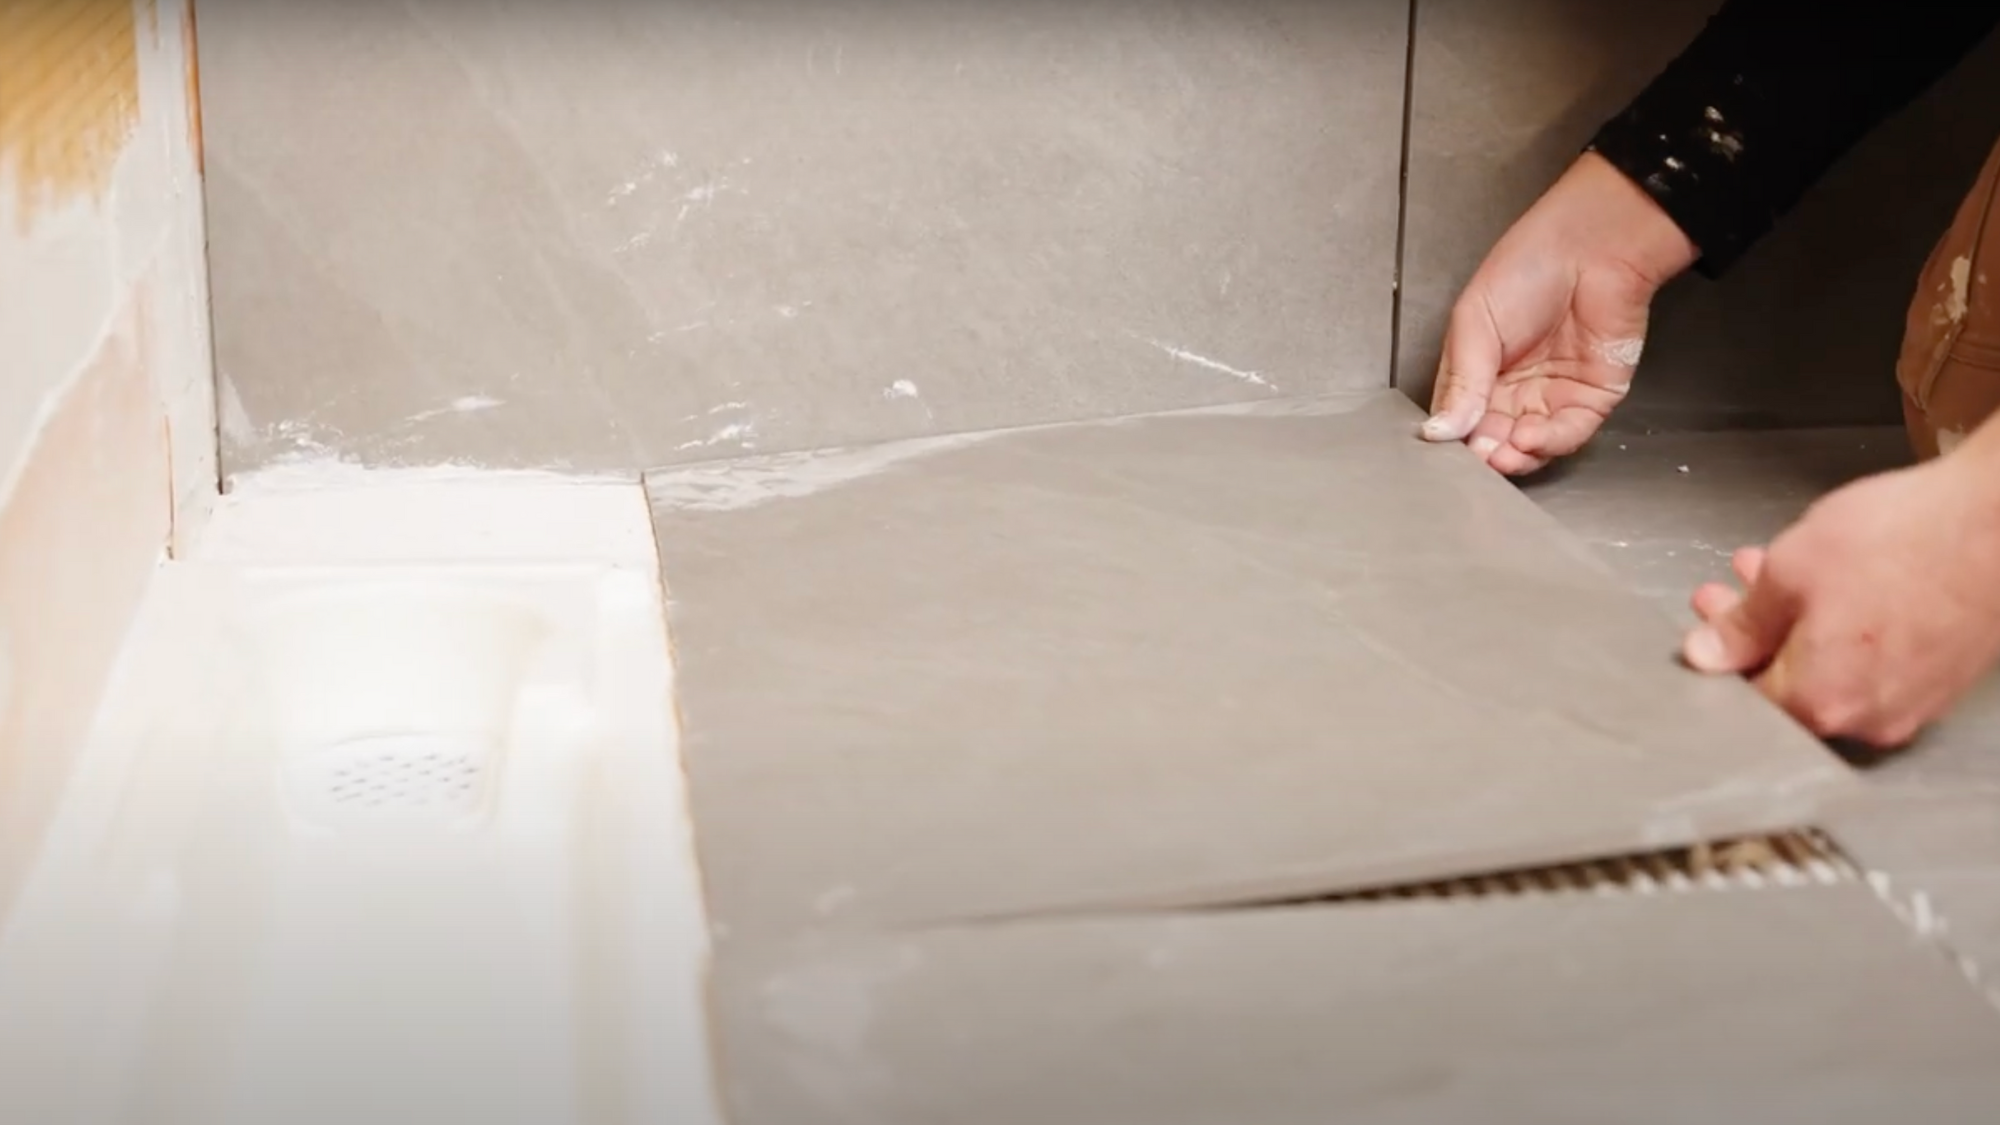
Complete all tiling work with care, leaving appropriate openings for rainstick components and access points for future maintenance needs.
5. Mount the Rainstick and Secure with Toggle Bolts
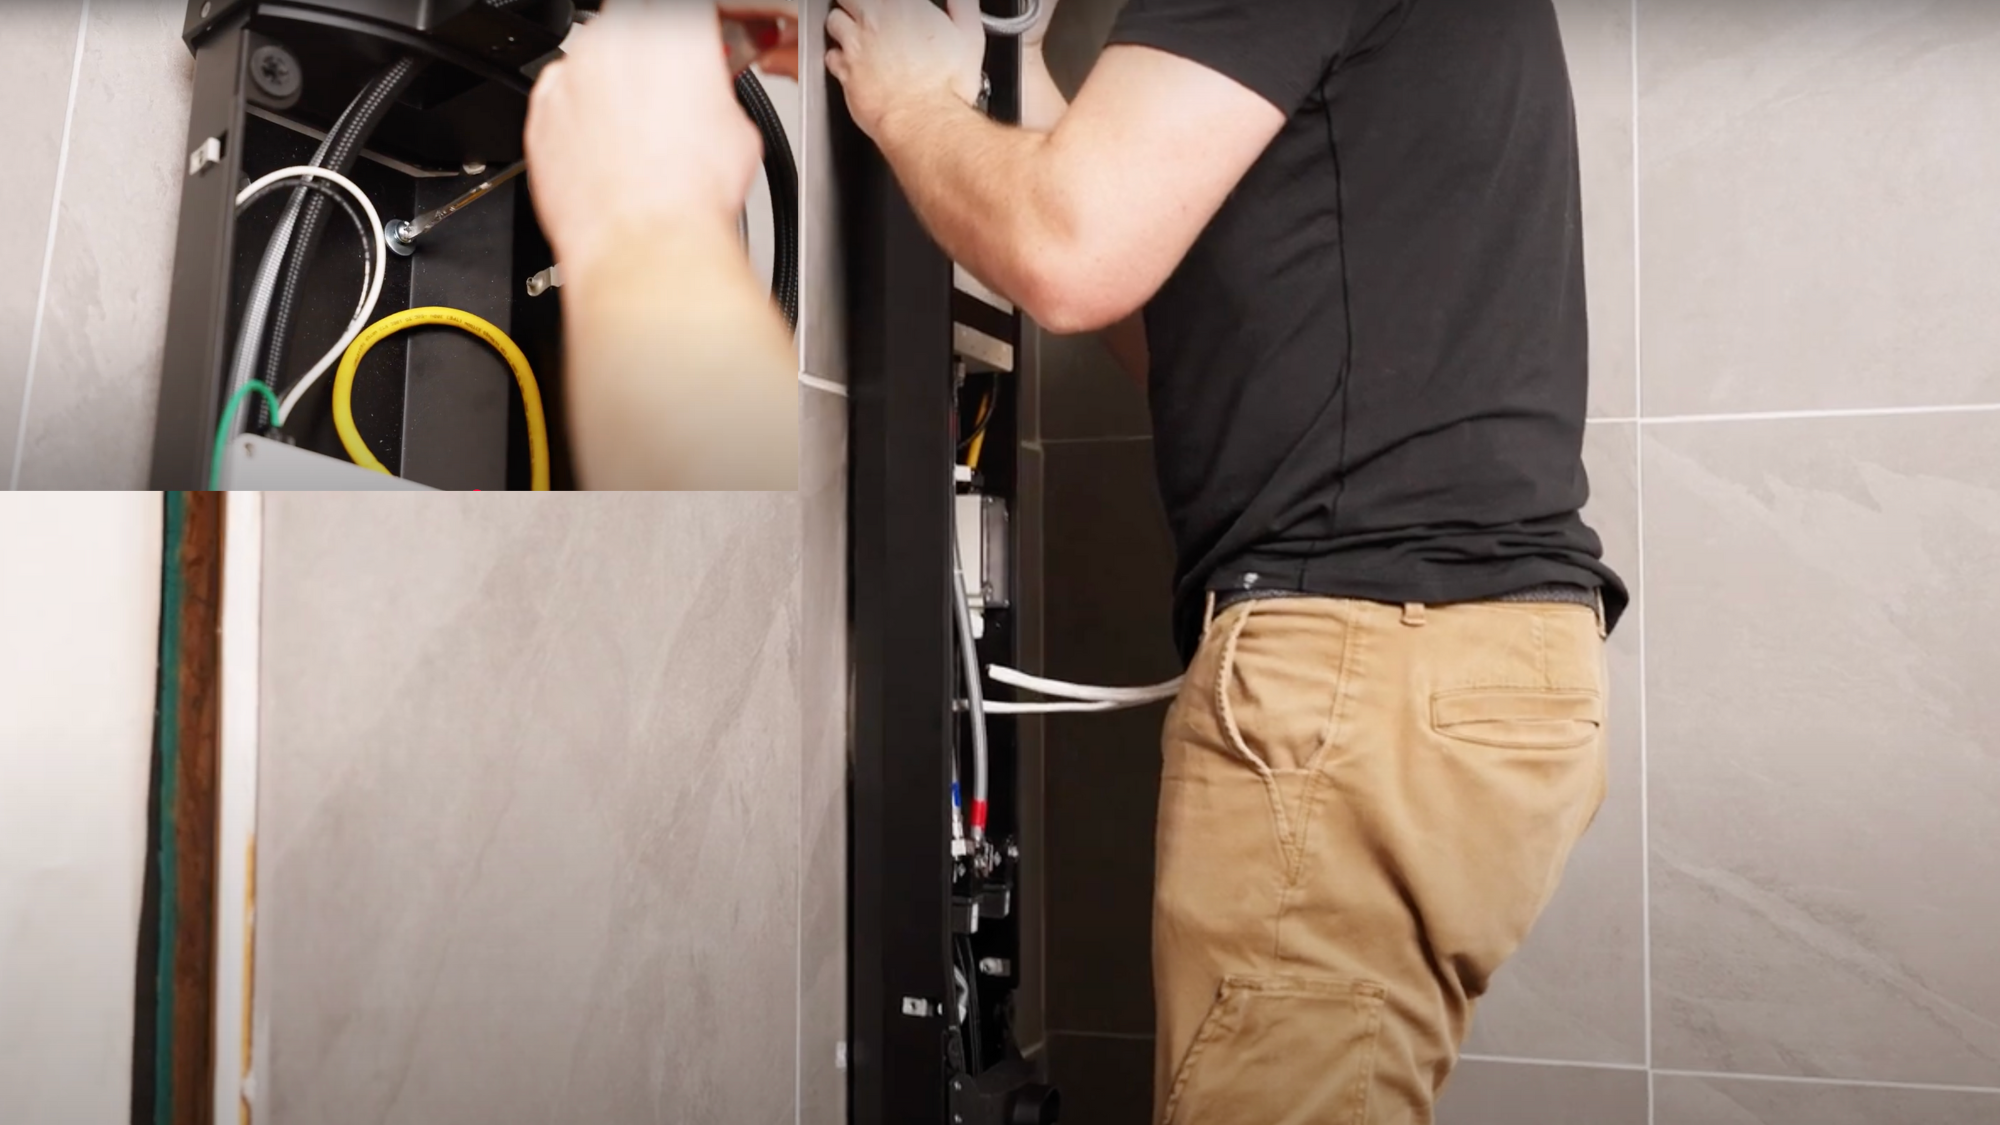
Carefully position the main unit against the wall bracket and secure it using the provided toggle bolts and fasteners. Check that the unit is level before final tightening.
6. Complete Electrical Wiring and Hose Connections
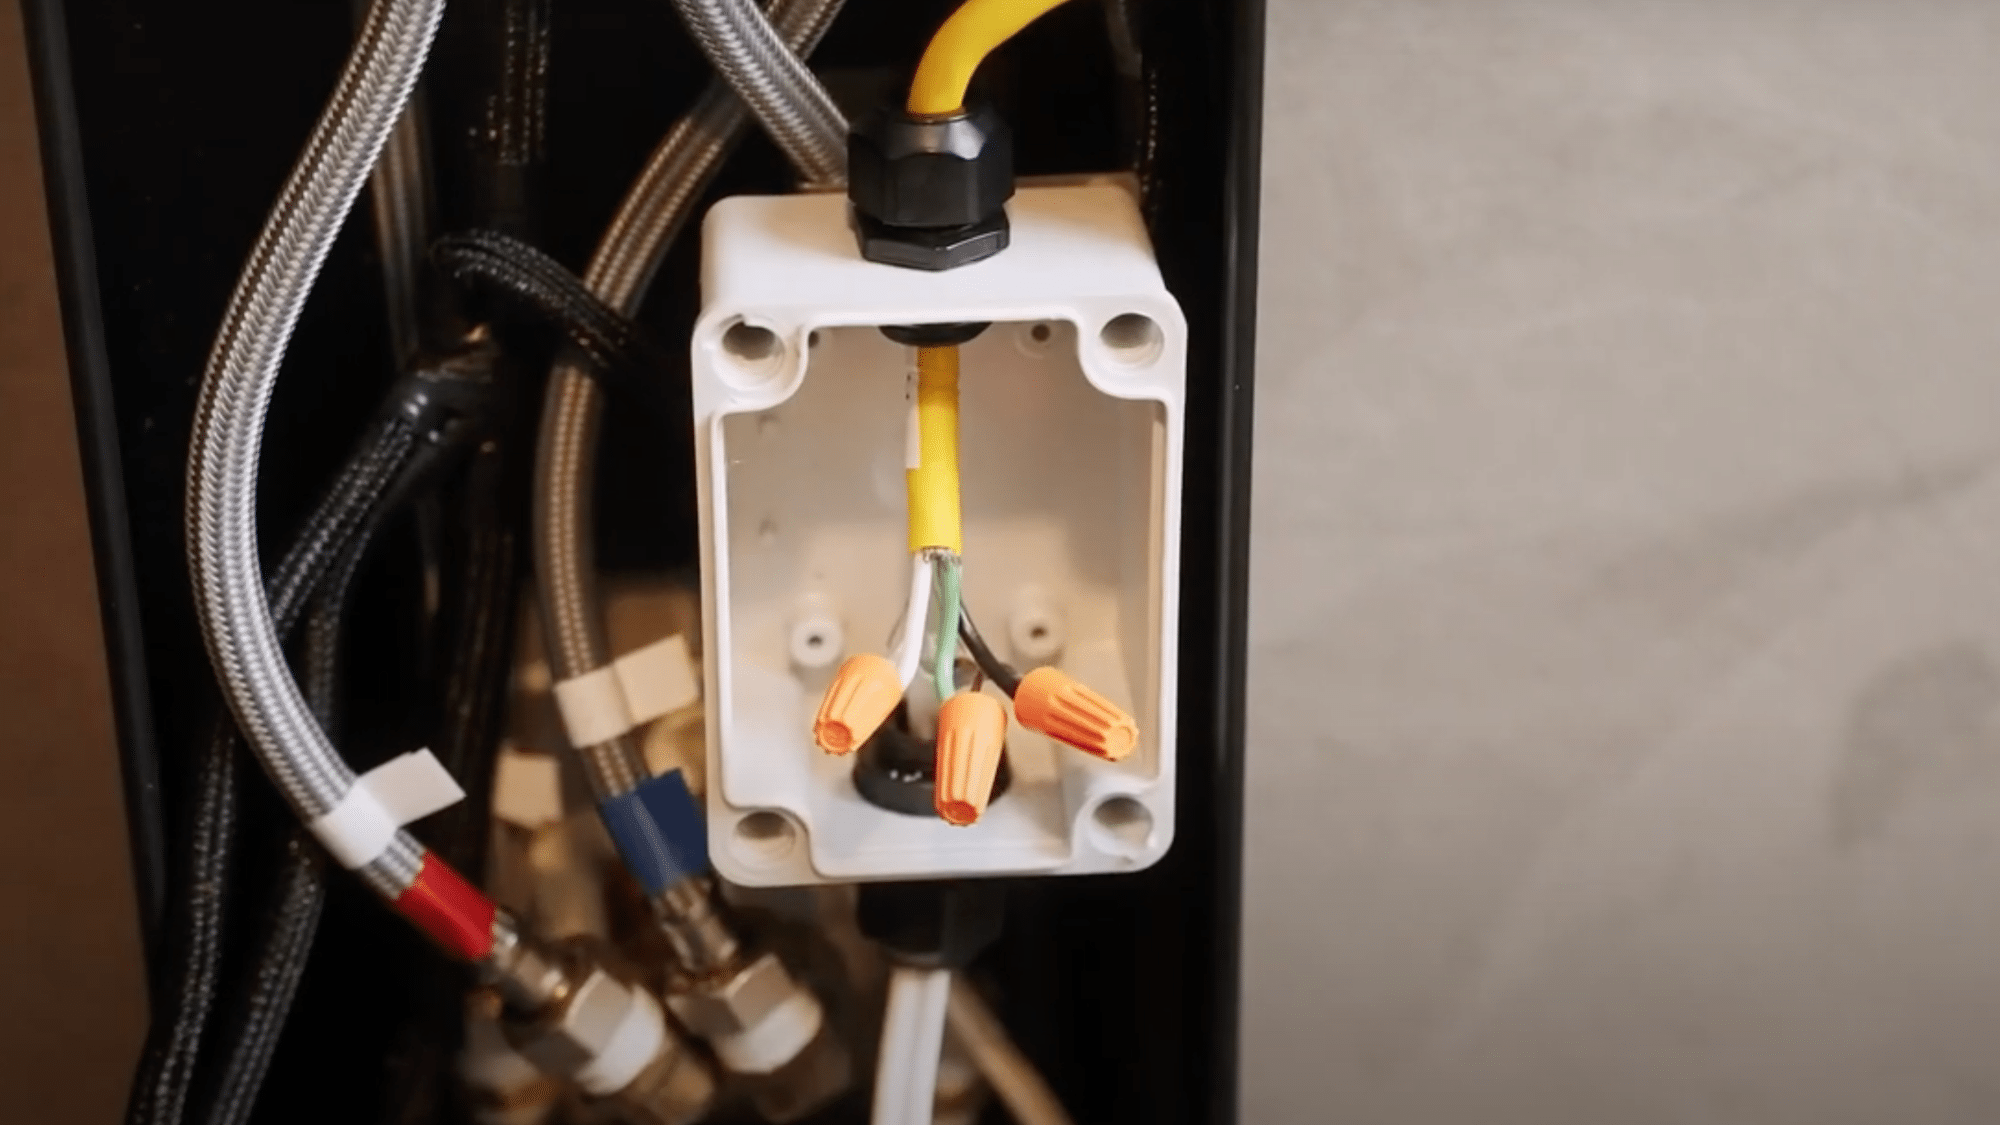
Connect the electrical supply to the GFCI-protected circuit for safety. Attach all water inlet, outlet, and drain hoses according to the labeled connections, ensuring they are tight but not over-tightened.
7. Final Assembly and Fixture Installation
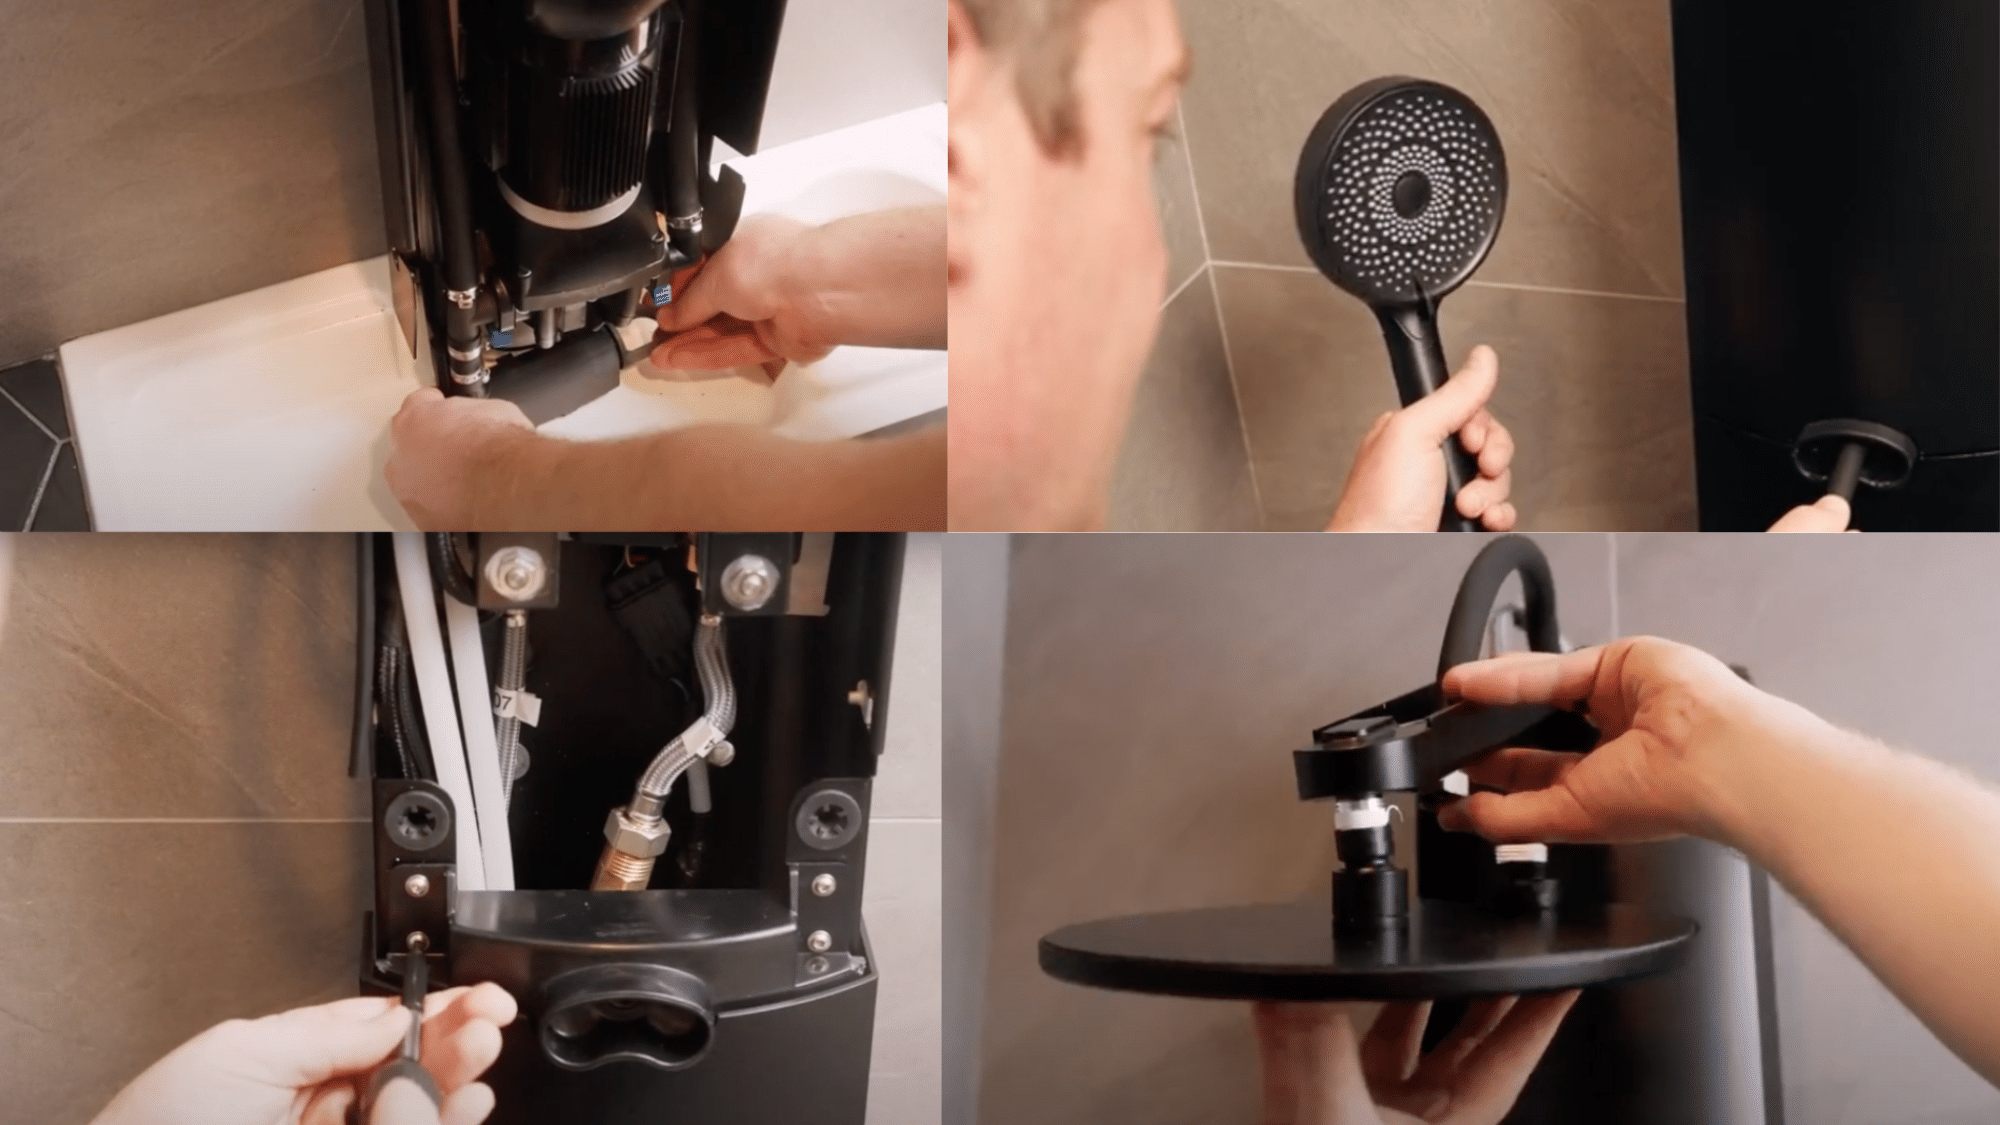
Install the foot spout, shower enclosure, wall controller, and main showerhead, testing all connections for leaks before completing the enclosure.
Attach the shower arm to the top unit, guide the black waterline through it, connect the gray line to the head component, and secure all parts using the included screws.
Video Tutorial
For more information, check out this video tutorial by RainStick Shower.
Getting Started with Rainstick Shower: How to Use?
Using a Rainstick Shower is easy. Turn on the system, set your temperature, and choose regular or water-saving mode.
The shower works like a standard one, saving water while maintaining pressure.
Step 1 – Initial Power On: First, turn on the system and allow the automatic 60-second cleaning cycle to finish completely.
Step 2 – Start Your Shower: Press the main button on the wall control for three seconds to start the shower, with the display showing the current water temperature.
Step 3 – Set Perfect Temperature: Change water temperature by turning the dial clockwise (warmer) or counterclockwise (cooler), or use the app slider for exact settings.
Step 4 – Choose Your Water Mode: Switch between water-saving mode and standard flow by tapping the mode button on the controller.
Step 5 – Perform Basic Maintenance: For maintenance, check the micron screen weekly to remove any buildup and run monthly cleaning cycles to keep performance at its best.
For more information, check out this video tutorial about How to Use the RainStick Hybrid Shower by RainStick Shower.
Where to Buy a Rainstick Shower and Who to Hire for Installation?
If you’re ready to bring a Rainstick Shower into your home, it’s important to know where to buy one and whom to trust with the installation.
Here’s a quick guide to help you make the best decision:
| Category | Details |
|---|---|
| Official Website |
|
| Authorized Retailers |
|
| Professional Installer Qualifications |
|
| DIY vs. Professional Installation |
|
Choosing the right source and installer ensures your Rainstick Shower performs at its best, offering you the luxury of sustainability with complete peace of mind.
Final Thoughts
The Rainstick Shower is a high-tech, water-smart system that combines sustainability and comfort. With recirculating water flow, app control, and a sleek design, it converts your daily shower into a responsible yet indulgent experience.
While the initial cost is higher than standard setups, the long-term water and energy savings make it a practical investment for modern homes. Thinking about making the switch?
Your perfect balance of luxury and efficiency is just one Rainstick away.
Looking for more ideas? Check out our other DIY Project guides to create a space that’s uniquely yours. Share your favorite step or part of the process in the comments, and inspire others with your experience.
