Looking for a simple way to display your plants while adding charm to your home? Making a macrame plant hanger is the perfect solution. This timeless craft brings natural beauty into any space without occupying floor space.
You’ll create a functional piece that showcases your favorite plants while showcasing your creative skills.
The best part about this project is how easy it is for beginners. You don’t need years of experience or expensive tools. With just a few basic materials and simple knots, you can make a beautiful plant hanger in under an hour.
This guide will walk you through each step, from setting up your cords to adding the final touches. By the end, you’ll have a sturdy, attractive macrame plant hanger ready to showcase your plants.
Why Choose Macrame for Plant Display?
Macrame has gained popularity again because it complements modern home styles perfectly. This ancient art form uses simple knotting techniques that anyone can learn. The natural texture of rope or cord adds warmth to any room.
Plant hangers made with macramé are ideal for small spaces. They let you grow more plants without using valuable floor space. You can hang them near windows where plants get good light. The handmade look also makes your home feel more personal and cozy.
Step-by-Step Guide to Making a Macrame Plant Hanger
Learn to craft a stylish macramé plant hanger from scratch with simple knots and step-by-step instructions
Tools and Materials Needed
| Item | Quantity | Purpose |
|---|---|---|
| Macrame cord (4mm thick) | 8 pieces, 3 feet each | Main structure |
| Short cord pieces | 2 pieces, 24 inches each | Wrapping knots |
| Wooden ring | 1 piece, 3-4 inches in diameter | Top hanging loop |
| Scissors | 1 pair | Cutting the excess cord |
| Measuring tape | 1 piece | Measuring distances |
| Plant pot | 1 piece, 5-6 inches in diameter | Testing fit |
Step 1: Setting Up Your Cords on the Wooden Ring
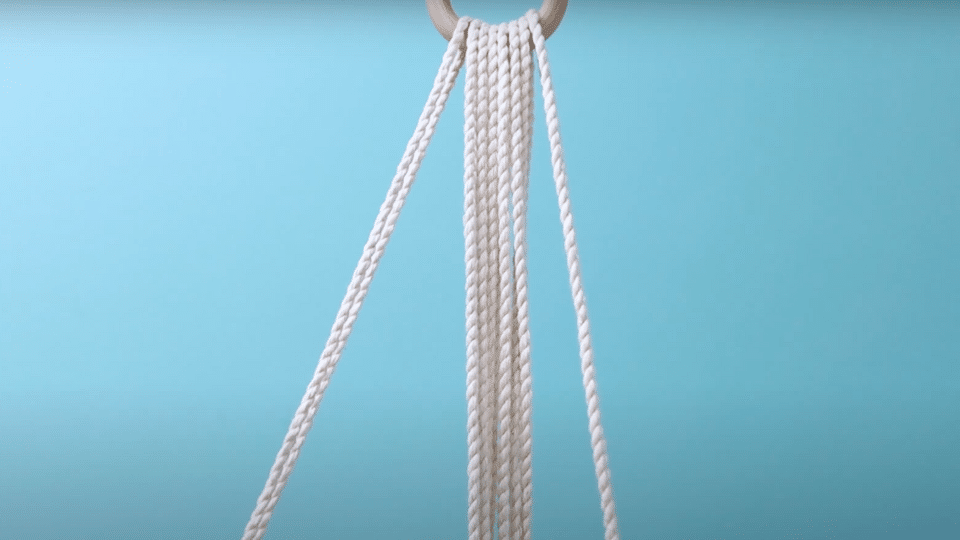
Start by threading your eight main cords through the wooden ring. Make sure you position the two longest cords on opposite sides of the ring. This setup gives your plant hanger better balance and strength. The wooden ring will be the top anchor point where you’ll hang your finished project.
Fold all the cords in half so they hang evenly from the ring. The ring should sit at the center point of each cord. Check that your longer cords are positioned correctly on opposite sides. This arrangement helps distribute the weight of your plant evenly.
Materials needed in this step:
- 8 macrame cords (3 feet each)
- 1 wooden ring
- Measuring tape
Instructions: Thread each cord through the ring and fold in half. Position longer cords on opposite sides. Make sure all cords hang at equal lengths from the ring.
Step 2: Creating the Spiral Pattern

Take the two outer cords (the longer ones) and start tying half knots. Cross the left cord over the center cords, then bring the right cord behind and through the loop. Tighten the knot, but don’t switch sides like you would for a square knot. Continue tying in the same manner to create a spiral pattern.
Continue this process until you have 25 half knots total. The spiral will form naturally as you keep tying knots the same way. This technique creates an attractive twisted pattern that adds visual interest to your plant hanger.
Materials needed in this step:
- The cord setup from Step 1
- Steady hands for consistent tension
Instructions: Tie 25 half knots using the two outer cords. Keep the same crossing pattern for each knot. Count carefully to ensure you have exactly 25 knots.
Step 3: Adding the First Wrapping Knot
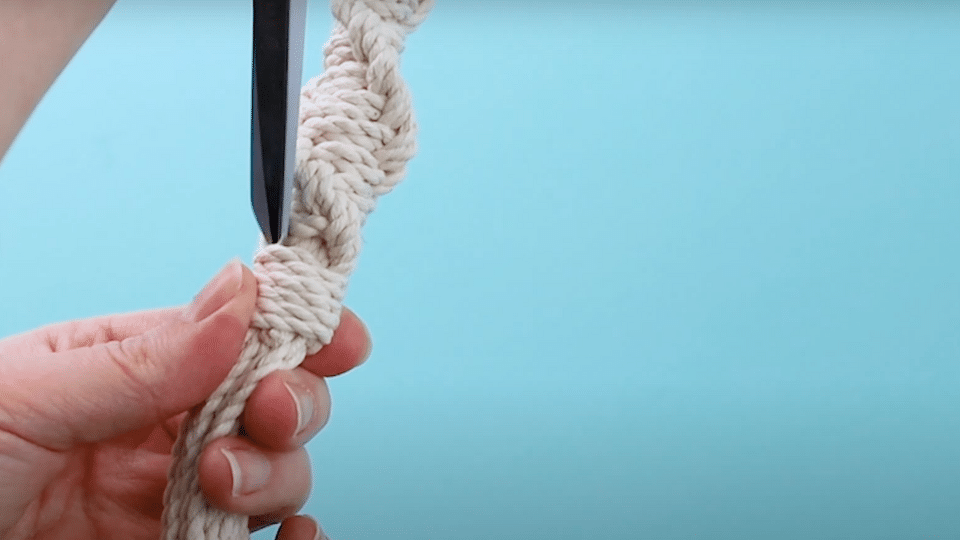
Take one of your 24-inch cord pieces and create a wrapping knot below the spiral section. Make a U-shape with the cord, holding it against the bundle with the short end pointing up. Wrap the longer end around the bundle six times, keeping the wraps tight and neat.
Thread the working end through the loop at the top, then pull the short end to tighten the loop. This pulls the working cord partway under the wraps. Trim any excess cord and tuck the ends under the wrapping for a clean finish.
Materials needed in this step:
- 1 piece of 24-inch cord
- Scissors for trimming
Instructions: Form a U-shape with the cord against the bundle. Wrap six times around. Thread through the loop and pull tight. Trim excess and tuck ends.
Step 4: Making the Plant Basket
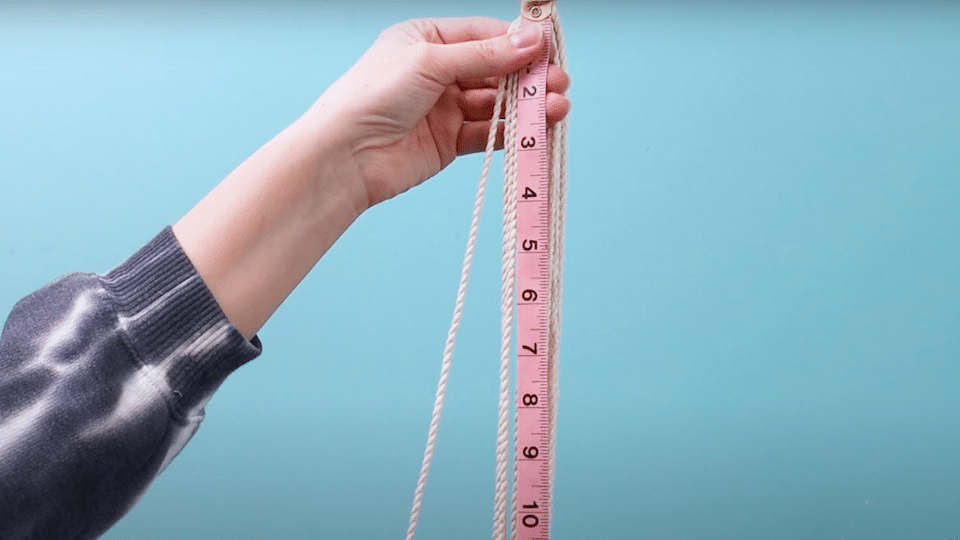
Measure 12 inches down from your wrapping knot and tie square knots using groups of four cords. Line up the top of each square knot at the 12-inch mark. Make sure all four knots sit at the same height so your plant hanger stays level.
Next, measure three inches down from these square knots and tie another row. This time, use alternating groups of four cords to connect the sections. This creates the basket shape that will hold your plant pot securely.
Materials needed in this step:
- The partially completed hanger
- Measuring tape
- Steady workspace
Instructions: Tie the first row of square knots at 12 inches. Measure 3 inches down. Tie the second row using alternating cord groups. Check that all knots align properly.
Step 5: Finishing with the Bottom Wrapping Knot
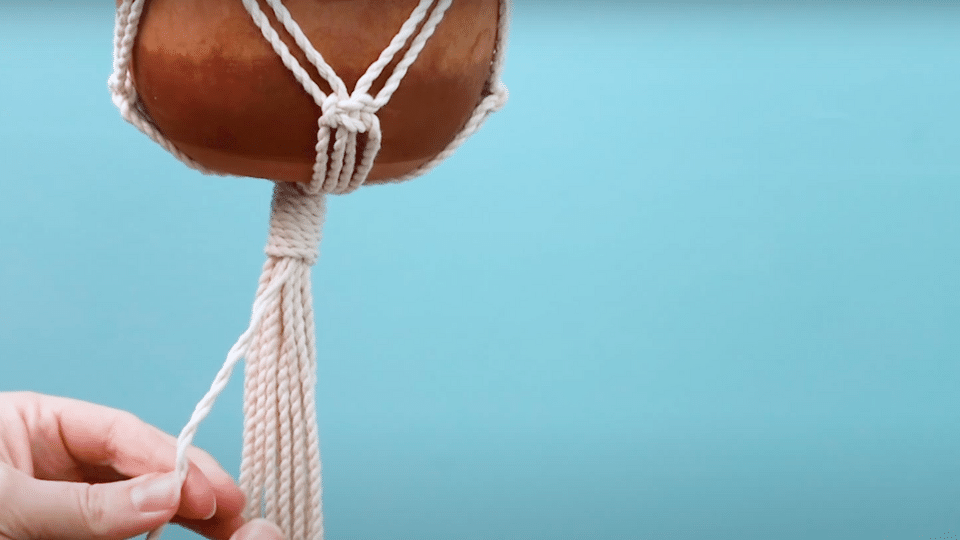
Measure three inches down from your last row of square knots. Use your second 24-inch cord piece to create another wrapping knot. Follow the same technique as in Step 3, making six or seven wraps around all the cords.
After securing the wrapping knot, trim the hanging cords to your preferred length. Five to six inches is a suitable length for most plant hangers. You can unravel the cord ends if you want a fringe effect, or leave them as they are for a cleaner look.
Materials needed in this step:
- 1 piece of 24-inch cord
- Scissors for final trimming
Instructions: Create a wrapping knot 3 inches below the last square knot. Wrap 6-7 times and secure. Trim fringe to desired length and unravel if wanted.
Video Tutorial
Special thanks to Marching North for providing valuable insights in their video, which I referenced while creating this guide.
Essential Macramé Tips for Plant Hanger Success
Learn expert techniques and creative insights to elevate your macramé plant hangers with precision, balance, and beauty.
1. Keep Your Tension Consistent
Maintaining even tension throughout your project makes the most significant difference in how your finished hanger looks. Too tight and your knots will bunch up. Too loose and the structure won’t hold properly. Practice on a small piece first if you’re new to macrame. Your hands will learn the proper tension as you work.
2. Choose the Right Cord Material
Cotton cord works best for beginners because it’s soft and easy to handle. It also holds knots well without slipping. Avoid synthetic materials that might be too slippery. Natural fibers, such as cotton or hemp, also look better and feel more authentic.
3. Test Your Plant Pot Size
Before you start knotting, test your plant pot in similar-sized containers. A pot that’s too small will fall through the basket. One that’s too large won’t fit properly. The ideal fit has about half an inch of space around the pot edges.
4. Work on a Stable Surface
Set up your workspace where you can secure the wooden ring. You might clip it to a table edge or hook it temporarily. Having a stable project while you work makes tying knots much easier and more accurate.
Common Macramé Plant Hanger Blunders
| Mistake | Why It Happens | How to Prevent |
|---|---|---|
| Uneven knot spacing | Not measuring carefully | Use a measuring tape for each section |
| Loose wrapping knots | Not pulling tight enough | Test the tightness before trimming the excess |
| Crooked plant basket | Inconsistent knot placement | Check alignment frequently while working |
| Fraying cord ends | Using dull scissors | Keep scissors sharp and make clean cuts |
| Wrong cord lengths | Poor planning | Measure twice, cut once approach |
Choosing the Right Plants for Your Hanging
1. Best Plant Types for Hanging Displays
Select plants that grow well in containers and don’t get too heavy. Pothos, spider plants, and trailing succulents work perfectly. Avoid plants that need frequent repotting or grow very large.
Flowering plants, such as petunias or trailing begonias, add color to your display. Just remember, they might need more water, which makes the hanger heavier. Choose plants based on the light conditions where you’ll hang your macrame creation.
2. Pot Selection and Weight Considerations
The pot you choose affects both the look and safety of your plant hanger. Terra cotta pots are classic but can be heavy when filled with soil and water. Lightweight plastic pots are ideal for beginners and come in a variety of attractive styles.
Make sure your pot has drainage holes to prevent water damage to the floors below. You might want to use a saucer, but remember this adds weight and changes the hanger’s balance. Test the total weight before hanging in its final location.
3. Proper Watering Techniques
Water your hanging plants carefully to avoid dripping on furniture or floors. Remove the pot from the hanger for thorough watering, then let excess water drain completely before rehanging.
Some plants prefer misting instead of heavy watering. This works well for air plants or certain succulents. Learn your specific plant’s needs and adjust your watering method accordingly.
Hanging and Placement Guidelines
- Select locations with suitable lighting for your plants and sufficient support to withstand the weight.
- Use ceiling joists or sturdy hooks as the best hanging points for maximum security.
- Avoid areas with high foot traffic where people might bump into the hanging plant.
- Consider the mature size of your plant when selecting placement as some grow quickl.
- Position near windows for good light, but ensure direct sunlight won’t be too intense.
- Plan for adequate space around the hanger for plant growth and easy maintenance access
Conclusion
Creating your macrame plant hanger brings satisfaction and beauty to your home. This simple project combines practical function with artistic expression. You’ve learned the basic techniques that open up many other macrame possibilities.
The skills you’ve practiced here, measuring, knotting, and finishing, apply to other macrame projects as well. You might want to try making wall hangings, table runners, or larger plant displays next. Each project builds your confidence and improves your technique.
Your handmade plant hanger will serve you well for years with proper care. The natural materials and simple construction make it both durable and attractive.
Most importantly, every time you see it, you’ll remember the satisfaction of creating something beautiful with your own hands.
This combination of function, beauty, and personal accomplishment makes macrame plant hangers such rewarding projects for crafters at any skill level.
Love a good weekend project? Find more fun DIY builds.