
Scrolling through homes online often brings the same thought to mind: can you build your own house instead of settling for someone else’s design?
The idea shows up quietly at first, usually after seeing prices climb or finding nothing that feels right. Then it grows into a real possibility.
A place shaped by your routines, style, and vision starts to feel worth exploring. Building your own home might sound intimidating, but it’s far more doable than most people assume.
With patience, a clear plan, and the courage to take the first step, creating a home from the ground up becomes a surprisingly rewarding path.
Common Challenges and How to Handle Them
If you’ve decided to build your house on your own, it’s important to know the challenges ahead. Being prepared keeps you in control.
| Challenge | What to Expect | Quick Fix |
|---|---|---|
| Timeline Delays | Weather, permits, or scheduling issues can slow work. | Add buffer time and plan for small setbacks. |
| Budget Overruns | Costs often rise once construction begins. | Keep a 10% contingency fund and monitor spending closely. |
| Quality Issues | Mistakes can slip by unnoticed. | Visit the site often and check the work before paying. |
| Subcontractor Problems | Some may miss deadlines or quit mid-job. | Get multiple bids, verify references, and use written agreements. |
| Permit Failures | Failed inspections pause progress. | Learn local building codes and use licensed tradespeople. |
| Decision Fatigue | Endless design choices can wear you down. | Make key selections early to stay organized and stress-free. |
After understanding the possibilities and challenges of building on your own, it’s time to focus on the details that make success possible.
Legal Restrictions & Owner-Builder Laws
Before committing to building your own home, make sure you understand your state and local owner-builder laws.
Regulations vary widely, and not every area allows owner-builders to act as their own general contractor.
-
State Requirements: Some states require you to pass exams, complete approved courses, or obtain an owner-builder permit before managing your own construction.
-
Licensed Supervision Rules: Several jurisdictions allow owner-builders but require certain work, especially structural, electrical, and mechanical, to be supervised or performed by licensed professionals.
-
DIY Limitations: In many areas, homeowners cannot legally perform their own electrical, plumbing, or HVAC work unless fully licensed. Some local codes restrict DIY work entirely.
-
Occupancy Regulations: Some states require owner-builders to live in the home for a set period before selling it, preventing people from acting as unlicensed contractors.
Ignoring owner-builder laws can result in fines, delays, failed inspections, or even forced demolition in extreme cases.
Always verify local regulations through your city or county permitting office before starting.
DIY vs. Hiring a General Contractor
Acting as your own general contractor can save money, but it’s important to know what you can realistically do yourself, legally and practically.
What You Can Typically Do Yourself
These tasks are often allowed for owner-builders and require basic skills:
- Painting, caulking, and interior finishing
- Installing flooring
- Landscaping and outdoor grading (non-structural)
- Installing cabinets, trim, shelving, and hardware
- Basic demolition
- Project management, scheduling, and purchasing
What Usually Requires Licensed Trades
Most states require licensed professionals for:
- Electrical wiring and panel installation
- Plumbing supply and drain systems
- HVAC installation and ductwork
- Structural engineering and certain framing elements
- Septic system installation
- Gas line work
Even if some of these tasks are legal to DIY, they are rarely recommended due to safety and inspection requirements.
The Real Learning Curve
Being an owner-builder means picking up new skills fast:
- Reading blueprints
- Understanding building codes
- Scheduling trades without conflicts
- Ordering materials at the right time
- Passing multiple inspections
- Managing unexpected issues
It’s entirely doable, but expect a steep learning curve and plan for extra time early in the process.
Phase 1: Planning: How to Build Your Own House
The planning phase is the foundation of your entire homebuilding. Every successful project starts with careful organization, accurate budgeting, and a clear roadmap.
Step 1: Get Pre-Approved for Financing
Start here. Not with land shopping. Not with Pinterest boards. With money.
Meet with lenders early to get pre-approved for a construction loan. This tells you exactly how much house you can afford to build and shows sellers you’re serious when you find land.
Construction loans work differently from regular mortgages:
- Money is released in stages (called “draws”) as work is completed
- Interest rates are typically higher
- You’ll need detailed plans and budgets before approval
- Some lenders won’t work with owner-builders at all
Shop around. Find a lender familiar with owner-builder projects who understands you’ll be managing the construction yourself.
Step 2: Find and Evaluate Land
Location matters, but don’t fall in love with a lot until you’ve checked for hidden costs.
What drives up land development costs:
- Heavy excavation or rock removal
- Poor soil that needs treatment or removal
- Extensive tree clearing (if you need to clear more than a few trees, costs add up fast)
- Long distance to utilities (connecting water, sewer, electric, and gas)
- Difficult access requiring expensive road work
- Steep slopes or drainage issues
Use a lot purchase checklist to evaluate every property. Walk the land with a builder or contractor if possible.
That gorgeous wooded lot might require $50,000 in tree removal and another $30,000 to connect utilities.
Step 3: Complete Your Due Diligence
Once you have land under contract, don’t skip these critical steps:
- Soil tests: Determine if the soil can support your foundation type.
- Title work: Confirm clean ownership with no liens or easement issues
Land survey: Establish exact boundaries and any restrictions - Architect consultation: Verify that your house design complies with zoning requirements
- Permit research: Find out local timelines and costs for permits
This phase protects you from expensive surprises later. Better to spend $3,000 on due diligence now than $30,000 fixing problems after you’ve started building.
Step 4: Design Your Home
Hire an architect and any required engineers to create detailed blueprints. Your plans should cover:
- Every room layout and dimension
- Exterior ridges and materials
- Site layout showing house placement, driveway, and utilities
- Electrical, plumbing, and HVAC systems
- Structural details and engineering specifications
Expect the design process to take 3-6 weeks for a typical home. More if your design is complex or requires multiple revisions.
Resist the urge to cheap out here. Detailed, professional plans prevent problems during construction and often pay for themselves by avoiding change orders and rework.
Step 5: Build Your Team
Building your team starts with balancing skilled subcontractors and dependable suppliers. Here’s a clear list to help you stay organized.
| Subcontractors for Specialized Work | Material Suppliers For |
|---|---|
| Foundation and concrete | Lumber and framing materials |
| Framing | Concrete |
| Roofing | Windows and doors |
| Plumbing | Roofing materials |
| Electrical | Insulation |
| HVAC | Drywall |
| Drywall | Flooring |
| Flooring | Fixtures and finishes |
| Cabinets and countertops | Cabinets and countertops |
| Painting | Paint and coatings |
Working with experienced subcontractors and quality suppliers ensures smoother progress, fewer delays, and better overall results during your home build.
Step 6: Create Your Material List and Master Budget
This is where many owner-builders fall apart. You need a comprehensive material list covering everything from concrete to doorknobs.
Your architect or designer can help, but ultimately you’re responsible for ensuring nothing gets forgotten. Missing items cause delays and force expensive rush orders.
Use all your bids to build a master budget that includes:
- Land cost
- Design and engineering fees
- All materials
- All labor
- Permits and fees
- Utility connections
- Landscaping
- 10% contingency fund
That contingency isn’t optional. Construction always has surprises.
Step 7: Build Your Construction Schedule
A detailed timeline from day one to final inspection prevents chaos.
Your schedule dictates:
- When to order materials (not too early to pay storage, not too late to cause delays)
- When to book subcontractors (good subs book up months in advance)
- When inspections need to happen
- When draws from your construction loan should occur
Think of your schedule as a living document. Update it weekly as work progresses and adjust for weather, delays, or changes.
Step 8: Get Your Permits and Approvals
Apply for building permits from your city or county. You’ll typically need:
- Building permit
- Electrical permit
- Plumbing permit
- Mechanical/HVAC permit
- Possibly separate permits for grading, septic, driveway, or demolition
If you’re building in a neighborhood with an HOA, get architectural approval for:
- House design and style
- Exterior colors
- Material choices
- Landscaping plans
Permitting takes anywhere from a few weeks to several months. Start early and factor this time into your schedule.
Phase 2: The Construction Process
If you’ve done Phase 1 correctly, construction becomes a matter of following your plan and schedule. Here’s how it unfolds.
Step 9: Site Preparation

Before building anything, prepare your site:
|
Set up utilities: Get temporary electricity, water, and possibly gas for construction Install facilities: Rent a portable toilet for workers Survey staking: Have your surveyor mark exactly where the house will sit Access: Create a temporary driveway for heavy equipment and material deliveries Clearing: Remove trees and brush as needed Excavation: Dig for foundation and utilities Grading: Shape the land for proper drainage away from the house |
This phase often reveals hidden issues such as rocks, poor soil, or water problems. Deal with them now before they become bigger problems.
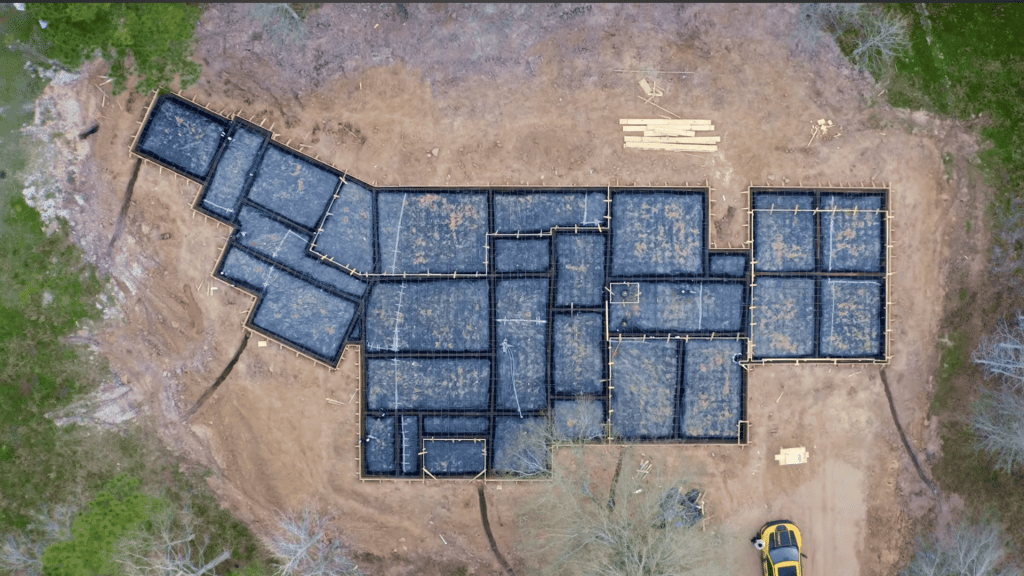
Step 10: Foundation

Foundation choices include slab-on-grade, pier-and-beam, or a full basement. Your soil conditions, budget, and design will determine which option is best for your home.
The process typically includes:
- Installing underground plumbing
- Laying a vapor barrier to prevent moisture issues
- Placing steel rebar for reinforcement
- Pouring the concrete
- Completing required inspections before and after the pour
Once the concrete is poured, it needs time to gain enough strength before construction can continue.
Allow about 7–28 days for the concrete to cure enough to continue construction, depending on weather and foundation type.
Full curing takes around 28 days, but light construction, such as framing, usually begins after the first week if inspections have been approved.
Because the entire structure depends on the foundation, this is not an area to cut corners or attempt major DIY work. Hiring qualified professionals ensures long-term stability and avoids costly structural problems later.
Step 11: Framing
This is when your house starts looking like an actual house. Framing includes:
- Building all walls
- Installing floor systems
- Constructing the roof structure
- Creating openings for windows, doors, and skylights
- Adding blocking for heavy items (TV mounts, cabinets, grab bars, shelving)
Good framers work fast: a typical house can be framed in 1-3 weeks. Before they leave, inspect to ensure:
- Walls are level and plumb
- Corners are square
- Openings match your window and door sizes
- Blocking is in all the right places
Once drywall goes up, fixing framing mistakes becomes very expensive.
Step 12: Exterior Work (Drying In)
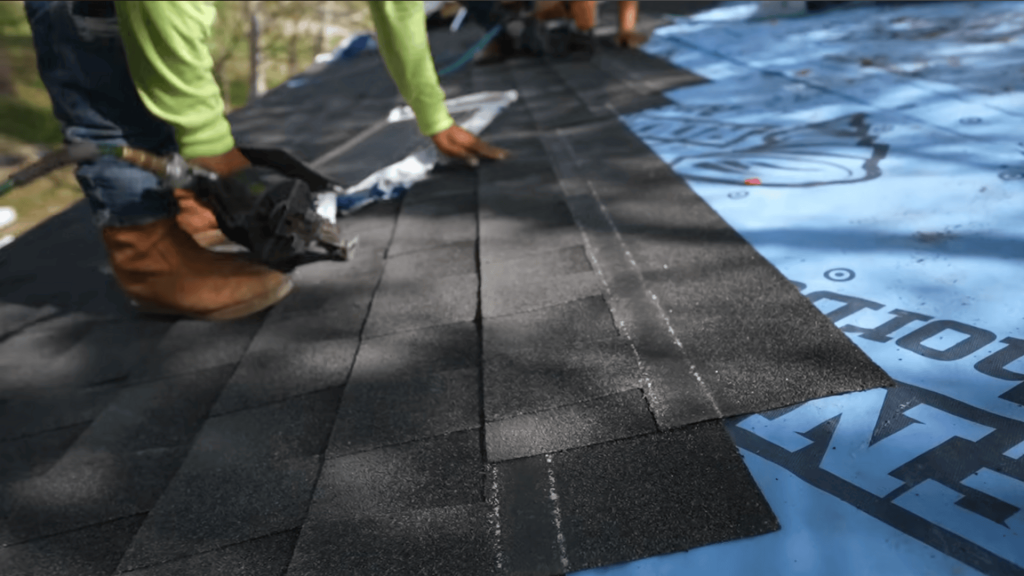
At this stage, the goal is to make your house weatherproof: a process known as “dried in.”
This involves installing the sheathing, flashing, and waterproof barriers that form the home’s first line of defense against moisture.
These layers seal the structure and prevent water from penetrating the walls. Next, properly install and flash all windows and doors to eliminate potential leak points.
Finally, complete the roofing system, including the underlayment, shingles or metal panels, and ridge vents for ventilation.
Once the roof and exterior barriers are in place, your interior is protected from the elements, allowing construction to continue smoothly even during rain or snow.
Step 13: Rough-Ins (MEP Systems)
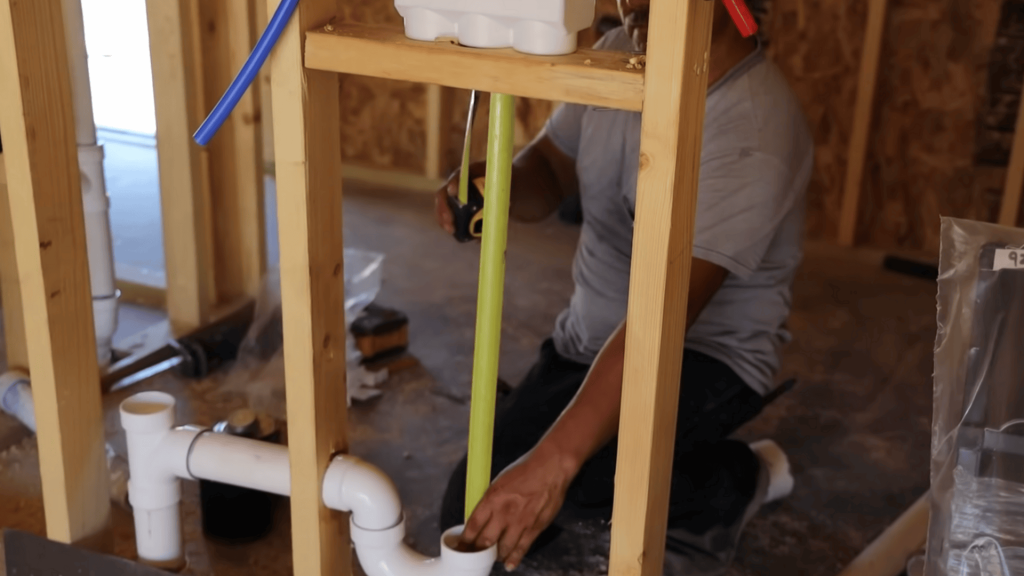
The MEP phase installs your home’s essential systems—everything that makes it functional, comfortable, and safe. Here’s what it includes:
- Mechanical (HVAC): Ductwork, vents, and placement of heating and cooling equipment
- Electrical: Wiring, service panels, outlets, and switch boxes throughout the walls
- Plumbing: Water lines, vents, and drains running through walls and floors
- Technology: Pre-wiring for security systems, cameras, speakers, and smart home features
Each system must pass inspection before walls are closed. Hiring licensed professionals ensures safety, compliance, and smooth progress without costly rework.
Step 14: Insulation and Drywall
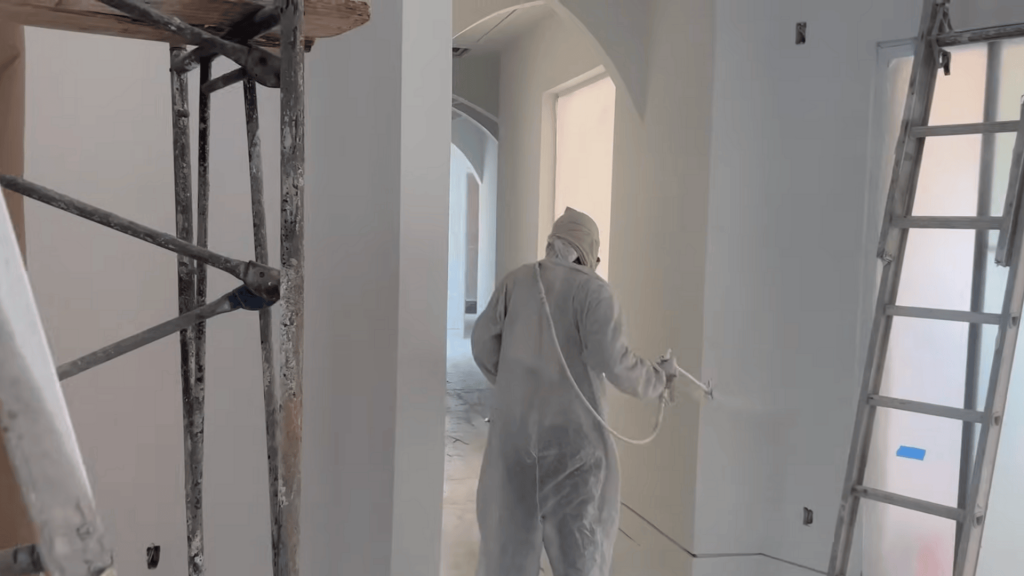
After rough-in inspections are approved, the next steps are to prepare your home for finishes:
- Air Sealing and Insulation: Fill all walls and ceilings to boost energy efficiency and comfort.
- Drywall Installation: Hang drywall sheets on walls and ceilings.
- Taping and Mudding: Cover all seams, corners, and screw holes for a smooth surface.
- Sanding: Even out surfaces to remove imperfections.
- Texture (Optional): Apply desired texture or finish for style and depth.
Tip: Quality drywall work is crucial, poor finishing will always be visible, especially under natural or angled lighting.
Step 15: Interior Finishes
This stage is when your house truly starts to feel like a home.
Flooring is installed: hardwood, tile, carpet, or vinyl, followed by detailed trim work, baseboards, and window sills.
Interior doors are hung, and cabinets and countertops are placed in kitchens, bathrooms, and laundry areas. Built-ins, closet shelving, and pantries add organization.
Finally, painting and staining bring warmth and personality. This finishing stage usually takes four to eight weeks, depending on your home’s size and design complexity.
Step 16: Final Installations and Completion
The final stage of your build is about completing details, verifying systems, and preparing your home for safe, comfortable living.
|
Don’t skip the punch list walkthrough: it’s your last chance to fix small issues before they become your responsibility.
If, after going through all this, you’d like a clear visual and audible walkthrough of the process, visit Case Lucas Robinson for practical, step-by-step guidance.
How Much Does It Really Cost to Build Your Own House?
Owner-builders typically save 15–30% compared to buying a similar new construction home.
Your exact savings depend on how involved you are, local labor rates, the complexity of your design, and how well you manage the project.
Example:
If similar new homes in your area cost $500,000, a typical owner-builder might spend:
- $350,000–$425,000 total
- Saving $75,000–$150,000
These savings come from reducing or eliminating:
- Builder overhead
- Contractor markups
- Some labor costs
- Project management fees
Important Reality Check
Actual savings vary. Many owner-builders save money, but others end up spending more than expected.
Mistakes, delays, poor subcontractor choices, or weak planning can quickly shrink your savings — or erase them entirely.
Your savings assume you can:
- Manage the project efficiently and consistently
- Avoid major errors through good planning
- Stay on schedule by tracking progress
- Prevent unexpected costs with detailed budgeting
- Value your time as part of the overall investment
If managing construction pulls you away from your regular work, factor in lost income. If stress affects your family or relationships, that has a cost, too.
The financial benefits are real, but they are not guaranteed. Every owner-builder who went over budget also started out confident that they would save money.
The Real Pros and Cons of Building Your Own House
Building your own home comes with powerful advantages and real challenges. This quick pros-and-cons table helps you decide whether the path fits you.
| Pros | Cons |
|---|---|
| Save 15–30% on build costs | Requires significant time and weekly management |
| Full control over design and materials | Steep learning curve for first-time builders |
| Choose your preferred subcontractors | Legal restrictions vary by state |
| Potential for higher-quality materials on the same budget | Not all lenders allow owner-builder loans |
| Build equity faster | Mistakes can create delays and extra costs |
| Flexibility to DIY finish work | Stressful when combined with a full-time job |
| Learn valuable construction skills | More responsibility during inspections and scheduling |
Use these pros and cons to decide whether acting as your own builder supports your goals, timeline, and comfort level throughout the project.
Final Thoughts
Building your own home is entirely possible, even without construction experience.
Success depends on planning carefully, following each step, asking for help when needed, and knowing your limits.
Start by getting pre-approved for financing, researching land, and creating a realistic budget using the 70% rule.
Connect with experienced builders or coaches, and learn your local building codes before starting.
Building a home can build strong equity, give you the design you want, and teach valuable life skills. It’s not for everyone, and that’s fine.
What matters most is making an informed choice that aligns with your goals, skills, and financial comfort.
Frequently Asked Questions
How Long Does It Usually Take To Build A House?
Most owner-built homes take six to twelve months, depending on size, weather, permit timelines, and subcontractor availability.
Do I Need Construction Experience To Be An Owner-Builder?
No, but being organized, patient, and willing to learn makes managing timelines, budgets, and subcontractors much easier.
Can I Live On-Site While Building My Home?
Yes, if local zoning allows. Many builders use RVs or temporary housing to save money and stay close to the project.
How Do I Choose Reliable Subcontractors?
Check references, verify insurance, read reviews, and use written agreements outlining payment terms, project scope, and expected timelines.
