Most homeowners find laundry rooms plain and uninviting. These utility spaces often have bare walls that make the room feel cold and unwelcoming while doing household chores.
Adding peel-and-stick wallpaper offers a quick, simple way to refresh your laundry room without spending much time or money. This temporary solution lets you update the space while keeping your walls damage-free.
This guide will show you the essential steps to install peel-and-stick wallpaper in your laundry room. You’ll learn to prepare your walls, measure correctly, and apply the paper smoothly.
We’ll cover common mistakes to avoid and share useful tips to help you complete this project in just a few hours.
Creating the Perfect Backdrop for Your Laundry Room
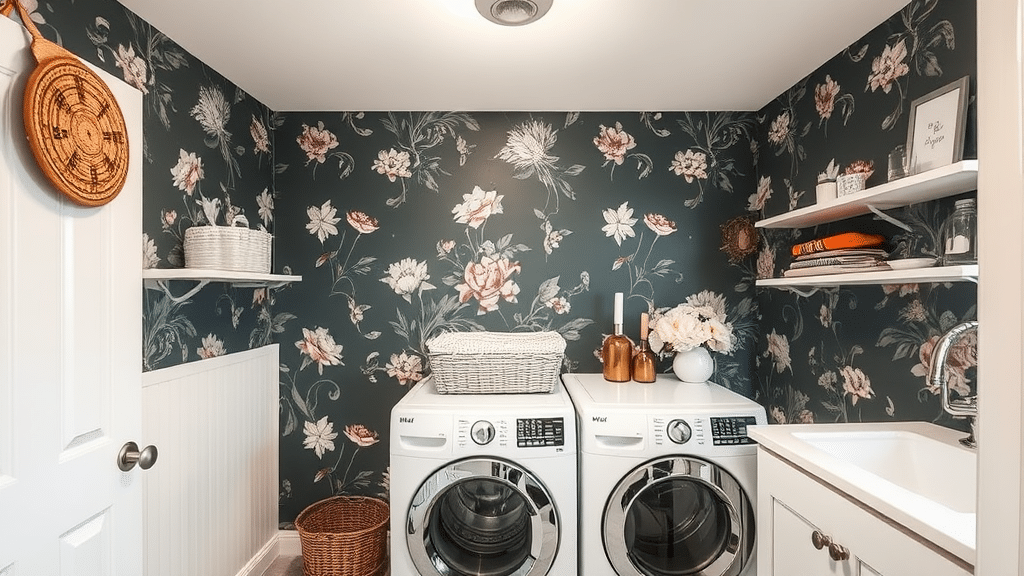
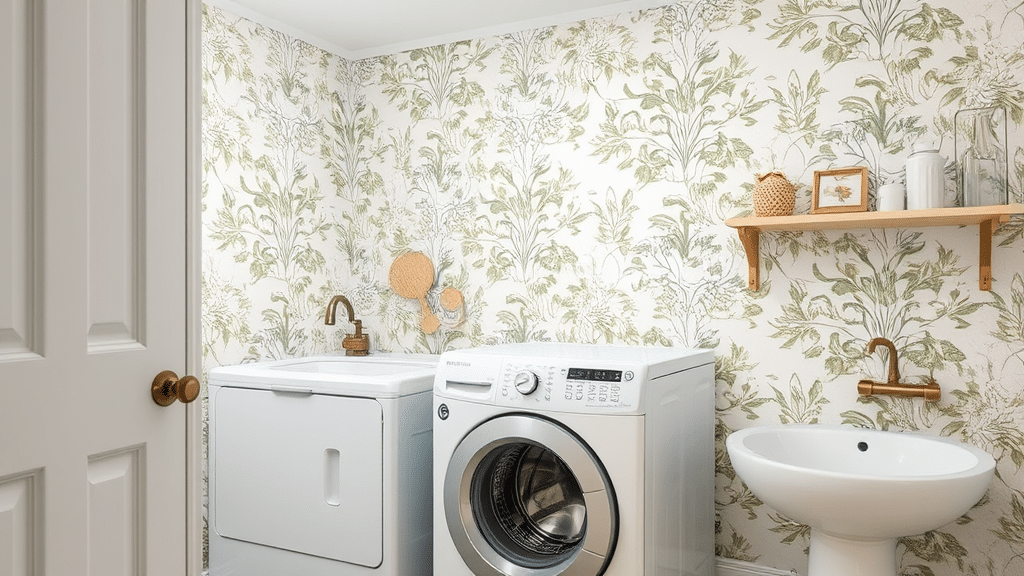
Finding the Right Pattern
Keep your laundry room practical but pleasant by choosing a pattern that fits your taste. Think about moisture-proof options like peel-and-stick papers.
Floral prints can bring life to the space. Simple lines or shapes work well, too. Small patterns hide wall flaws, while large ones catch the eye. Pick a design that makes you smile when you walk in.
Matching Your Room’s Colors
Your wallpaper should work well with what’s already in the room. Look at your cabinets and floor for color ideas. If your cabinets are blue, try wallpaper with matching blue shades.
This makes everything look well-planned. Light colors make small rooms feel bigger. Dark colors add warmth. The right mix of colors turns a basic laundry room into a space you’ll enjoy using.
Tools and Materials You’ll Need
|
Supply Item |
Purpose |
|
Scraper Tool |
Removes air bubbles and smooths paper onto wall |
|
Utility Knife |
Makes clean, exact cuts along edges and corners |
|
Damp Cloth |
Cleans walls before putting up paper |
|
Measuring Tape |
Gets right wall size and paper sections |
|
Step Ladder |
Helps reach top sections of walls |
|
Paper Panels |
Main material for the project (mark each piece) |
|
Level |
Makes sure paper lines stay straight |
|
Pencil |
Marks cutting lines and measurements |
|
Clean Rags |
Wipes off extra moisture as needed |
|
Work Gloves |
Keeps hands clean while working |
Step-By-Step Installation Guide
Step 1: Getting the Size Right
Before you start, measure your walls from floor to ceiling. Take width measurements from each corner.
Always add two extra inches on all sides – this helps fix any mistakes later. When you cut your paper, use a clean, flat table and a new, sharp knife. This helps prevent tears or jagged edges.
Mark each piece with numbers in order from left to right. Write these numbers on the paper backing. Good measurements prevent waste and help you plan how many sheets you’ll need.
Keep your measuring tape, pencil, and knife handy throughout this step.
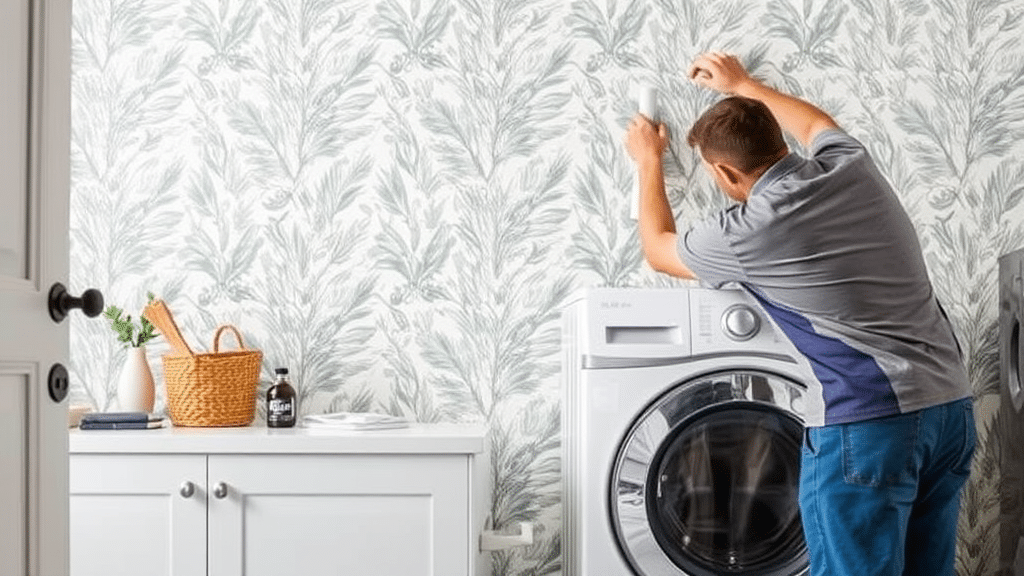
Step 2: Putting up Your First Sheet
Begin in a corner where the ceiling meets the wall. Take the first numbered sheet and pull down about six inches of the backing paper.
Line up the top edge carefully against your ceiling line. Start pressing from the middle section of your sheet, then work toward the edges.
This method stops air bubbles from forming under the paper. Keep a straight-edge tool ready to smooth any spots that don’t stick right away. Work slowly and check your progress often.
Step 3: Joining Paper Edges
Look at your pattern and make sure it matches between sheets before you stick them. Put the edge of your new sheet over the last one you placed.
Press down firmly with your flat tool, working from top to bottom. Check for any spots where the paper doesn’t meet properly. Some patterns need extra care to match up right.
Fix any areas that bubble up or don’t stick well right away. Good joining makes your walls look better.
Step 4: Working Around Wall Items
Place your paper over outlets and light switches without cutting first. Use your pencil to mark the four corners of each item.
Cut carefully with your sharp knife, using light pressure. Work slowly around each mark you made. Press all the edges down with your flat tool after cutting.
Make sure no loose edges stick up around switches or plugs. Fix any rough spots right away. Clean edges around wall items make your work look better.
Step 5: Handling Corners and Edges
Pull the paper tight as you move into corners. Cut straight down where walls meet, using your sharp blade. Press both sides flat with your smoothing tool. Some walls might not be straight, so work slowly here.
Take extra care with outside corners – they often show wear first. Cut edges near the floor last. A metal ruler helps make straight cuts along the bottom. This step needs patience for the best results.
Step 6: Managing Tricky Spots
Windows and doors need special care. Cut paper about two inches past each frame. Make small cuts at corners to help paper fold neatly.
Press firmly around all edges of frames. Look for spots where paper might catch or lift. Fix these areas right away with extra pressing. Small details here make a big difference in how your room looks.
Step 7: Final Touches
Wait an hour after putting up your last sheet. Look at your walls in good daylight. Check every seam where sheets meet. Press down any edges that start to lift.
Wipe the surface with a clean, dry cloth to remove marks. Keep the room’s air moving but not too warm. Good drying time helps your paper stay up longer. This final check helps catch small problems early.
Step 8: Clean-Up and Care
Put away all tools and leftover paper. Keep extra pieces for future fixes. Clean any paste from baseboards or trim. Write down the paper brand and pattern number.
Store this information for later needs. Give walls gentle care for the first week. Avoid touching or cleaning during this time. Good after-care helps your work last longer.
Video Tutorial
Check out this YouTube video for a detailed step-by-step tutorial on installing Peel and Stick Wallpaper.
Common Problems and Solutions
1. Fixing Air Pockets
See a bubble? Don’t worry – it’s a common issue. Pull back the paper with care and put it down again. Work from the middle out with your flat tool.
For tiny air spots, make a small hole with a pin. Press the air out softly with your tool. If the paper folds, lift it up right away and try again. Take your time with each fix.
2. Matching Patterns
Look at your design where you see it most – at your eye’s height. Put up a test piece before you stick it down. Stand back to check if the lines match.
Make small changes until everything fits. Keep checking as you go up and down. Use light pressure until you’re sure it all fits. Press firmly once you like how it looks.
3. Working with Uneven Walls
Most walls have slight bends or curves. Leave extra paper at the top when you start. Use your level tool often as you work. Put up small sections at a time.
Cut off extra paper after it sticks well. Take time with corners – they often need special care. Check your work from different spots in the room. Good planning helps handle wall quirks.
Keeping Your Walls Looking Good
Daily Care
Your peel-and-stick paper stays nice with basic care. Use a soft cloth for weekly dust removal. For spots or marks, mix mild soap with water. Pat the area gently – don’t scrub. Keep these items away from your walls:
- Strong cleaning sprays
- Rough cleaning pads
- Bleach products
- Oil-based cleaners
Making Your Paper Last
Check your walls each season for loose spots. Press down edges that start to lift. Here’s how to fix common issues:
When Edges Lift
- Warm the spot with your hair dryer
- Hold it about 6 inches away
- Use low heat for 30 seconds
- Press down with your smooth tool
- Let it cool before touching
For Small Damage
- Clean the spot first
- Cut a piece from your saved paper
- Match the pattern carefully
- Apply the new piece slowly
- Smooth from middle to edges
Remember: Keep your leftover paper in a flat, dry place for future fixes. Good care helps your walls stay fresh longer.
Conclusion
Adding Peel and Stick Wallpaper to Your Laundry Room Brings New Life to a Basic Space. The Process Might Feel Tricky at First, but With Careful Steps and the Right Tools, You Can Make it Work.
Take Time with Each Sheet, Check Your Lines, and Fix Small Issues as They Come Up.
Remember that Good Prep Work Makes a Big Difference. Clean Walls, Exact Measurements, and the Right Tools Set You up for Success.
Even if Some Spots Need Extra Work, the End Result Makes Your Effort Count.
Your laundry room can become a spot that makes you smile. When you know the right steps and take your time, this simple update can turn a plain room into one you’ll enjoy using every day.
