Blank walls can make any room feel incomplete and uninspired. Many homeowners struggle to display their photos and artwork without drilling numerous holes or spending too much on expensive display solutions.
A DIY picture ledge offers a practical, budget-friendly way to showcase your favorite pieces while adding visual interest to your space. This simple wooden shelf lets you switch out displays without damaging your walls.
In this guide, you’ll learn exactly how to build a custom picture ledge for your home.
We’ll cover everything from the materials and tools you’ll need to a straightforward, step-by-step process anyone can follow, even if you’ve never built anything before.
What is a Picture Ledge?
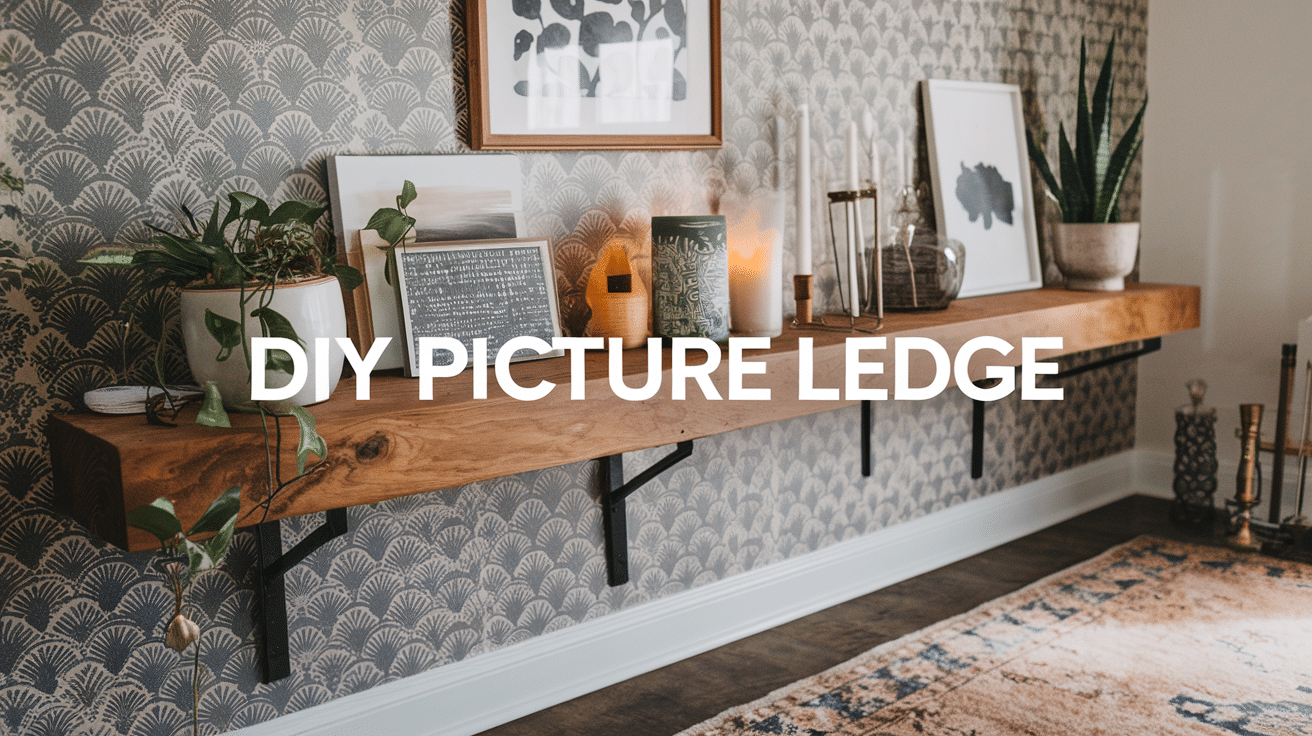
A picture ledge is a slim, wall-mounted shelf with a small lip on the front edge. This simple design creates a perfect platform for leaning framed photos, artwork, and other decorative items against the wall rather than hanging them.
Unlike standard shelves, picture ledges are specifically made with a shallow depth and raised front edge that keeps items from sliding off while allowing them to rest at a slight angle.
This design lets you layer multiple pieces of different sizes for an appealing display.
Picture ledges are wonderful for displaying framed photos, art prints, greeting cards, small plants, books, and decorative objects. They allow you to change your display whenever you want without drilling more holes in your walls.
What Makes a DIY Picture Ledge Totally Worth It?
Creating your picture ledge offers several benefits over buying pre-made options:
Custom sizing: Store-bought ledges come in standard sizes that might not perfectly fit your space. By building your own, you can make it exactly the length you need.
Cost-effective: The materials for a DIY picture ledge typically cost much less than ready-made versions. With just a few pieces of wood and basic supplies, you can create a quality shelf for a fraction of retail prices.
Personal achievement: There’s something satisfying about pointing to a useful item in your home and saying, “I made that.” Even if you’ve never tackled a woodworking project before, this simple weekend project is approachable and gives you a sense of accomplishment.
Materials & Tools You’ll Need
Before starting your DIY picture ledge project, gather all the necessary supplies. Having everything ready will make the building process smoother and more enjoyable.
| Item | Purpose | Notes |
|---|---|---|
| Timber planks (x3) | The base, back, and front lip of the ledge | 2 wider planks (same length), 1 narrower plank for front lip |
| Construction adhesive | To bond the timber pieces together | Strong wood adhesive like Liquid Nails or similar |
| Clamps | To hold timber pieces in place while drying | At least 2 recommended |
| Nail gun or hammer & nails | To secure joints permanently | Timber screws can also be used instead |
| Mitre saw or hand saw | To cut the wood to desired lengths | Pre-cut options available at hardware stores |
| Sandpaper / sanding sponge | To smooth the surface and edges | 80 grit for rough sanding, 220 grit for finishing |
| Wood putty | To fill in nail holes for a seamless look | Match the color to your timber (e.g., Radiata Pine) |
| Varnish | To protect and finish the wood surface | Water-based varnish is preferred for a natural look |
| Spirit level | To ensure the ledge is mounted straight | Crucial for wall alignment |
| Painter’s tape | To visualize placement on the wall | Optional but helpful |
| Stud finder | To locate studs in the wall for secure mounting | Ensures strong anchoring |
| Screws | To attach ledge securely to wall studs | Choose based on wall type and timber thickness |
| Screwdriver or drill | To drive screws into wall and wood | A drill makes the process easier |
| Damp cloth | To wipe excess glue and clean surfaces | For neat finishing |
Tools:
- Measuring tape
- Pencil
- Saw (hand saw or circular saw)
- Drill with bits
- Screwdriver
- Level
- Clamps (optional but helpful)
- Sanding block
- Paintbrush or cloth for staining
Don’t worry if you lack some tools—many hardware stores offer cutting services for the wood pieces, which can simplify your project considerably.
How to Build a DIY Picture Ledge (Step-by-Step)
This simple, step-by-step process will guide you through creating a custom picture ledge for your home using basic tools and materials. It is perfect for displaying your favorite photos, artwork, and small decorative items.
Step 1: Gather Your Materials

You’ll need three timber planks (two wide, one narrow for the front lip), construction adhesive, a nail gun or hammer and nails (or timber screws), clamps, sandpaper, wood putty, varnish, a saw, spirit level, painter’s tape, stud finder, and screws with screwdriver.
Step 2: Cut the Timber

Cut two wide planks to your desired length (around 1.45 meters works well). Cut one narrower plank for the front edge. For neater results, cut slightly longer than needed so you can trim the ends later.
Step 3: Assemble the Base and Back

Secure the back plank flat to your work surface. Apply construction adhesive to the bottom edge of the back plank and attach the base plank to form an “L” shape. Clamp in place, let dry for 20 minutes, then secure with nails or screws.
Step 4: Add the Front Lip

Apply adhesive to the bottom of the thinner front plank and attach it to the front edge of the base to form a “U” shape. Clamp, let dry, then secure with nails or screws. Wipe away any excess glue that squeezes out.
Step 5: Trim and Smooth the Edges

If the edges are uneven, trim both ends of the ledge using a saw for a clean, professional finish. This small step makes a big difference in the final appearance.
Step 6: Fill and Sand

Fill nail holes with wood putty and let dry. Sand the entire ledge, starting with 80-grit sandpaper and finishing with 220-grit for smoothness. When complete, wipe off all sanding dust.
Step 7: Apply Varnish

Use water-based varnish for a natural finish or oil-based varnish for richer tones. Apply the first coat, let it dry, and then lightly sand. Apply a second coat and allow it to dry completely before handling.
Step 8: Mount the Ledge

Use a spirit level to mark a straight line on the wall and painter’s tape to visualize placement. Find wall studs with a stud finder and mark them. Pre-drill holes in the back of the ledge where studs align, then screw the ledge into the wall studs.
Step 9: Style and Enjoy

Decorate your new DIY picture ledge with art, framed prints, plants, or seasonal items. The beauty of this shelf is that you can easily change your display whenever you want a fresh look.
Video Tutorial
For more information, check out this video tutorial by Life of Kotts
7 Creative Ideas for Your DIY Picture Ledge
Looking to style your picture ledge in a way that’s both functional and eye-catching? These creative ideas will help you turn a simple shelf into a stunning display that reflects your personality and style.
1. Mini Gallery Wall

Layer framed prints, sketches, or family photos to create a rotating art display. This is great for living rooms, hallways, or entryways. Mix frame sizes for a modern, curated look.
2. Kids’ Book Nook

Store and display favorite books on a picture ledge in a child’s bedroom or playroom. It keeps books visible and within easy reach while doubling as cute wall decor.
3. Kitchen Herb & Recipe Shelf

Mount a picture ledge in the kitchen to hold small potted herbs, go-to recipe cards, or decorative kitchen prints. Add spice jars for extra function and flair.
4. Bathroom Décor Ledge

Install above the toilet or bathtub to hold small plants, rolled towels, candles, or framed quotes. It brings warmth and personality to a functional space.
5. Seasonal Display Shelf

Switch out decor pieces based on the season — pumpkins in fall, mini wreaths in winter, and flowers in spring. A perfect way to keep your space feeling fresh year-round.
6. Workspace Inspiration Ledge

Above your desk, display motivational quotes, mood boards, or small supplies like washi tape or pens. Keeps your workspace both stylish and inspiring.
7. TV Wall Accent

Mount a picture ledge above or below your TV to hold minimalist decor, remotes, or framed art that complements the room’s theme and adds visual interest.
Helpful Tips for Success
Get wood pre-cut if needed: If you don’t own a saw or don’t feel comfortable making precise cuts, most hardware stores will cut wood to your specifications, often for free or a small fee.
Consider wood type carefully: Pine is budget-friendly and easy to work with, but hardwoods like oak or maple, while more expensive, offer increased durability for heavier items.
Use a level at multiple points: When mounting your shelf, check that it’s level not just at the center but also at both ends to ensure it’s perfectly straight along the entire length.
Apply clamps during glue drying: Using clamps while the glue sets prevents the boards from shifting and creates stronger bonds between pieces.
Countersink your screws: By drilling a slightly wider hole at the top of your screw hole, you can sink the screw head below the wood surface, making it easier to hide with wood filler.
Sand with the grain: Always sand in the direction of the wood grain to avoid creating visible scratches in your finished piece.
Test your wall anchors: If you can’t mount into studs, make sure to use wall anchors rated for more weight than you plan to put on the shelf.
Consider adding a small bead of silicone: Along the back edge where the shelf meets the wall to prevent items from falling behind the shelf.
Final Thoughts
This DIY picture ledge project offers a simple way to create a versatile display space in your home. Perfect for beginners, it requires minimal tools yet yields professional results.
The flexible design lets you change your decor without additional wall damage. This customizable shelf is an ideal way to showcase what matters most to you while adding personal style to your space.
We’d love to see how your picture ledge turns out! Share photos of your finished project in the comments below, or ask any questions if you hit a snag during the building process.
