
Looking to refresh your home lighting without spending too much? A chandelier makeover might be your answer!
When done properly, updating an old light fixture can completely change how a room feels. The magic of a chandelier makeover before and after shows just how much impact small changes can make.
Think of your old chandelier not as outdated, but as a blank canvas waiting for your personal touch. With some basic supplies and a bit of time, you can turn a forgotten fixture into a centerpiece that matches your style perfectly.
In the sections that follow, we’ll walk through why this project is worth your time, show you how to plan and execute it step-by-step, and help you avoid common mistakes along the way.
Why You Should Consider a Chandelier Makeover?
Thinking about giving your lighting a fresh look? Here are some compelling reasons to update your existing chandelier instead of buying new:
1. Cost-Effectiveness of Remaking an Existing Chandelier: By updating your current chandelier, you save money that would otherwise be spent on buying a completely new piece. Often, a fresh coat of paint, new bulbs, or minor repairs can make an old chandelier look like new.
2. Personalization Opportunities: With a chandelier makeover, you can create something truly yours. Choose the style, colors, and materials that match your personal taste and existing room décor.
3. Environmental Benefits of Repurposing and Reusing: Updating your chandelier helps reduce waste by reusing materials. Instead of throwing out an old light fixture, you can restore it, helping the environment while still getting a beautiful result.
Process of Chandelier Makeover
Turning an old chandelier into something fresh involves a few key steps. Let’s look at what goes into this change from start to finish.
Before: The Look of the Chandelier
Most chandeliers show clear signs when they need attention. Here’s what to look for when deciding if yours needs a refresh:
- Dull or Outdated Appearance: Most chandeliers lose their shine over time, regardless of their original quality.
Metal parts turn dull and may show spots of corrosion, glass elements become cloudy with dust build-up, and designs that once looked modern now feel stuck in the past compared to current lighting trends in home décor.
- Worn-Out Finishes or Parts: Paint chips away from metal surfaces, bronze or brass finishes wear thin or tarnish, and small decorative parts often break off during cleaning or from general wear.
These issues not only affect how the chandelier looks but can also impact the quality of light it provides and its overall function.
- Mismatched with Room Décor: When you update your furniture, wall colors, or overall style direction, your chandelier might suddenly feel like it belongs in a different house.
This mismatch creates a visual disconnect in your otherwise carefully designed room, making the lighting fixture stand out for all the wrong reasons.
Steps for Planning Your Chandelier Makeover
Before grabbing your tools, take some time to plan your approach. A good plan makes all the difference between a rushed job and a stunning result.
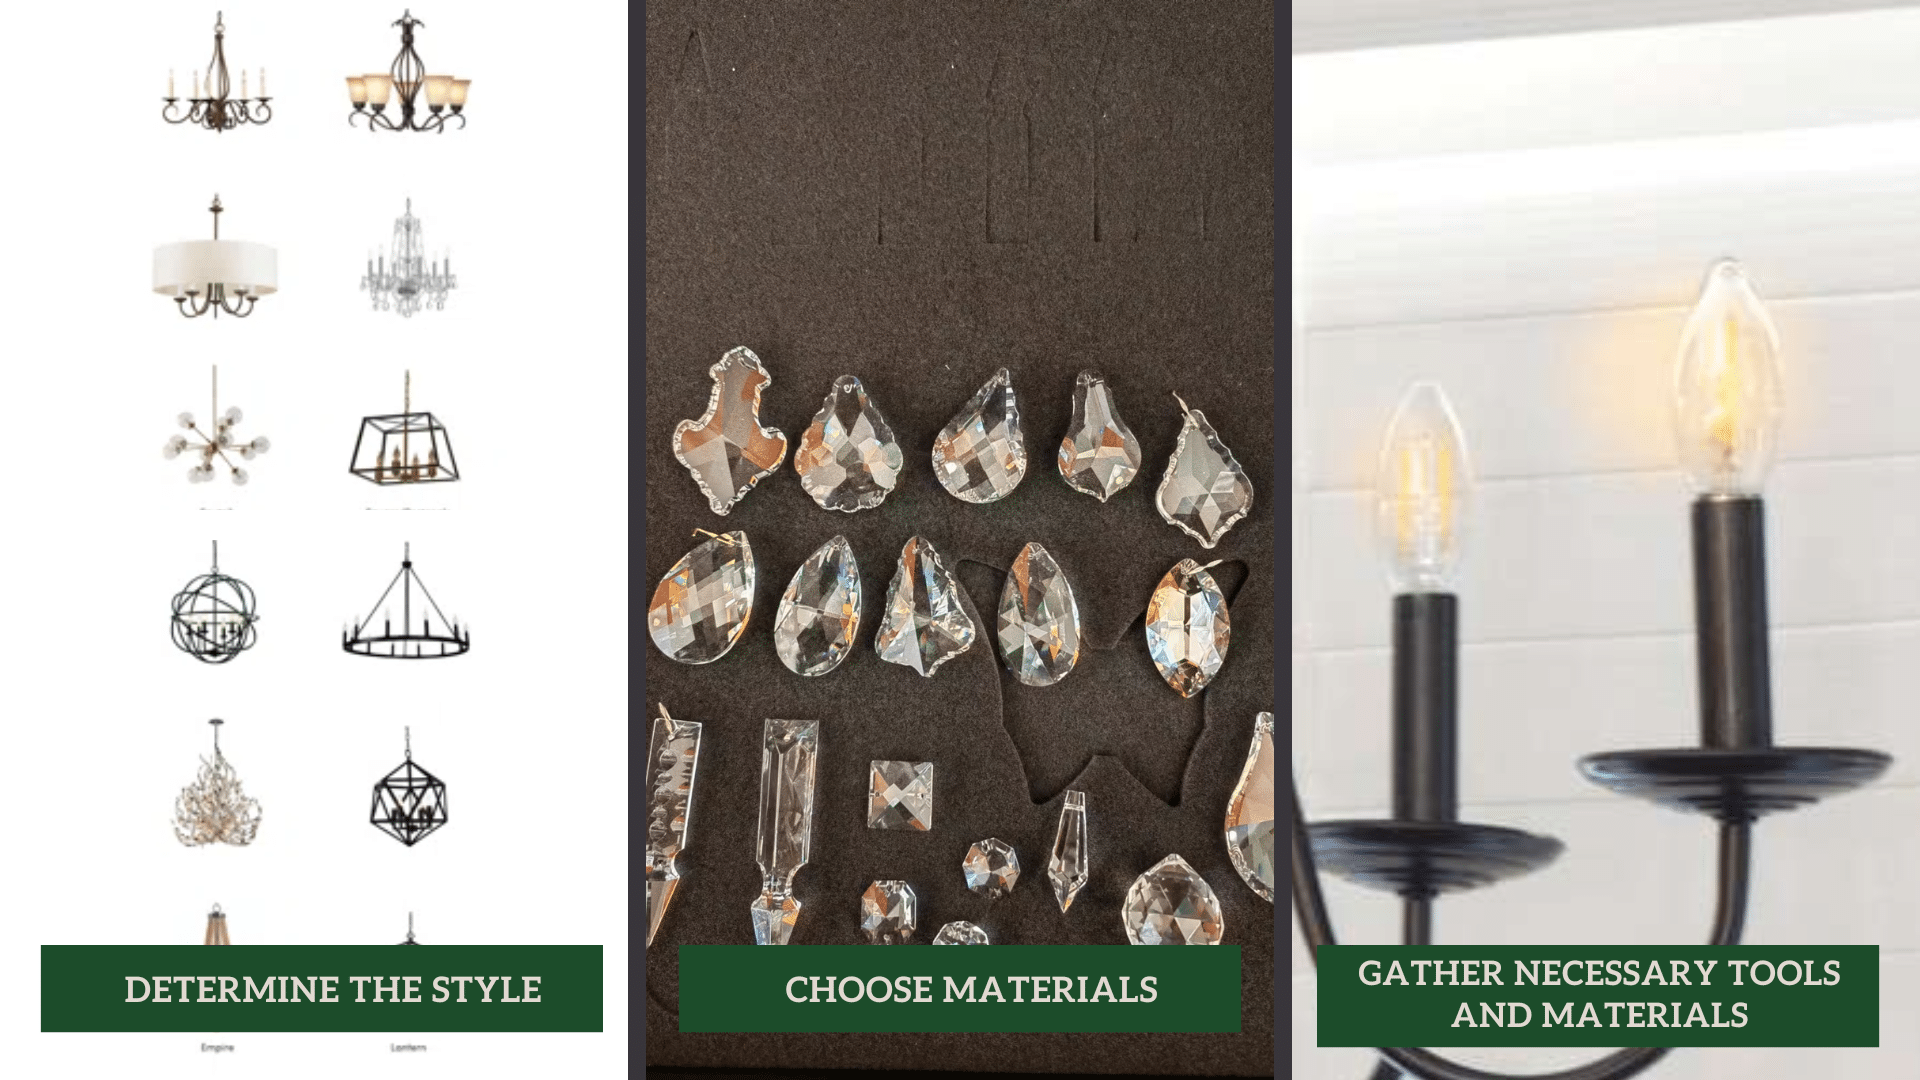
Step 1 – Determine the Style
Choose a style that complements your room’s existing décor. Popular choices include modern, vintage, boho, and industrial looks. Consider what fits with your furniture, wall colors, and overall home design. Browse design magazines, social media, or home improvement stores for inspiration that matches your vision.
Step 2 – Choose Materials
Decide on whether you will paint, replace crystals, or add decorative elements like fabric or beads to the chandelier. Think about durability and maintenance of each material option.
For example, matte paint hides dust better than glossy finishes, while certain metals may require special cleaners to maintain their look.
Step 3 – Gather Necessary Tools and Materials
Make sure you have all the tools required for the makeover, such as: cleaning supplies, paint, brushes, spray paint, and new bulbs or chains.
Include safety equipment like: gloves, eye protection, and a stable ladder. Creating a complete shopping list beforehand saves multiple trips to the store and keeps your project on track.
Budgeting Tips for Your MakeoverSmart spending ensures your chandelier refresh stays affordable while still looking high-end:
Calculate the cost of materials and tools before starting. Even with a budget-friendly chandelier, adding quality materials like good paint, new crystals, or updated bulbs can make a significant impact on the overall look. |
After: The Stunning Changeover
When you complete all the steps, the change in your lighting fixture will amaze you. The results often look so good that friends might think you bought something completely new.
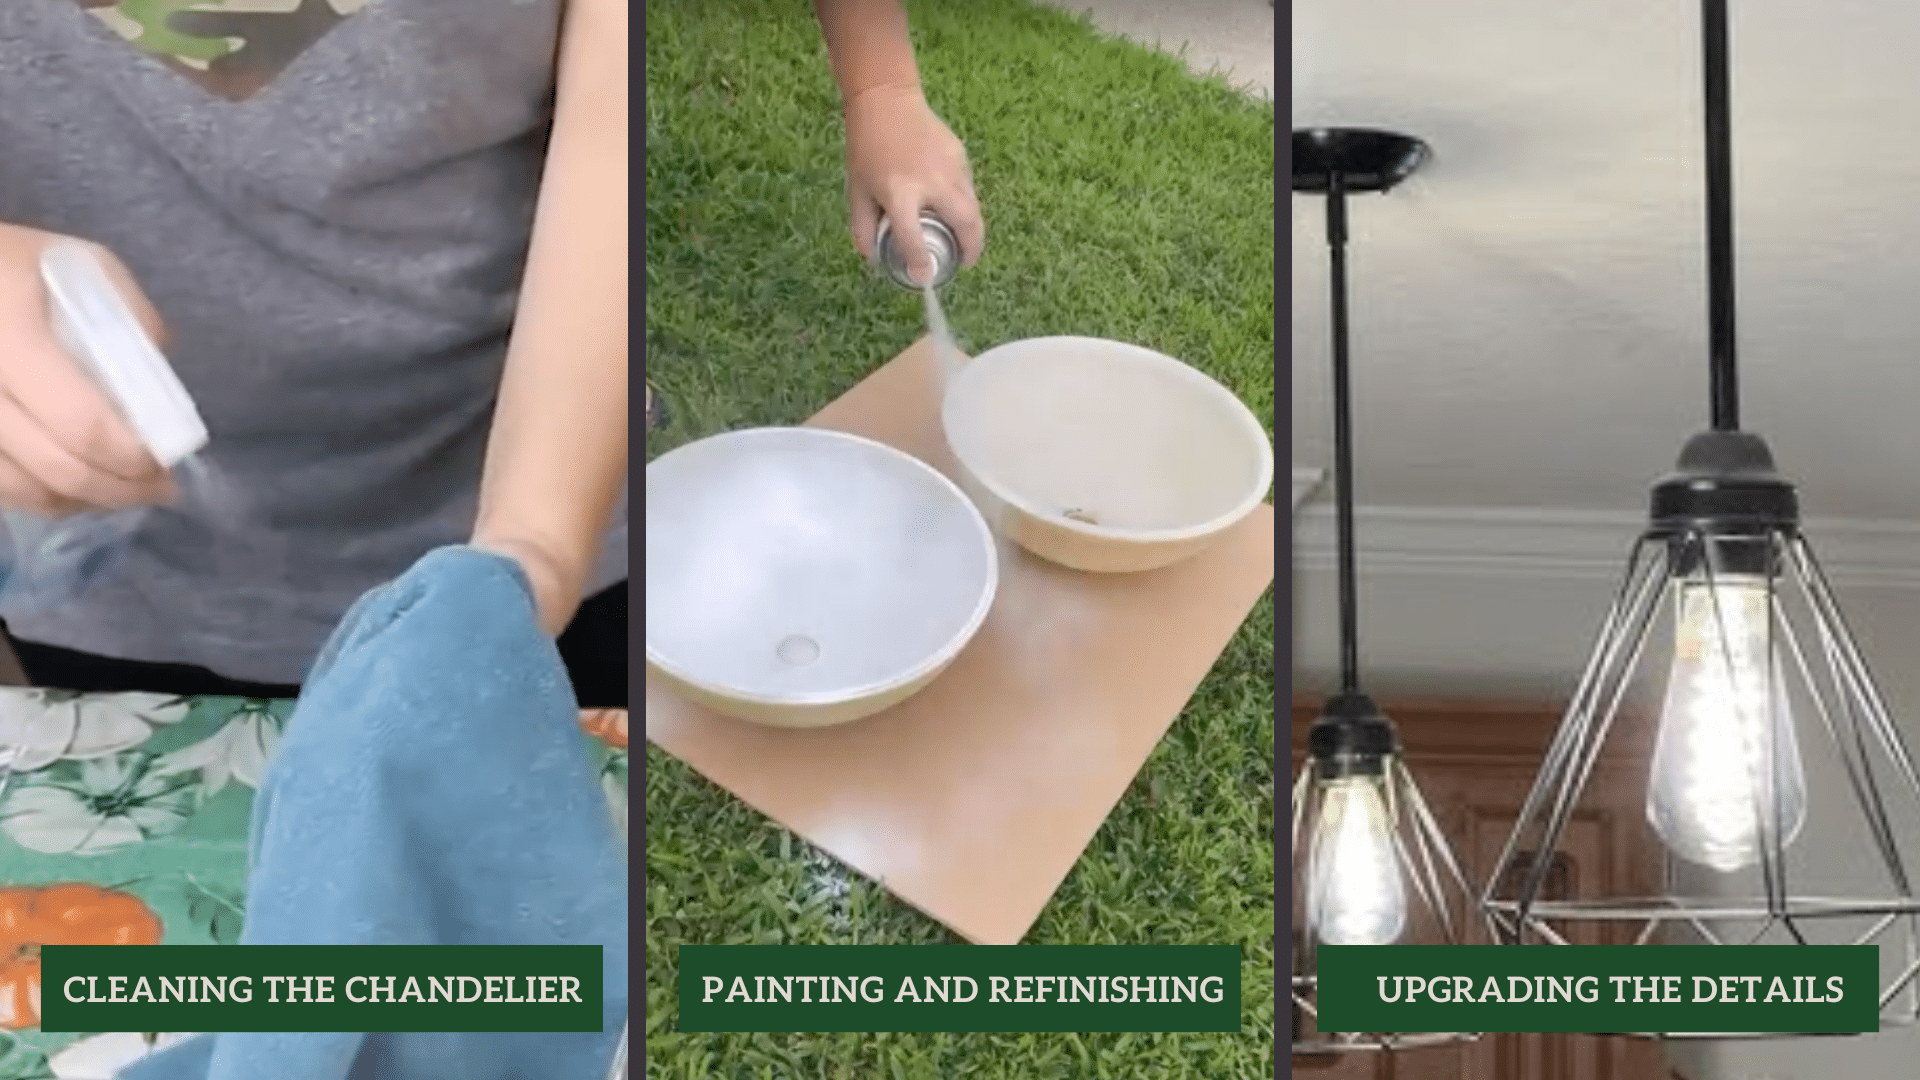
Step 4 – Cleaning the Chandelier
Thoroughly clean every part, from the hanging crystals to the base. Dust and dirt can accumulate over time, so a good clean is crucial. Use a microfiber cloth for dry dusting, then wipe with a slightly damp cloth dipped in mild soap solution. Allow it to dry completely before moving to the next step.
Step 5 – Painting and Refinishing
Apply a coat of paint to freshen up the chandelier. Use metallic or matte finishes based on your desired look. Be sure to spray both the front and back of the chandelier’s parts. Apply thin, even coats and allow proper drying time between applications to avoid drips and ensure a smooth finish.
Step 6 – Upgrading the Details
Consider adding new crystals, beads, or modern bulbs that better match the room’s style. Replace old wiring if necessary for safety. Small touches like changing the chain or adding decorative caps to bulb bases can make a big difference in the final look.
Before and After Photos -Final Results
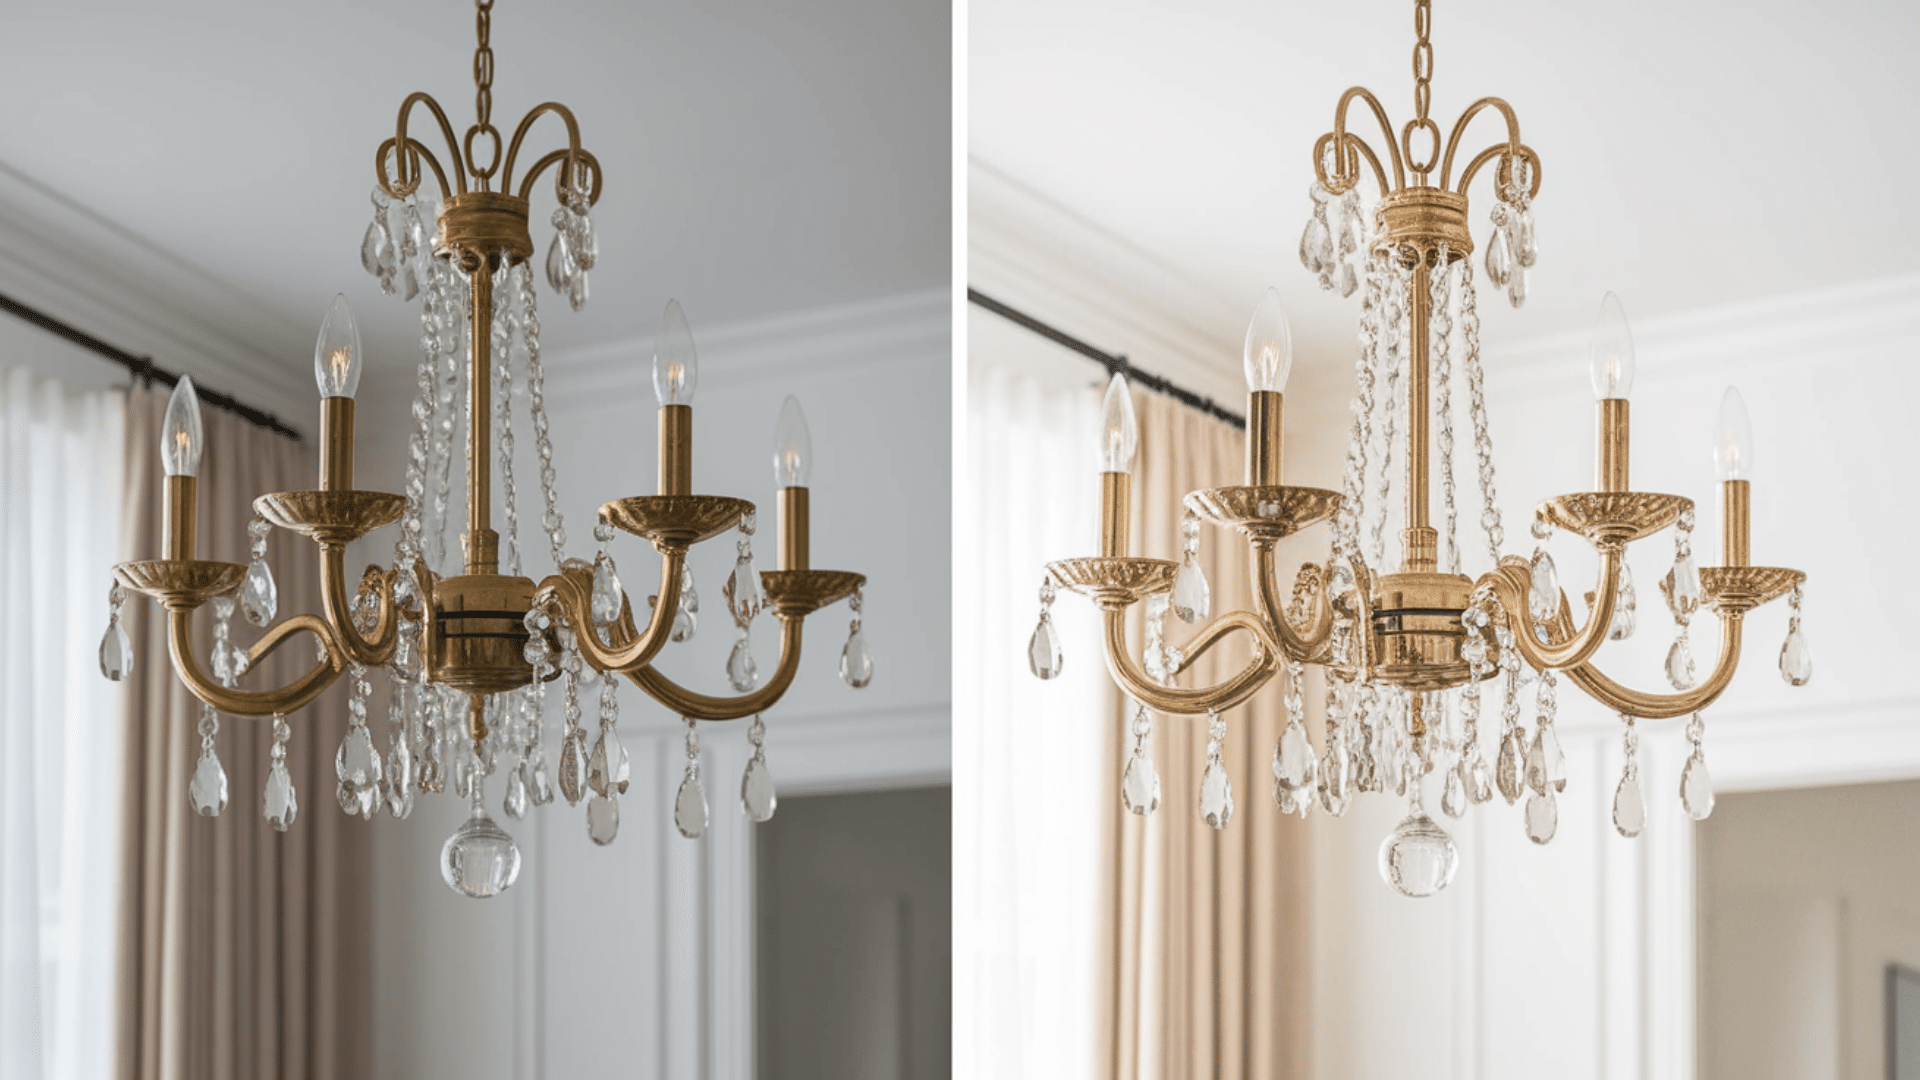
The true magic of a chandelier makeover becomes clear when you see the comparison photos. These visual records show just how much impact your work has made.
Tips for a Successful Chandelier Makeover
Small details make a big difference when updating your light fixture. These practical tips will help you achieve professional-looking results.
1. Ensure Safety During the Process: Always disconnect the power before starting. Use a stable ladder and proper safety gear when working with electrical components. If needed, consult an electrician for complex wiring issues.
2. Work in a Well-Ventilated Area: When painting or using waxes, work where air flows freely. This protects your lungs and helps finishes dry properly without dust settling on wet surfaces.
3. Use High-Quality Materials: The quality of paint, crystals, and bulbs directly affects how long your makeover lasts. Better materials may cost more upfront but save money by not needing frequent replacement.
4. Consider the Room’s Design: Make sure your updated chandelier matches your room’s color scheme, style, and proportions. The fixture should enhance the space, not fight against it.
Conclusion
A chandelier makeover provides a budget-friendly way to refresh your home lighting and add your personal touch to your décor. By remaking an existing fixture rather than buying new, you save money while creating something unique that perfectly fits your space.
We’ve walked through the entire process—from spotting signs that your chandelier needs updating, to planning your approach, and following clear steps to achieve amazing results.
Remember to prioritize safety, use quality materials, and think about how your updated fixture will work with your room’s overall design. With just some basic supplies and a bit of patience, you can create a stunning focal point for any room.
Why not try it yourself?
We’d love to know your before and after stories in the comments section below!
