
Store-bought upholstered beds can cost hundreds or even thousands of dollars, leaving many homeowners searching for budget-friendly alternatives.
You want a beautiful, custom bed that fits your style and budget without breaking the bank.
This complete guide will show you exactly how to build a professional-looking upholstered bed frame for a fraction of the retail price.
You’ll learn how to create a queen-size upholstered bed using simple materials and basic tools.
We’ll guide you through each step, from selecting the right fabric to adding the finishing touches that make your DIY project look like it was purchased from a store.
By following this tutorial, you can save money while getting the exact design and fabric you want for your bedroom.
Why Choose DIY Over Store-Bought Beds?
Building your upholstered bed frame offers several advantages over purchasing ready-made furniture. First, you have complete control over fabric selection, allowing you to perfectly match your existing decor.
Second, the cost savings are significant; you can create a custom bed for less than half the price of similar retail options.
The construction process also ensures better quality control. You know exactly what materials go into your bed frame, and you can reinforce areas that need extra support.
Choosing the Right Fabric for Your Bed Frame
- Best Fabric Types for Upholstery – Select durable fabrics such as cotton canvas, linen, or upholstery-grade materials. Consider cotton duck, canvas, or heavy-weight cotton for best results.
- Color and Pattern Considerations – Choose colors that complement your bedroom decor and existing furniture pieces. Neutral tones, such as beige, gray, or cream, work well for long-term use and match changing decor styles.
- Fabric Quantity Calculator – For queen-size beds, you will need approximately 4-5 yards of 54-inch-wide fabric, depending on your design. Curtain panels work great as they’re pre-hemmed and often cost less than upholstery fabric.
DIY Upholstered Bed Frame: Step-by-Step Guide
Follow this detailed step-by-step guide to craft a custom bed frame from scratch, no prior woodworking experience required.
Tools and Materials Needed
| Item | Quantity |
|---|---|
| 1×8 boards | 4 pieces |
| 1×3 boards | Multiple pieces |
| Corner brackets | 4 pieces |
| Leg brackets | 6 pieces |
| Wooden legs | 6 pieces |
| Wood screws | Various sizes |
| Curtain panels | 3 panels |
| Quilt batting | 1 roll |
| Twin mattress pad | 1 piece |
| Staple gun | 1 |
| Pin nailer | 1 |
| Drill | 1 |
Step 1: Prepare Your Fabric Panels
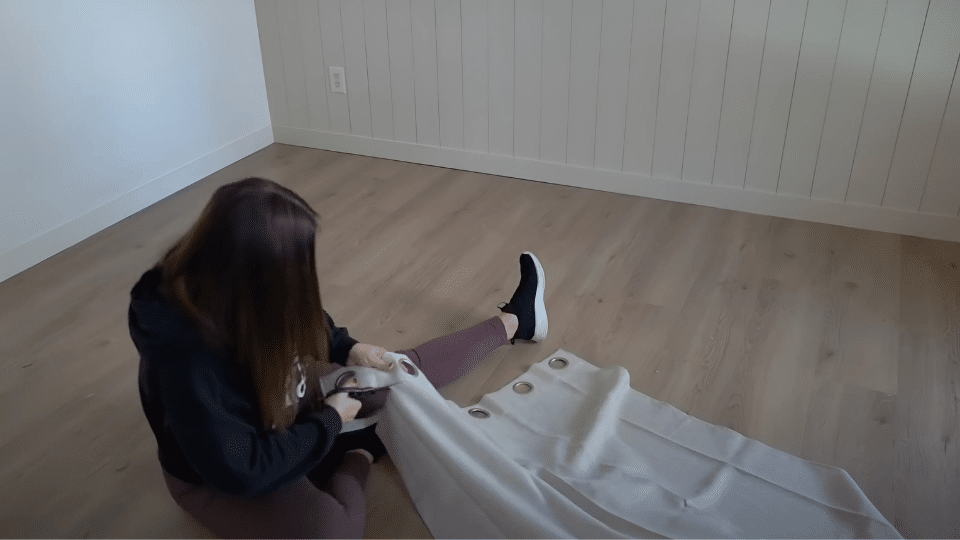
Remove the rings from your curtain panels using scissors. Steam all fabric pieces to remove wrinkles and create smooth surfaces for upholstering.
Materials needed: Curtain panels, scissors, and a steam iron
Instructions: Cut off ring portions cleanly. Steam each panel thoroughly. Measure fabric against board sizes, ensuring 3-4 inches extra on all sides.
Step 2: Cut Lumber to Size
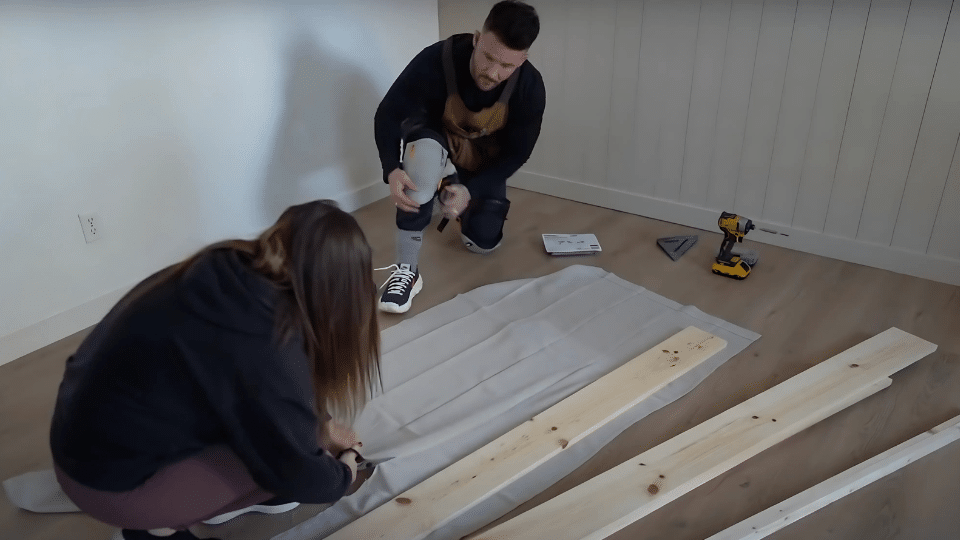
Cut your 1×8 boards to queen-size bed dimensions. You need pieces for the headboard, footboard, and two side rails.
Materials needed: 1×8 boards, measuring tape, saw
Instructions: Mark cutting lines clearly. Cut headboard to desired width and height. Cut side rails to mattress length plus extra inches. Sand all edges smooth.
Step 3: Add Padding to Frame Pieces
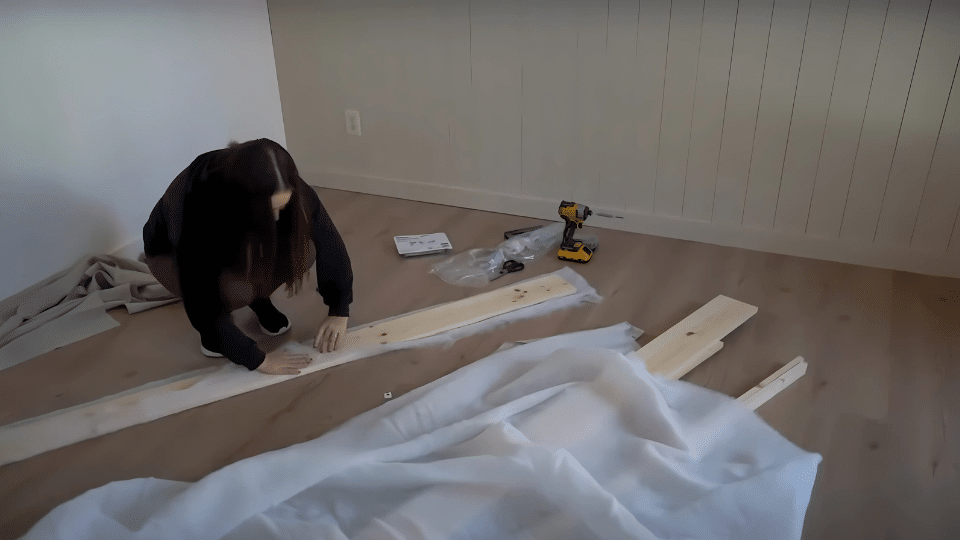
Apply quilt batting to each board for a soft, upholstered feel. This padding layer goes between the wood and the fabric.
Materials needed: Quilt batting, staple gun, scissors
Instructions: Cut the batting larger than the boards. Place over the front surface, wrap to the back. Staple batting to the back, maintaining a tight, smooth surface.
Step 4: Upholster Frame Pieces with Fabric
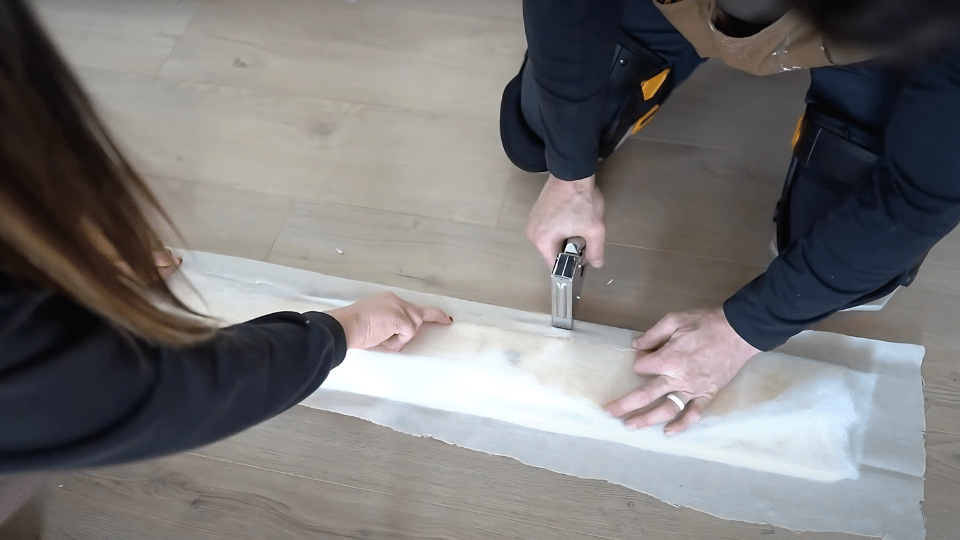
Cover padded boards with fabric to create professional, upholstered pieces. Work carefully to avoid wrinkles.
Materials needed: Fabric panels, staple gun, scissors
Instructions: Place fabric face-down, center board on top. Pull fabric tight to back and staple. Work from center outward, alternating sides for even tension.
Step 5: Assemble the Frame Structure
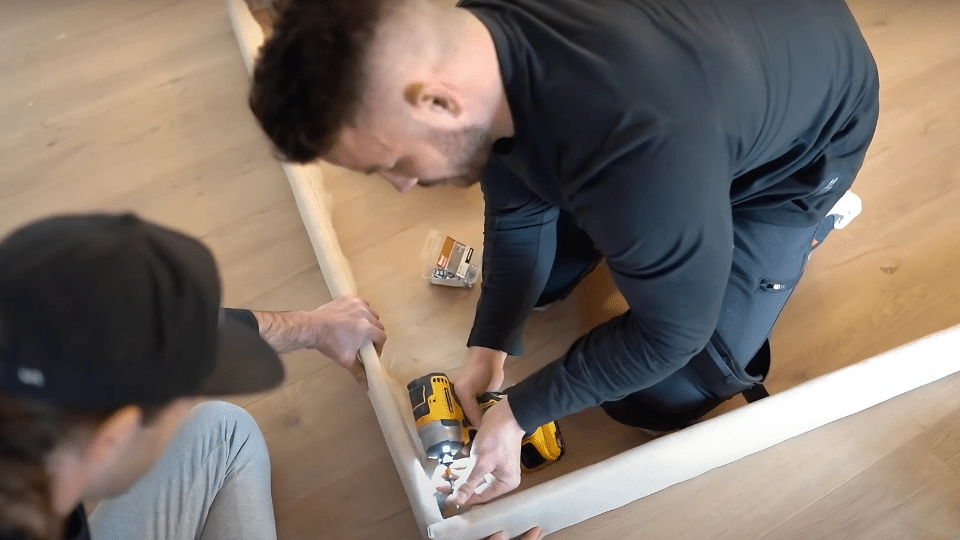
Connect upholstered pieces using corner brackets to form the main bed frame structure.
Materials needed: Corner brackets, wood screws, drill
Instructions: Attach brackets to inside corners. Connect the side rails to the footboard first. Add a headboard, ensuring all joints are square and tight.
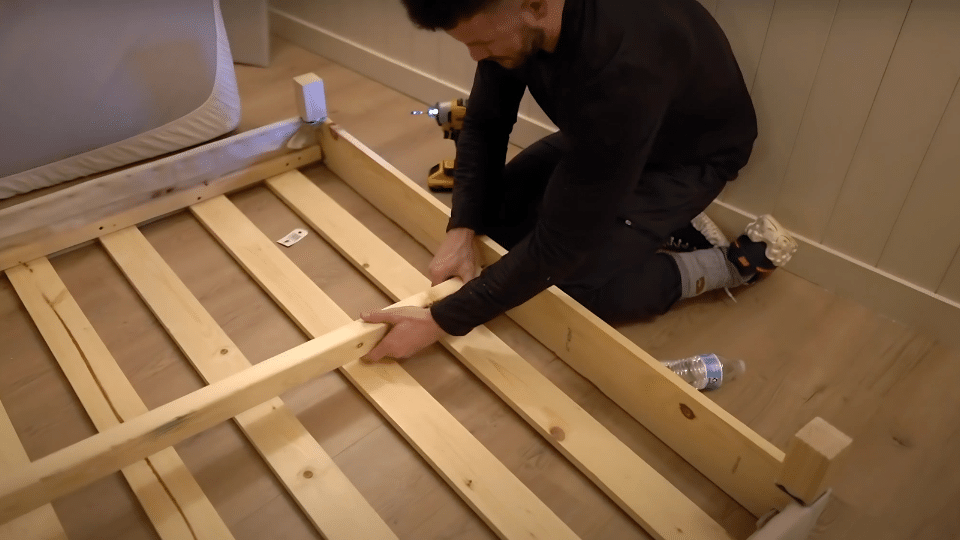
Step 6: Install Support System and Legs
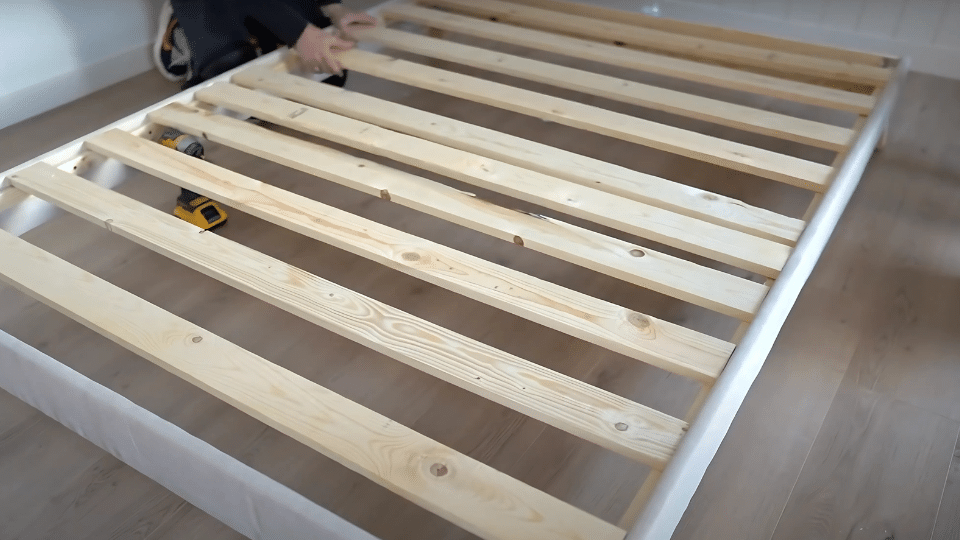
Add an internal support framework for mattress support and attach legs for stability.
Materials needed: 1×3 boards, mattress slats, leg brackets, wooden legs
Instructions: Install support ledge inside frame perimeter. Add slats across the width with a center support beam. Attach leg brackets and install all six legs.
Step 7: Create and Install the Headboard
Build and upholster the headboard using plywood, padding, and fabric for a comfortable backrest.
Materials needed: Plywood, twin mattress pad, fabric, connection hardware
Instructions: Cut plywood to size. Staple mattress pad to front. Add a batting layer, then cover with fabric. Connect the headboard to the frame securely.
Care & Maintenance Tips for Your DIY Upholstered Bed
From spot cleaning to fabric protection, find easy ways to care for your custom bed.
1. Regular Fabric Care
Keep your upholstered bed frame looking new with regular maintenance. Vacuum the fabric surfaces weekly using an upholstery attachment to remove dust and debris.
For spot cleaning, use a mild upholstery cleaner and test it on a hidden area first. Blot stains gently rather than rubbing, which can damage the fabric or push stains deeper. Allow the fabric to dry completely before using the bed.
2. Frame Stability Checks
Inspect your bed frame connections periodically to ensure everything remains tight and secure. Loose screws or brackets can cause wobbling and potentially damage your beautiful upholstery work.
Check the mattress support slats regularly for any signs of bowing or cracking. Replace damaged slats promptly to maintain proper mattress support and prevent uneven wear on your mattress.
3. Protecting Your Investment
Use a mattress protector to prevent spills from reaching your bed frame. Even small amounts of moisture can damage wood components or create stains on your upholstery that are difficult to remove.
Rotate your mattress regularly to ensure even wear on both the mattress and your bed frame. This simple step extends the life of both components and maintains the professional appearance of your DIY project.
4. Seasonal Deep Cleaning
Plan a thorough cleaning session twice yearly to keep your bed frame in top condition. Remove the mattress and thoroughly vacuum all surfaces, including areas that are normally hidden.
Steam clean the fabric if your upholstery material allows it, or use professional upholstery cleaning services for delicate fabrics. This deep cleaning removes accumulated dust, helping to maintain the fabric’s original color and texture.
5. Storage and Moving Considerations
If you need to move or store your bed frame, disassemble it carefully to protect the upholstered surfaces. Wrap each piece in blankets or bubble wrap to prevent scratches or tears during transport.
Keep all hardware in labeled bags so reassembly is straightforward. Take photos before disassembly to help you remember the correct configuration when reassembling your bed.
DIY Upholstered Bed Frame Errors You Can Avoid
| Mistake | Why It’s Problematic | Prevention Method |
|---|---|---|
| Skipping fabric steaming | Creates a wrinkled, unprofessional appearance | Always steam before upholstering |
| Insufficient padding | Results in a hard, uncomfortable surface | Use adequate batting layers |
| Uneven fabric tension | Causes wrinkles and poor appearance | Work systematically, check frequently |
| Wrong bracket type | Legs may angle incorrectly | Use flat leg brackets, not angled ones |
| Missing center support | The frame may sag or break | Always install the center beam with legs |
| Inadequate hardware | The frame becomes wobbly over time | Use proper-sized screws and brackets |
| Poor fabric placement | Uneven coverage or pattern misalignment | Measure and center carefully |
| Rushing corner details | Messy, unprofessional corners | Take time to fold fabric properly |
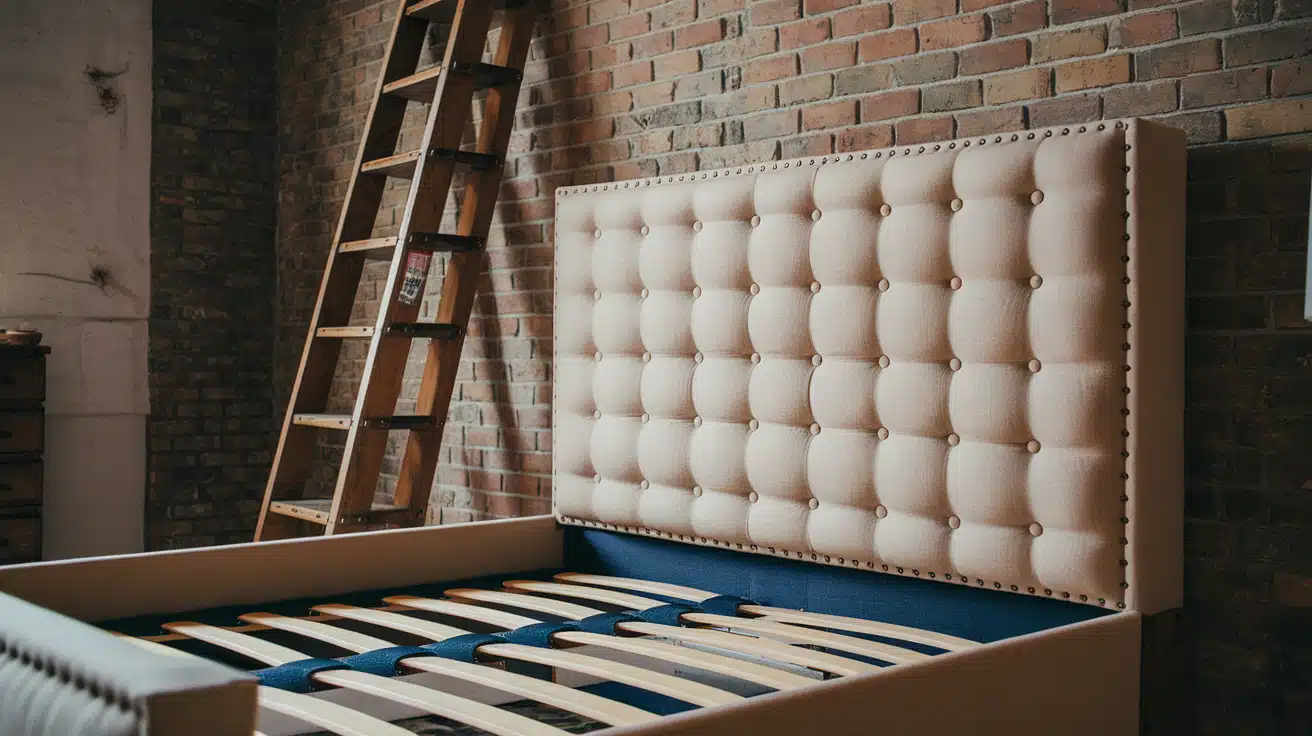
Design Variations Options for an Upholstered Bed
1. Headboard Height Options
Standard headboards are 48-60 inches tall. Taller headboards create dramatic focal points, while shorter ones are more suitable for rooms with low ceilings.
2. Alternative Leg Styles
Replace standard wooden legs with hairpin legs for a modern look, or use turned legs for a traditional style. Metal legs offer industrial appeal.
3. Button Tufting Technique
Add button tufting to your headboard for an extra touch of style. This requires additional batting and buttons, but creates a professional upholstered appearance.
Conclusion
Building your upholstered bed frame is a rewarding project that combines practical skills with creative design.
You’ve learned how to change basic lumber and fabric into a professional-looking piece of furniture that rivals expensive store-bought options.
Your finished bed frame will provide years of comfortable use while showcasing your DIY skills. The money saved can be invested in high-quality mattresses or other bedroom accessories.
This project builds confidence for future furniture-making endeavors and teaches valuable upholstery techniques. You now know how to repair or reupholster other furniture pieces in your home.
Share your completed project with friends and family who might be inspired to try their DIY furniture projects.