

A pinch pot is a basic hand-building pottery technique used to form small bowls, cups, or decorative pieces.
It begins with shaping a ball of clay, then pressing a thumb into the center to create a hollow.
The walls are gradually thinned and expanded by pinching and turning the clay between your fingers and thumbs.
This method doesn’t require a pottery wheel or special tools, making it ideal for beginners. It’s one of the oldest known ceramic methods, often used in ancient pottery.
Pinch pots help you develop control over clay thickness, balance, and form while allowing endless creativity in design and texture.
What Is a Pinch Pot
A pinch pot is created by shaping a lump of clay into a hollow form using only your hands.
You begin by pressing your thumb into the center of the clay ball, then use fingers and thumbs to gently pinch outward and upward, gradually forming the walls of your vessel.
This technique doesn’t require a potter’s wheel or difficult tools, making it accessible for almost anyone.
It encourages direct interaction with the material, feeling the thickness of the walls, the curve of the interior, and the shape emerging under your touch.
Because each movement influences the form, every pinch pot becomes a distinct, handmade piece full of character and texture.
Cute Pinch Pot Ideas
Cute pinch pots are fun, creative, and full of personality. They can be shaped into animals, flowers, hearts, or tiny planters, each design showing your unique style and creativity with clay.
1. Cat Pinch Pot
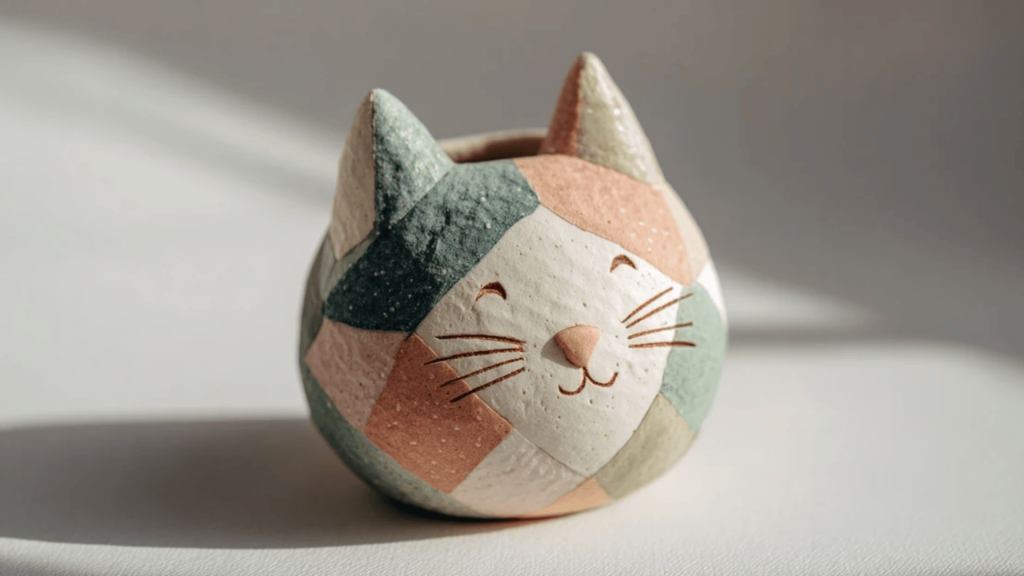
Create pointy ears using small clay triangles, carve delicate whiskers with a needle tool, and paint soft pastel stripes or calico patches for personality.
Perfect for holding rings or earrings on your dresser. A beginner’s way to personalize pottery with charming feline features.
2. Owl Pinch Pot

Make an oval-shaped bowl, press circles for eyes using a round tool, and carve detailed feathers across the surface.
Paint in earthy tones or bright blues for a modern twist. Great for classroom crafts or small trinket holders with a woodland character that appeals.
3. Bunny Pinch Pot

Form long ears from rolled coils, attach securely with slip and scoring technique, and paint a sweet face with a pink nose.
Ideal as an Easter dish or keepsake bowl that captures springtime warmth and playful character in clay. This design works beautifully for seasonal decorations.
4. Fox Pinch Pot
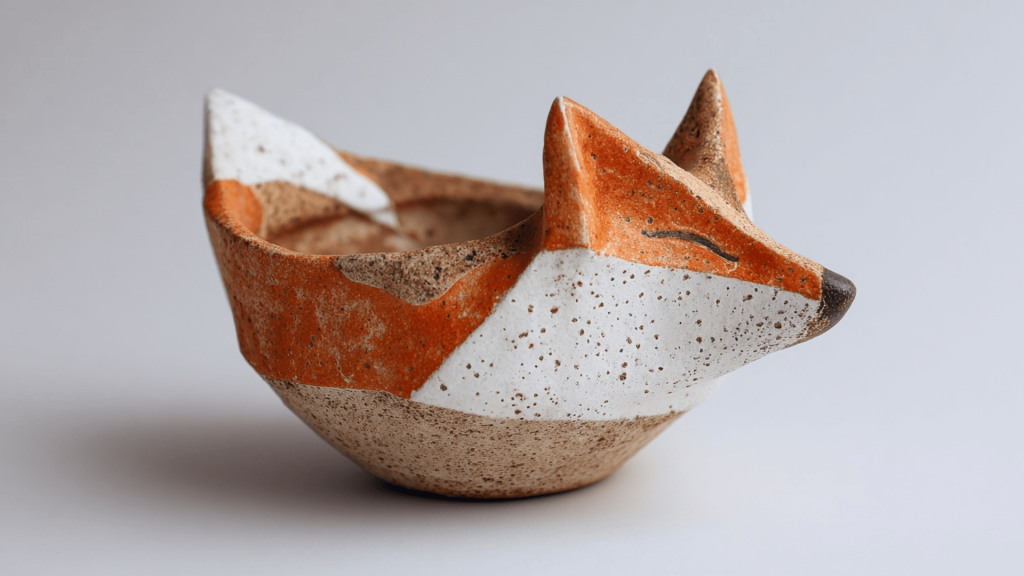
Create a pointed muzzle extending from the bowl rim and paint with orange and white glaze in layers.
Looks charming as a plant pot or pen holder on your desk. Bring forest-inspired character to your workspace or home décor with this friendly creature design.
5. Turtle Pinch Pot
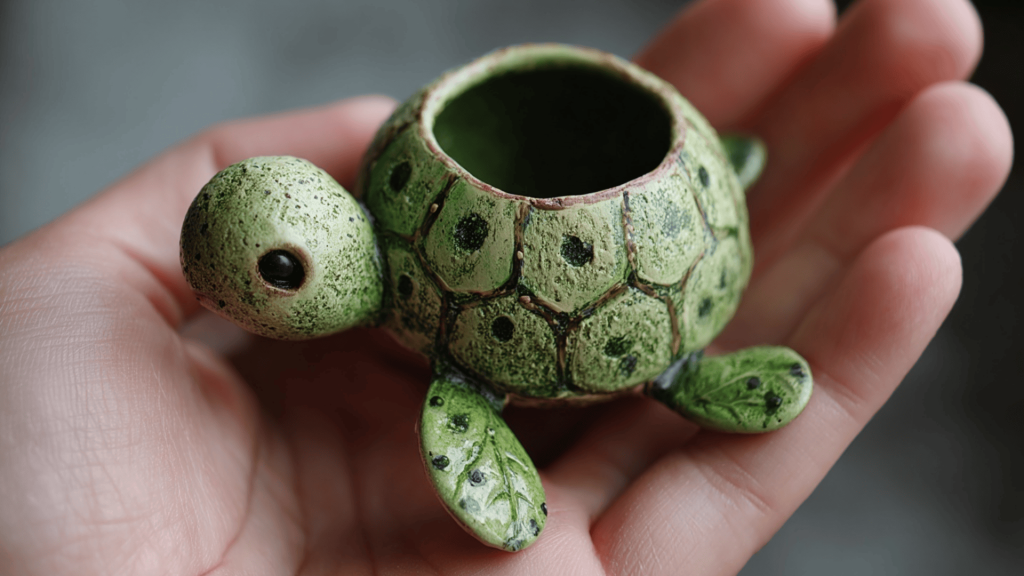
Make a rounded base shell with textured patterns, then add four little legs and a small head protruding outward.
Paint the shell green with geometric spots or hexagonal patterns for a realistic touch. This design works well for nature lovers seeking simple clay projects celebrating wildlife themes.
6. Monster Pinch Pot
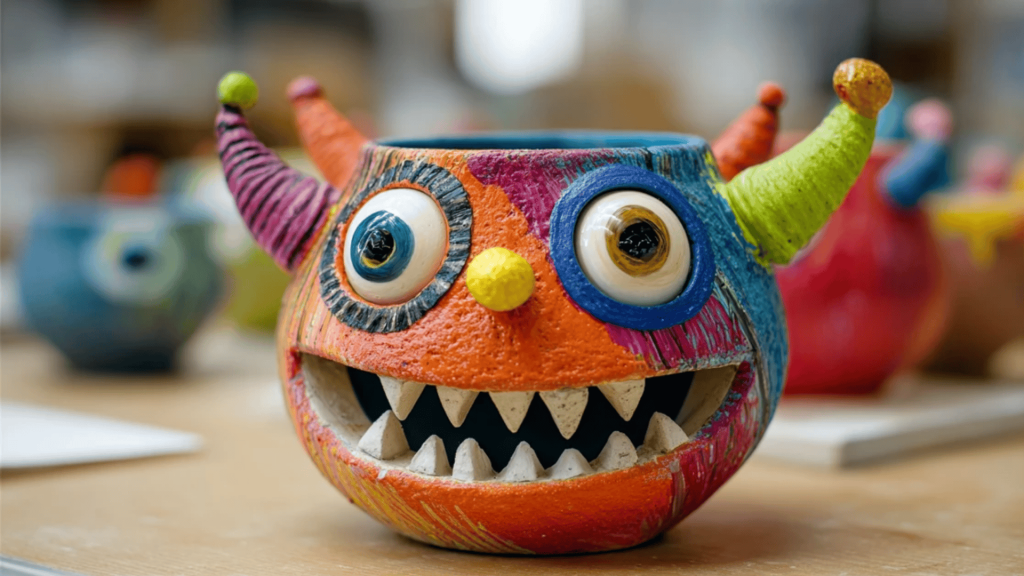
Add clay horns in various sizes, attach goofy googly eyes with different expressions, and carve a wide open mouth with teeth.
Great fun for art lessons and Halloween decorations throughout October. Let young artists express their imagination with silly monster faces and bright colors, showcasing unique personalities.
7. Emoji Face Pot
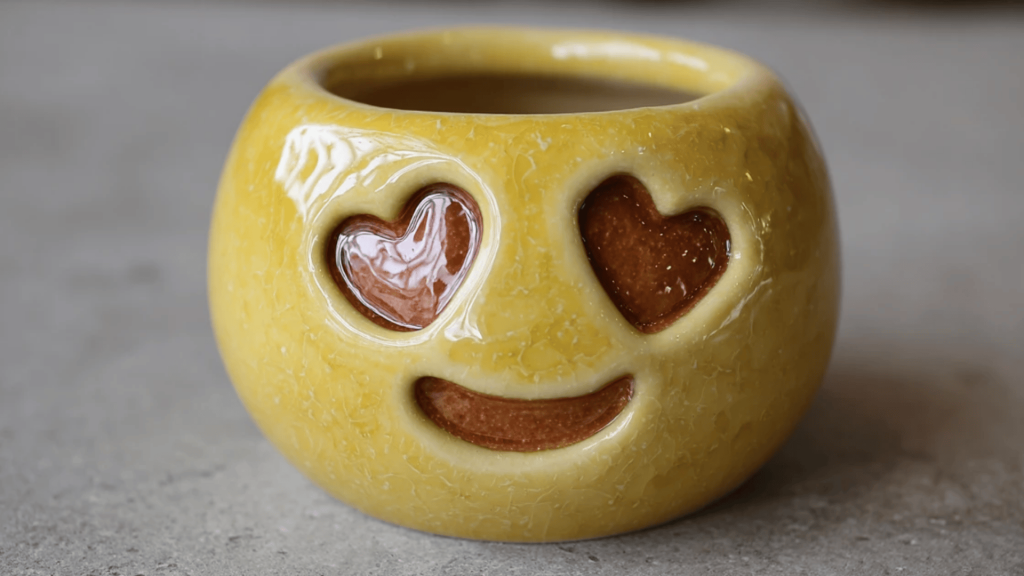
Carve or paint your favorite emoji face like heart eyes, happy smile, laughing tears, or silly grin with tongue out.
Superior for quick crafts and desk décor that shows personality. This simple project brings character to any space with minimal effort required, making it perfect for beginners.
8. Heart Pinch Pot
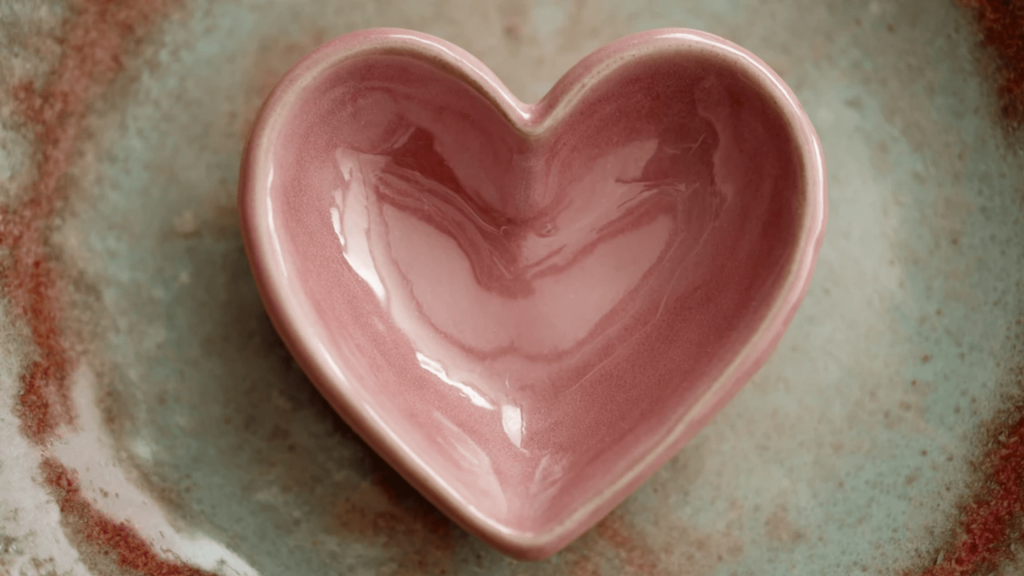
Pinch two small lobes on top to shape a heart rim with symmetrical curves. Paint pink, red, or blush tones with glossy finish.
Perfect as a Valentine’s gift or jewelry holder that shows thoughtfulness and handmade care for someone special in your life, celebrating romance through pottery.
9. Star Pinch Dish
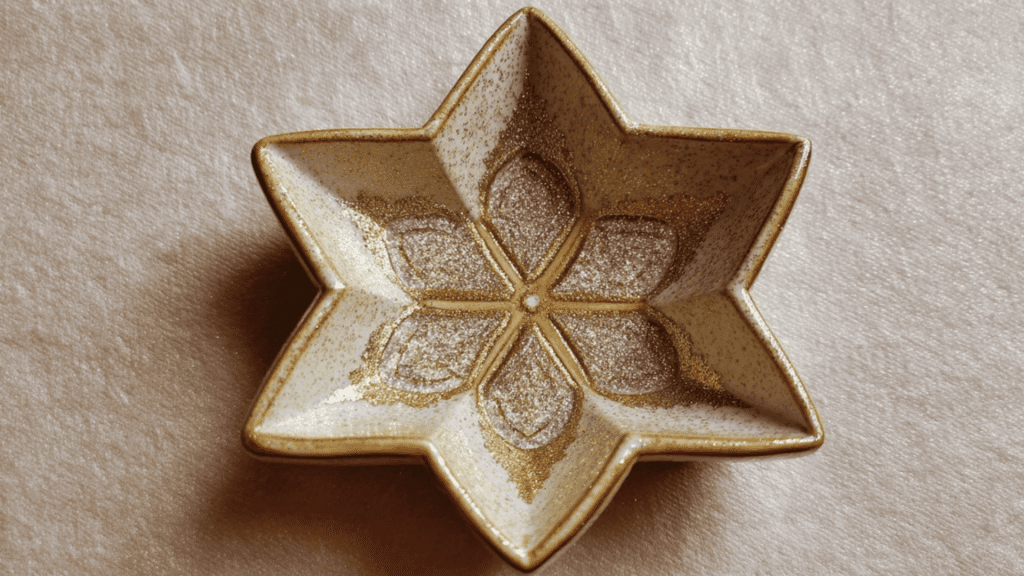
Form five or more points around the rim and smooth carefully to maintain sharp edges. Paint gold, silver, or white with glitter speckles for sparkle.
Ideal for holiday or birthday gifts that capture the magic of night skies and celebrations in functional pottery, perfect for treasures.
10. Cloud Pinch Pot
Shape gentle curves and rounded edges like a fluffy cloud floating across the sky. Paint light blue, pearl white, or soft gray for a calm, minimal look.
This design brings serene sky-inspired beauty to your desk or bedside table with ease, creating a peaceful atmosphere in your rooms.
11. Leaf Imprint Pot

Press real leaves from your garden into soft clay before forming the pinch pot shape. The intricate texture remains after drying, then paint veins in metallic green, copper, or bronze.
This technique captures outdoor beauty and creates organic patterns that feel genuine and earthy in handmade pottery.
12. Lace Textured Pinch Pot

Use lace doilies, vintage fabric, or burlap to stamp detailed texture on the exterior surface. Works beautifully with pastel glaze or chalky finish in neutral tones.
This method adds intricate detail without requiring advanced carving skills or special tools, making it accessible for potters at any level.
13. Mushroom Pinch Pot
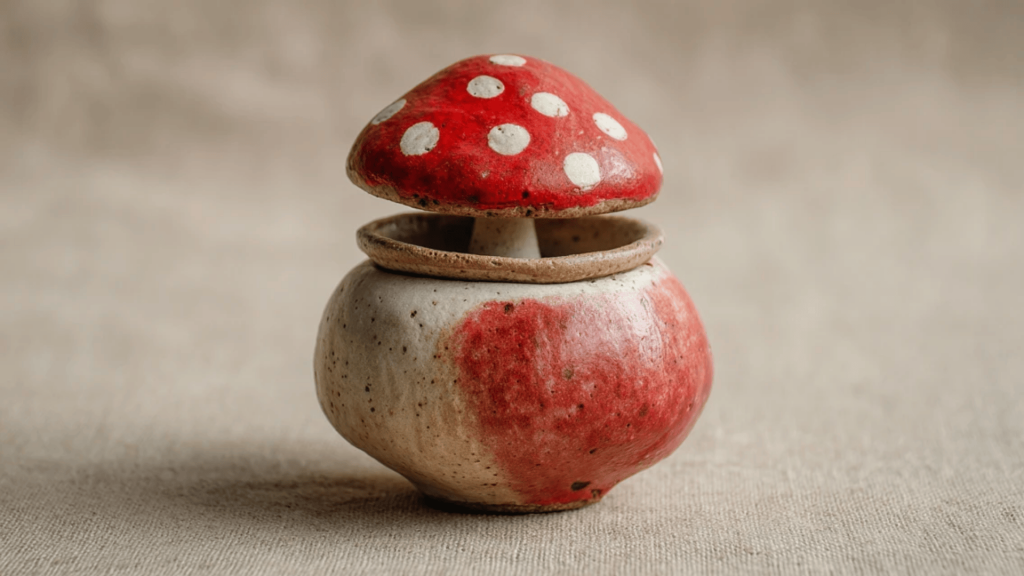
Sculpt a rounded bowl base and add a mushroom cap on top, or paint colorful spots on the surface. Great for fairy garden themes and fantasy décor.
Bring storybook magic to your plant displays or shelf décor with this playful design that appeals to those who love forest aesthetics.
14. Ring Dish
Form a shallow bowl with smooth interior and slightly raised edges. Paint initials, geometric dots, or gold rim edges for a chic look.
Keep jewelry organized on your dresser or bathroom counter with this practical handmade piece that prevents rings and earrings from getting lost while adding appeal.
15. Lidded Pinch Pot
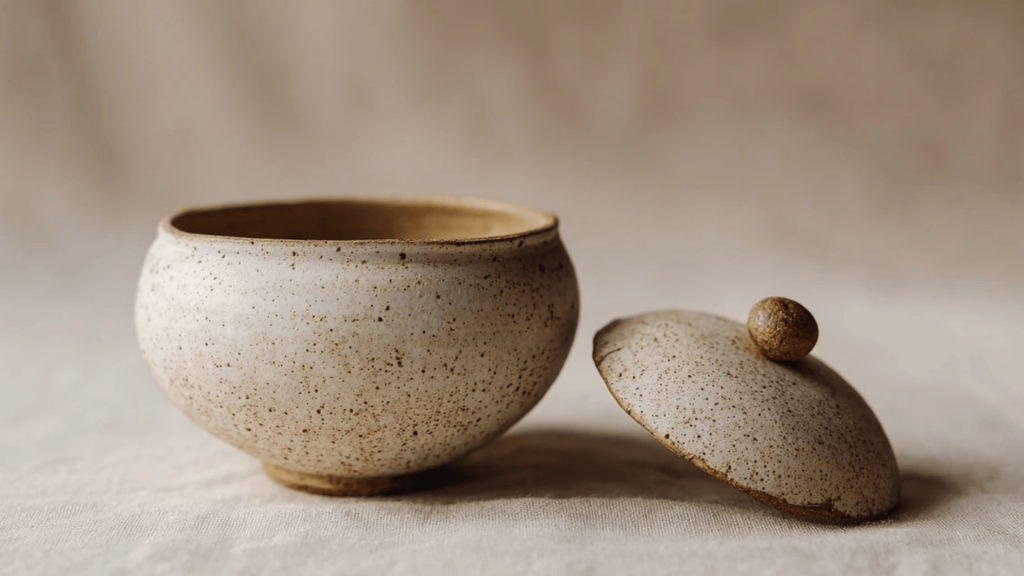
Create two pots that fit together as a lid and a base with matching diameters. Add a small knob handle on top for easy lifting.
Perfect for storing jewelry, small treasures, or trinkets safely. This construction offers a fun challenge and practical storage solution in one piece, teaching valuable joining techniques.
16. Candle Holder
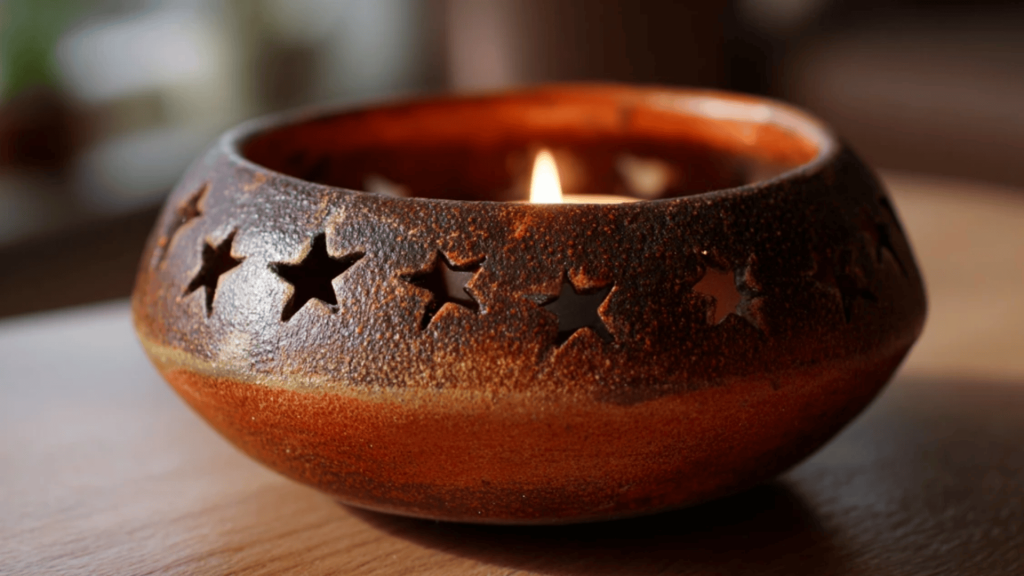
Make a shallow pot with a stable base, carve star or geometric holes around the sides, and glaze with soft warm tones.
Adds warmth to your space when lit with tea lights. The carved openings create beautiful light patterns that set a relaxing mood for any room throughout your home.
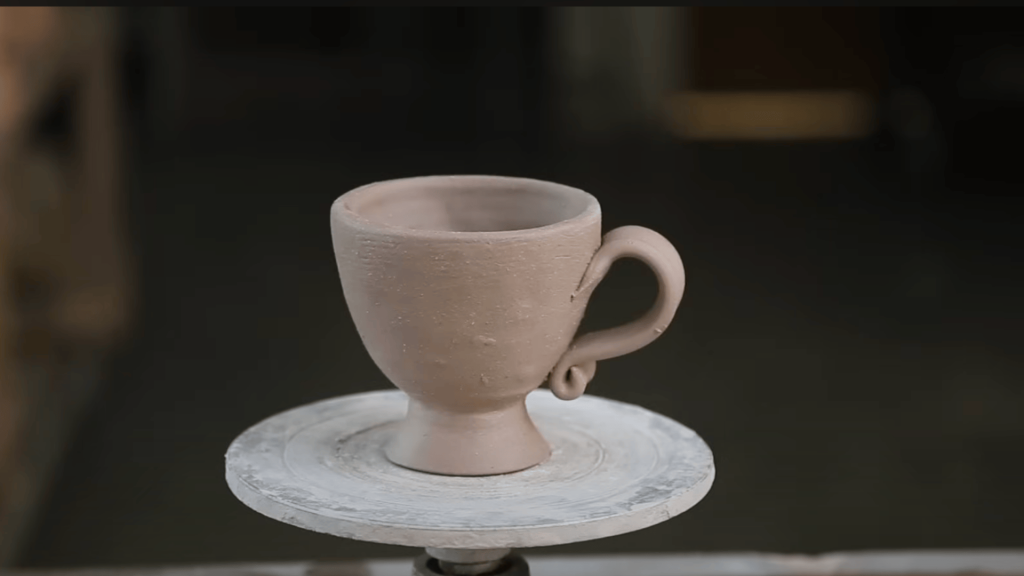
17. Mini Teacup Pot

Add a small curved handle to your pot to mimic a classic teacup shape. Paint with floral patterns, polka dot motifs, or striped designs.
Great gift idea for tea lovers or anyone who appreciates handmade kitchen décor with nostalgic character and charm reminiscent of grandmother’s china collection traditions.
18. Pumpkin Pinch Pot
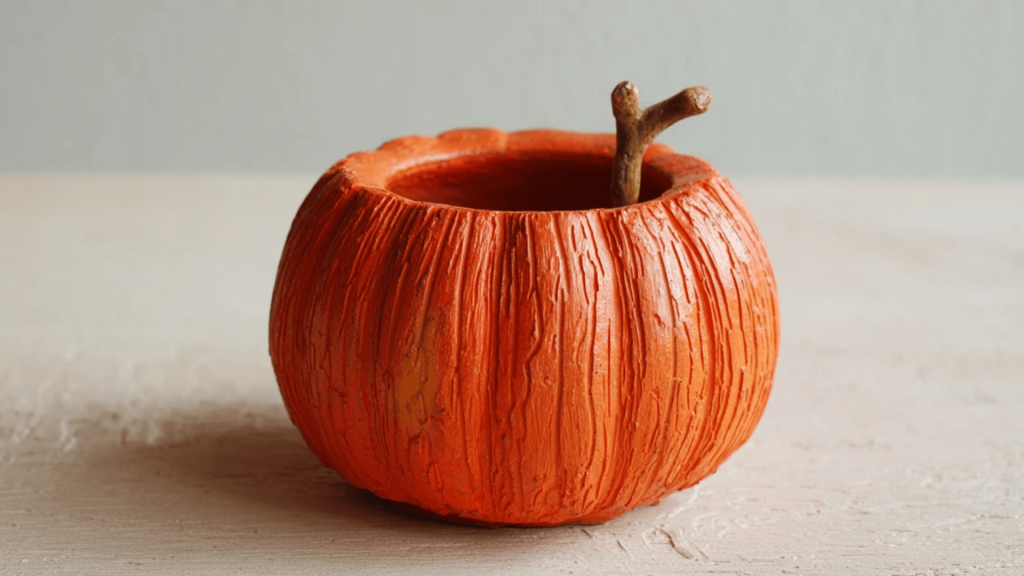
Add vertical grooves with a carving tool from top to bottom, and paint orange with a green stem attachment. Perfect for fall or Halloween décor throughout September and October.
This festive design brings autumn spirit to your home with classic pumpkin features and colors that celebrate harvest season.
19. Snowman Pinch Pot
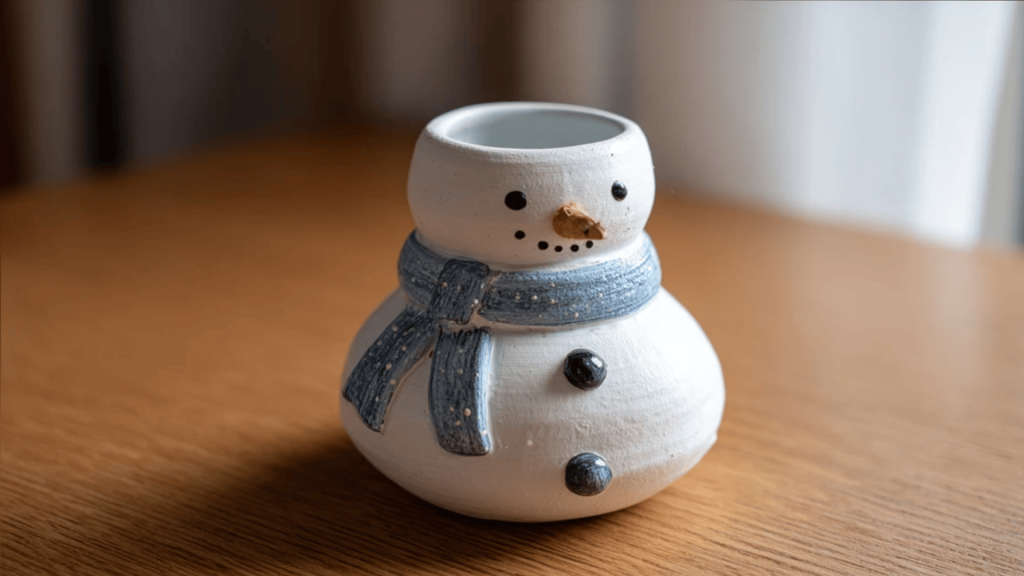
Stack two pinch pots for the body and head, paint in white or cream, and add a colorful scarf and button details.
This cheerful winter character makes a delightful holiday decoration or gift that spreads seasonal joy during December celebrations. Kids especially love making these friendly snowmen.
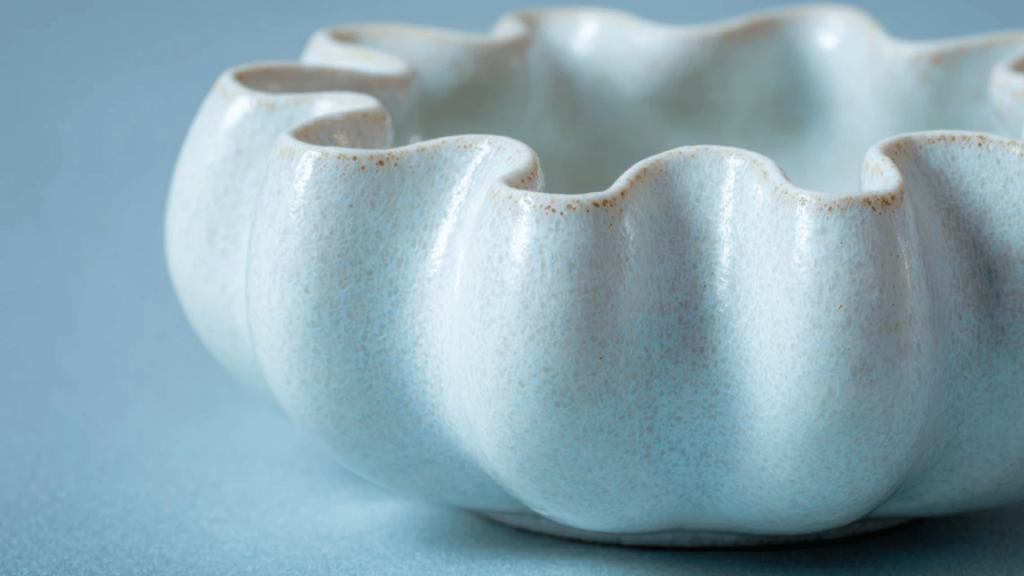
20. Flower Petal Bowl

Pinch petal-like edges outward to create a flower shape with five or six petals. Paint soft pink, lavender, or yellow for a gentle look.
This design brings garden-inspired beauty indoors while practicing shaping techniques and organic forms in clay. The curved petals create visual interest.
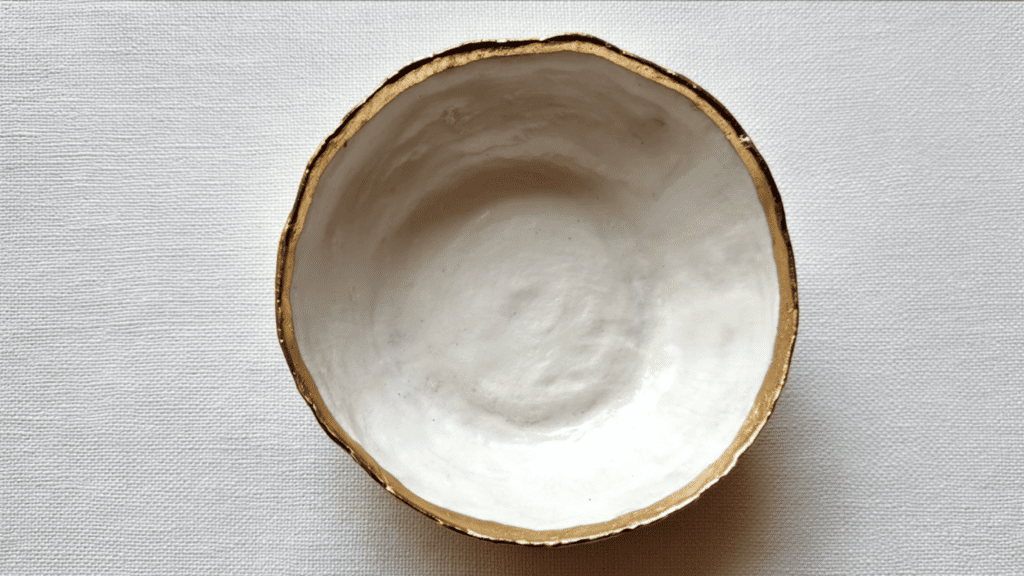
21. Minimal Pastel Pot
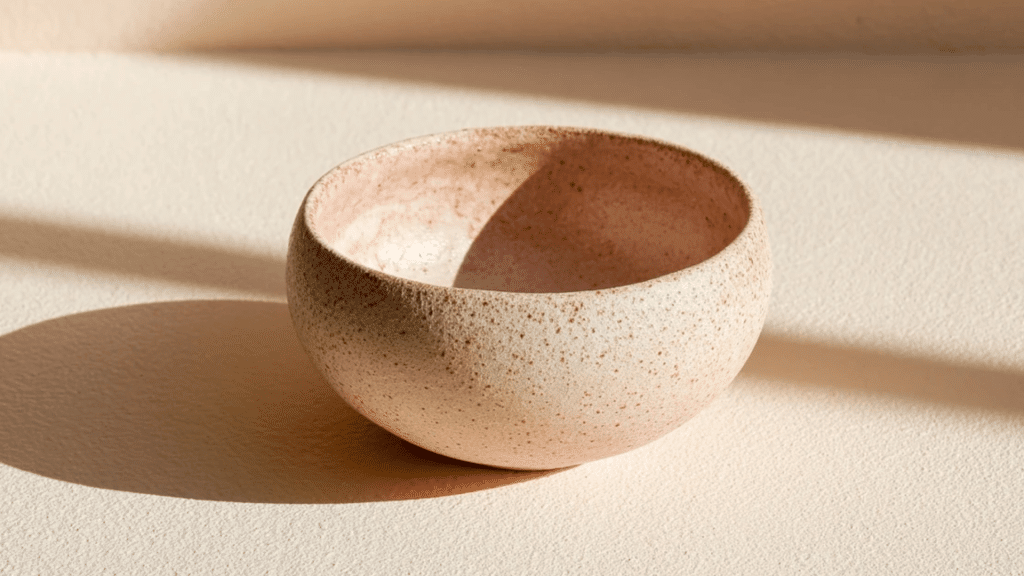
Smooth finish achieved through careful sanding, soft blush or mint glaze application, and clean lines. This minimalist design fits any modern home.
The understated color palette and simple form create a calming presence that complements contemporary interior styles perfectly. This approach values function and simplicity over ornamentation, reflecting design philosophy.
Tips for Making Perfect Pinch Pots
These simple tips will help you make smooth, sturdy, and well-shaped pinch pots that dry beautifully every time.
- Keep clay slightly moist to prevent cracks and make shaping easier.
- Pinch slowly and evenly for balanced wall thickness all around.
- Support the pot with one hand while shaping with the other.
- Use a damp sponge to smooth instead of adding extra water.
- Lightly compress the rim to strengthen and prevent cracking.
- Dry slowly under plastic wrap for even moisture loss.
- Avoid overhandling once shaped to maintain clean form and texture.
- Rotate your pot while shaping for perfect symmetry and balance.
Follow these tips to craft strong, smooth pinch pots that hold their shape and showcase your creativity.
How to Make a Pinch Pot
If you want to learn how to make pinch pots, this simple guide will walk you through the process from start to finish.
Step 1: Prepare Your Clay
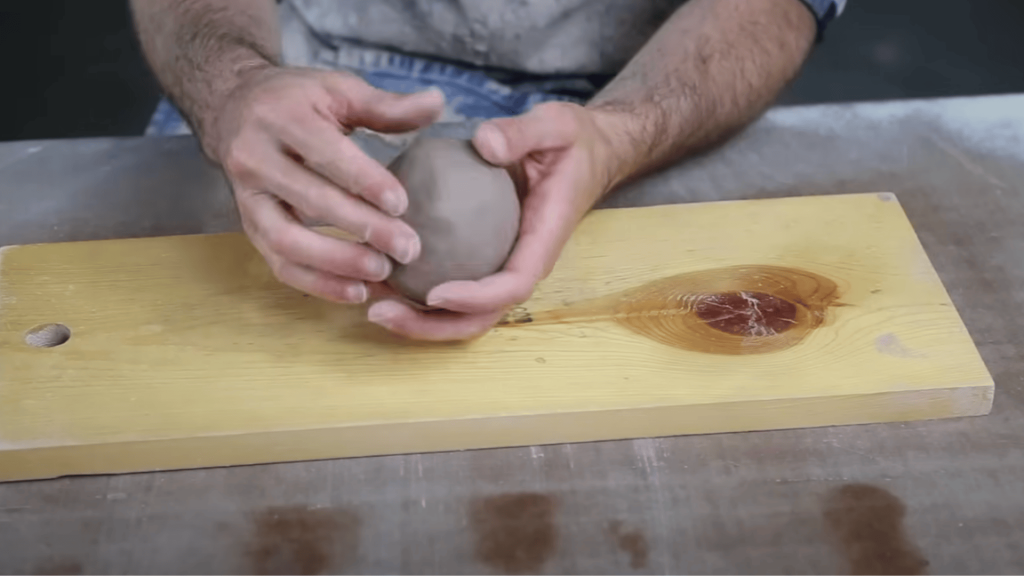
Start with about one pound of wedged clay. Roll it into a smooth, round ball to remove air pockets.
This ensures even walls and prevents cracks later when pinching or drying your finished pot.
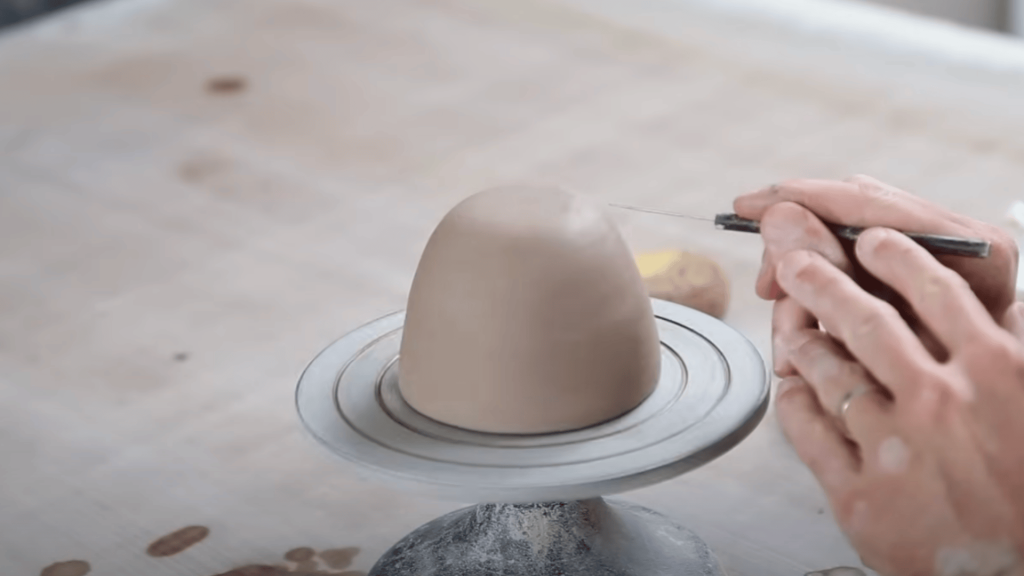
Step 2: Form the Hollow
Press your thumb into the center of the clay ball, stopping before you reach the bottom.
Gently rotate and pinch around the inside to create the initial bowl shape, keeping the base thick enough for strength.
Step 3: Pinch and Shape Evenly
Use both thumbs inside the pot and fingers outside to pinch and turn continuously. Support the sides with one hand as you work.
Keep wall thickness around 6–8 mm for a lightweight, balanced, and sturdy form.
Step 4: Smooth and Trim the Rim
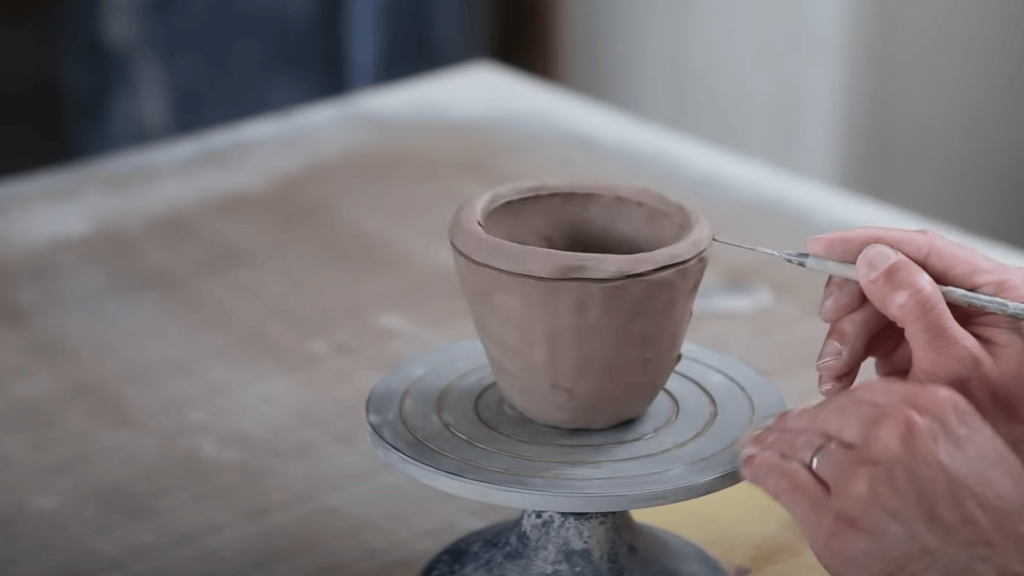
Level uneven edges using a needle tool or small knife. If cracks appear, add a little water and compress gently.
Finish by smoothing the rim and surface with a damp sponge or chamois for a polished look.
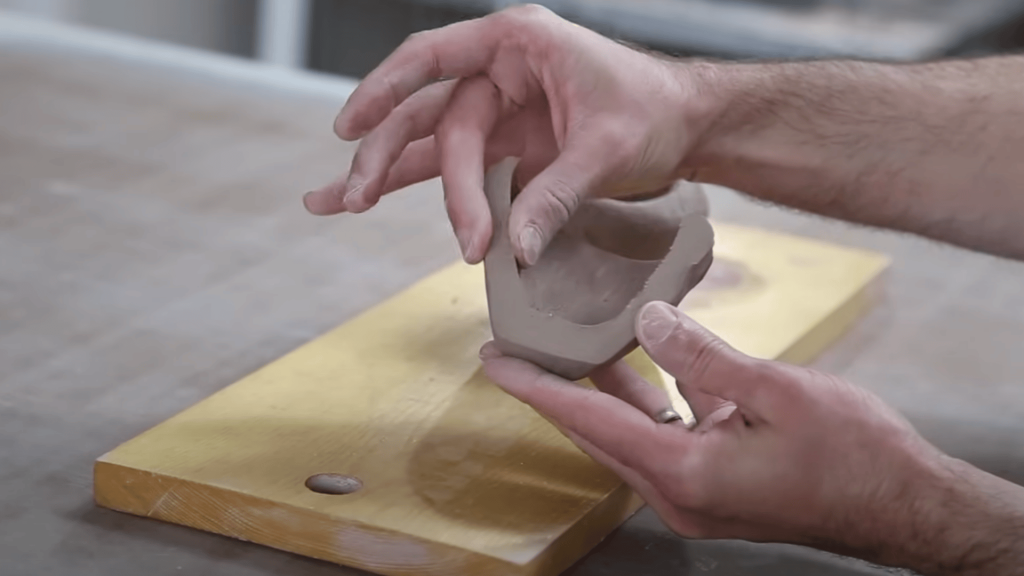
Step 5: Refine and Add Details
Once the pot reaches the leather-hard stage, smooth tool marks with a damp sponge and rib.
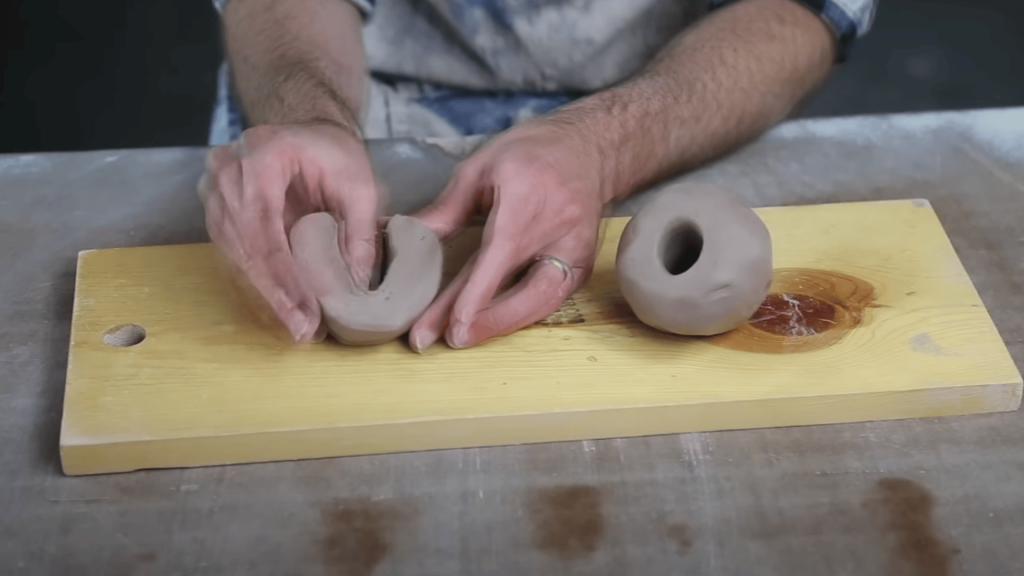
You can also score and slip to attach extras like a small foot ring or decorative handle for added style and balance.
Step 6: Dry and Finish Your Pot
Let the pot dry slowly under plastic to avoid cracks. Once fully dry, paint, glaze, or seal, depending on your clay type.
Proper drying and finishing bring out your pot’s texture and ensure lasting durability.
For a more detailed demonstration, check out the video tutorial by Danny Bealer, which visually walks through each stage of making a pinch pot, from shaping to trimming and finishing.
Extra Decoration and Maintenance Tips
Adding decoration and care to your pinch pots helps them last longer and look more professional. Here are some quick ideas:
- Use stamps, lace, or leaves to press gentle textures before drying.
- Paint with soft pastel shades or metallic accents for a polished finish.
- Apply a clear matte or glossy sealant once completely dry.
- Add small details like dots, carved lines, or initials for a personal touch.
- Keep air-dry pots away from water and humidity to prevent damage.
- For glazed pottery, handle carefully to avoid chips or scratches.
- Store finished pots on a stable, dry shelf with good airflow.
With thoughtful decoration and simple care, your pinch pots will stay bright, smooth, and beautiful for years.
Final Thoughts
Making pinch pots is an enjoyable and calming way to explore creativity through clay. Each piece reflects your patience, style, and hands-on connection with the material.
From forming the shape to decorating and sealing, every step allows room for expression and learning.
As you continue, experiment with new textures, colors, and finishes to make your pottery truly personal.
If used as a small planter, jewelry dish, or keepsake, a handmade pinch pot adds warmth and character to any space.
Keep practicing, stay curious, and don’t be afraid to reshape or start again. Ready to create your own? Gather your clay and start pinching today!