Home offices need smart storage solutions that fit perfectly into your space. Store-bought furniture rarely matches your exact needs or room dimensions.
You end up with gaps, wasted space, and a cluttered appearance that doesn’t convey a professional image.
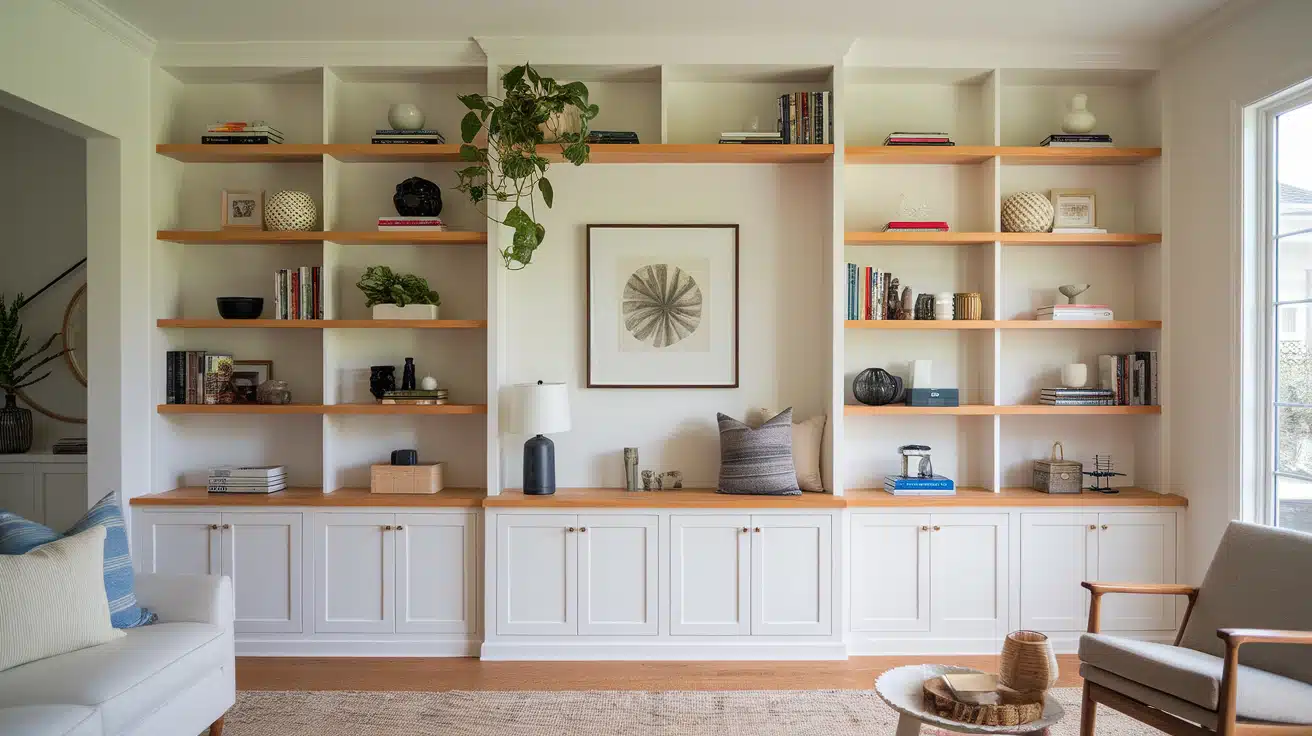
Building custom-built-in cabinets solves these problems completely. You get exactly the storage you need, perfectly fitted to your space. These cabinets add significant value to your home while creating a clean, organized workspace.
This guide will show you how to build professional-quality built-in cabinets from scratch. You’ll learn the complete process, from planning and measuring to final installation.
We’ll cover material selection, cutting techniques, assembly methods, and finishing touches that make your project look like professional work.
Why Choose DIY Built-Ins Over Store-Bought Furniture
Custom-built-ins offer several advantages over ready-made furniture. First, they fit your exact space perfectly. No more awkward gaps or furniture that’s too small for the wall. Second, you control the quality of materials and construction.
Store-bought furniture often uses cheap materials that wear out quickly.
Built-ins also add permanent value to your home. They become an integral part of the house structure, making rooms more functional and appealing to potential buyers. You can design them to match your specific needs, whether that’s adjustable shelving, hidden storage, or integrated lighting.
Step-by-Step Guide to Building DIY Built-Ins
Building your own DIY built-ins is easier than you think. This step-by-step guide walks you through planning, measuring, framing, and finishing custom shelving or cabinetry that fits your space and style.
Tools and Materials Needed
| Category | Items | Purpose |
|---|---|---|
| Power Tools | Table saw, Router, Drill, Nail gun, Circular saw | Cutting and assembly |
| Hand Tools | Speed square, Measuring tape, Level, Clamps | Measuring and alignment |
| Materials | 3/4″ birch plywood, 1×2 poplar, 1×4 poplar, Pocket screws | Main construction |
| Hardware | Shelf pins, Hinges, Drawer slides, Brad nails | Functional components |
| Finishing | Wood glue, Sandpaper, Primer, Paint, Caulk | Surface preparation |
Step 1: Planning and Measuring Your Space
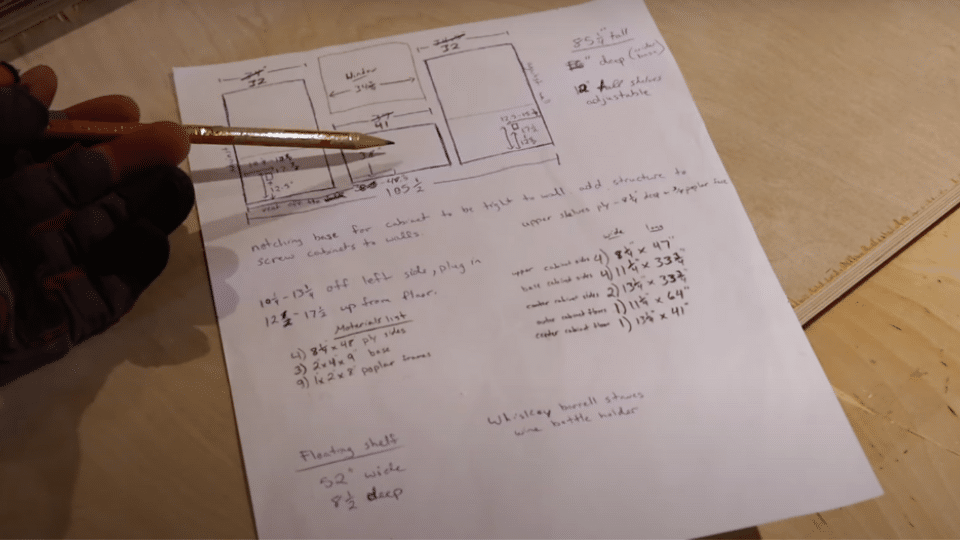
Begin with detailed plans that take into account your room’s specific dimensions. Measure the wall where your built-ins will go, checking for level floors and plumb walls. Create sketches that show the cabinet layout, including heights, widths, and depths.
Materials needed in this step:
- Measuring tape
- Graph paper
- Pencil
Instructions:
- Measure wall dimensions carefully
- Sketch your design with exact measurements
- Create a cut list for all pieces
- Plan the installation sequence
Step 2: Cutting Cabinet Boxes
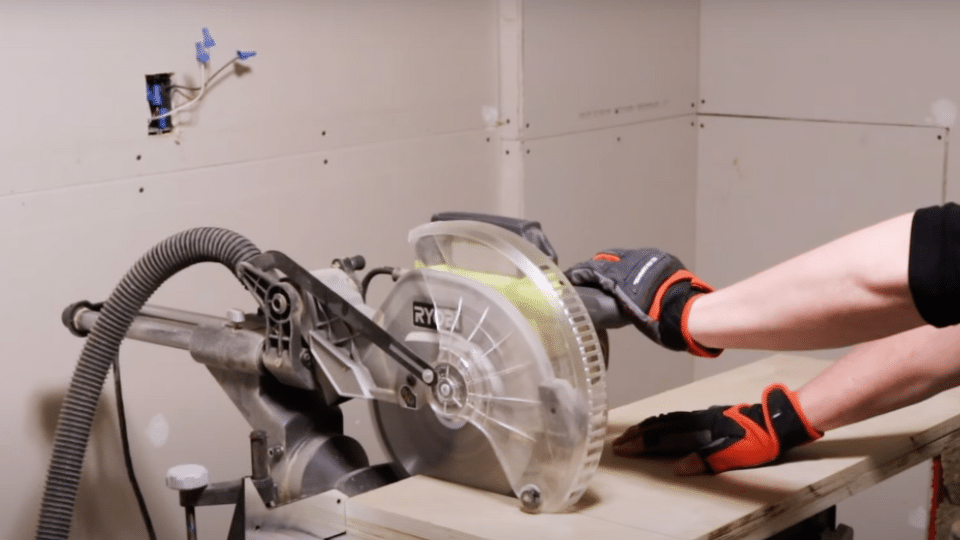
Cut all plywood pieces for cabinet boxes using 3/4-inch sanded birch plywood. Route a 1/4-inch deep rabbet along the back edges of the side panels. This groove holds the back panel and eliminates wall gaps.
Materials needed in this step:
- 3/4″ birch plywood
- 1/4″ plywood for backs
- Router with 1/4″ bit
Instructions:
- Cut all cabinet box pieces to size
- Route rabbets on the back edges
- Test-fit pieces before assembly
- Sand all cut edges smooth
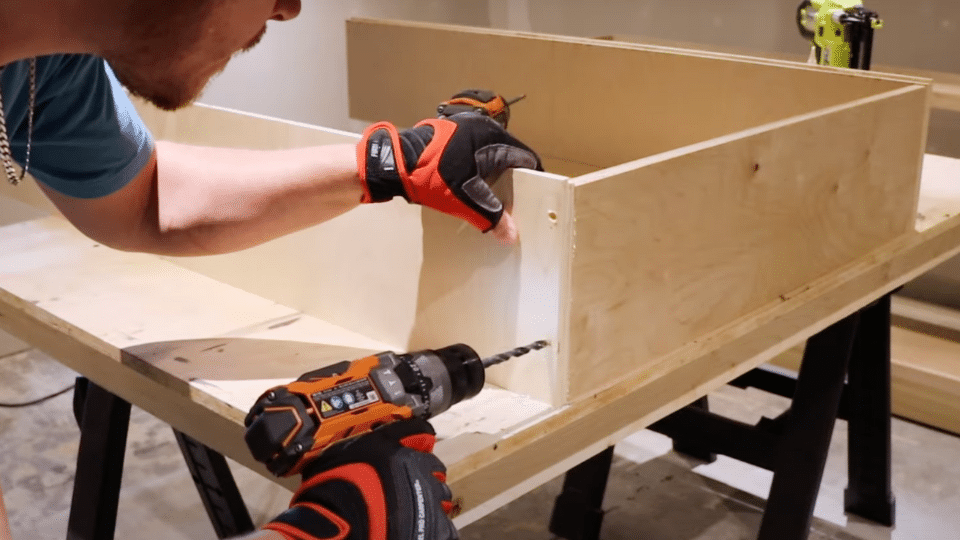
Step 3: Assembling Cabinet Boxes
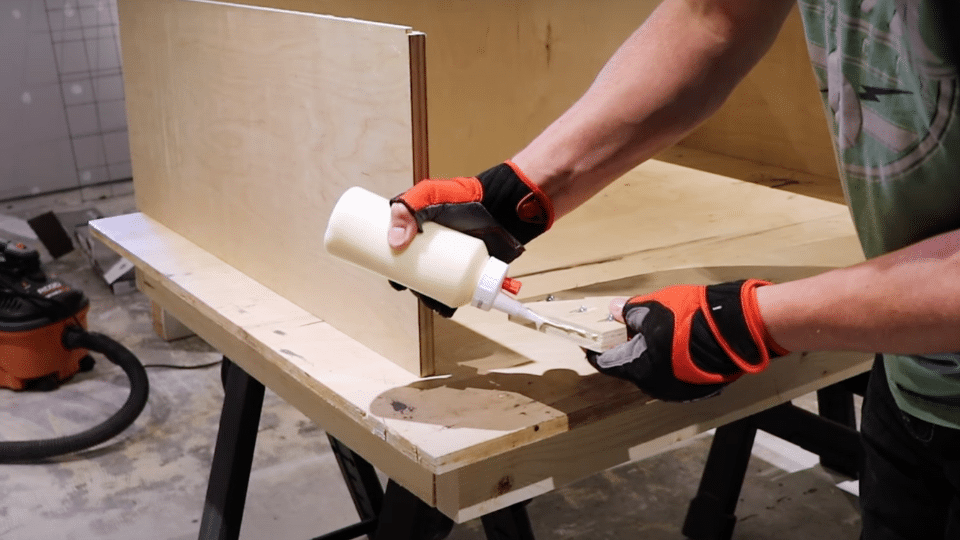
Join sides to bottom panel using pocket hole screws and wood glue. Add the top panel and internal stretchers for strength. Check that each box is square by measuring diagonally across corners.
Materials needed in this step:
- Pocket hole screws
- Wood glue
- Clamps
- Brad nails
Instructions:
- Join sides to bottom with screws and glue
- Attach the top panel and stretchers
- Check for square and adjust
- Install a wall-mounting cleat
Step 4: Building Face Frames
Cut 1×2 poplar pieces for face frame rails and stiles. Assemble with pocket holes and screws. For outside cabinets, create a 1/4-inch overhang on the wall side.
Materials needed in this step:
- 1×2 poplar lumber
- Pocket hole screws
- Wood glue
- 1.5″ brad nails
Instructions:
- Cut face frame pieces to size
- Assemble the frame with pocket holes
- Attach the frame to the cabinet box
- Check alignment with shelf positions
Step 5: Installing Adjustable Shelving
Drill holes for shelf pins using a drilling jig. Space holes 1-2 inches apart for maximum adjustability. Make shelves from 3/4-inch plywood with poplar reinforcement for heavy loads.
Materials needed in this step:
- Shelf pin drilling jig
- Shelf pins
- 3/4″ plywood for shelves
- 1×2 poplar for reinforcement
Instructions:
- Drill shelf pin holes consistently
- Cut shelves with slight clearance
- Add reinforcement cleats
- Test-fit all shelves
Step 6: Adding Upper Cabinets
Upper cabinets use face screws instead of pocket holes. Install a fixed center shelf for stability in tall cabinets. Plan crown molding installation to cover screw holes.
Materials needed in this step:
- Same materials as lower cabinets
- Deck screws
- Crown molding
- Wood filler
Instructions:
- Assemble with face screws
- Install a fixed center shelf
- Fill screw holes with filler
- Prepare for molding installation
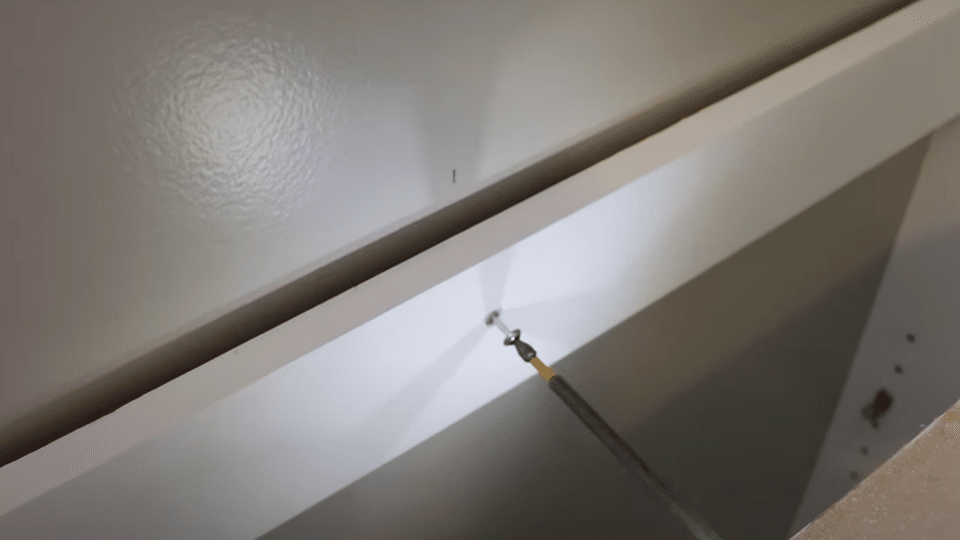
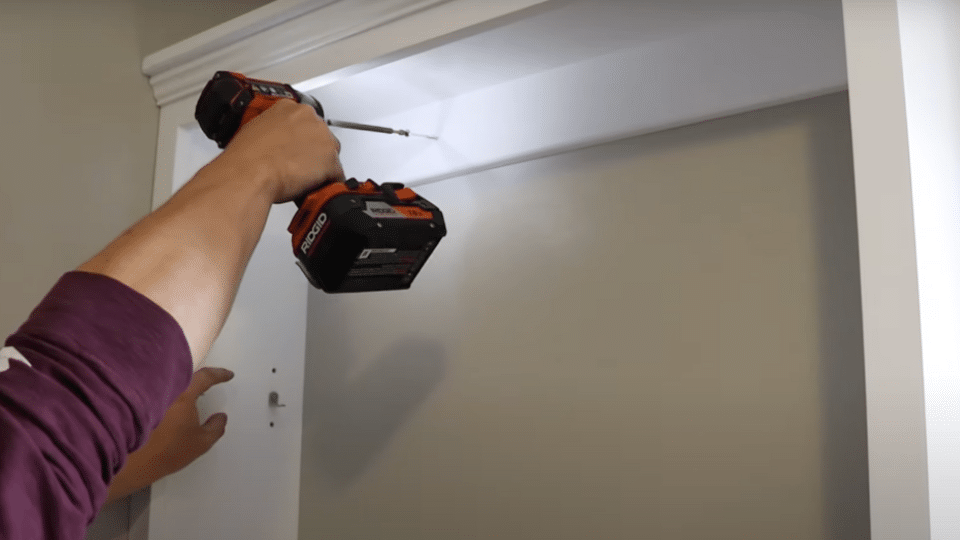
Step 7: Finishing and Installation
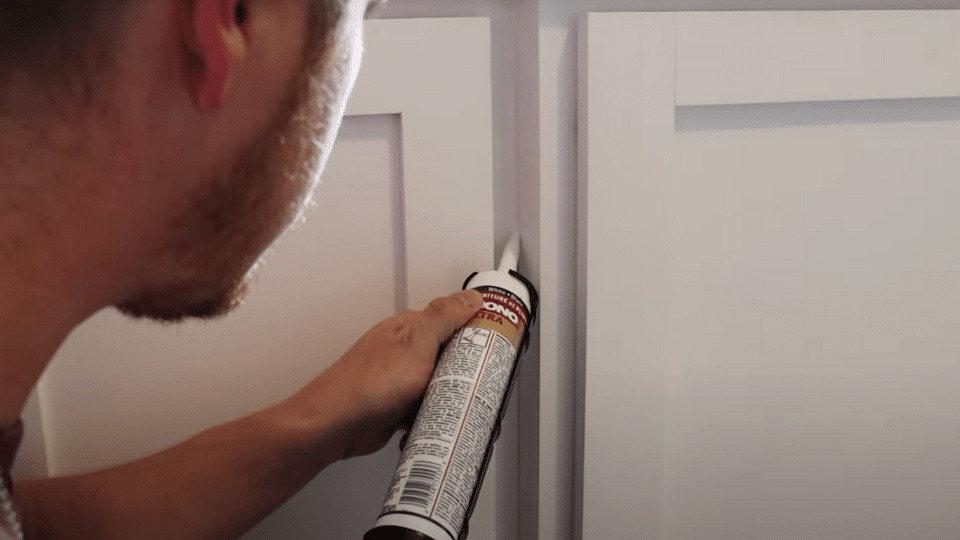
Sand all surfaces with 120-grit sandpaper. Apply primer and paint with high-quality latex paint. Install cabinets by screwing into wall studs. Add caulk to all joints.
Materials needed in this step:
- Sandpaper (120 grit)
- Primer and paint
- Caulk
- Wall screws
Instructions:
- Sand all surfaces smooth
- Prime and paint components
- Install securely to the wall studs
- Add caulk and install doors
Video Tutorial
Special thanks to Jesse does DIY for providing valuable insights in their video, which I referenced while creating this guide.
Cost Breakdown for DIY Built-Ins
| Expense Category | DIY Cost Estimate | Professional Equivalent | Notes |
|---|---|---|---|
| Plywood & Lumber | $200 – $400 | Included in total | Invest in high-quality plywood for durability and finish quality |
| Hardware (Hinges, Pulls) | $100 – $200 | Included in total | Quality hardware improves functionality and longevity |
| Paint & Finishing Supplies | $50 – $100 | Included in total | Includes primer, paint, brushes, rollers, etc. |
| Labor | $0 (DIY) | $1,200 – $2,800 | Labor makes up 60–70% of pro installation costs |
| Total Estimated Cost | $400 – $800 | $2,000 – $4,000 | DIY saves thousands while offering customization and learning experience |
Design Options and Customization Ideas for Built Ins
Room-Specific Features:
- Home offices: adjustable shelving, file storage, cord management
- Living rooms: display space for books and decorative items
- Bedrooms: clothing storage, jewelry drawers, mirror integration
Interior Lighting:
- LED strips for better visibility and visual appeal
- Plan electrical work before installation
- Battery-powered options for easier installation
Storage Combinations:
- Mix open shelving with closed cabinets
- Use doors to hide clutter
- Display attractive items on open shelves
- Add pull-out drawers for deep storage
Smart Tips for DIY Built-In Projects
1. Material Selection
Choose birch plywood for strength and smooth paint coverage. Avoid construction-grade materials that have voids and rough surfaces. Store materials flat and let them acclimate before cutting.
2. Measurement Accuracy
Double-check all measurements before cutting expensive materials. Create a detailed cut list and organize cuts for efficiency. Consider saw blade width when calculating final dimensions.
3. Assembly Quality
Use wood glue on all joints for long-term strength. Clap pieces properly and check for square frequently. Small errors compound quickly and affect the final appearance.
Safety Considerations While Building
Power tools require constant attention and proper safety equipment. Wear safety glasses and hearing protection when cutting or routing. Keep work areas clean to prevent trips and falls.
Support plywood sheets properly when cutting to prevent binding and kickback. Use sharp blades and take your time with cuts. Rushing leads to accidents and poor results.
Check electrical circuits before drilling into walls. Use a stud finder to locate framing and avoid utilities. When in doubt, consult a professional rather than risk damage or injury.
DIY Built-In Pitfalls That Could Ruin Your Project
| Mistake | Why It Happens | How to Avoid |
|---|---|---|
| Inaccurate measurements | Rushing the planning phase | Double-check all measurements before cutting |
| Skipping the rabbit | Trying to save time | Always route rabbets for back panels |
| Poor face frame alignment | Not checking shelf positions | Mark shelf locations before attaching frames |
| Inadequate wall attachment | Using wrong screws or missing studs | Use proper screws into wall studs only |
| Skipping wood glue | Relying only on screws | Always use glue with mechanical fasteners |
| Forcing tight joints | Imprecise cutting | Sand or trim pieces to fit properly |
| Inadequate sanding | Rushing to finish | Sand all surfaces before painting |
| Thin paint coats | Impatience with drying time | Apply multiple thin coats instead of thick ones |
Final Thoughts
Building DIY built-ins transforms any room into a more functional and valuable space. The process requires careful planning, high-quality materials, and meticulous attention to detail, but the results are well worth the effort.
You’ll have custom storage that fits your exact needs and adds significant value to your home.
The key to success lies in taking your time with measurements and cuts. Precision in these early steps prevents problems later and ensures professional-looking results. Don’t rush the finishing process either proper sanding, priming, and painting make all the difference between an amateur and a professional appearance.
Remember that built-ins are a permanent addition to your home. Invest in quality materials and take pride in your craftsmanship.
With proper planning and execution, your DIY built-ins will serve you well for decades while adding both function and beauty to your living space.
