
Ever looked at wall art and thought, “I could make that myself”?
You’re right! Making your own plaster art is easier than you might think and gives your home a personal touch that store-bought pieces just can’t match.
This guide will show you how to create stunning plaster art on canvas using simple materials like wire mesh and joint compound.
No fancy tools or an art degree are needed! You’ll learn how to prepare your canvas, attach wire mesh, apply plaster bandages, and finish with joint compound for a smooth, professional look.
Each step has been broken down to make it foolproof, even for beginners.
By the end of this tutorial, you’ll have a beautiful piece of wall art that costs a fraction of what you’d pay in stores—and the pride of having made it yourself.
Your Must-Have Tools for DIY Plaster Art
| Material | Description |
|---|---|
| Canvas | 80×80 cm canvas for the base |
| Wire Mesh | Wire mesh with larger holes for molding |
| Joint Compound | Used for smooth finishing |
| Protection Gloves | To protect hands during the process |
| Staple Gun | For attaching the wire mesh to the canvas |
| Plastic Drop Cloth | To protect the working area |
| Plaster Bandages | For creating the texture over the mesh |
| Sanding Paper | For smoothing the surface after drying |
| Paint Brushes | For applying plaster and joint compound |
| Varnish | To finish and protect the artwork |
DIY Process in Simple Steps
Now that you’ve gathered your materials, let’s walk through the process of creating your own plaster art.
Follow these simple steps, each with helpful pro tips, to guide you through the creation process from start to finish.
Step 1: Prepare the Wire Mesh
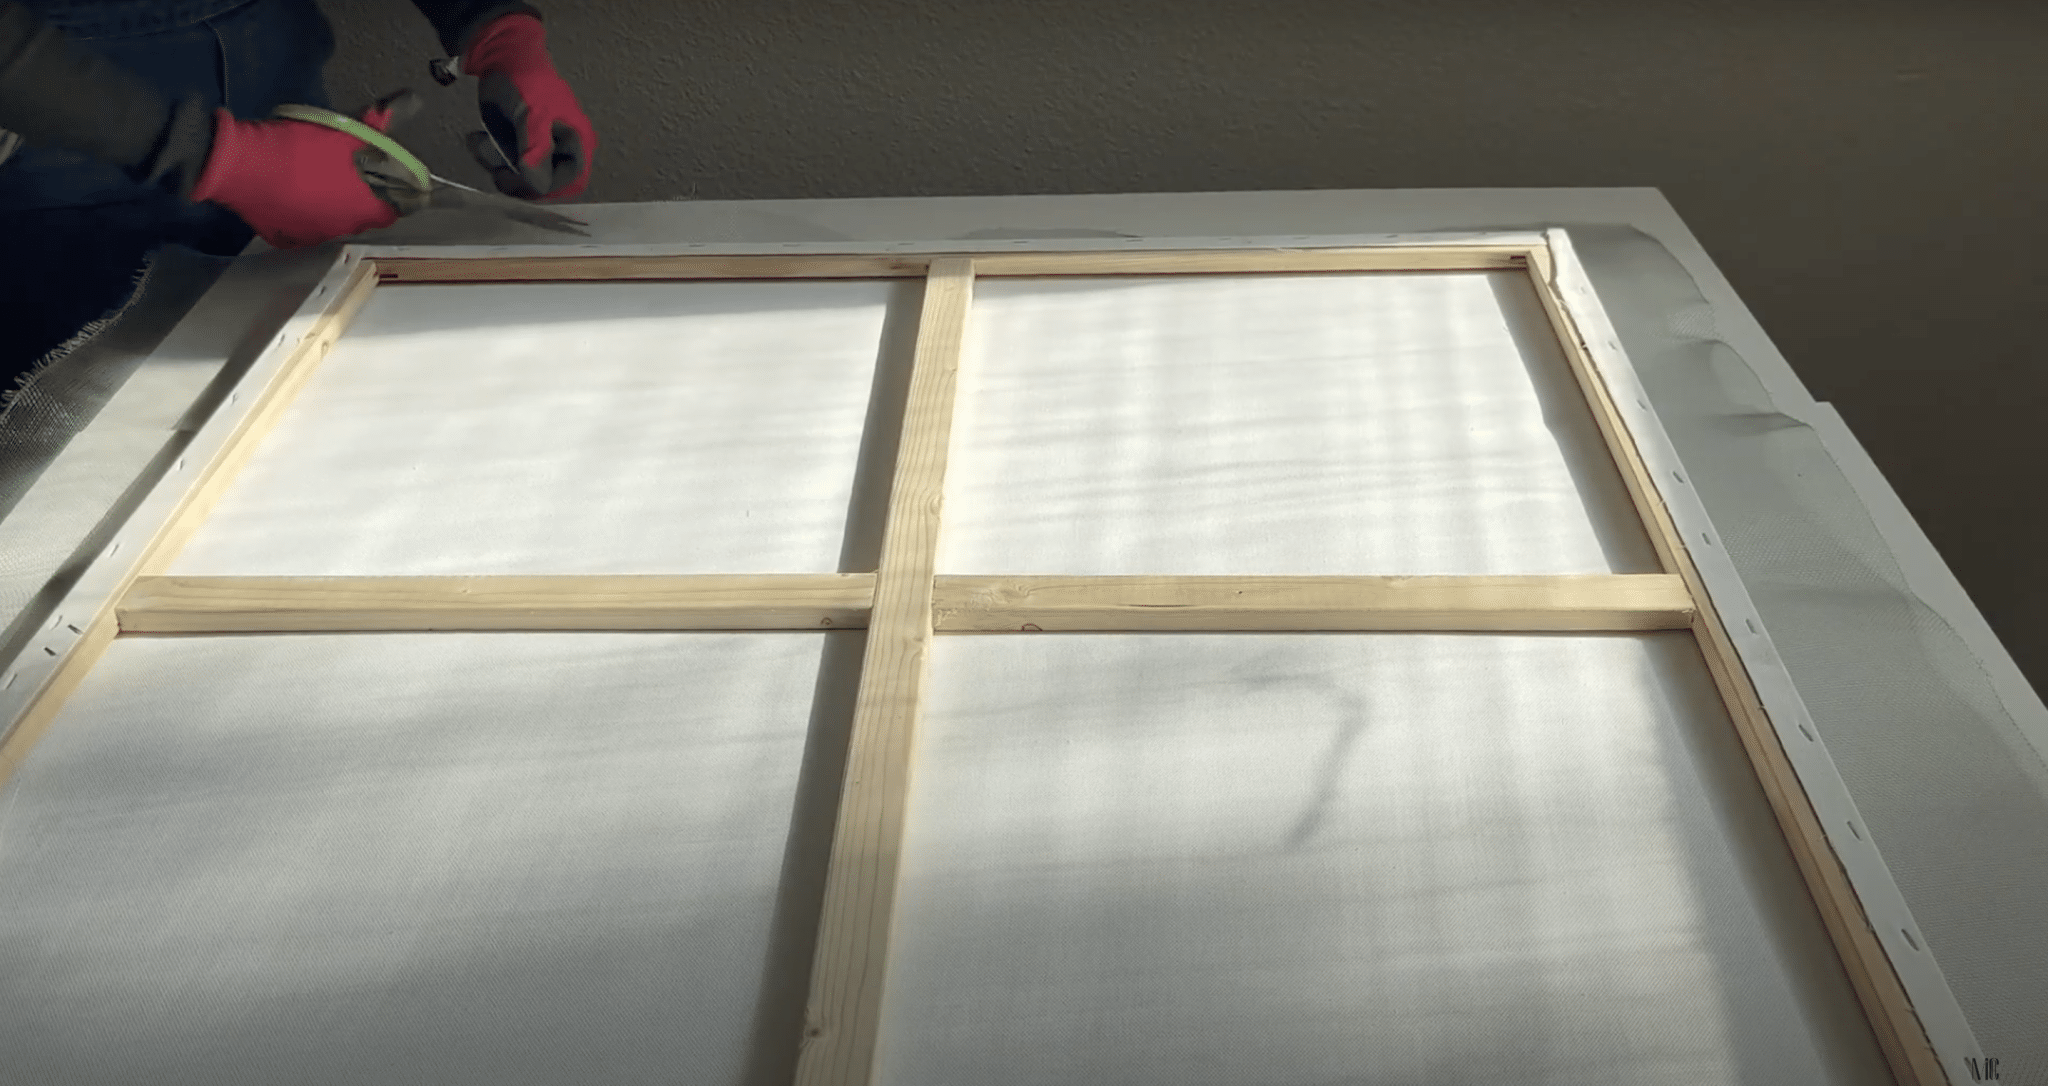
First, cut the wire mesh to match the size of your canvas. It should be slightly larger than the canvas so that you can staple it securely.
Choose a wire mesh with larger holes, as it will be easier to mold and apply plaster to.
Pro Tip: When cutting the wire mesh, use wire cutters to get a clean, smooth edge. Wearing gloves is important to avoid getting scratched by the sharp edges of the mesh.
Step 2: Attach the Wire Mesh to The Canvas
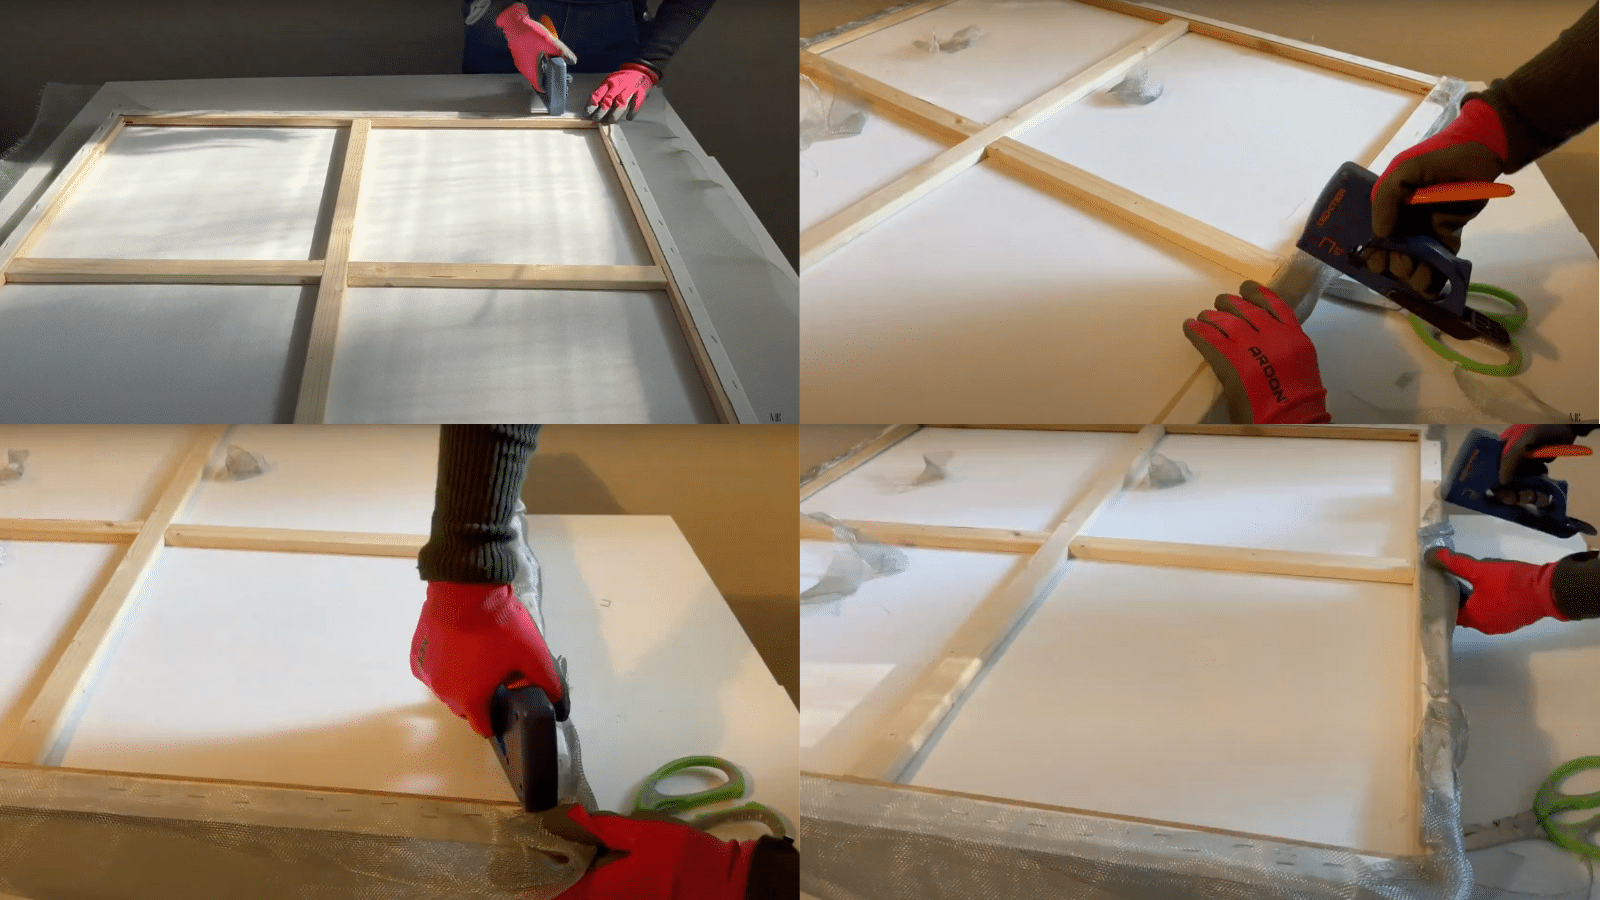
Place the cut wire mesh over the canvas. Use a staple gun to attach the mesh to one side of the canvas, pulling it tight as you go.
Once one side is stapled, flip the canvas over and staple the other side, ensuring the mesh is taut and firmly attached to the canvas.
Pro Tip: Staple the wire mesh only every few inches to ensure the mesh is secured evenly. Don’t staple too close to the edges, as this can cause the canvas to tear when stretched.
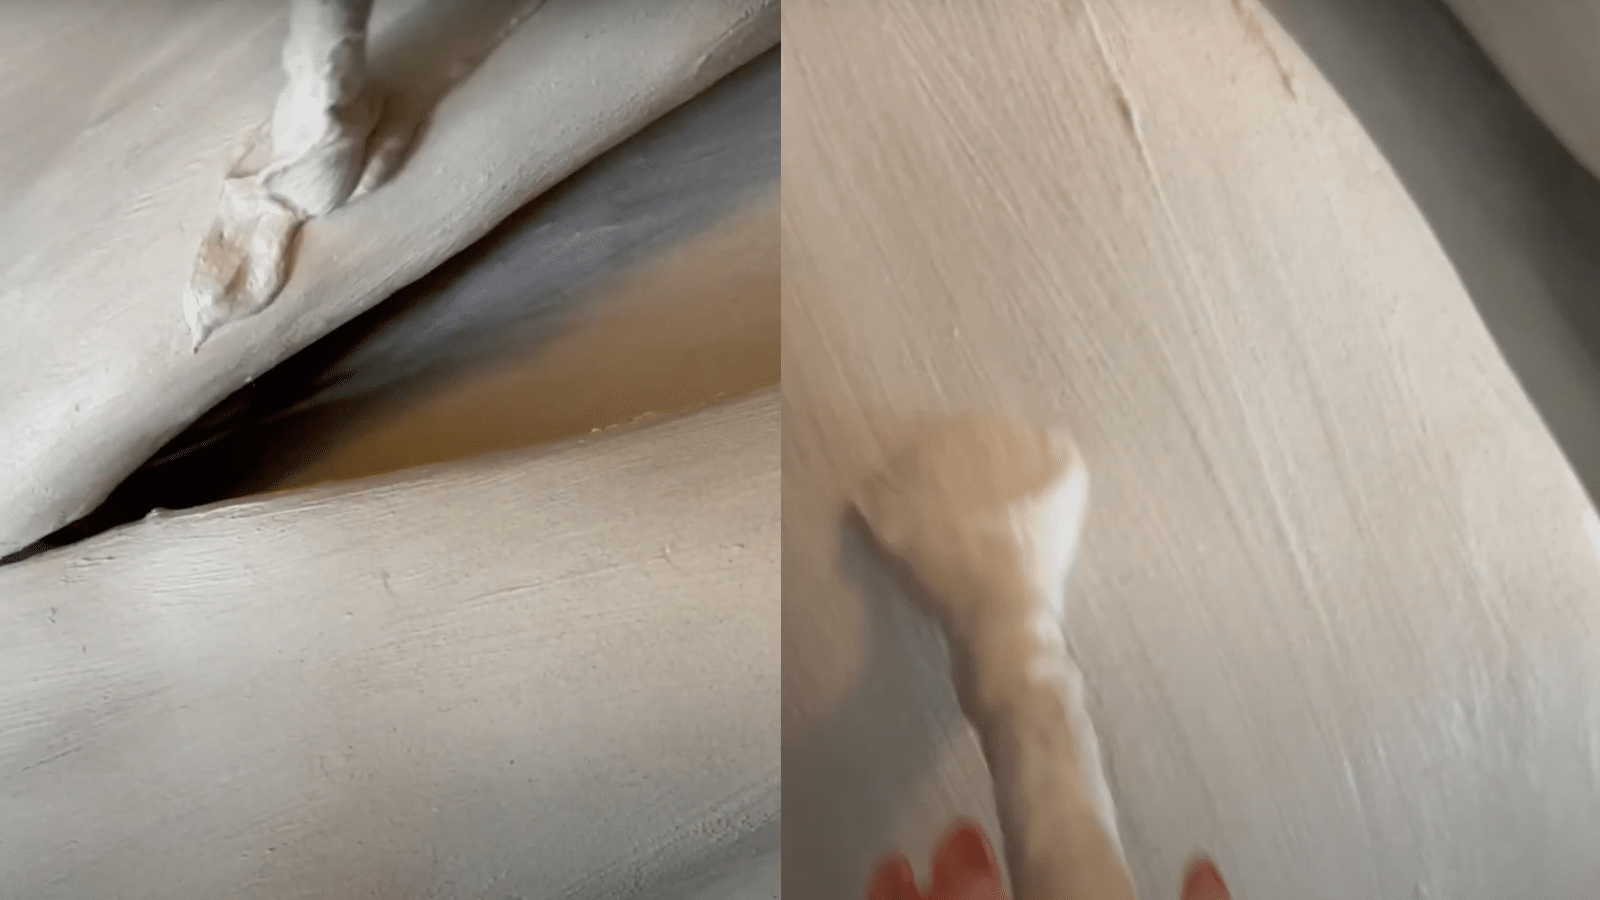
Step 3: Apply Plaster Bandages
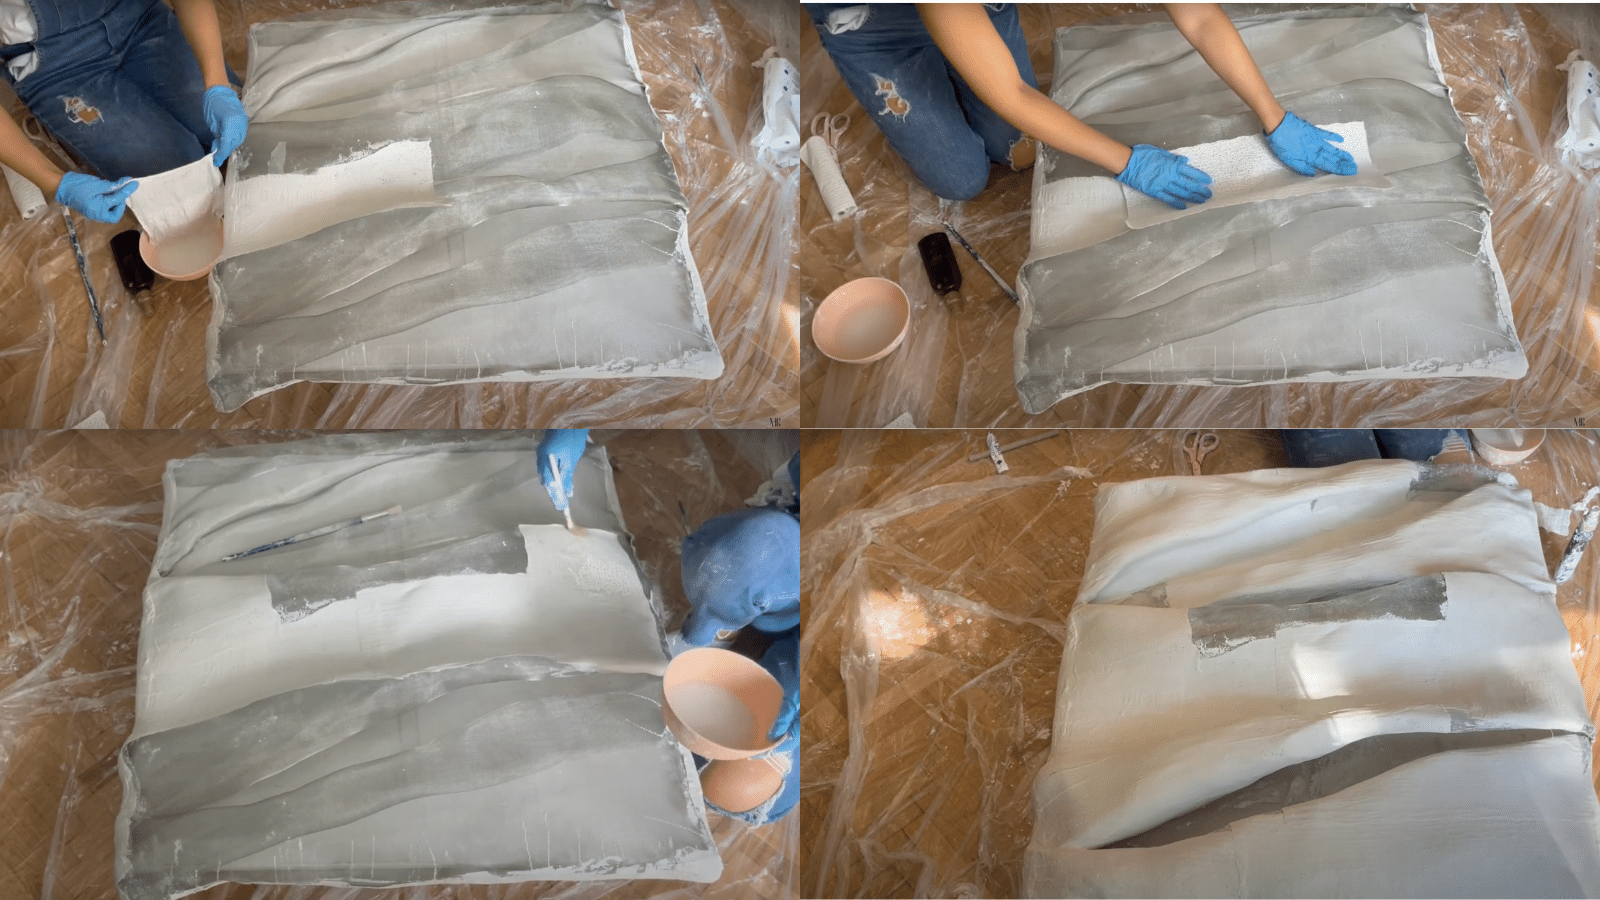
Take the plaster bandages and dip them in water. You can either dip them directly into a bowl of water or spray them with water using a bottle.
Apply the wet plaster bandages over the wire mesh, making sure they stick well. Continue until the entire wire mesh is covered. Let it dry completely for about 4 hours.
Pro Tip: If you’re new to plastering, work in smaller sections at a time. This will help you focus on one area and prevent the plaster from drying before you can properly mold it.
Step 4: Mix and Apply Joint Compound
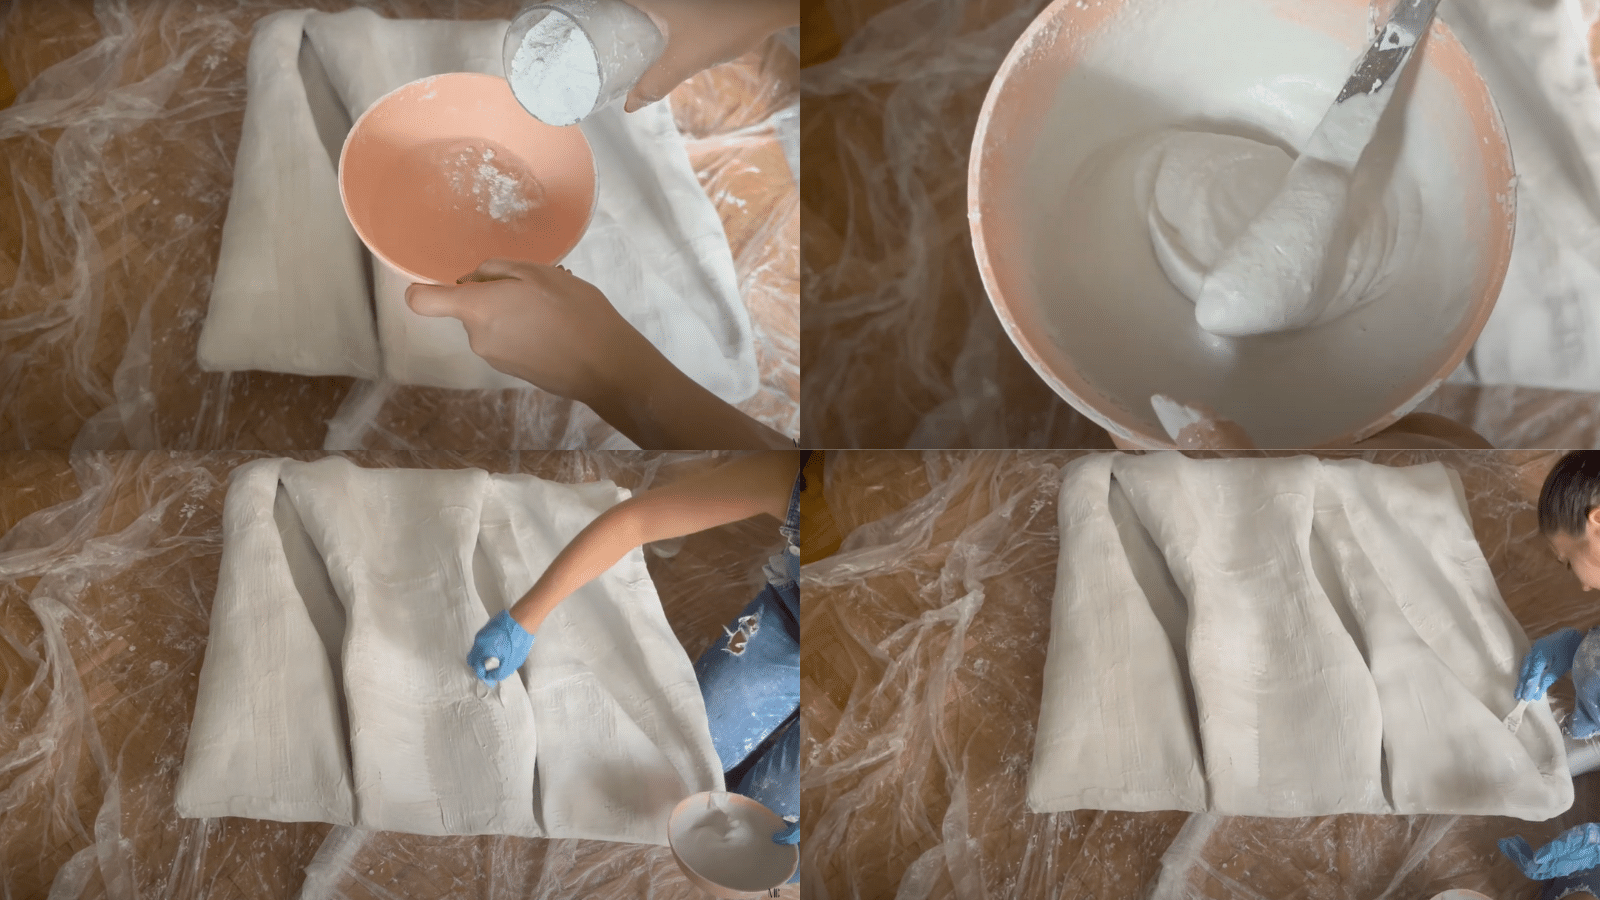
Once the plaster bandages are dry, mix the joint compound with water. The mixture should be smooth and creamy, so add 1 part water to 2 parts joint compound.
Use a large paintbrush to apply the first layer of joint compound onto the surface. Then, smooth it out with a smaller paintbrush to ensure an even texture.
Pro Tip: To achieve a smoother finish, use warm water when mixing the joint compound. Warm water helps make the mixture more fluid and easier to apply evenly.
Step 5: Smooth and Sand (Optional)
Let the first coat of joint compound dry. If you prefer a smooth finish, you can sand the surface lightly.
Alternatively, you can reapply a second layer of joint compound and smooth it out again with water, without sanding.
Repeat the process until you’re happy with the texture.
Pro Tip: If you want a smoother finish but don’t want to sand, use a wet sponge or a damp cloth to lightly smooth out the surface before the joint compound dries completely.
Step 6: Finish with Varnish
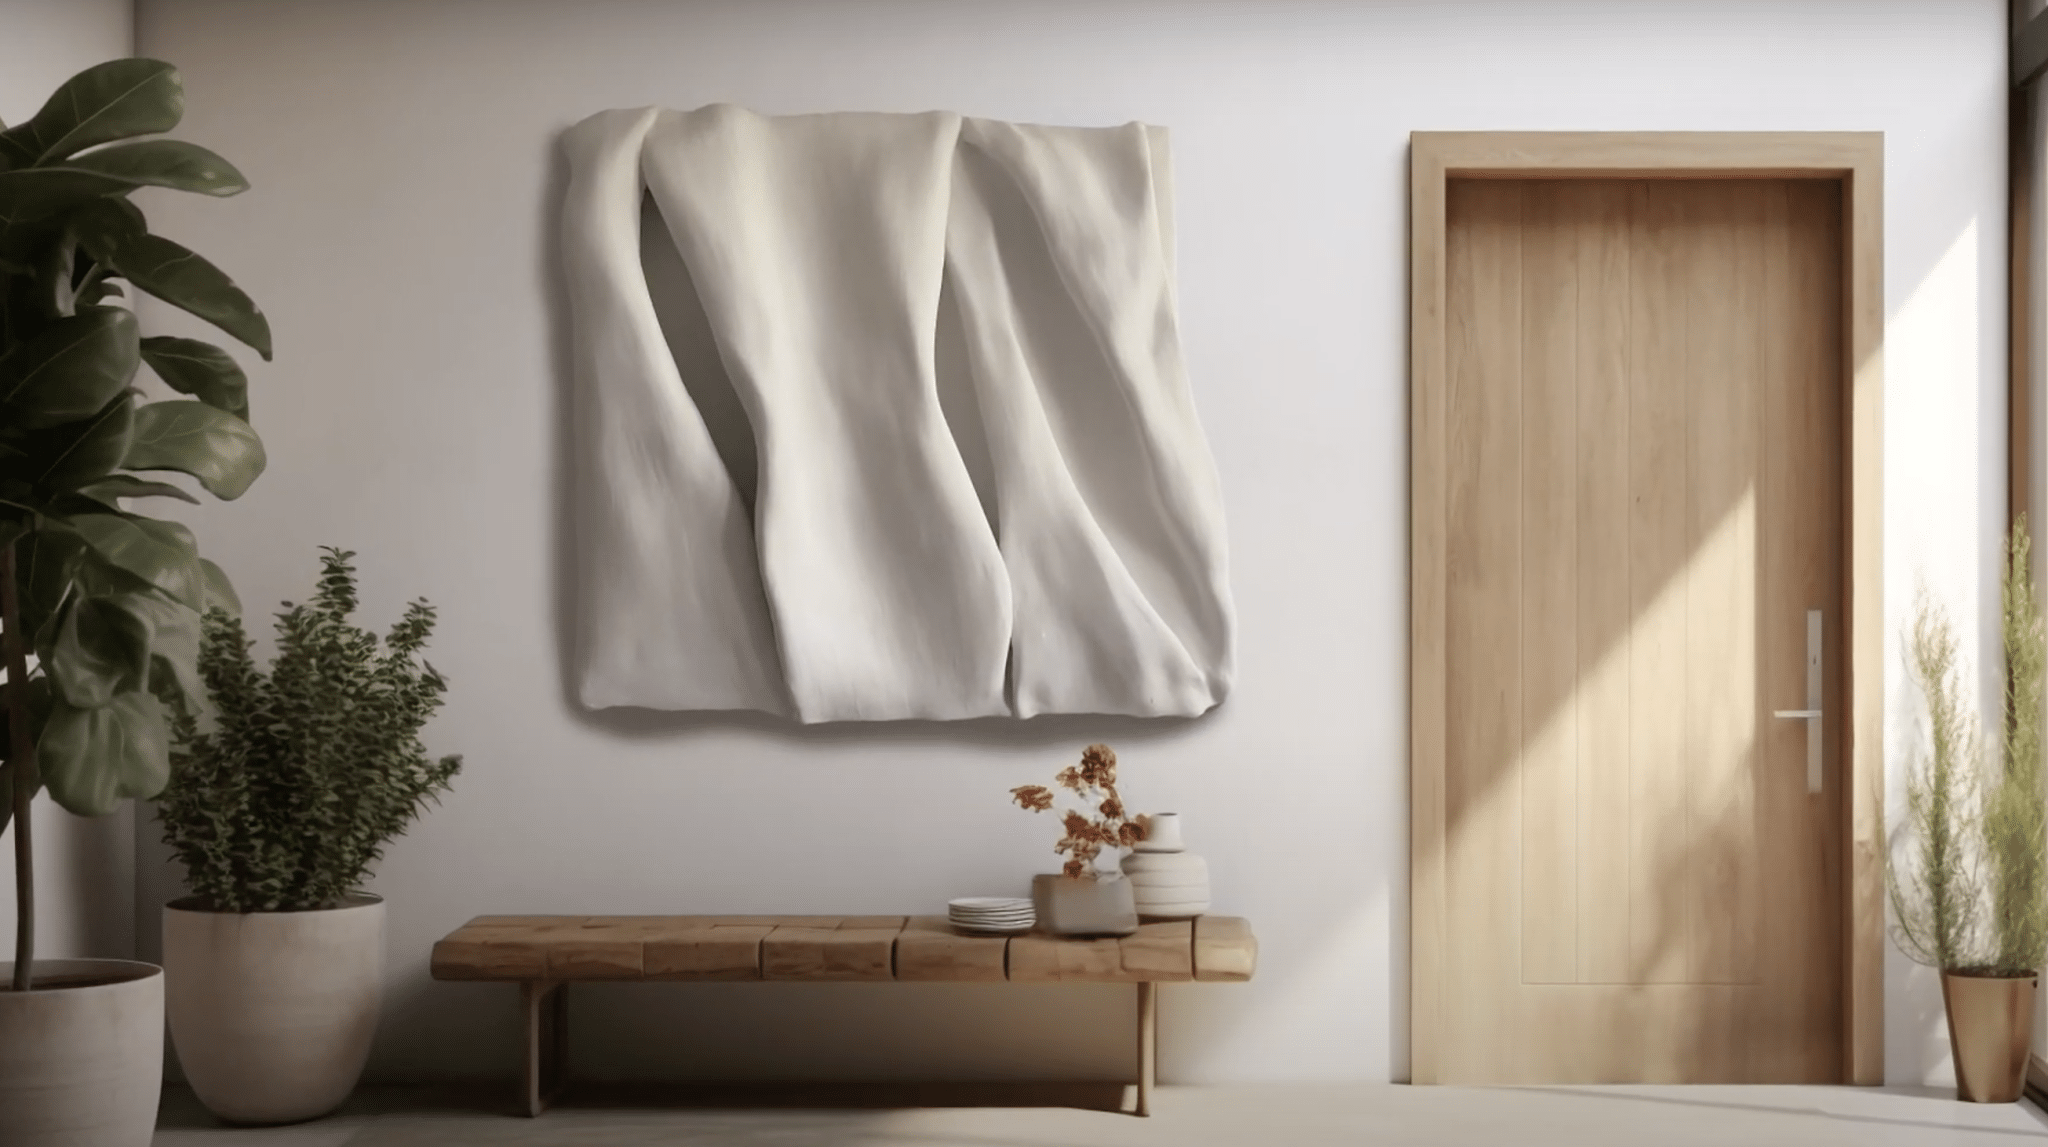
Once your artwork is completely dry and smooth, apply a coat of varnish to seal and protect the surface. This will give the project a nice finish and ensure it lasts longer.
Once the varnish is dry, your DIY wall art is ready to be displayed!
Pro Tip: For a professional-looking finish, apply the varnish in thin, even coats. Don’t rush it—let each coat dry completely before applying the next to avoid streaks or uneven texture.
Watch How It’s Done: DIY Plaster Art Video Tutorial
For more information, check out this video tutorial by ATELIER MICO
Budgeting for DIY Plaster Art – Costs Breakdown
The cost of creating plaster art depends on the materials you choose and the size of your project. Here’s a breakdown of typical costs:
| Material | Description | Estimated Cost |
|---|---|---|
| Canvas | Standard 80×80 cm canvas for the base | $10 – $30 |
| Wire Mesh | Wire mesh with larger holes, size depending on project | $5 – $10 |
| Plaster Bandages | A pack of plaster bandages, usually 10 meters | $7 – $15 |
| Joint Compound | 4-5 liters of joint compound for smooth finishing | $10 – $20 |
| Varnish | Varnish to seal and protect the surface of the artwork | $5 – $15 |
| Tools | Staple gun, brushes, gloves, and other basic tools | $10 – $30 |
Overall Cost: For a typical 80×80 cm plaster wall art project, you’ll spend around $40 to $70 on materials, depending on the quality and quantity of supplies.
Maintaining Your DIY Plaster Art
To ensure your DIY plaster art remains in great shape, it’s important to follow some maintenance tips, avoid common mistakes, and understand the costs involved in creating these beautiful pieces.
Below, we break down how to extend the life of your artwork, highlight common errors to avoid, and provide a cost breakdown for your project.
1. To Ensure Longevity of Your Plaster Art
Plaster art can last for many years when properly maintained. The durability of your piece depends on the materials used and the care it receives. Here are some tips to ensure your plaster artwork stays in good condition:
- Direct exposure to sunlight can cause the plaster to discolor or weaken over time. Keep your plaster art out of direct sunlight to preserve its color and structure.
- Plaster is sensitive to moisture. High humidity can cause it to soften or develop mold. Place your artwork in a well-ventilated area with controlled humidity levels.
- Plaster can be fragile, especially if it’s thin. Be careful when moving it, and avoid hanging it in high-traffic areas where it might be accidentally bumped.
2. Common Mistakes to Avoid
While DIY plaster art can be an enjoyable and rewarding project, there are a few common mistakes that could affect the final result:
- Too much water can cause the plaster to become too soft or take longer to dry. Make sure to dip the plaster bandages only briefly and allow excess water to drip off before applying them.
- Applying joint compound in thick, uneven layers can result in cracks or an uneven texture. Apply thin layers, letting each dry completely before adding the next.
- If you skip the varnish step, the surface of your artwork can become dusty or easily damaged. A good coat of varnish helps protect your work and gives it a polished finish.
Summing It Up
There you have it—your very own handmade plaster art piece ready to hang! With just a few basic materials and some patience, you’ve created something truly unique for your home.
What makes this project so worthwhile is how it allows you to express your creativity without breaking the bank.
Remember, your first attempt doesn’t need to be perfect. Each piece tells its own story, including the little imperfections that make it genuinely yours.
As you practice, you’ll develop your own methods and style.
We’d love to see what you create! Share photos of your finished pieces in the comments below, or tell us about any techniques you modified along the way.
Thank you for following along with this tutorial. Happy creating, and enjoy your new wall art!
