

Walls take up most of the space in a room, so when they look worn or uneven, the whole area feels dull.
Cracks, stains, or peeling patches can make even nice furniture seem out of place. The good part is, you don’t always need to repaint.
There are easy and creative ways to hide bad walls using simple materials like fabric, wallpaper, or wood panels.
These ideas work well for renters and homeowners who want a quick fix without the mess or cost of painting. With a few smart choices, you can make your walls look neat and stylish again.
Why You Might Skip Paint
Painting is not always the best answer for walls that look worn or uneven. It takes time to prepare the surface, buy supplies, and deal with strong smells and cleanup.
Paint also struggles to cover cracks, dents, or stains, which often show through after drying. In rentals, many landlords don’t allow repainting or permanent color changes.
High humidity can also cause paint to peel or bubble, making the problem worse.
For these reasons, more people are probing creative and practical options on how to hide bad walls without paint, using materials that are easier to apply, removable, and far less messy.
Creative Wall Treatment Ideas
Tired of dull or damaged walls? Try these simple, creative solutions that cover flaws quickly and make any room feel fresh again.
1. Peel-&-Stick Wallpaper
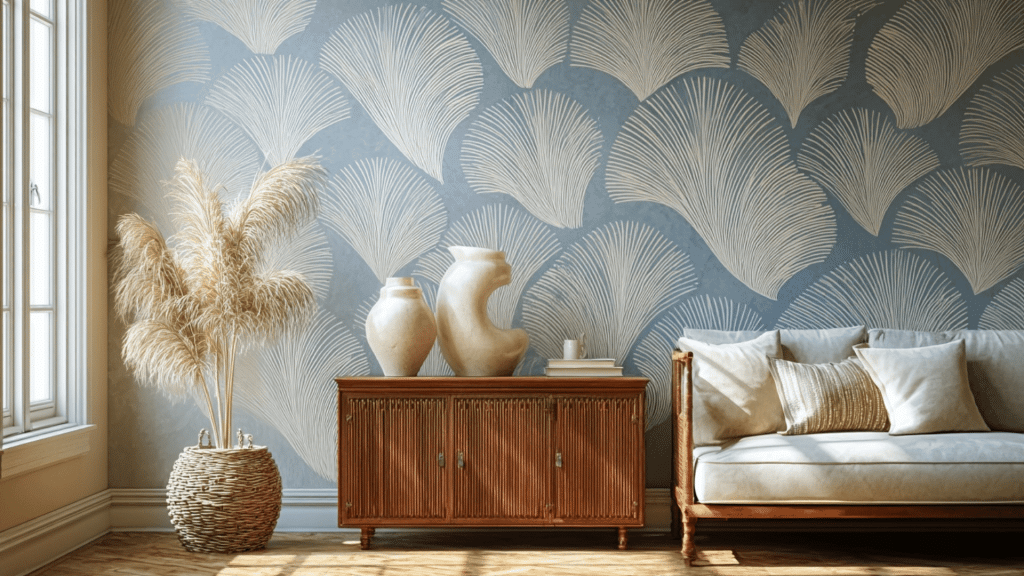
Use large sheets of adhesive wallpaper to cover entire walls or problem zones. Ideal for smooth surfaces, this method conceals blemishes and outdated finishes.
Available in countless patterns from geometric designs to botanical prints. Perfect for renters who need damage-free removal when moving out.
Pro tip: Clean and dry the wall thoroughly before application to avoid peeling along seams.
2. Fabric Wall Hangings or Tapestries
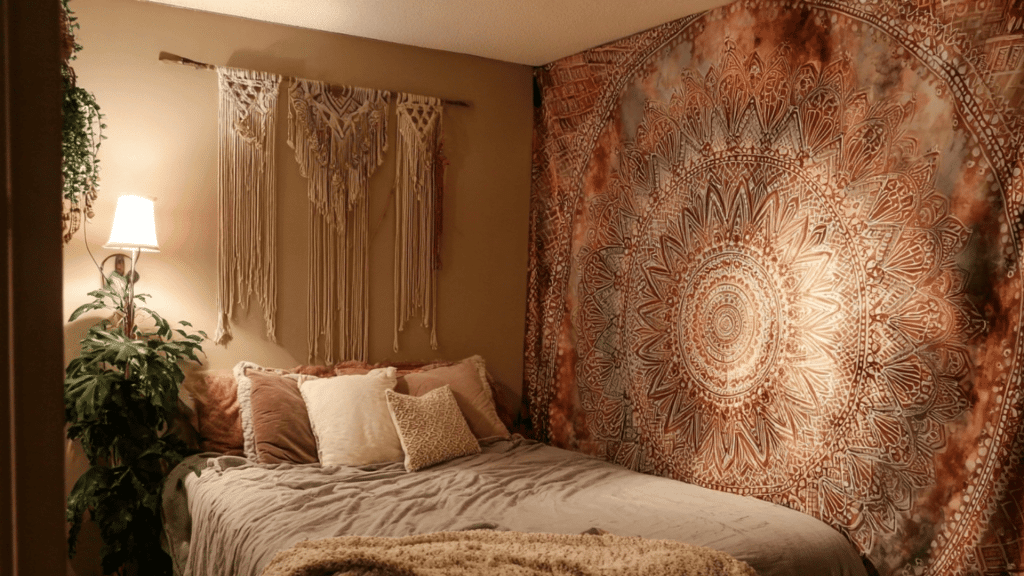
Drape or staple a large piece of fabric or a tapestry across the wall to mask damage and add softness.
Choose from bohemian weavings, vintage quilts, or modern textile art. This approach brings warmth, texture, and personality while completely hiding surface problems.
Pro tip: Use a tension rod or removable hooks if you want minimal impact on rental walls.
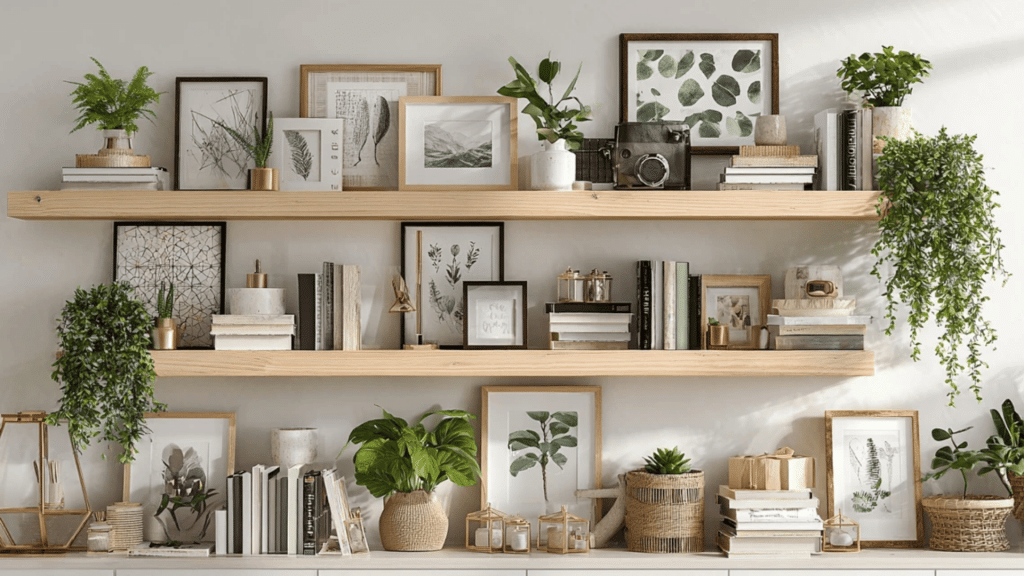
3. Gallery Wall with Art & Photos
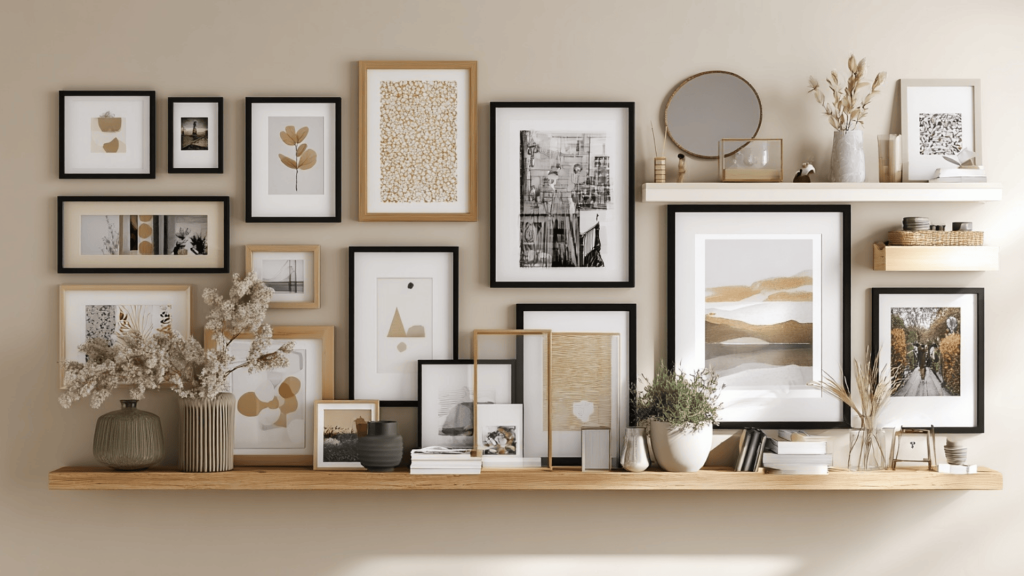
Fill the wall with framed artwork, personal photos, mirrors, and shelving to draw attention away from surface flaws. Mix different frame sizes and styles for visual interest.
This curated display becomes a focal point that tells your story while strategically covering imperfections.
Pro tip: Mount heavier items at the bottom to anchor the display and ensure safety.
4. Floor-to-Ceiling Curtains on a Wall

Install curtain rods along the top of the wall and hang full-length drapes even if there’s no window; the fabric hides the wall behind.
This theatrical approach adds drama to any room while providing complete coverage. Choose colors that complement your décor scheme.
Pro tip: Choose a heavier fabric if the wall has deep texture or dark stains to help block visual irregularities.
5. Large Mirror or Mirror Panel Wall
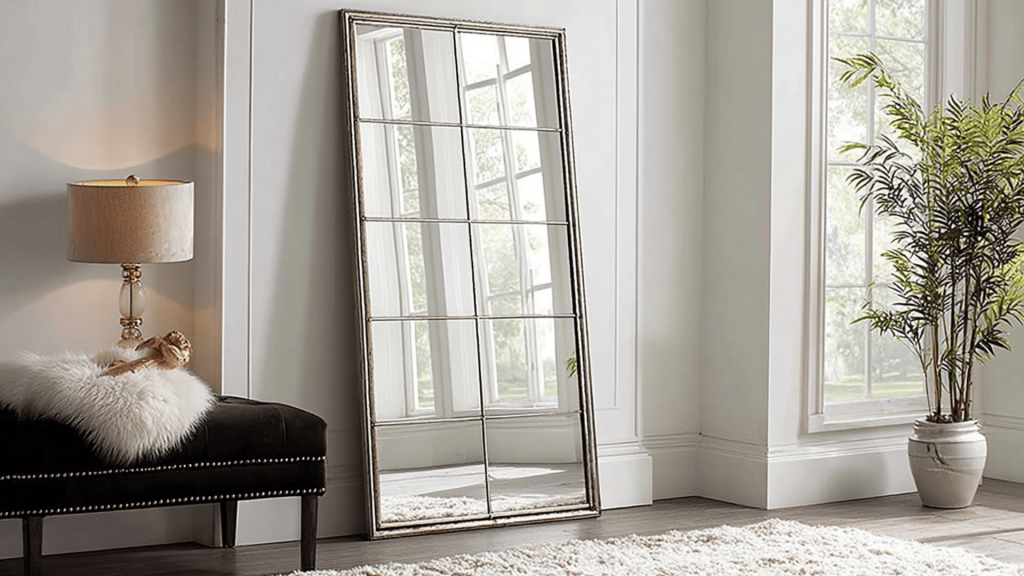
Mount or lean a large mirror or several mirror panels against the wall to reflect light and cover visible damage.
Mirrors expand small spaces visually and brighten dim rooms. Consider antiqued glass for vintage charm or frameless designs for contemporary style. Works beautifully in entryways and bedrooms.
Pro tip: Secure mirrors properly and keep them away from direct sunlight to avoid heat buildup.
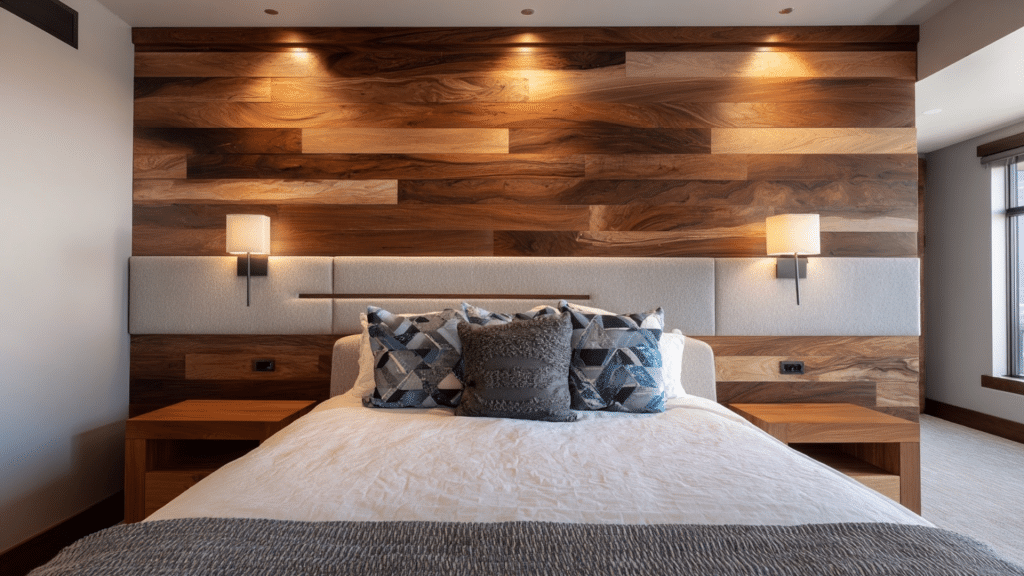
6. Wooden Slat or Tongue-and-Groove Paneling
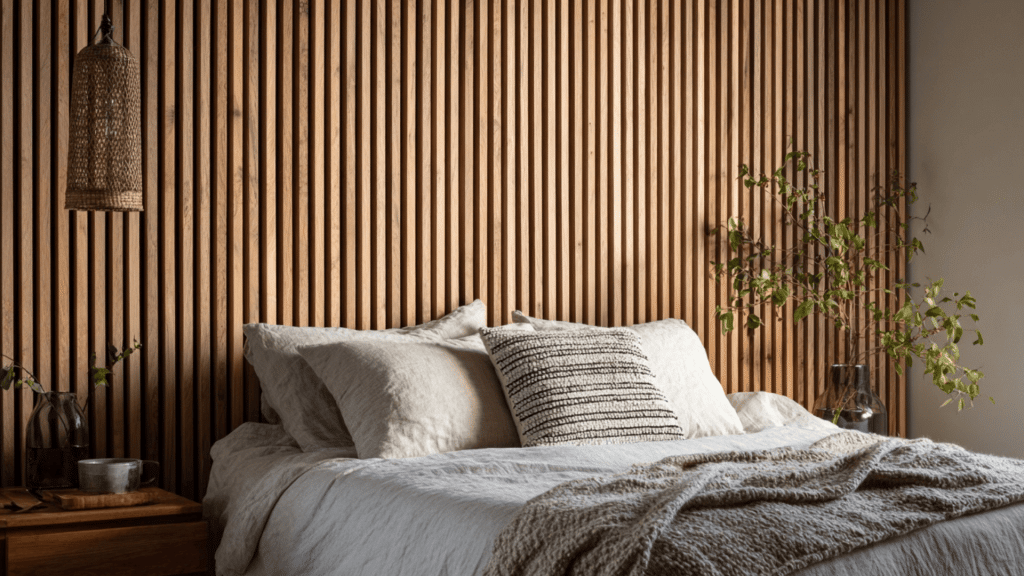
Fix vertical or horizontal wood slats, MDF boards, or tongue-and-groove panels over the wall surface to give it texture and hide imperfections.
This creates a modern Scandinavian or rustic farmhouse look, depending on finish choices. Slat spacing variations offer different visual effects.
Pro tip: Use lightweight materials and adhesive strips if you’re in a rental and want to avoid major drilling.
7. 3-D Wall Panels (PVC / MDF)
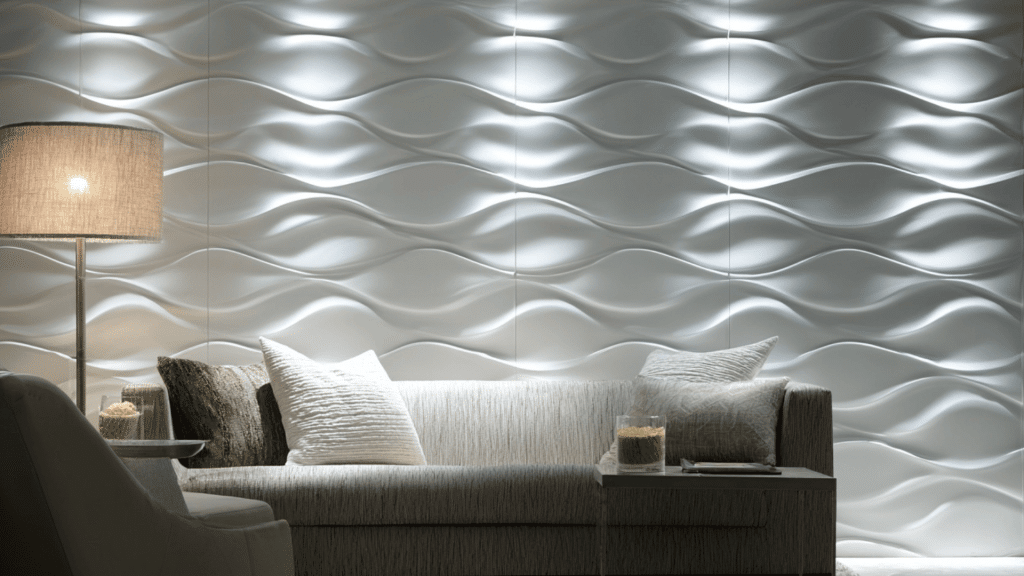
Install self-adhesive or modular 3-D panels made of PVC, MDF, or foam to cover uneven walls and add depth.
These architectural elements create shadows and dimensional interest. Available in wave patterns, geometric shapes, or abstract designs. Transforms flat, damaged surfaces into statement features.
Pro tip: Choose panels with some relief or ridges, as they’ll hide surface flaws more effectively than flat ones.
8. Cork Wall Panels or Tiles
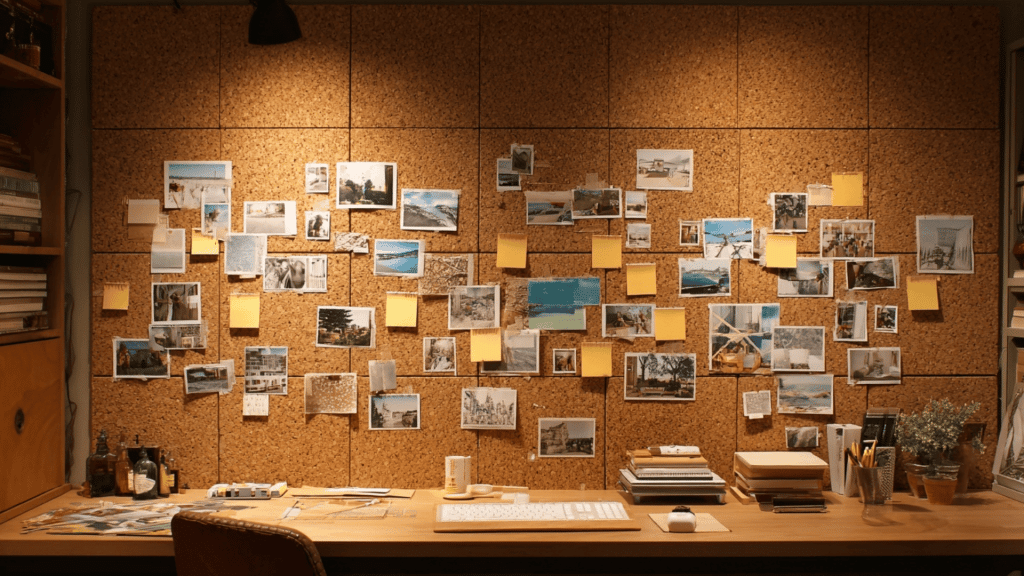
Stick cork tiles or panels onto the wall to cover flaws and provide a surface you can pin items to, like notes, photos, or art.
Natural cork offers sound absorption benefits and sustainability credentials. Perfect for home offices, craft rooms, or children’s spaces where function meets style.
Pro tip: Use pre-cut tiles and a roller during installation to ensure good adhesion and minimal gaps.
9. Wall Decals & Stickers
Apply large-scale decals or a pattern of smaller ones to conceal blemishes and add character. Especially good for smaller problem areas.
From tropical leaves to geometric patterns, these removable designs offer flexibility. Kid-friendly options include alphabet letters, animals, or space themes for playrooms.
Pro tip: Apply slowly from one edge and smooth with a squeegee to avoid bubbles or misalignment.
10. Floating Shelves or Furniture Placement
Install bookshelves, consoles, or display units in front of the wall to block or disguise the worst spots while adding function.
Strategic furniture arrangement creates storage opportunities while solving cosmetic problems. Stack books, plants, decorative objects, or collections on open shelving for a practical style.
Pro tip: Place tall furniture flush against the wall so the damage stays hidden behind the piece.
11. Slatted Screen or Decorative Room Divider Against Wall
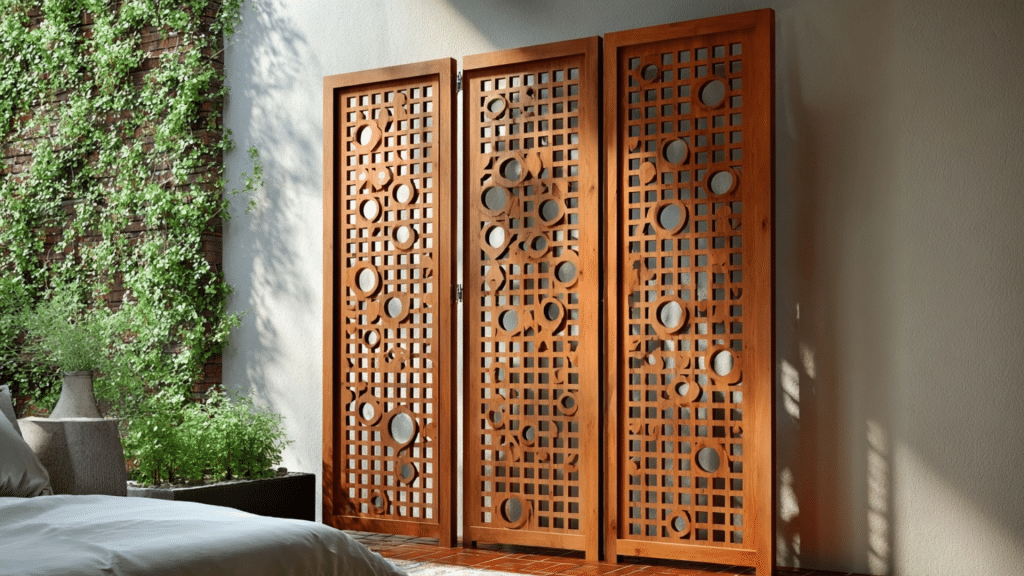
Position a freestanding screen or divider a few inches from the wall to conceal the surface behind it without mounting anything.
Folding screens come in various styles like Asian-inspired, mid-century modern, or ornate vintage. This portable solution offers flexibility to rearrange or remove whenever needed.
Pro tip: Opt for a screen slightly taller than the damage zone to avoid leaving gaps at the top or bottom.
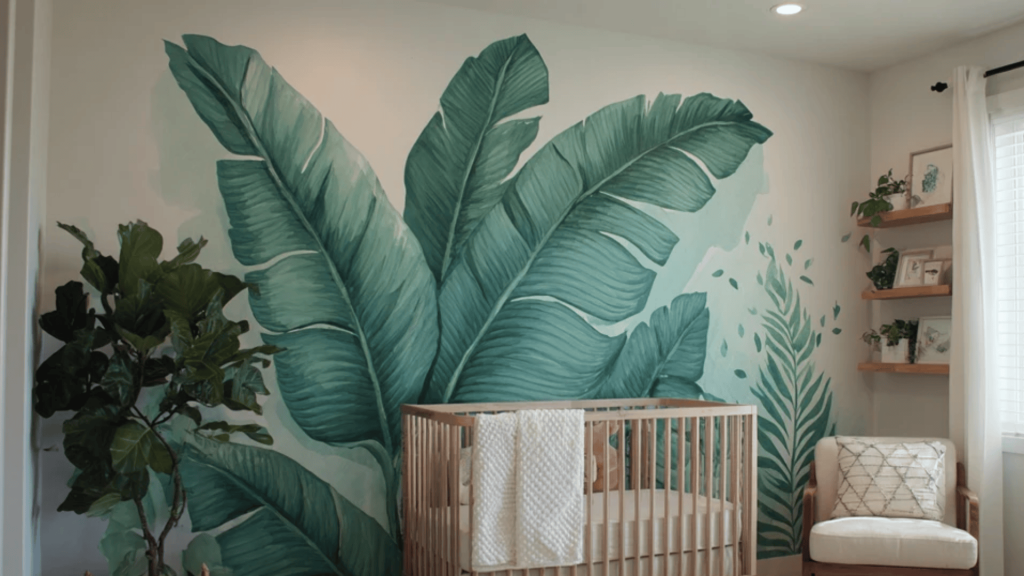
12. Wallpaper Murals or Graphic Wall Art
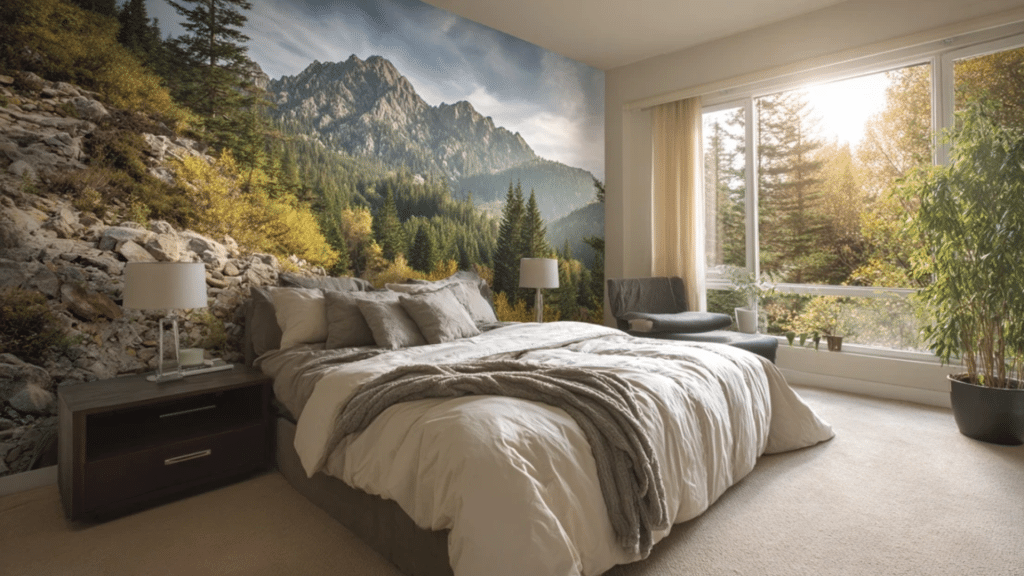
Choose a large photographic mural or bold wallpaper print to dominate the wall and distract from imperfections. Forest scenes, cityscapes, abstract art, or world maps change rooms into immersive environments.
The oversized imagery commands attention, making viewers focus on the design rather than the underlying surface issues.
Pro tip: Center the focal design over the worst part of the wall so attention is drawn where you want it.
13. Fabric-Wrapped Panels (DIY Upholstered Wall)
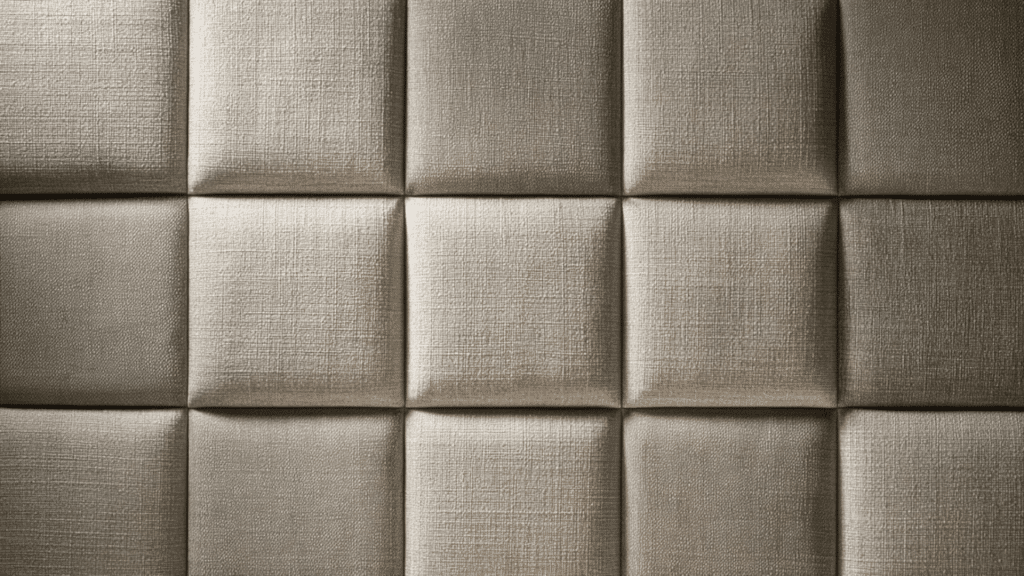
Create oversized panels wrapped in fabric and mount them over the wall to hide uneven surfaces and add acoustic value.
Choose textiles that match your color scheme, like linen for casual comfort, velvet for luxury, or patterned cotton for playfulness. These padded treatments soften sound and improve room acoustics.
Pro tip: Use foam backing behind the fabric to smooth out lumps or dents before mounting.
14. Adhesive Vinyl Tiles or Stick-On Tiles
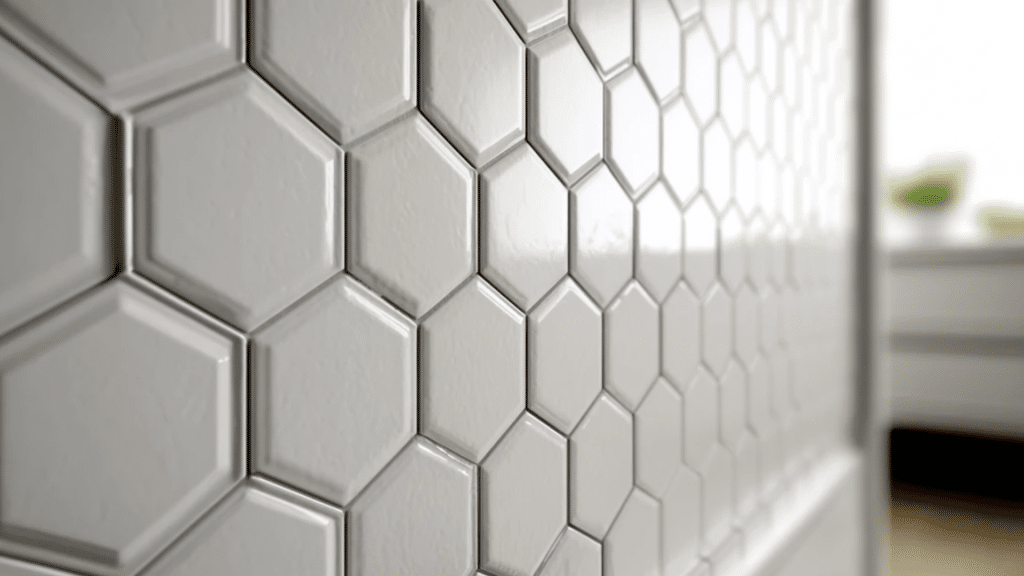
Apply peel-and-stick tile-effect vinyl or faux brick panels across the wall for full coverage and easy cleanup.
Mimics subway tiles, hexagons, Moroccan patterns, or exposed brick without grout mess or professional installation costs. Waterproof options work well in kitchens or bathrooms where moisture resistance matters.
Pro tip: Match tile edges carefully at corners and trim excess for a smooth finish.
15. Layered Wallpaper with Moulding or Trim

Install removable wallpaper and overlay decorative trim or wood battens to create a framed panel look that distracts the eye from the wall’s base surface.
This wainscoting-inspired technique adds traditional style or modern geometry, depending on your choices. The combination of pattern and structure creates depth.
Pro tip: Use painters’ tape to mark the grid before you fix moulding to keep lines straight and consistent.
16. Wall-to-Wall Rugs or Textile Panels
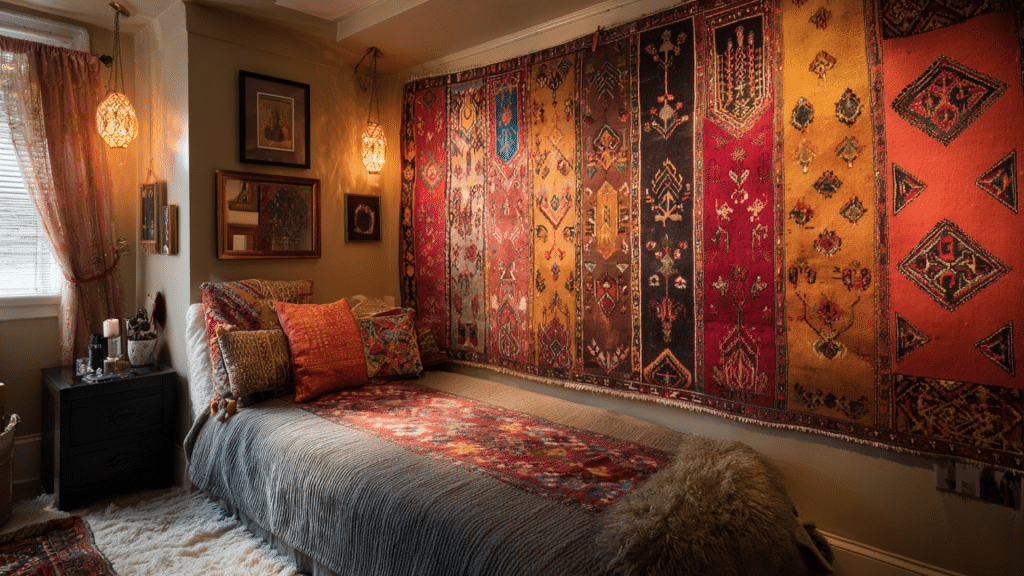
Hang a large area rug, quilt, or textile panel across the wall to hide flaws and add warmth to the room. Vintage Persian rugs, Moroccan weavings, or colorful quilts become artistic statements.
This bohemian approach celebrates craftsmanship while solving practical problems. Adds insulation properties and soundproofing benefits.
Pro tip: Use Velcro strips or curtain rods so you can easily take it down for cleaning.
17. Living Wall or Vertical Garden Panel
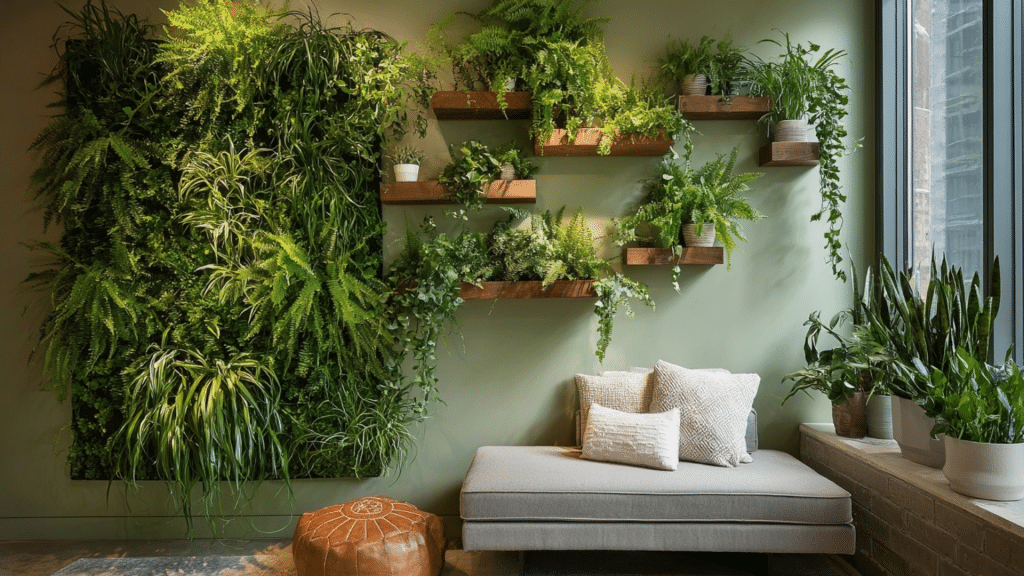
Install faux or real plant panels on the wall to cover damage and bring a natural element into the space. Artificial greenery requires zero maintenance while providing year-round lushness.
Real plants need irrigation systems, but purify air and create biophilic connections. This organic solution works beautifully in modern homes.
Pro tip: If using real plants, check for moisture behind the panel to avoid mould forming.
18. Chalkboard or Dry-Erase Wall Panel

Apply a chalkboard sheet or dry-erase board to cover a problem area and add a reusable function for notes or drawings.
Perfect for kitchens with grocery lists, home offices for brainstorming, or kids’ rooms for creative expression. Magnetic versions accommodate papers with magnets. Transforms damaged surfaces into interactive command centers.
Pro tip: Use strong adhesive or screws, depending on the substrate, so the panel stays firmly in place.
19. Leaning Large Artwork or Oversized Mirror
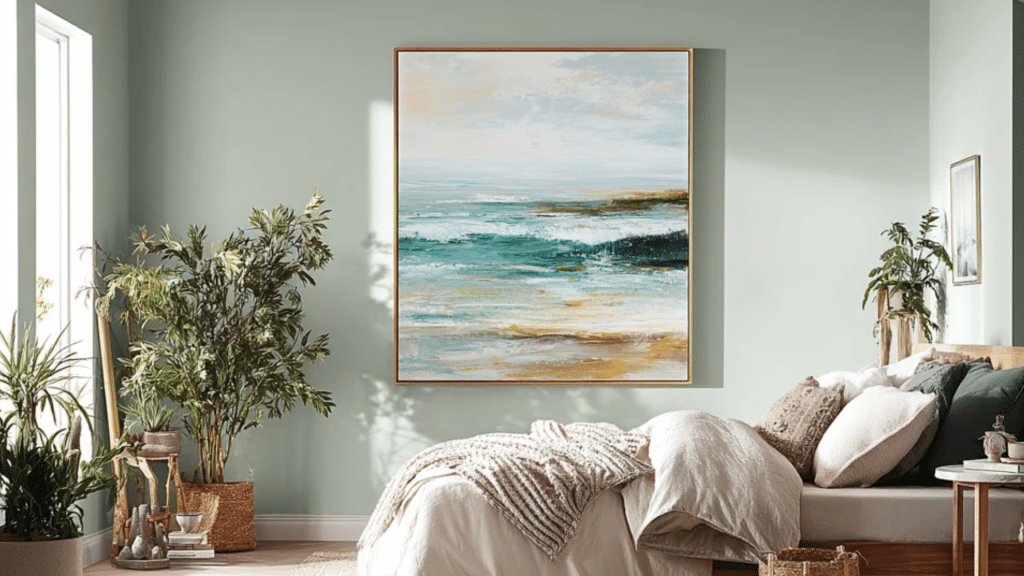
Instead of mounting, lean a large piece of art or a wide mirror against the wall to cover the base or center of the surface.
This casual, gallery-inspired styling works particularly well in bedrooms, living rooms, or entryways. Rotating pieces becomes effortless when you desire seasonal changes.
Pro tip: Place a non-slip pad behind the base to prevent it from slipping or damaging the floor.
20. Wainscoting, Chair Rail & Half-Wall Treatments
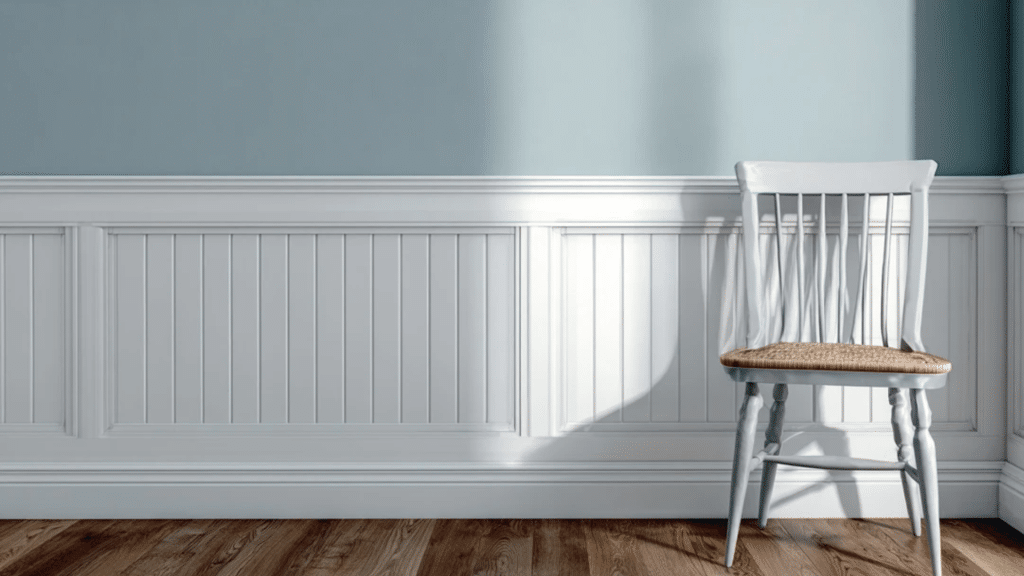
Apply beadboard, board-and-batten, or wainscoting to the lower portion of the wall where damage is concentrated, then leave the upper wall simple.
This classic architectural detail originated in Victorian homes for protection against furniture scuffs. Today, it conceals bottom-half deterioration while introducing traditional charm.
Pro tip: Choose a darker lower panel colour to mask scuffs and marks more effectively.
21. Modular Peg-Board System with Accessories
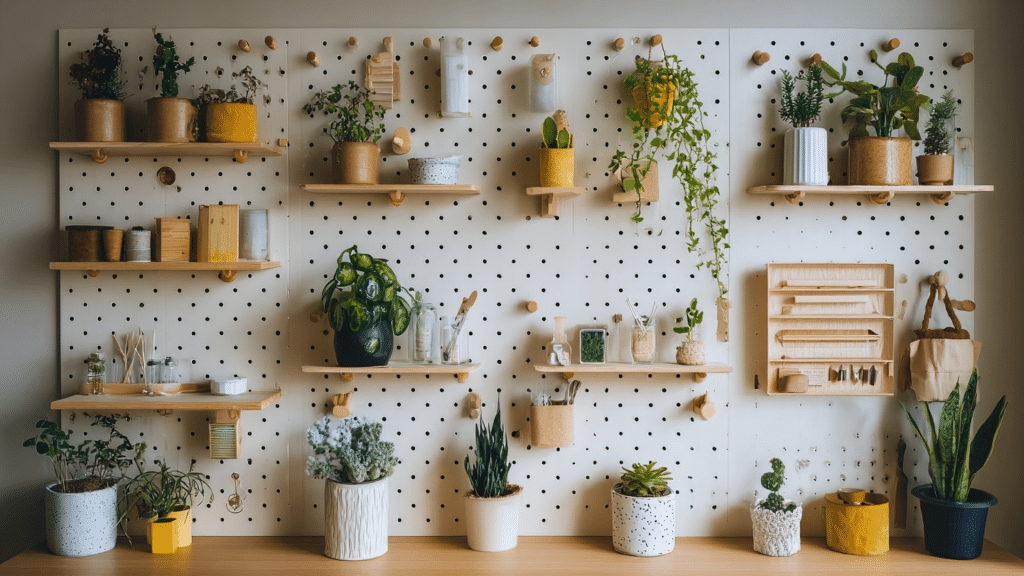
Mount a pegboard overlay and hang plants, lights, tools, or décor items to cover flaws while adding storage. Originally workshop staples, peg-boards now appear in trendy kitchens, offices, and craft spaces.
Customize configurations endlessly by moving hooks and shelves. Painted peg-boards coordinate with existing décor.
Pro tip: Use wall anchors rated for the weight of your accessories to avoid pulling the pegboard off the wall.
22. Photo Collage Wallpaper or Wall Mural of Photos

Print a custom photo mural or large collage of favourite images across the wall to draw attention to the imagery and away from the surface behind. Celebrate family memories, travel adventures, or artistic photography in oversized formats.
This personalized approach creates emotional connections and conversation starters while cleverly disguising structural issues.
Pro tip: Matte finish is better than gloss because it reduces glare and hides surface texture more effectively.
23. Decorative Adhesive Film on Existing Wall Surface

Use thin vinyl film in wood grain, marble look, or metallic styles to cover the wall cheaply and easily without heavy installation.
These self-clinging films mimic expensive materials at a fraction of the cost. From faux concrete to brushed gold, options suit every preference. Removes cleanly when needed, leaving minimal residue.
Pro tip: Apply a hairdryer on low heat after installation to help the film conform around corners and edges.
24. Accent Lighting & Shadow Play to Distract from Flaws
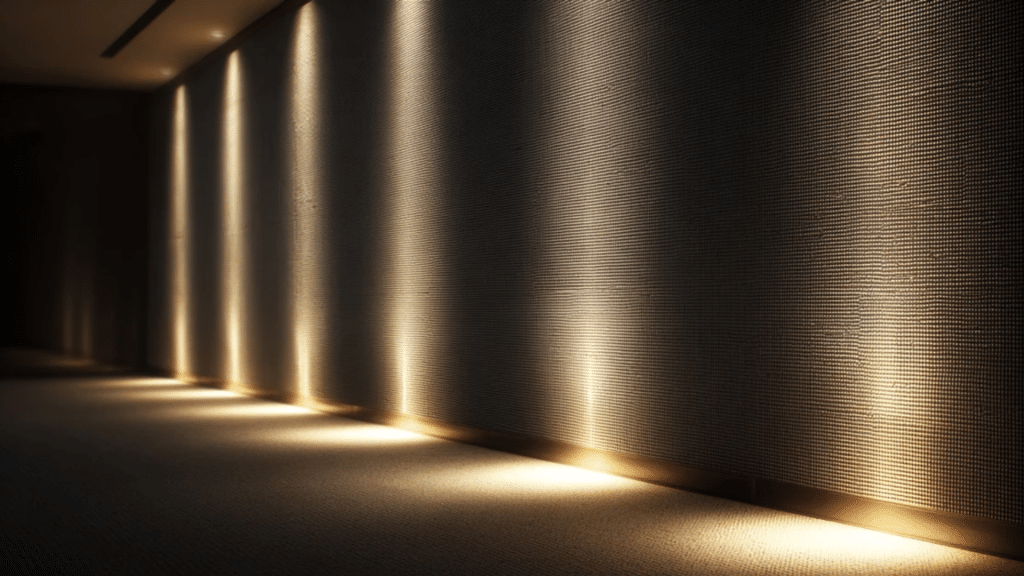
Use uplights, wall washers, or LED strips to cast gentle light and subtle shadows across the wall, which helps hide irregularities. Strategic illumination draws eyes toward brightness rather than imperfections.
Grazing light emphasizes intentional texture while minimizing unwanted damage to visibility. Dimmable options allow mood adjustments throughout the day and night.
Pro tip: Position lighting close to the wall edge and angle inward to soften texture and imperfections.
25. Mixed-Material Feature Wall (Combine 2-3 Treatments)
Combine two or more methods, such as wood slats, fabric panels, plus lighting, to create a layered treatment that conceals defects and adds visual interest.
This approach builds complexity and intrigue. Pair rough textures with smooth ones, matte with metallic, or organic with industrial elements for depth.
Pro tip: Stick to one dominant material and use the others as accents so the design stays clear and intentional.
How to Choose the Right One
Choosing the right wall treatment depends on your wall’s condition, room type, and how much effort you’re ready to invest.
- Check wall damage: Inspect for cracks, dents, or stains to decide how much coverage you actually need.
- Match room use: Use waterproof vinyl or PVC in wet areas and softer materials like fabric in dry spaces.
- Plan your budget: Pick easy DIY fixes for quick results or invest in panels for long-lasting style.
- Think permanence: Go for removable options if you’re renting; fixed ones suit owned homes better.
- Consider lighting: Warm or soft lighting helps hide surface flaws and enhances your chosen wall texture.
- Match your style: Choose materials and colors that fit your décor theme and make the room feel cohesive.
The best wall treatment balances looks, cost, and practicality while keeping your space easy to maintain and visually appealing.
Wrapping It All Up
Covering up flawed walls doesn’t have to be stressful or expensive. With a little creativity and the right materials, you can quickly refresh your space and make every wall look neat and inviting.
From simple peel-and-stick ideas to textured panels and layered designs, there’s an option for every budget and skill level.
Focus on what feels right for your home, something practical, stylish, and easy to manage long-term. You don’t need special tools or professional help to make it happen.
Start today by choosing one idea that suits your space best, and see how easily your walls can look new again.