
Ever walked into a store, picked up a simple curtain rod, and nearly dropped it when you saw the price tag? $50 for a stick with fancy ends? No thanks!
Making your DIY curtain rod from wood is not only budget-friendly but also surprisingly simple. With basic tools and a trip to the hardware store, you can create something truly yours.
Store-bought rods come in limited sizes and styles. Your custom creation fits exactly how you need it. No more cutting metal rods or settling for “close enough.”
This project takes just one afternoon but changes your whole room. Your windows get a fresh look that perfectly matches your style.
Ready to save cash and impress visitors with your handiwork?
This guide outlines the steps in clear, doable detail. Let’s make something special for your windows!
Tools and Materials You’ll Need
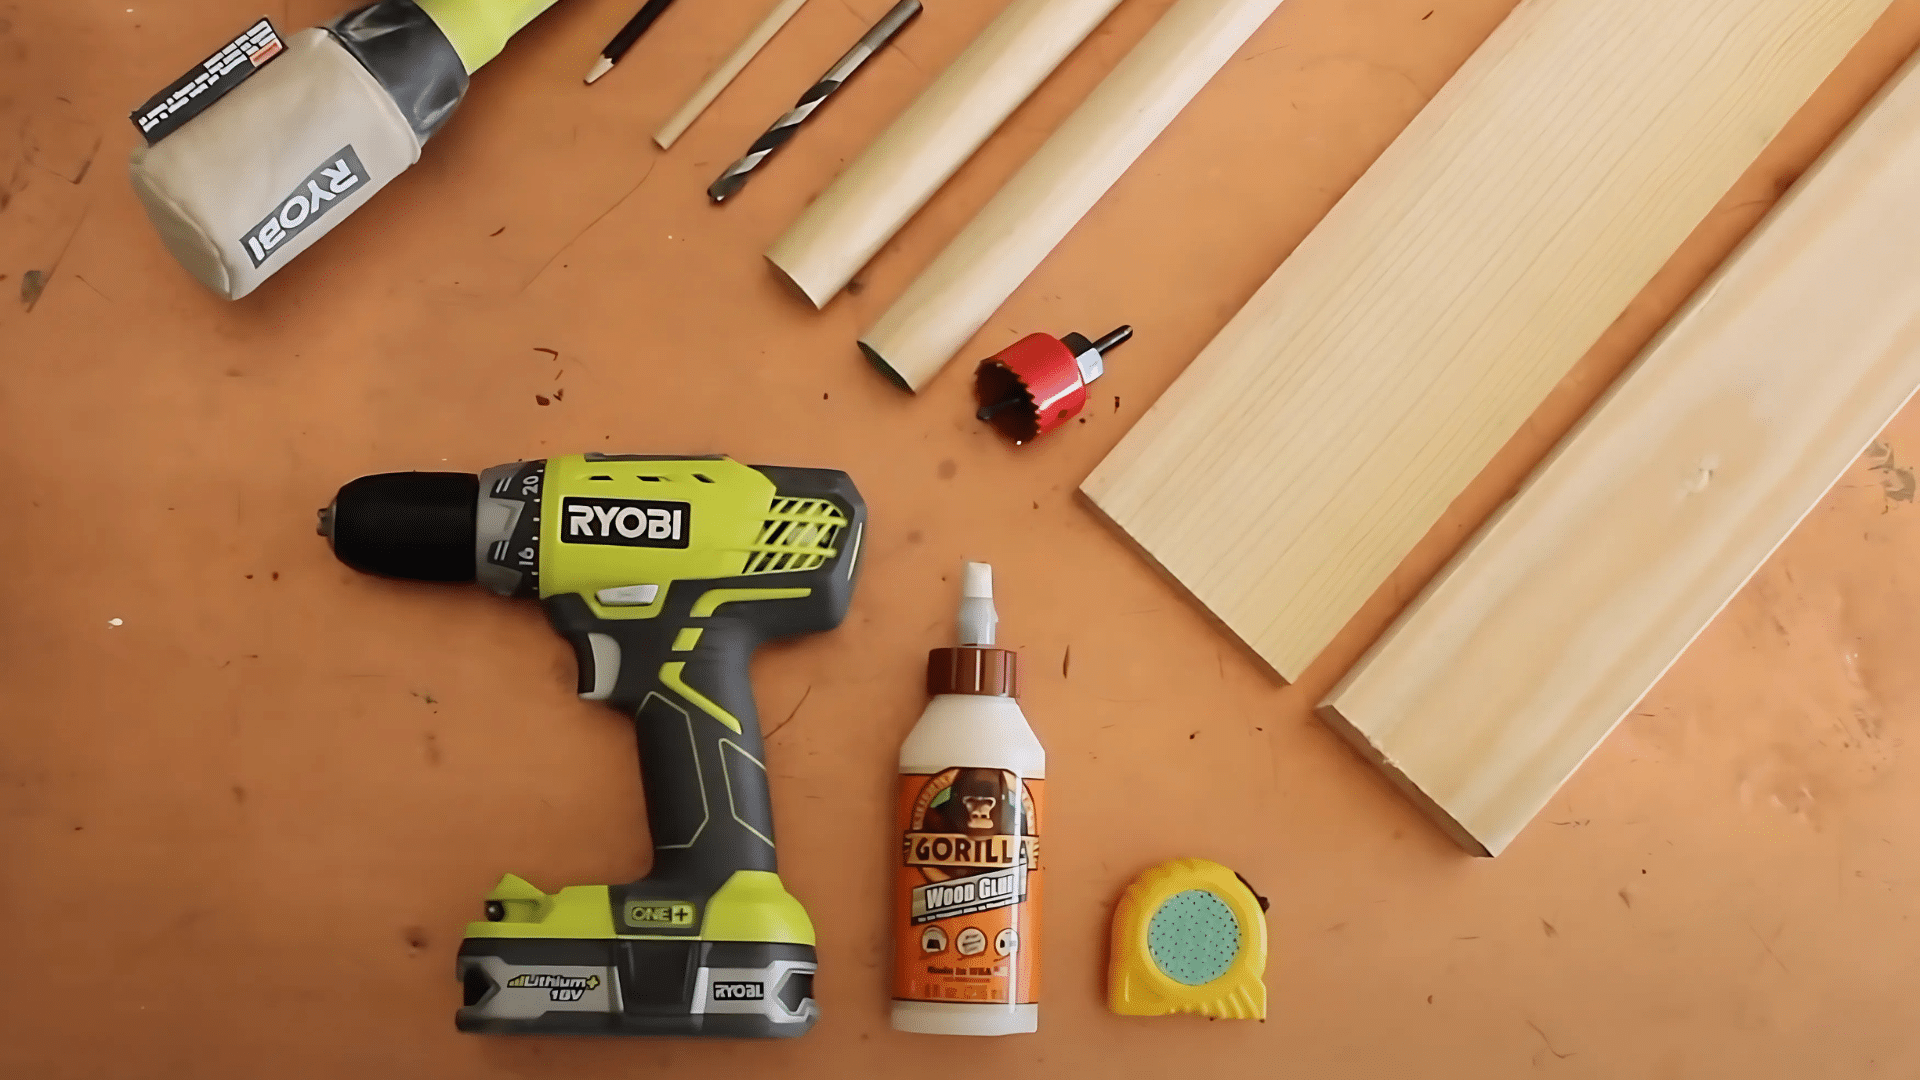
| Tools | Materials |
|---|---|
| Wireless drill | Scrap wood |
| Measuring tape | Wood glue |
| Hole saw and drill bits | 2 Dowels (thicker and thinner) |
| Sandpaper or orbital sander | 2 Screws |
| Phillips head drill bit | Paint (optional) |
Step-by-Step Guide for DIY Curtain Rod
Now that you have all your tools and materials ready, let’s get started! Follow these simple steps to create your custom wooden curtain rod, which will look great and last for years.
Step 1: Preparing Your Wood Pieces
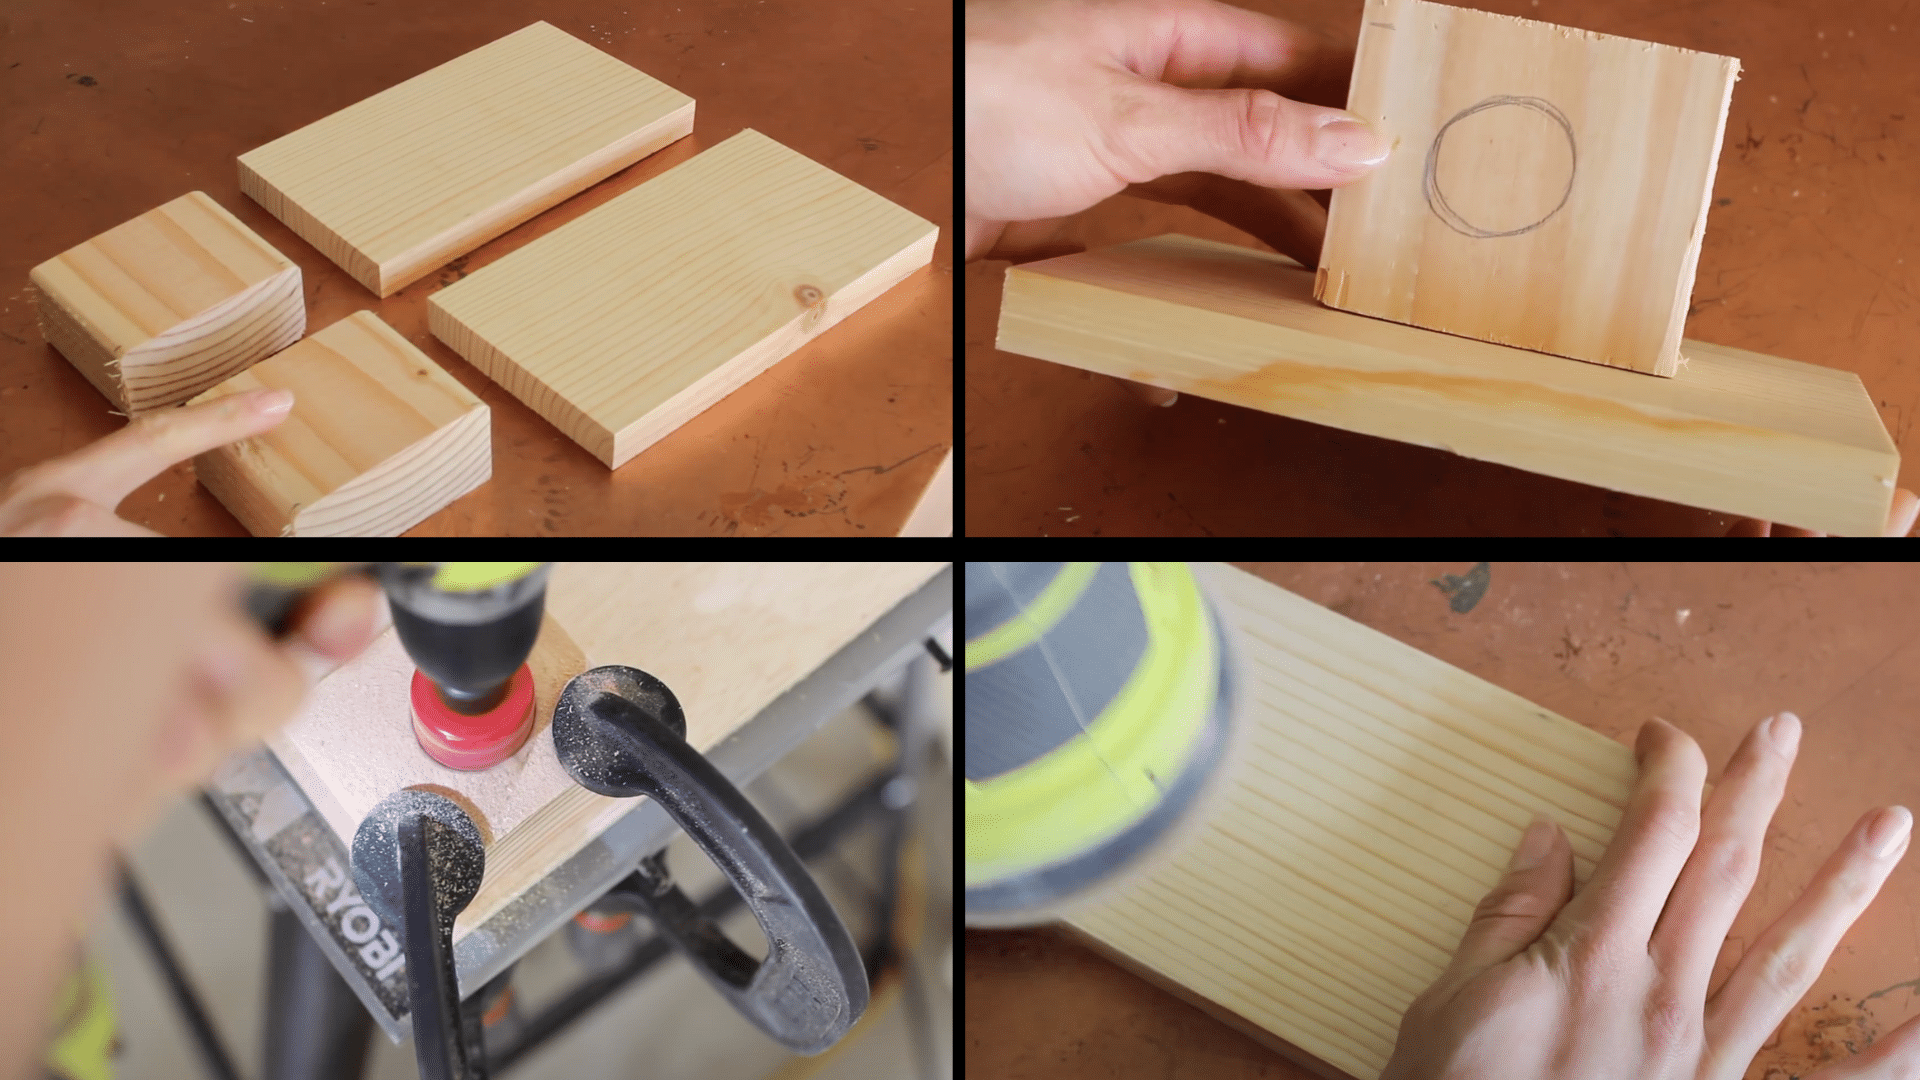
Getting your wood pieces ready is the foundation of a great-looking curtain rod. Take your time with these initial cuts and holes—they’ll determine how professional your finished product looks.
- Cut the Wood: Measure and cut two pieces of scrap wood. One should be thicker and the other thinner.
- Drill Holes: Use a hole saw to drill a hole through the thinner piece to fit the thicker dowel. Make sure the hole is snug.
- Smooth Edges: Sand the edges of your wood pieces with sandpaper or an orbital sander to remove any rough spots.
Step 2: Attaching the Dowels
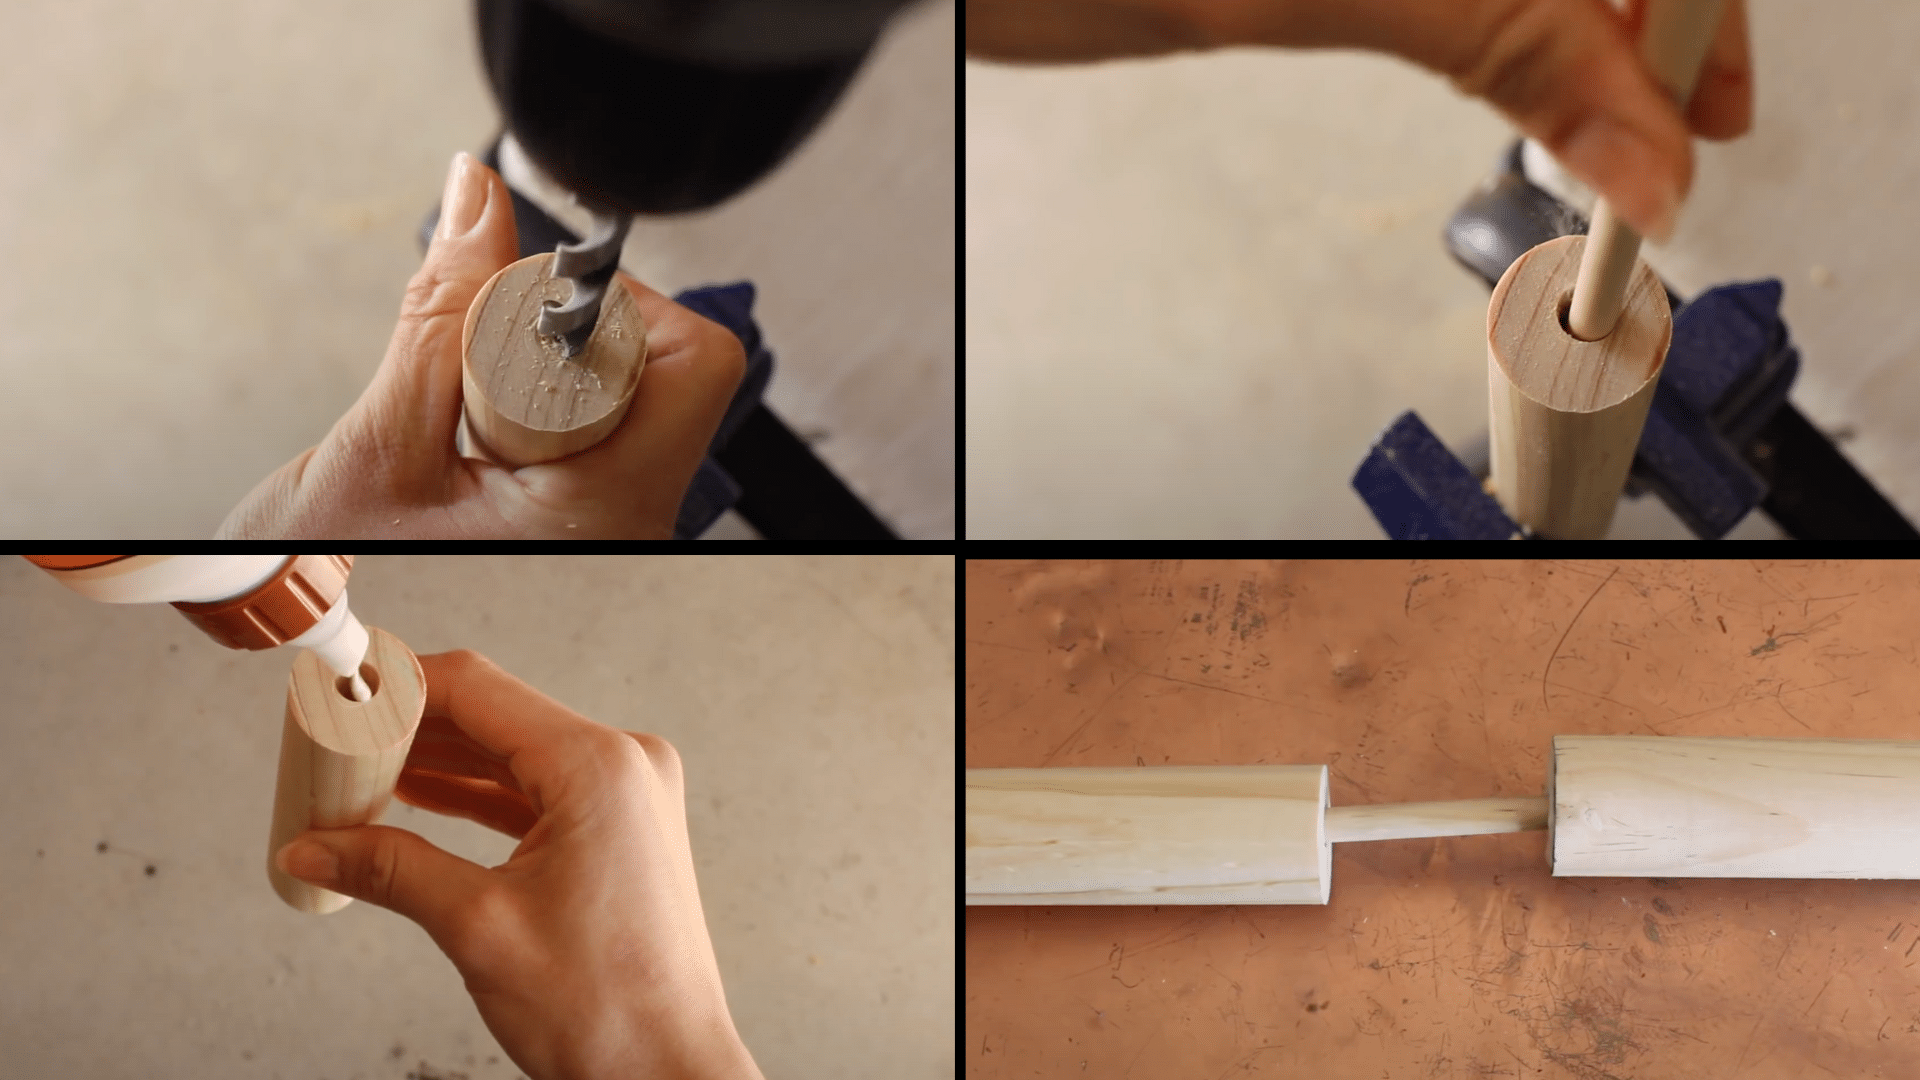
The dowels are what give your diy curtain rod its strength and style. Making sure they’re properly attached will prevent any wobbling or sagging once your curtains are hung.
- Drill Holes in the Dowel: Drill a hole through the center of both the thicker and thinner dowels.
- Apply Wood Glue: Insert wood glue into the drilled holes to securely attach the dowels.
- Align and Secure: Line up the dowels and press them firmly together, ensuring the pieces fit tightly. Use clamps if needed to hold everything in place.
Step 3: Assembling the Curtain Rod
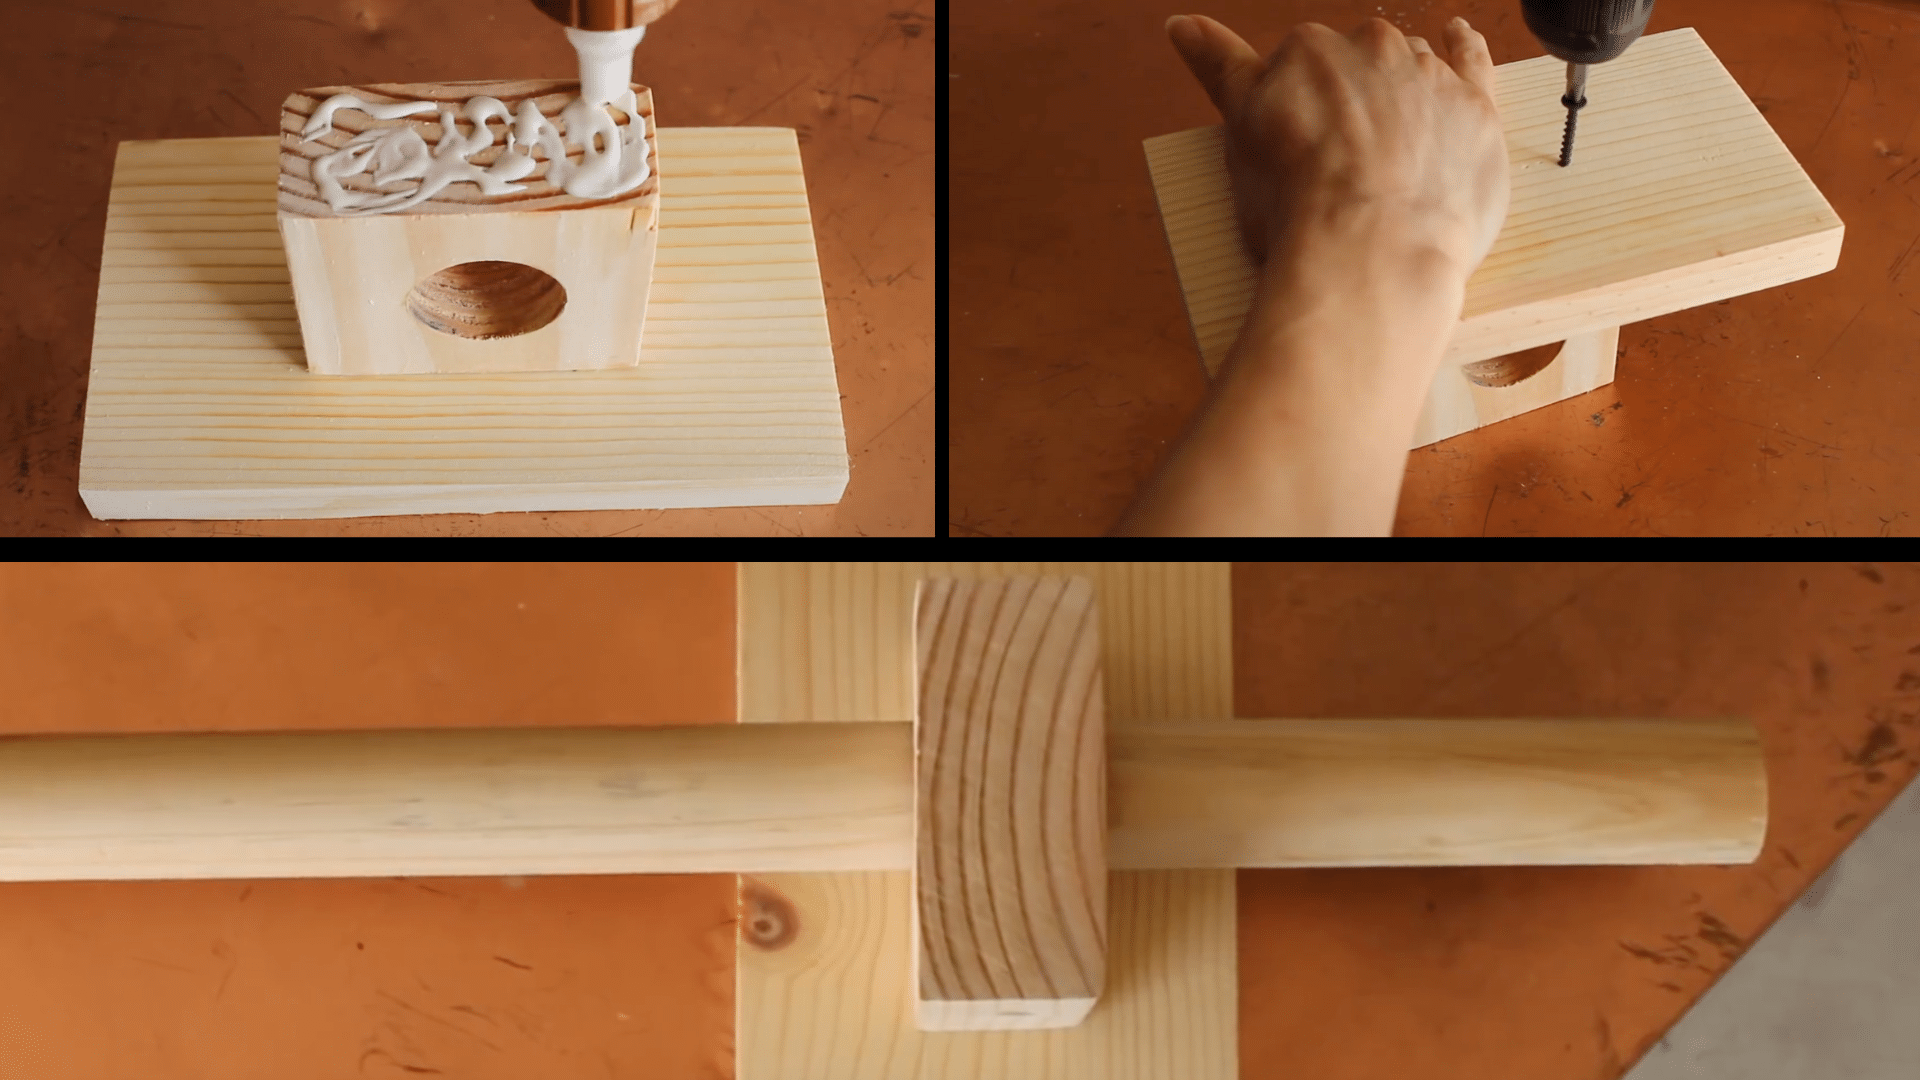
Now comes the exciting part: Your curtain rod starts taking shape! This assembly step transforms separate pieces into one sturdy rod that’s ready to hold your curtains.
- Attach the Pieces: Once the glue has dried, attach the thinner dowel piece to the thicker piece using wood glue and screws for added security.
- Check Alignment: Use a tape measure to ensure everything is even and aligned before securing the screws.
Step 4: Installing the Curtain Rod
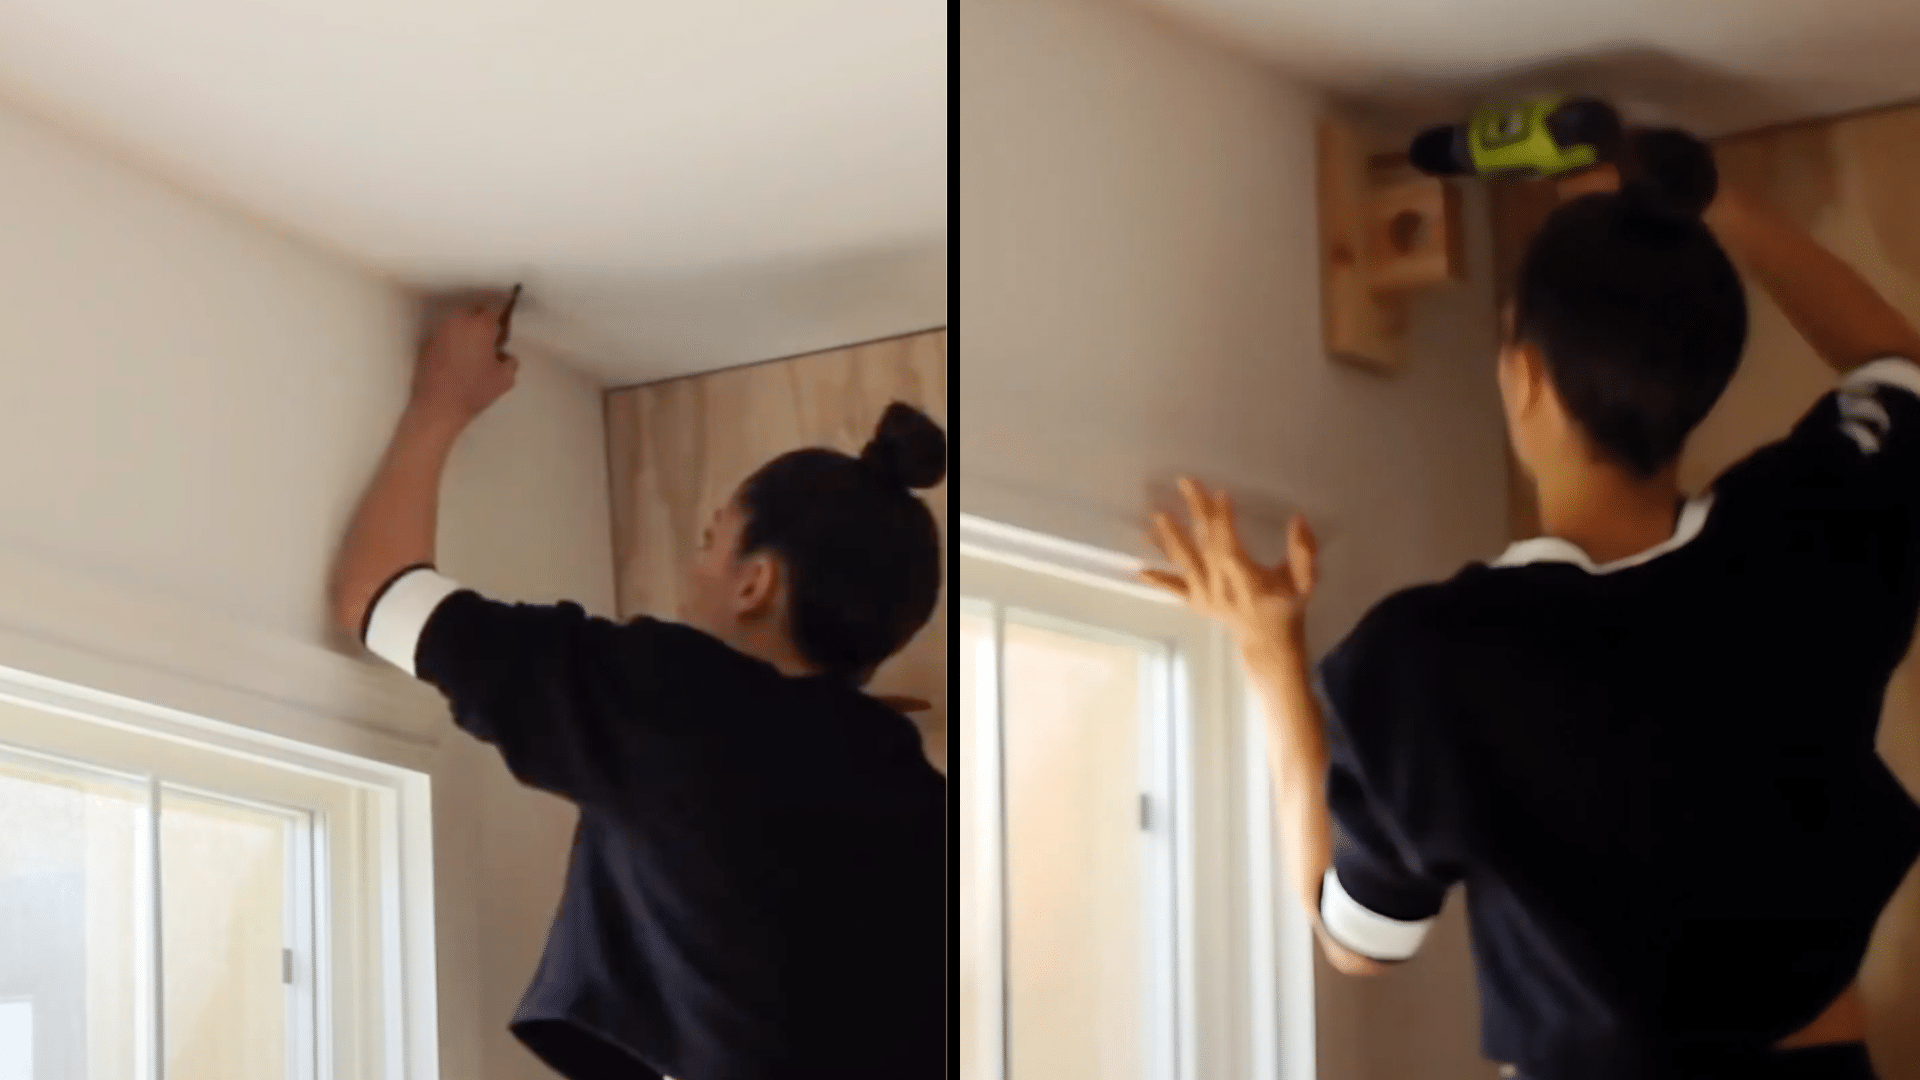
Proper installation ensures your new rod stays put, even with heavier curtains. Finding the studs is key—they’ll provide the support your curtain rod needs.
- Find the Studs: Use a stud finder to locate two studs in your wall where you will attach the curtain rod.
- Drill the Screws: Use longer wood screws to attach the curtain rod to the studs, ensuring a secure hold.
Step 5: Hanging the Curtains
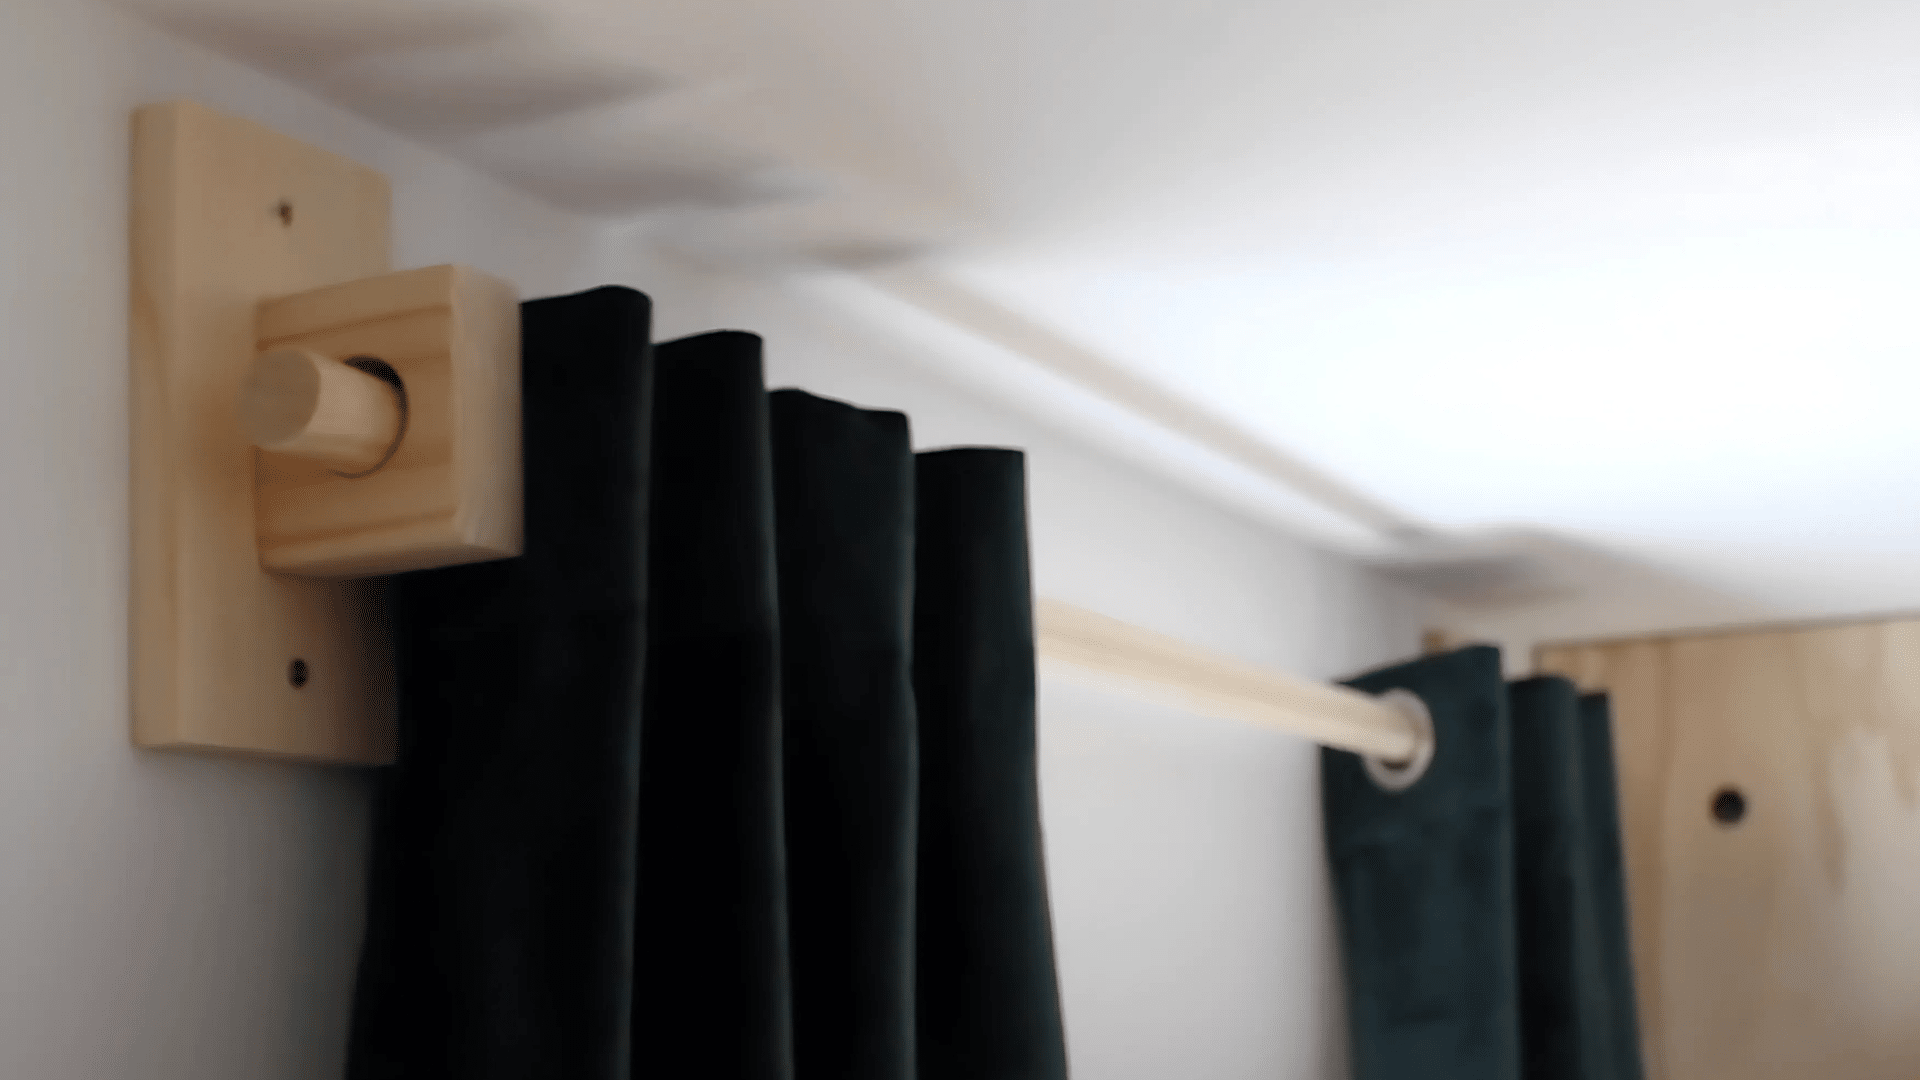
This is the moment you’ve been waiting for! Seeing your curtains on your handmade rod brings the whole project full circle and shows off your handiwork to everyone who visits.
- Hang Your Curtains: Once the rod is installed, hang up your curtains. The finished look should seamlessly blend with your home decor.
Video Tutorial
Check out this detailed video tutorial on YouTube that walks you through every part of making your wooden curtain rod, by LivingtoDIYwithRachelMetz.
Important Safety Precautions to Consider
Safety comes first with any DIY project. Take a few simple precautions to ensure your curtain rod project goes smoothly without any accidents or injuries.
- Always wear safety glasses when drilling or cutting wood
- Keep your fingers away from drill bits and saw blades
- Use clamps to hold wood pieces steady while working
- Make sure your work area is well-ventilated when applying paint or stain
- Double-check that your curtain rod is securely attached to wall studs before hanging curtains
- Keep small hardware like screws away from children and pets during your project
Finishing Touches: Paint & Stain Ideas
The right finish can take your diy curtain rod from good to great! A thoughtful color choice helps your new curtain rod either blend in with your decor or stand out as a statement piece. Here are some options to consider:
Natural & Rustic: Leave the wood unpainted or apply a light wood stain for a warm, natural look.
Clean & Modern: For a sleek, contemporary feel, use matte or satin paint in neutral tones.
Bold Statement: Make your curtain rod a focal point with dark or metallic shades.
Wrapping Up Your DIY Curtain Rod
Congratulations on creating your wooden curtain rod! This weekend project saves you money. It gives your windows a custom touch.
Store-bought options can’t match your personal style. Making your own diy curtain rod offers great versatility. You can adjust the size. You can choose the style. You can pick the perfect finish for your space.
There’s something special about handmade items. Imagine pointing to your curtains when guests visit. “I made that myself,” you’ll say with pride.
Small details make a big difference in home decor. Your custom rod might inspire other DIY projects.
What will you create next? In the comments, share photos of your finished curtain rod. We’d love to see your creative touches!
Frequently Asked Questions (FAQs)
What Can You Use Instead of a Curtain Rod?
Depending on your aesthetic and the weight of the curtains, you can use alternatives like a tension rod, a bamboo pole, or a metal pipe.
Can I Use PVC Pipe as a Curtain Rod?
Yes, PVC pipes can work as curtain rods for lighter curtains and are a cost-effective and easy-to-install option.
How Do You Hang Window Curtains Without a Rod?
You can hang window curtains without a rod by using adhesive hooks, tension rods, or curtain wire systems that don’t require drilling into the wall.
How Far Should a Curtain Rod Extend Past a Bracket?
A curtain rod should extend at least 3-6 inches past the brackets on each side to ensure the curtains can fully open and close without obstruction.
