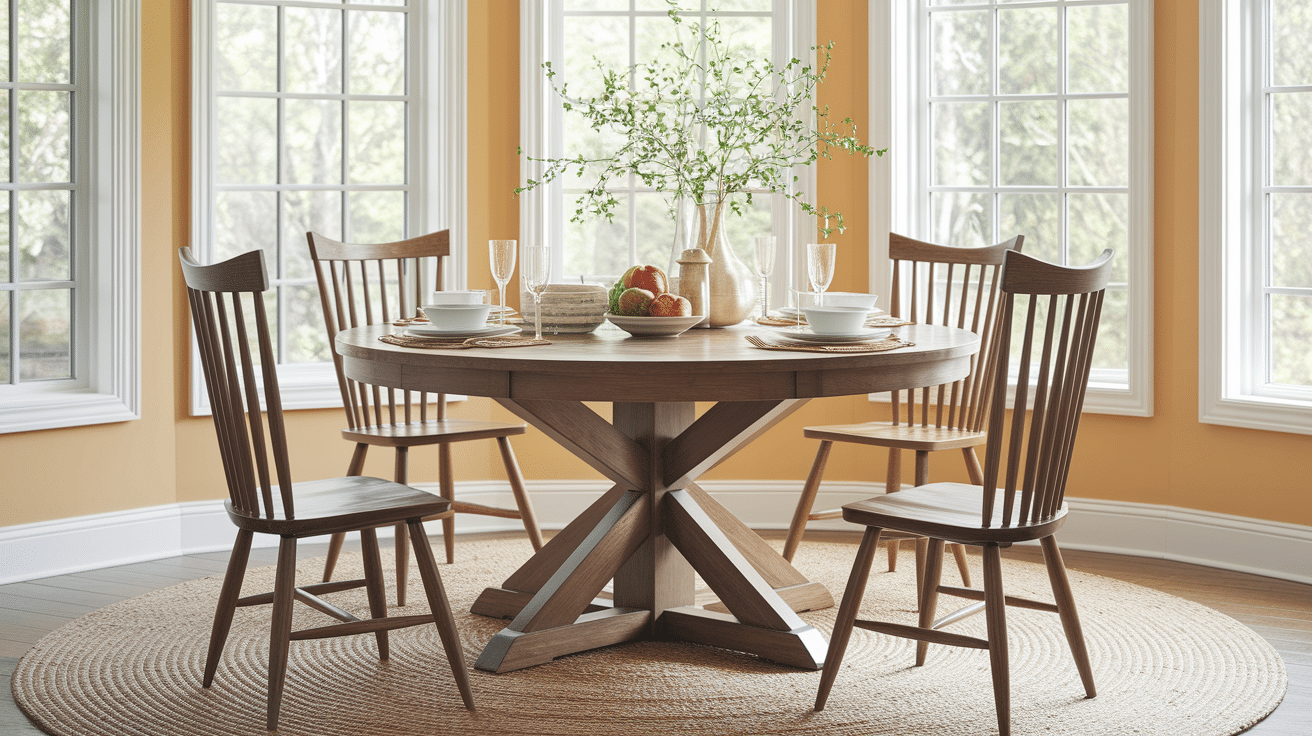
Want to create a statement piece for your dining room without breaking the bank?
This 6-foot round farmhouse dining table project delivers professional results using straightforward techniques, even if you’re newer to woodworking.
Building your table allows you to customize dimensions, materials, and finishes to match your home perfectly.
Better yet, this project uses accessible materials available at your local home improvement store, making it both affordable and practical.
In this guide, we’ll walk through each stage of constructing a beautiful round dining table in a rustic farmhouse style that comfortably seats 6-8 people. Let’s get started!
Materials and Tools Required
| Item | Quantity |
|---|---|
| 2×4 lumber | 20-24 boards (8 ft) |
| 2×10 lumber | 8 pieces (3-4 ft each) |
| 4×4 posts | 4-6 pieces (8 ft) |
| 1/4″ dowel | 1 ft |
| 1″ dowels | 2-3 ft |
| Wood glue | 16 oz bottle |
| Pocket hole screws (1-1/4″) | 20-25 |
| Pocket hole screws (2-1/2″) | 20-25 |
| Wood screws (various) | 20-30 |
| Leveling feet with felt pads | 4 |
| Minwax Pre-Stain Wood Conditioner | 1 pint |
| Minwax Special Walnut stain | 1 quart |
| Minwax Polyacrylic Clear Coat (Satin) | 1 quart |
Tools
| Tool | Purpose |
|---|---|
| Circular saw | Cutting boards to size and trimming the round tabletop in jig |
| Jigsaw | Cutting curved edges, including border curves and trimming corners |
| Miter/chop saw | Making precise angled cuts, especially for the border and base pieces |
| Drill | Drilling holes and driving screws |
| Pocket hole jig | Creating hidden joints to securely attach base components |
| Belt sander or hand plane | Flattening and smoothing surfaces and leveling glued boards |
| Clamps (various sizes) | Holding glued boards together firmly while drying |
| Chisel | Cleaning out half-lap joints in the X-brace assembly |
| String and pencil | Drawing a perfect circle to guide your tabletop shape |
| Measuring tools | Ensuring precise measurements for accurate cuts and alignment |
| Sandpaper (80, 120, 220 grit) | Smoothing the surface progressively before staining and sealing |
Step-by-Step Guide to Make Round Dinner Table
Creating a round dinner table is a fun project that can change your dining space. Follow this simple step-by-step guide to build a beautiful, functional table.
Step 1: Plan and Mark Your Circle

Start by finding a clean, flat workspace large enough to accommodate your 6-foot circle. Mark a center point and attach one end of a 3-foot string to it. Tie a pencil to the other end of the string to create a simple compass.
Keep the string taut and rotate the pencil in a complete circle to draw your template. This circle will guide the arrangement of your lumber and ensure your finished table has the proper dimensions.
Quick Tips:
- Pin the center end of the string to the floor for more precise results
- Double-check your radius measurement before drawing the full circle
- Use chalk instead of pencil if working on a concrete floor
- Take photos of your marked circle for reference later
Step 2: Prepare and Glue the Tabletop Boards

Cut your 2×4 lumber slightly longer than your circle’s diameter (about 6’2″) to allow for final trimming. Arrange the boards side by side within your marked circle to ensure complete coverage.
Instead of attempting to glue all boards at once, divide your tabletop into four manageable sections of 5-6 boards each. Apply glue to the edges of each board in a section, then clamp firmly from both edges and across the top.
Allow each section to dry properly for 24 hours.
Quick Tips:
- Arrange boards with alternating growth rings to minimize warping
- Use dowels or biscuits between boards to maintain alignment
- Keep a damp cloth handy to wipe away excess glue immediately
- Use a straightedge to check for flatness during and after gluing
Step 3: Create a Circle Cutting Jig

Measure exactly 3 feet (for a 6-foot diameter table) from the inside edge of the saw blade and drill a 1/4″ hole at this point. This will be your pivot point.
Find and mark the exact center of your tabletop, then drill a 1/4″ hole about 1″ deep.
When using the jig, insert a 1/4″ dowel through the jig hole and into the tabletop’s center hole. Set your saw blade to cut only about 1/16″ deep per pass.
Make multiple shallow passes, gradually increasing depth, until you’ve cut through the entire tabletop.
Quick Tips:
- Test your jig on scrap material before using it on your project
- Cut off excess corners with a jigsaw first to make the circular saw’s job easier
- Keep the saw cord clear of the blade path during rotation
- Have someone help stabilize the work while cutting
Step 4: Craft the Border

Cut eight pieces of 2×10 lumber with 45-degree angles on both ends to form an octagon. For a 6-foot diameter table, each piece will be approximately 29 inches on the outside edge. Use an online octagon calculator for precise measurements.
Temporarily assemble the octagon with tape and place your circular tabletop in the center. Trace the inner circle onto the border pieces, adding reference marks to maintain alignment.
Cut along these lines with a jigsaw and smooth the curves with a drum sander.
Quick Tips:
- Number your border pieces to maintain their correct order
- Cut slightly outside your traced line, then sand to the final shape
- Apply glue to both surfaces for stronger joints
- Fill any gaps with a mixture of fine sawdust and wood glue
Step 5: Build the Base Structure

For a standard dining height table (30″), cut 4×4 posts into specific lengths: four pieces for the bottom X-brace (approximately 30″ each), four for the top X-brace (approximately 24″ each), four corner braces (approximately 12″ each), and one center post (about 28″).
Mark the center point on each piece to create half-lap joints where the X-braces intersect.
Make multiple passes with your circular saw set to half the depth of the 4×4, then use a chisel to remove the waste material between cuts. Test-fit each joint before assembly.
Quick Tips:
- Use a speed square to mark accurate cut lines
- Make multiple shallow saw passes rather than trying to cut half-laps in one go
- Pre-drill holes to prevent splitting the wood
- Dry-fit all parts before applying glue
Step 6: Sand and Apply Finish

Begin sanding with 80-grit paper to remove any major unevenness or glue residue. Progress to 120-grit for general smoothing, then finish with 220-grit for a polished surface ready for finishing. Always sand with the grain and vacuum between grits.
Apply pre-stain wood conditioner with a clean cloth to prevent blotchy absorption, which is especially important with pine.
Allow it to penetrate for 15 minutes, then wipe off any excess with a clean cloth. This step ensures even stain absorption across different wood densities.
Quick Tips:
- Work in a dust-free, well-ventilated area with temperatures between 65-75°F
- Strain polyacrylic before use to remove any particles
- Use a high-quality brush for smoother application
- Apply polyacrylic in thin coats for better durability
Step 7: Attach the Base to the Tabletop

Place the tabletop upside down on a clean, padded surface. Position the assembled base in the center, ensuring it’s square to the tabletop.
Mark the position where the top X-brace meets the tabletop underside.
Remove the base temporarily and drill pocket holes in the top X-brace at the marked positions. Reposition the base and attach it to the tabletop using 2-1/2″ pocket hole screws. Don’t overtighten, as this allows for natural wood movement.
Quick Tips:
- Use elongated holes or figure-eight fasteners to allow for wood movement
- Position pocket holes where they won’t be visible
- Pre-drill pilot holes to prevent splitting
- Adjust all feet to ensure the table doesn’t rock
Keeping Your New Table Beautiful for Years

Your handcrafted table isn’t just furniture—it’s an investment that deserves proper care. With some simple daily habits, you can maintain its beauty for many years to come.
Simple Daily Habits
Make coasters your table’s best friends! Place them under glasses and cups to prevent water rings.
Use placemats when serving meals to shield the surface from hot dishes and potential scratches.
Cleaning Made Simple
Keep cleaning gentle and effective. Wipe your table with a slightly damp cloth to remove dust and small spills, then immediately dry the surface with a soft, clean cloth.
This prevents moisture from seeping into the wood.
Seasonal Care
Every 3-6 months, treat your table to furniture polish made specifically for polyacrylic finishes. This maintains the sheen and protects the surface.
Apply in thin, even coats following the direction of the wood grain.
What to Avoid
Your table’s worst enemies are direct sunlight, heat sources, and harsh cleaning products.
Position your table away from windows with strong sunlight and keep it at a distance from heaters or radiators. Stick to gentle cleaners made for wood surfaces.
Long-Term Maintenance
Your table might need a refresh every few years with a new coat of polyacrylic. You’ll know it’s time when the finish begins to look dull, even after polishing.
This simple step restores the protective layer and brings back the original luster.
Conclusion: Enjoy Your Handcrafted Table
Your completed round dining table represents more than just a functional piece of furniture—it’s a showcase of your craftsmanship and creativity.
The knowledge that you built this table with your own hands will enhance every meal served on it.
The techniques you’ve learned in this project—from creating perfect circles to crafting strong wood joints—will serve you well in future woodworking endeavors.
We’d love to see your finished table! Share photos of your creation and tell us how you customized it to fit your home perfectly.
The satisfaction of building quality furniture that will serve your family for generations is truly unmatched.
Happy building!
Frequently Asked Questions (FAQs)
How Long Does This Project Take?
Expect to spend 2-3 weekends on this project, allowing for drying time between steps.
Can I Make a Smaller Table Using the Same Technique?
Yes! Adjust the radius of your circle and the length of your border pieces proportionally.
What’s the Best Wood Type for This Project?
Pine is affordable and takes stain well. For higher durability, consider oak, maple, or other hardwoods.
How Much Will This Project Cost?
Depending on material choices, expect to spend $215-300, which is significantly less than comparable store-bought tables.
