Have you ever wanted a beautiful, functional sideboard but couldn’t find exactly what you’re looking for in stores?
Building your own sideboard allows you to customize dimensions, style, and finish while saving money.
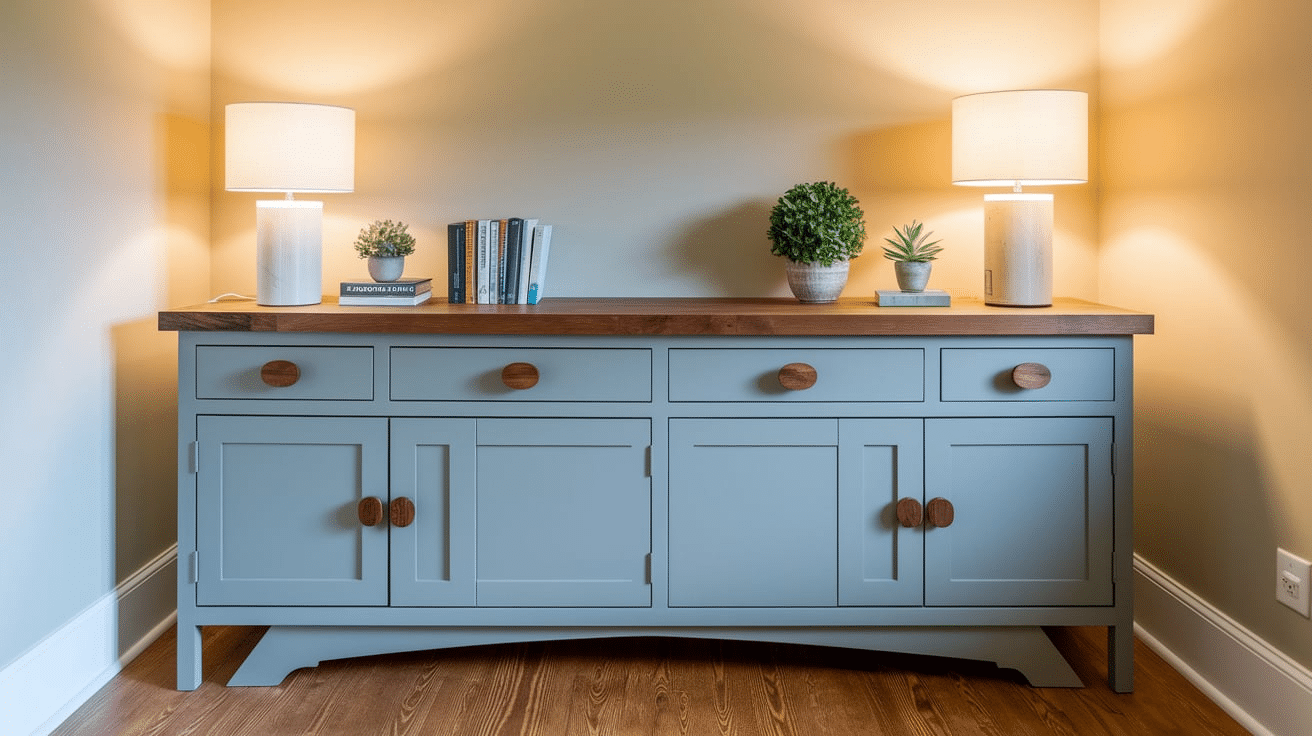
This guide explains how to construct a DIY sideboard with a walnut top and inset doors and drawers in simple, manageable steps.
Even if you’re new to woodworking, this project uses straightforward joinery techniques that anyone can master with patience and attention to detail.
Let’s create a sideboard that will serve as both a practical storage solution and a standout piece in your home.
Tools Required
| Tool | Purpose |
|---|---|
| Table Saw | Cutting lumber, making rabbets, tongue and groove joinery |
| Band Saw | Cutting tapers on legs |
| Oscillating Belt Sander | Smoothing tapered legs |
| Drill | Creating pocket holes, installing hardware |
| Pocket Hole Jig | Creating pocket holes for joinery |
| Clamps (various sizes) | Holding pieces during assembly and glue-ups |
| Brad Nailer | Attaching trim pieces and back panel |
| Block Plane | Making minor adjustments to doors |
| Crosscut Sled | Accurate cutting of panels and boards |
| Measuring Tools (tape measure, square) | Ensuring accurate dimensions and square corners |
| Sandpaper (80, 150, 320 grit) | Surface preparation and between-coat sanding |
| Foam Roller and Paintbrush | Applying paint finishes |
| Playing Cards | Used as spacers for consistent reveals |
| Lathe (optional) | For making custom wooden knobs |
Materials Required
| Material | Quantity | Purpose |
|---|---|---|
| Select Pine 2×2s | 4 pieces (8 ft) | Legs and frame pieces |
| 3/4″ Plywood | 1 sheet (4×8 ft) | Side panels, shelves, drawer boxes, stretchers |
| 1/4″ Plywood | 1/2 sheet (4×8 ft) | Back panel, door panels, drawer bottoms |
| 1×2 Pine | 8 ft | Trim for sides and shelves |
| 1×3 Pine | 16 ft | Trim for sides and door frames |
| Walnut Boards | ~12 board feet | Top and custom knobs/pulls |
| Wood Glue | 8 oz bottle | All wood joinery |
Step-by-Step Process to Make Sideboard
Creating a sideboard involves careful planning and precise woodworking techniques, beginning with selecting quality lumber and drafting detailed designs.
Step 1: Create the Legs and Frame
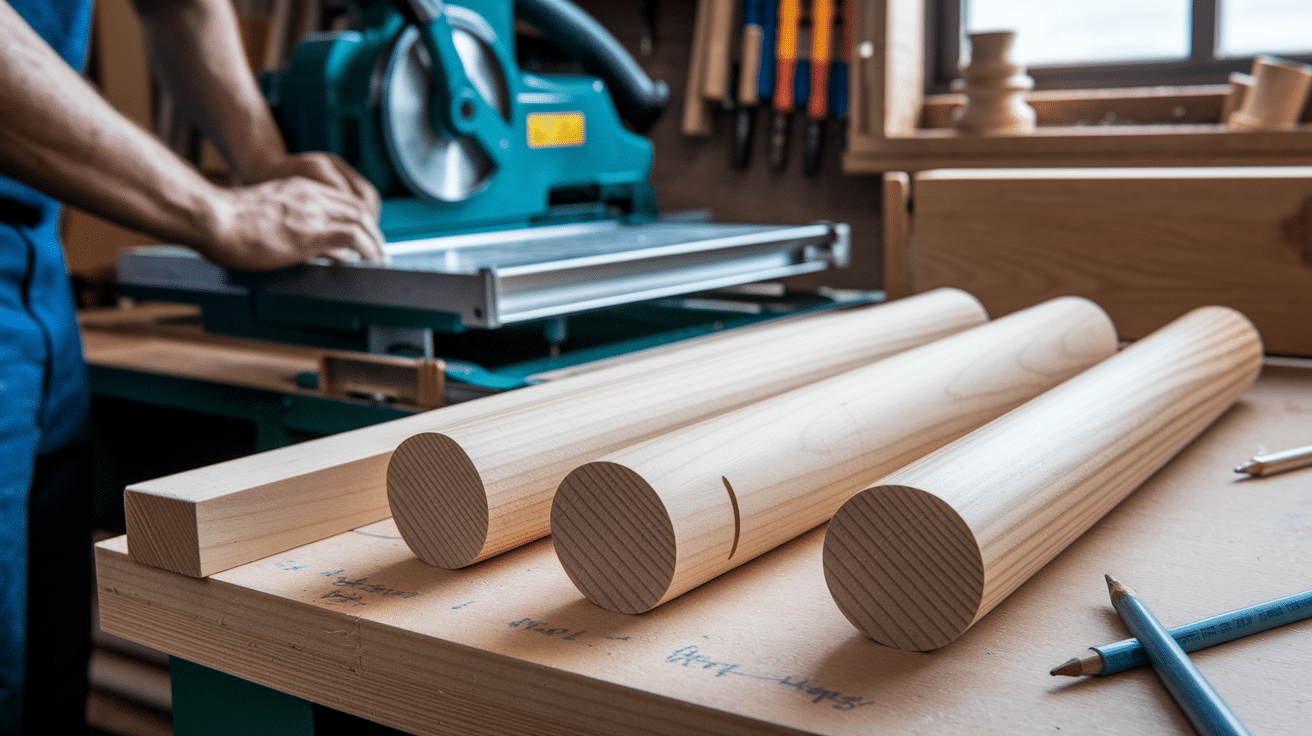
Begin by cutting four legs from select pine 2×2s. Define the feet by adding a slight taper for visual interest. Mark your taper lines, cut them on a bandsaw, and sand smooth.
For the back legs, cut rabbets to receive the back panel, ensuring it sits flush with the rear of the legs.
Quick tips:
- Use a paper template at the bottom to mark consistent tapers on all legs
- Make two passes on the table saw when cutting rabbets – first to define depth, then width
- Sand the tapered sections thoroughly to remove any saw marks
Step 2: Construct the Side Panels
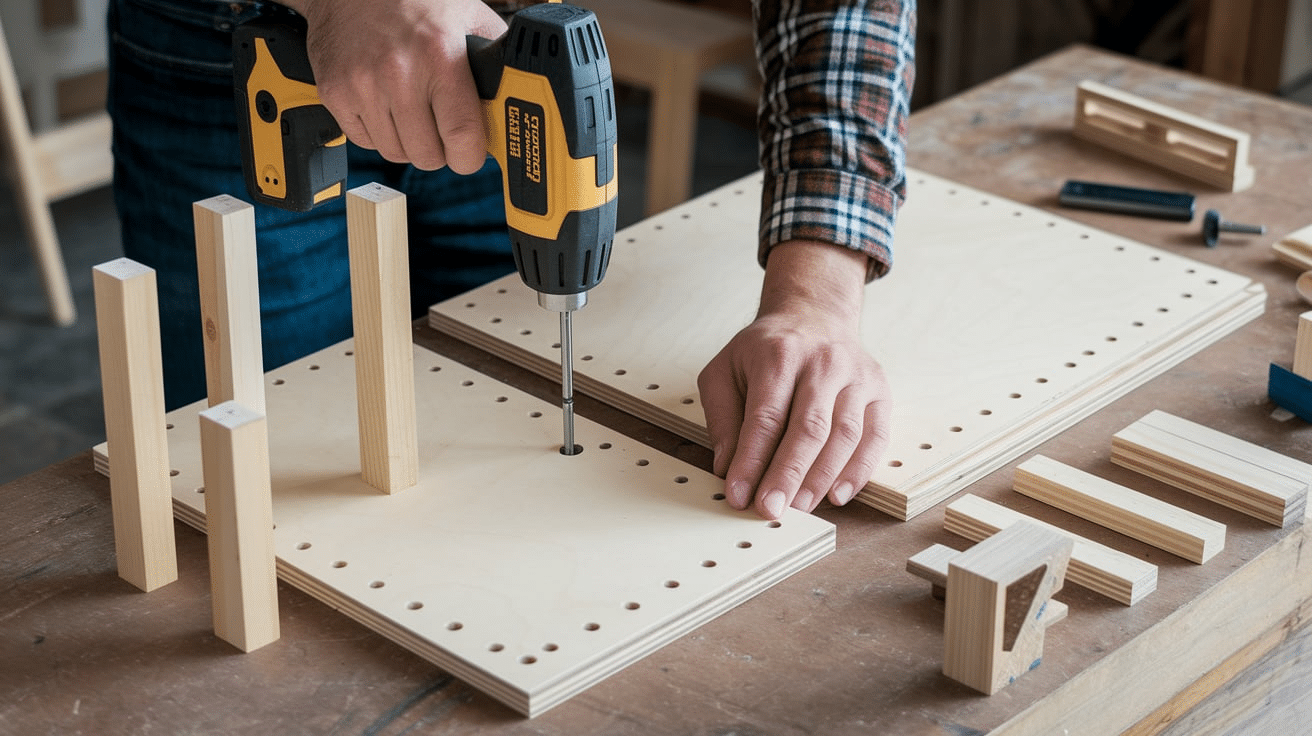
Cut side panels from 3/4-inch plywood. This design uses a faux frame and panel approach with simple trim pieces and pocket holes along the sides of the panels to join them to the legs.
Position each panel with a 3/4-inch spacer to align it properly with the legs, then secure it with pocket screws.
Quick tips:
- Keep the pocket holes on the inside of the cabinet where they won’t be visible
- Use clamps to hold everything in position while driving pocket screws
- Add 1×2 trim for the top rail and 1×3 trim for the bottom rail to create the faux frame look
- Drill shelf pin holes now for adjustable shelves later
Step 3: Assemble the Main Carcass
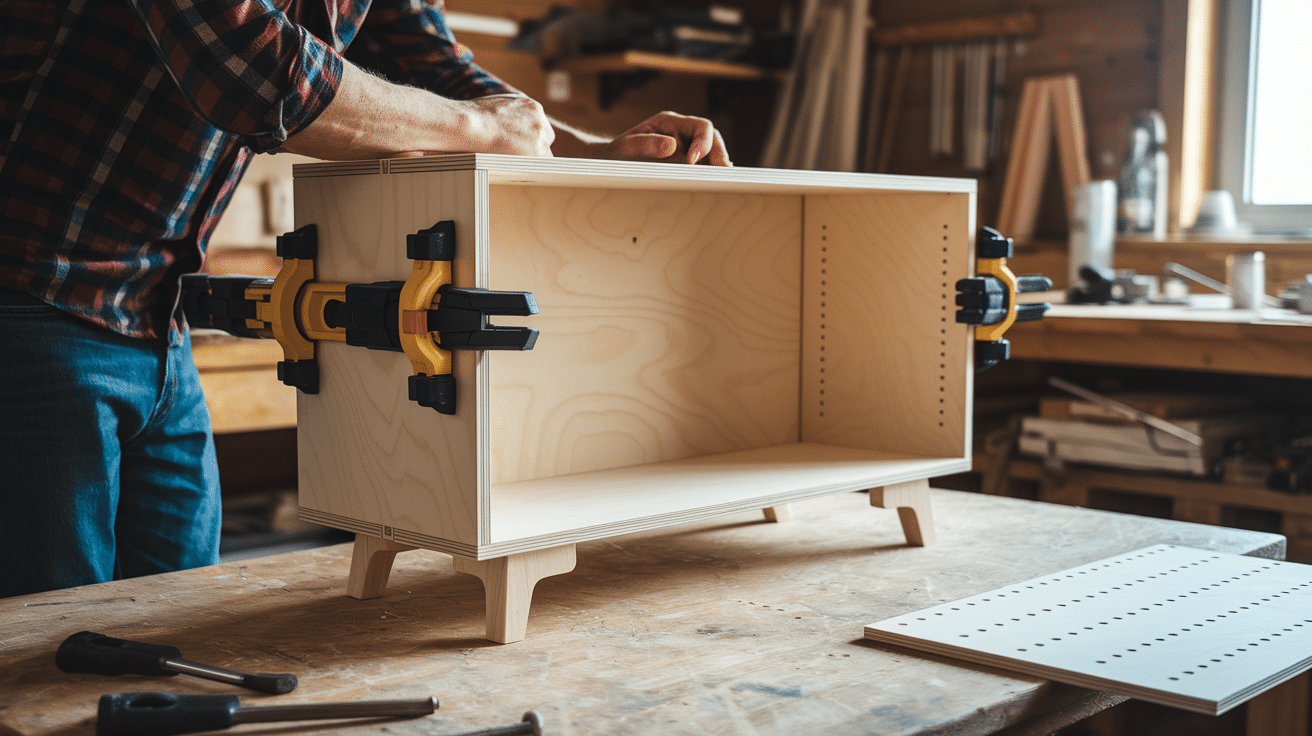
Connect the sides with plywood back stretchers, 2×2 front frame pieces, and a bottom panel. Cut all pieces to size with pocket holes for joinery.
Start by attaching the front frame members to one side, then the back stretcher flush with the rabbets. Stand the sides up, clamp them together, and connect with pocket screws.
Quick tips:
- Use a small 2×2 center divider to space the front frame pieces properly
- Ensure the back stretcher aligns perfectly with the rabbets cut earlier
- Check for a square at each step of the assembly
- Use a spacer to position the bottom shelf for even door openings
Step 4: Build and Install the Drawers
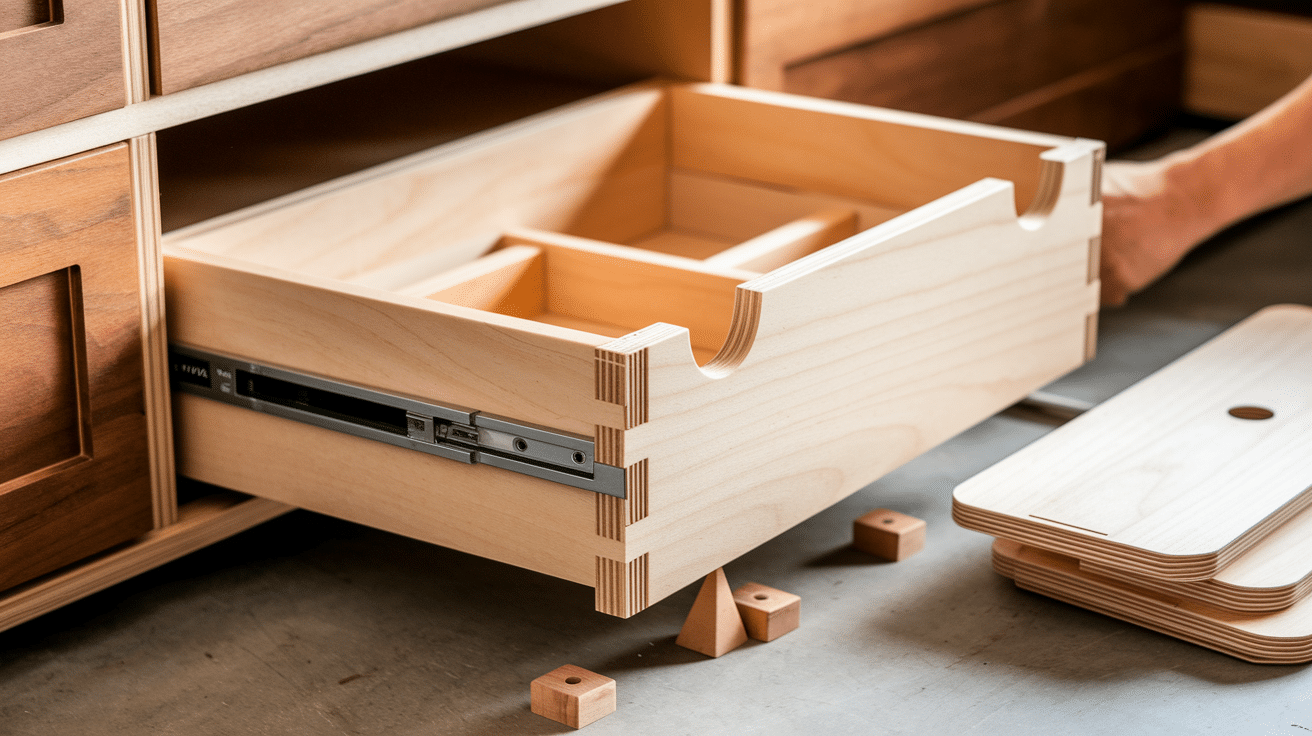
Create drawer boxes from 3/4-inch plywood with pocket-hole joinery. Install full-extension drawer slides for smooth operation.
Cut all drawer parts to width, then use a crosscut sled with a stop block for consistent lengths. Add a middle support in the carcass to mount the drawer slides.
Quick tips:
- Seal drawer interiors with shellac before assembly for easier finishing
- Use 1/4-inch plywood for drawer bottoms, with a chamfered edge for a clean look
- Place drawers on 1/8-inch spacers when installing slides for proper alignment
- Mount slides in three stages – secure first screw, pull the drawer out, add second screw, remove the drawer completely for the third screw
Step 5: Craft the Cabinet Doors
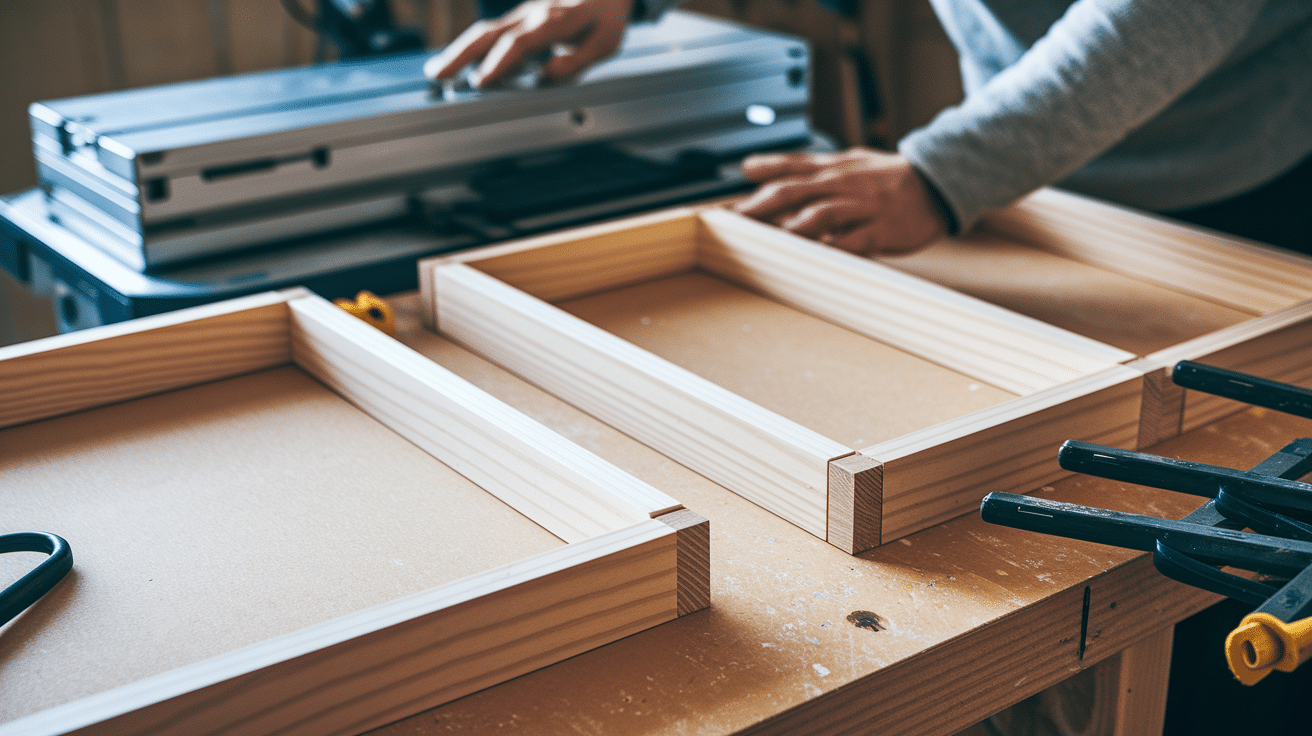
Make frame-and-panel doors using 1×3 pine with 1/4-inch plywood panels. Cut frame pieces slightly long to allow for fine adjustments.
Use tongue and groove joinery for strong connections and a professional appearance. Cut grooves in all frame pieces, then create matching tongues on the ends of the rails.
Quick tips:
- Make test cuts on scrap wood to perfect your groove and tongue dimensions
- Pre-paint plywood panels before assembly for easier finishing
- Check doors for square during glue-up and adjust as needed
- Use clamps to hold everything tight while the glue dries
Step 6: Create and Finish the Walnut Top
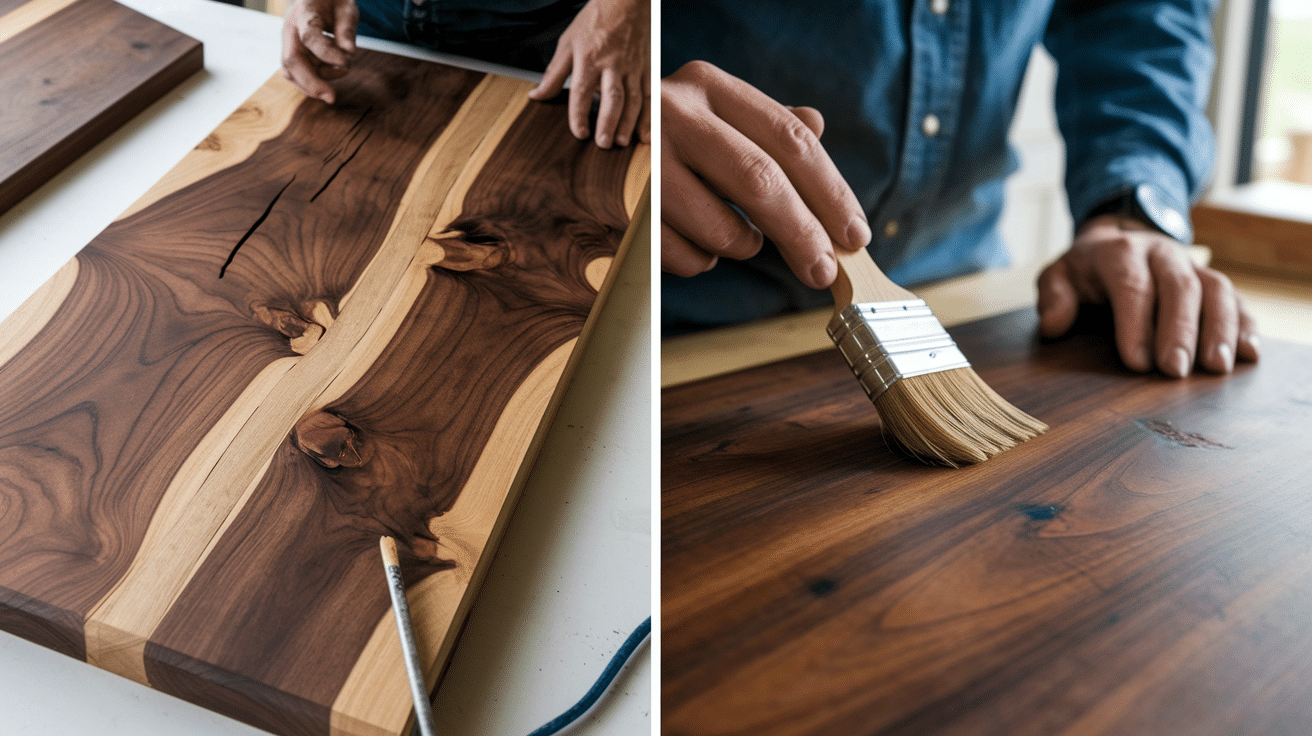
Select walnut boards with characters and prepare them for gluing. Plane boards on one side while leaving the other with natural texture if desired.
Joint the edges for tight seams, then glue them together into a panel. After drying, cut to the final size and sand carefully to preserve character while creating a smooth surface.
Quick tips:
- Make relief cuts in boards that aren’t perfectly flat to help them lay flat during glue-up
- Support large panels properly when cutting on a crosscut sled
- Sand with progressively finer grits (80, then 150, then 320 between finish coats)
- Apply multiple thin coats of finish rather than one thick coat for better results
Step 7: Final Assembly and Finishing
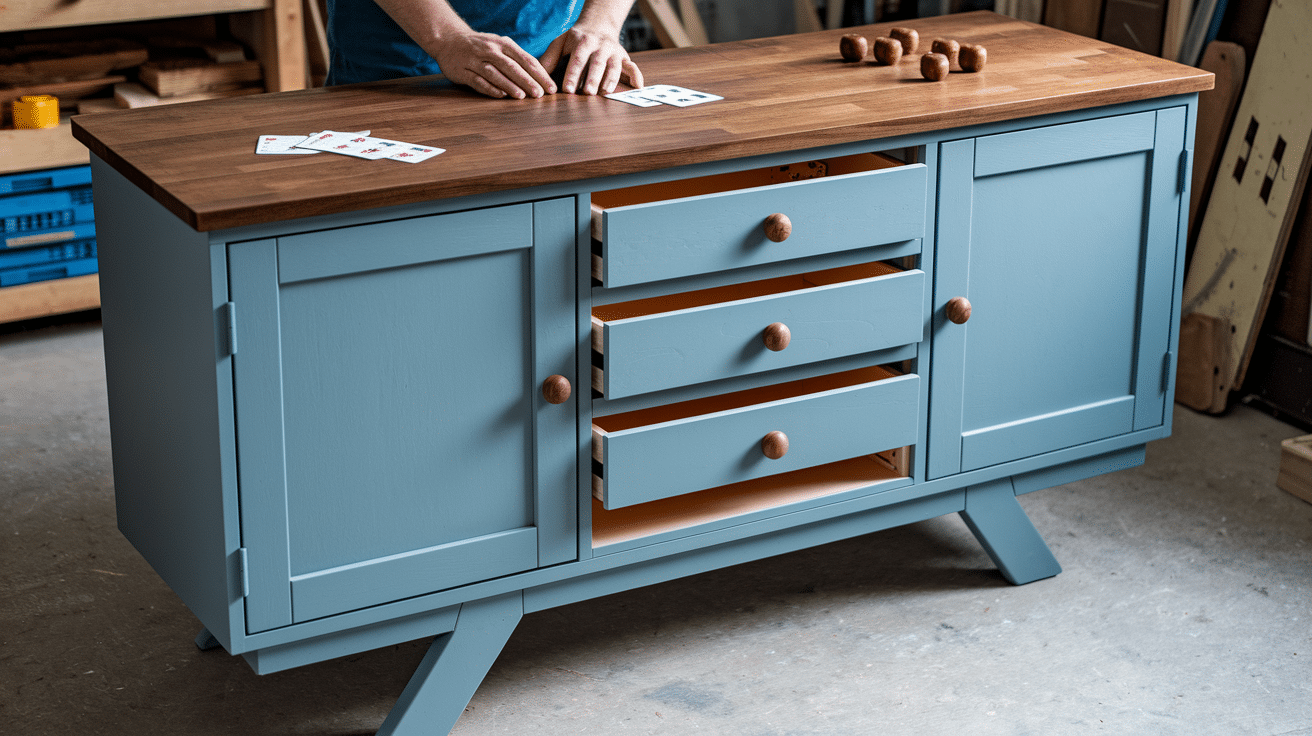
Paint the carcass, doors, and drawer fronts. Install hardware, attach doors with hinges, and mount drawer fronts with consistent reveals.
Attach the walnut top using tabletop fasteners that allow for wood movement. Install the back panel with brad nails to complete the sideboard.
Quick tips:
- Sand between paint coats with 320-grit paper for a smooth finish
- Use playing cards as shims to create consistent reveals around drawers and doors
- Add magnetic catches to keep doors closed securely
- Consider making your wooden knobs and pulls from matching walnut for a cohesive look
Make It Your Own: Customization Ideas for Your DIY Sideboard
The beauty of DIY furniture projects lies in the ability to customize every aspect to match your home and personal style. Here are some creative ways to modify this sideboard design while keeping the basic construction method the same.
Size Adjustments
Don’t feel locked into standard dimensions. Modify the sideboard to fit your space perfectly:
- Length: You can extend or shorten the sideboard by adjusting the width of the side panels and the length of the front frame pieces.
- Height: Create a taller buffet by extending the legs and adding additional shelving inside.
- Depth: Increase depth for more storage capacity or decrease it for narrower spaces.
A quick tip: When changing dimensions, make a scaled drawing first to ensure everything remains proportional.
Material Variations
While pine and walnut work beautifully, consider these alternatives:
- Cabinet Base: Try maple for durability, cherry for warmth, or oak for a traditional look.
- Top Surface: Consider reclaimed barn wood for rustic charm, butcher block for a kitchen-friendly surface, or marble for luxury (though this requires a sturdier base).
- Mixed Media: Incorporate metal pipe legs, steel accents, or copper hardware for an industrial feel.
A quick tip: Visit local sawmills or wood recycling centers to find unique, affordable lumber with character.
Wrap-Up: Enjoy Your Custom Sideboard
Building your sideboard takes time and care, but the result is worth the effort. You’ll have a piece that perfectly fits your space and style, with quality construction that can last for generations.
This sideboard combines traditional woodworking techniques with modern materials and simple joinery methods.
The walnut top adds warmth and character to the painted base, creating a versatile piece that works in many different interior styles.
Suppose you’re planning to store dining room essentials, use it as a media console, or display your favorite items. In that case, this DIY sideboard provides both practical storage and visual appeal that mass-produced furniture can’t match.
Frequently Asked Questions
What Is a Sideboard vs. A Buffet?
A sideboard typically has cabinets that reach the floor and are slightly taller, while a buffet has longer legs and might be narrower in depth.
How to Make a Kitchen Cabinet Look Like Furniture?
To help kitchen cabinets appear like standalone furniture, add furniture-style legs, replace standard hardware with decorative pulls, incorporate crown molding at the top, and consider painting or staining them in a color contrasting with your other cabinets.
What Goes in A Kitchen Sideboard?
Kitchen sideboards are perfect for storing items that you want accessible but that don’t clutter countertops.
