

Store-bought cutting boards crack, warp, and dull your knives faster than you’d expect. Most home cooks settle for cheap plastic boards that harbor bacteria or thin wood boards that split after months of use.
End grain cutting boards offer a better solution. They’re gentler on knife edges, self-heal from cuts, and last for decades when appropriately made. Professional chefs prefer them, but they cost $100+ in stores.
You can build your own end grain cutting board for under $30 using basic tools and techniques. This guide walks you through each step, from selecting the right wood to applying the final finish. You’ll save money while creating a kitchen tool that improves your cooking experience.
Follow these clear instructions to build a cutting board that rivals expensive store versions. Let’s start with the materials you’ll need.
Understanding End Grain vs. Edge Grain
Wood grain direction affects how your cutting board performs. The way you cut and arrange wood pieces changes the board’s strength, appearance, and knife-friendliness.
- End grain boards show wood fibers cut across their length.
- Edge grain boards display wood fibers running along their length.
This difference impacts durability, maintenance, and cost.
Edge Grain vs. End Grain Comparison Table
| Feature | Edge Grain | End Grain |
|---|---|---|
| Visual Pattern | Long, straight lines running across the board | Checkerboard or mosaic pattern with visible growth rings |
| Knife Impact | Harder surface; dulls knives faster | Softer surface; gentle on knife edges |
| Self-Healing | Shows permanent cut marks | Fibers close up after cutting |
| Durability | Good for light to medium use | Excellent for heavy chopping |
| Water Resistance | Absorbs moisture through grain lines | Better moisture resistance |
| Cost to Build | Less expensive; uses fewer pieces | More expensive; requires more cuts and glue |
| Build Time | 2-3 hours | 4-6 hours |
| Weight | Lighter | Heavier due to thickness |
| Maintenance | Monthly oiling | Monthly oiling |
When to Choose Each Type
Choose End Grain When:
- You do heavy chopping and meal prep daily
- Knife sharpness is important to you
- You want a board that lasts 20+ years
- Budget allows for higher material costs
Choose Edge Grain When:
- You need a lighter, portable board
- Building your first cutting board
- Working with a tight budget
- You prefer simpler construction methods
End grain boards cost more upfront but save money long-term. They protect your knives and handle daily kitchen tasks better than edge grain alternatives.
Step-By-Step Guide: End Grain Cutting Board
Tools Required
| Tool | Purpose |
|---|---|
| Table saw | Cut wood pieces and trim strips |
| Miter gauge | Square up board ends |
| Cross cut sled | Final squaring and trimming |
| Stop block | Safe fence positioning |
| Clamps (multiple) | Hold pieces during glue-up |
| Drum sander | Flatten board surface |
| Router | Cut finger grooves and round edges |
| Round nose router bit | Create finger grip grooves |
| 1/4″ round over bit | Smooth board edges |
| Sandpaper (various grits) | Final surface preparation |
Materials Required
| Material | Quantity | Notes |
|---|---|---|
| Hardwood pieces (sipo/maple) | 6-8 pieces | Different sizes from scrap wood |
| Titebond III glue | 1 bottle | Waterproof and food-safe |
| Cutting board oil | 1 bottle | Food-safe mineral oil or specialized oil |
| Water | Small amount | For grain raising technique |
Step 1: Prepare Wood and First Glue-Up
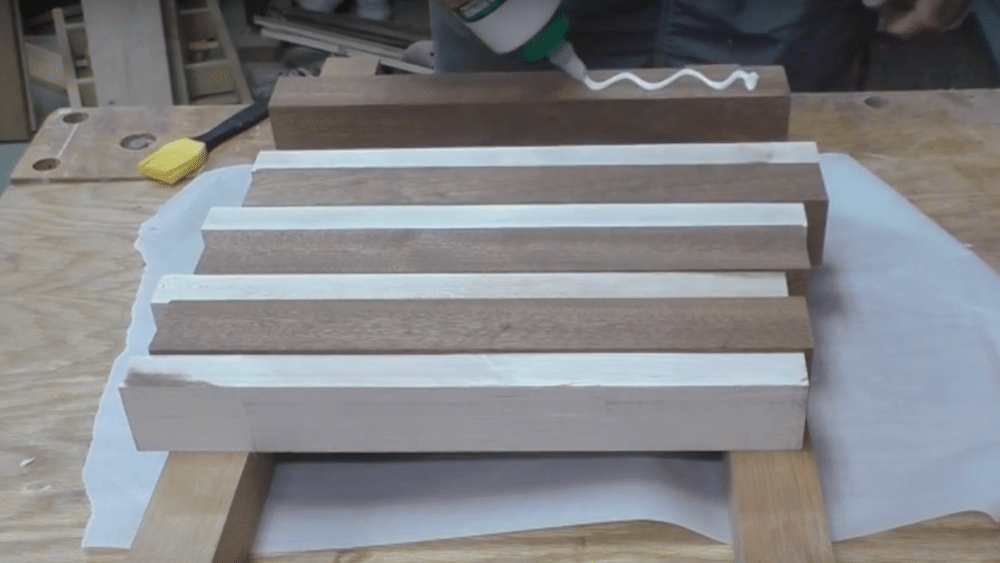
Cut your wood pieces to similar lengths and arrange them in your desired pattern. Apply Titebond III glue liberally to all surfaces that will be joined. This first glue-up creates long strips that will later be cut and reassembled.
- Arrange wood pieces in desired color pattern
- Apply generous amount of waterproof glue to all surfaces
- Clamp pieces together and let cure overnight
Note: Clean up glue squeeze-out immediately while it’s still wet – it’s much easier than removing dried glue later.
Step 2: Trim and Cut Strips (Day 2)
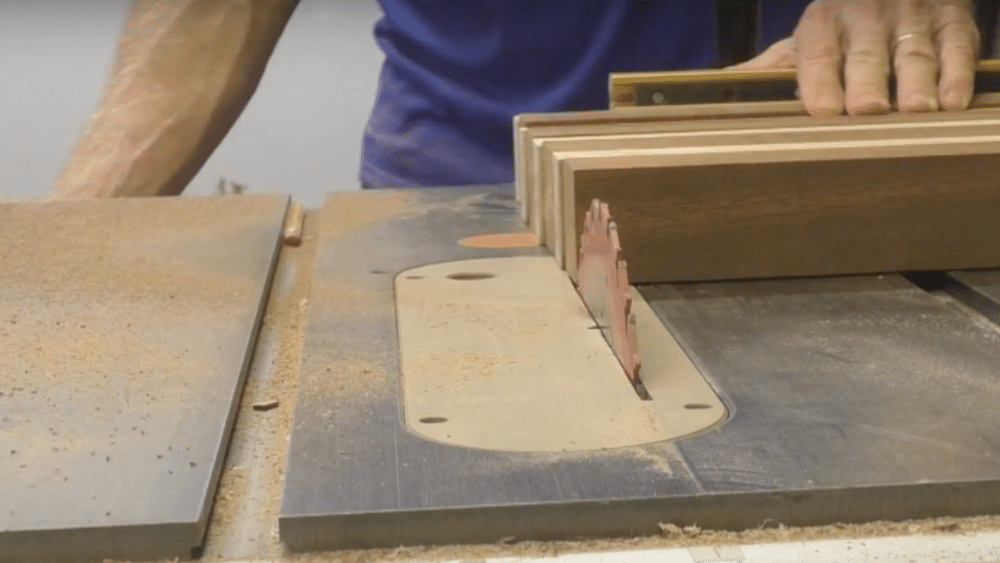
Remove clamps and trim both ends square using a miter gauge on the table saw. Cut the glued panel into strips approximately 1.5 inches wide using a stop block for safety. Lay out the strips to preview your final checkerboard pattern.
- Square both ends with miter gauge and table saw
- Cut 1.5″ wide strips using stop block on fence
- Arrange strips to check final pattern before second glue-up
Note: Use a stop block instead of the fence alone to prevent dangerous kickback when crosscutting.
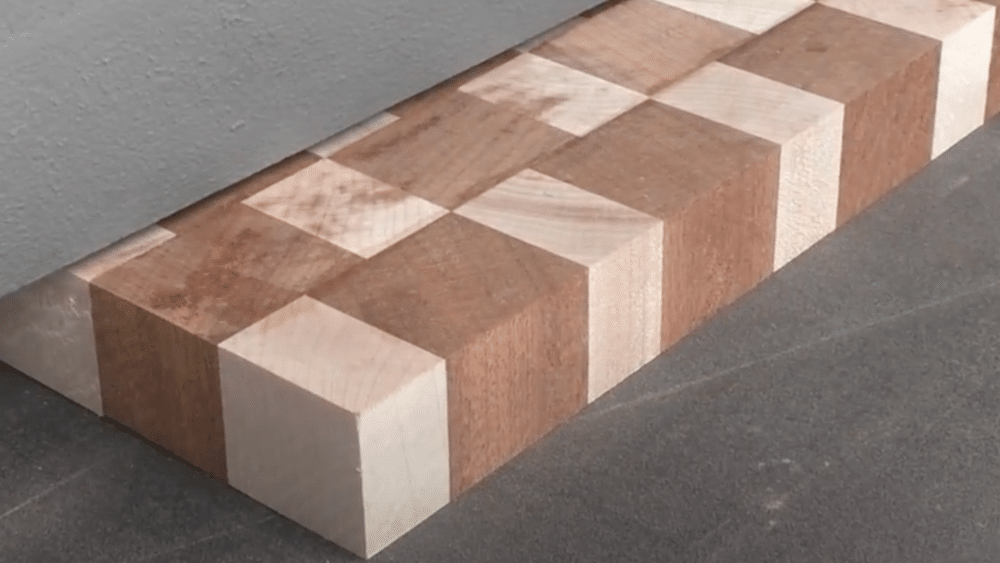
Step 3: Second Glue-Up

Apply glue to the cut surfaces of your strips and arrange them in alternating pattern for the checkerboard look. Clamp in both directions – lengthwise for the glue joint and crosswise to prevent pieces from sliding out of alignment.
- Apply glue to all strip surfaces that will be joined
- Alternate strip orientation for checkerboard pattern
- Clamp in both directions and let cure overnight
Note: Light crosswise clamping pressure prevents sliding while main lengthwise clamps provide gluing pressure.
Step 4: Square and Flatten Board
Use a cross cut sled to trim all edges square and remove any excess material. Run the board through a drum sander to achieve a perfectly flat surface on both sides. This step ensures your cutting board sits flat and stable.
- Trim all edges square using cross cut sled
- Sand both faces flat with drum sander
- Check for consistent thickness across entire board
Note: Take light passes with the drum sander to avoid burn marks that require extra sanding to remove.
Step 5: Add Finger Grooves and Round Edges
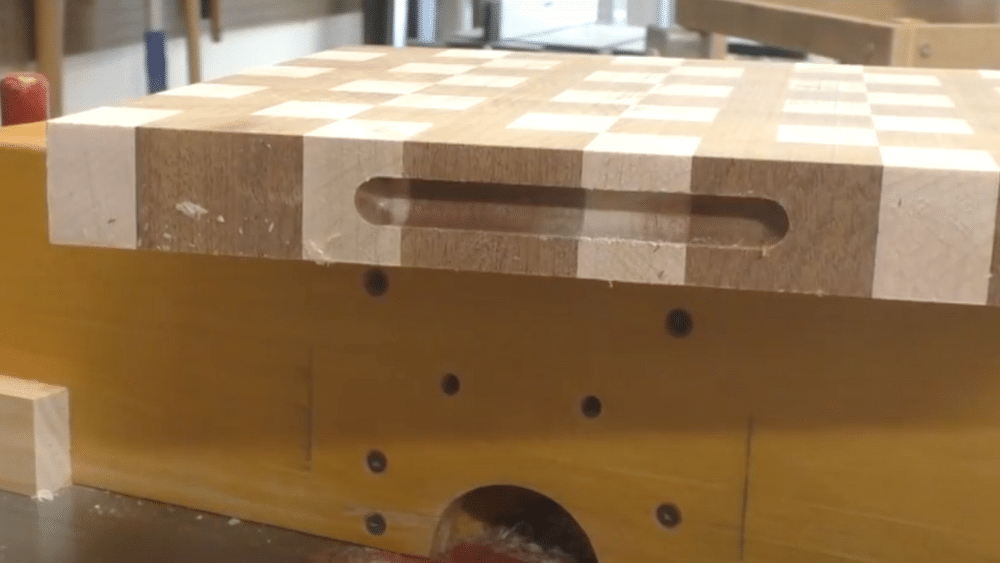
Use a round nose router bit to cut finger grooves on both ends of the board. These grooves allow easy lifting without adding feet, so both sides remain usable. Follow with a 1/4″ round over bit to soften all edges.
- Cut finger grooves in both ends with round nose bit
- Round over all edges with 1/4″ round over router bit
- Sand any router burn marks smooth
Note: Finger grooves eliminate the need for feet, making both sides of the board functional for cutting.
Step 6: Final Sanding and Oil Finish
Sand the entire board smooth, then soak briefly in water to raise the grain. Let dry completely and sand again – this process creates an extra-smooth surface. Apply multiple coats of food-safe cutting board oil, allowing each coat to soak in completely.
- Complete final sanding with progressively finer grits
- Use water-soak method to raise grain, then sand smooth
- Apply several coats of cutting board oil liberally
Note: End grain absorbs more oil than edge grain, so apply oil generously and allow extra time for absorption.
For a visual tutorial, refer to this video by Wood U Make It
Maintenance Tips for Cutting Boards
- Clean immediately after use – Wash with warm soapy water and scrub gently with a soft brush. Never soak the board or put it in the dishwasher, as excess water causes cracking and warping.
- Dry completely before storing – Stand the board upright or lay flat with good air circulation around all sides. Both surfaces need to dry evenly to prevent the wood from cupping or splitting.
- Oil monthly with food-safe products – Apply mineral oil or specialized cutting board oil when the wood looks dry or water no longer beads on the surface. Let oil soak in for several hours before wiping excess.
- Sand and re-oil deep scratches – Light sanding with 220-grit paper removes knife marks and stains. Clean thoroughly, let dry completely, then apply fresh oil to restore the protective finish.
- Flip regularly during use – Alternate between both sides to ensure even wear patterns. This prevents one side from becoming more worn than the other and extends the board’s usable life.
5 Common Mistakes to Avoid
1. Using soft woods like pine or cedar – Soft woods dent easily, harbor bacteria in scratches, and break down quickly under knife use. Stick to hardwoods like maple, walnut, or cherry that resist wear and stay sanitary longer.
2. Applying glue unevenly or too thinly – Skimpy glue application creates weak spots that split apart during use. Spread glue evenly across all surfaces and use enough to see slight squeeze-out when clamped – gaps mean failed joints.
3. Skipping the flattening step with planer or sander – An uneven cutting board rocks during use, making chopping dangerous and inefficient. Take time to flatten both surfaces properly so your board sits stable on counters.
4. Removing clamps too early before glue fully cures – Rushing the 24-hour cure time creates weak joints that fail later. Leave clamps on overnight for each glue-up session, even if the glue feels dry to touch.
5. Using regular wood stain or polyurethane finishes – Standard wood finishes contain toxic chemicals that leach into food over time. Only use food-safe mineral oil or beeswax blends designed specifically for cutting boards and kitchen tools.
Conclusion
Building your own end grain cutting board saves money while creating a kitchen tool that outperforms store-bought options. You now have the complete process from wood selection to final oiling, plus maintenance tips that will keep your board functional for decades.
This project costs under $30 but delivers the same quality as $100+ commercial boards. Your knives will stay sharper longer, and the self-healing wood surface handles daily chopping better than plastic or thin wood alternatives.
Start gathering hardwood scraps from your workshop or local lumber yard. Take your time with each glue-up and don’t rush the curing process. Remember to oil your finished board monthly and clean it properly after each use.
What type of wood will you choose for your first end grain cutting board? Share your results and questions in the comments below.