

Frustrated by crooked cuts that ruin your projects?
You’re not alone; most beginners struggle with getting straight lines from their circular saw, often blaming their “unsteady hands” or cheap tools.
Here’s the truth: learning how to make straight cuts with a circular saw has nothing to do with natural talent.
Professional woodworkers get perfect results because they use proven techniques and simple guides, not because they have superhuman steadiness.
This blog will show you exactly how to make straight cuts with a circular saw using methods that work for complete beginners.
We’ll cover why cuts go wrong, what tools make the difference, and step-by-step techniques you can use immediately. No guesswork, no expensive equipment, just reliable methods that deliver clean and accurate cuts every time.
Why Straight Cuts Go Crooked?
Understanding why cuts fail is the first step in learning how to make straight cuts with a circular saw. Here are the main culprits:
- Hand control problems – Gripping too tightly or trying to steer creates jerky movements
- Baseplate drift – Lifting edges or rocking the saw sends the blade off course
- Inaccurate marking – Rushed measuring and unclear lines make following impossible
- Saw base offset confusion – The blade sits 1-2 inches from the baseplate edge
- No guide support – Cutting freehand is like drawing straight lines without a ruler
Making Straight Cuts: Step-by-Step
The straight edge method delivers the most accurate results for beginners. You’ll need these tools and steps to get it right:
Tools You’ll Need
| Tool | Purpose | Notes |
|---|---|---|
| Circular saw | Main cutting tool | Corded or cordless, both work |
| Quality blade | Clean cuts | 40+ teeth for plywood, 24 for lumber |
| Safety gear | Protection | Glasses required, hearing protection recommended |
| Sawhorses | Work support | Two horses work better than one |
| Clamps | Hold guides | Quick-grip clamps are easiest |
| Straight edge | Cutting guide | Level, factory board, or straight strip |
| Tape measure | Accurate marking | 25-foot tape handles most projects |
| Pencil | Mark cut lines | Sharp point for clear, thin lines |
Step 1: Pick a Reliable Straight Edge
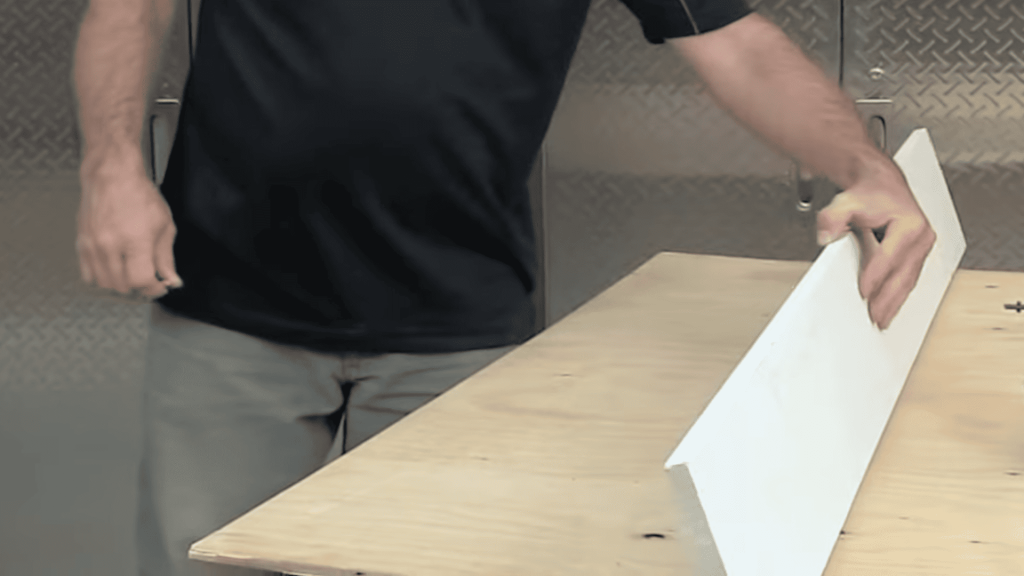
Choose a level, factory-edge board, or straight wood strip that’s longer than your cut. A 4-foot level works great for most projects because it’s guaranteed straight and heavy enough to stay put.
Factory edges from plywood are also excellent because they’re machine-cut for perfect straightness.
Avoid using boards unless you’ve verified they’re truly straight by sighting down the edge.
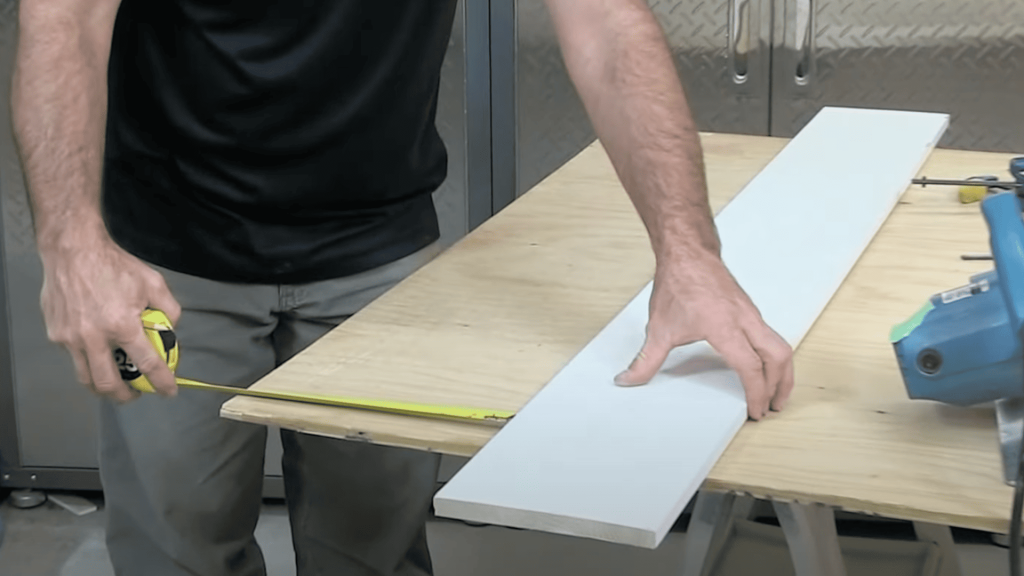
Step 2: Measure Your Saw’s Base Offset

Measure from the blade to the outer edge of the baseplate (usually 1-2 inches). Write this number down – you’ll use it every time.
This measurement is critical because the blade doesn’t cut where the baseplate sits.
For example, if your offset is 1.5 inches, you’ll need to position your guide 1.5 inches away from your actual cut line. Test this measurement by making a practice cut on scrap wood.
Step 3: Mark Your Cut Line
Use a pencil and a straightedge to create thin, clear lines. Mark both ends of long cuts, then connect with a straight line.
For crosscuts, use a combination square to ensure your line is perfectly perpendicular to the board edge.
For rip cuts, measure the same distance from the edge at multiple points to ensure your line stays parallel. Mark an “X” on the waste side so you know which side to cut.
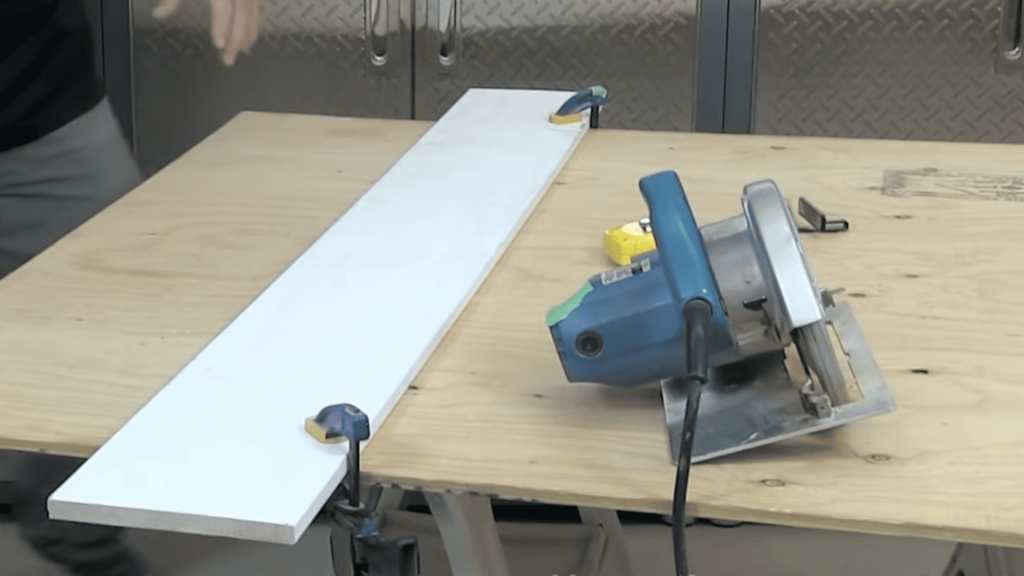
Step 4: Clamp the Straight Edge
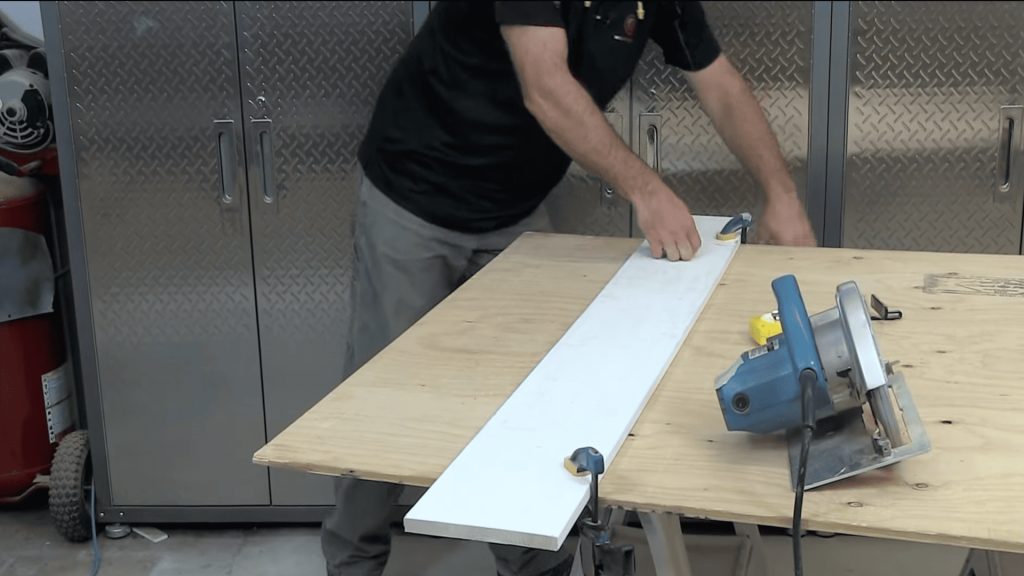
Position your guide at the offset distance from your cut line.
Use clamps at both ends, ensuring they don’t obstruct the saw’s path. Start by clamping one end, then carefully align the other end before clamping it down.
For cuts longer than 4 feet, add a third clamp in the middle. Test the setup by placing your saw against the guide; the blade should align perfectly with your cut line.
Step 5: Set Blade Depth
Set the blade 1/8″ deeper than your material thickness. This minimizes splintering and improves control.
Measure your material first, then adjust the depth setting on your saw. Too shallow won’t cut completely through; too deep creates unnecessary friction and increases the risk of kickback.
The correct depth cuts cleanly while exposing minimal blade below the material.
Step 6: Double-Check Setup
Verify sawhorses won’t be cut and gear up with safety equipment. Make sure you have good lighting on your work area.
Check that both cut pieces will be supported and can fall away freely without binding the blade. Put on safety glasses and hearing protection.
Clear any obstacles from your cutting path and ensure you have stable footing throughout the cut.
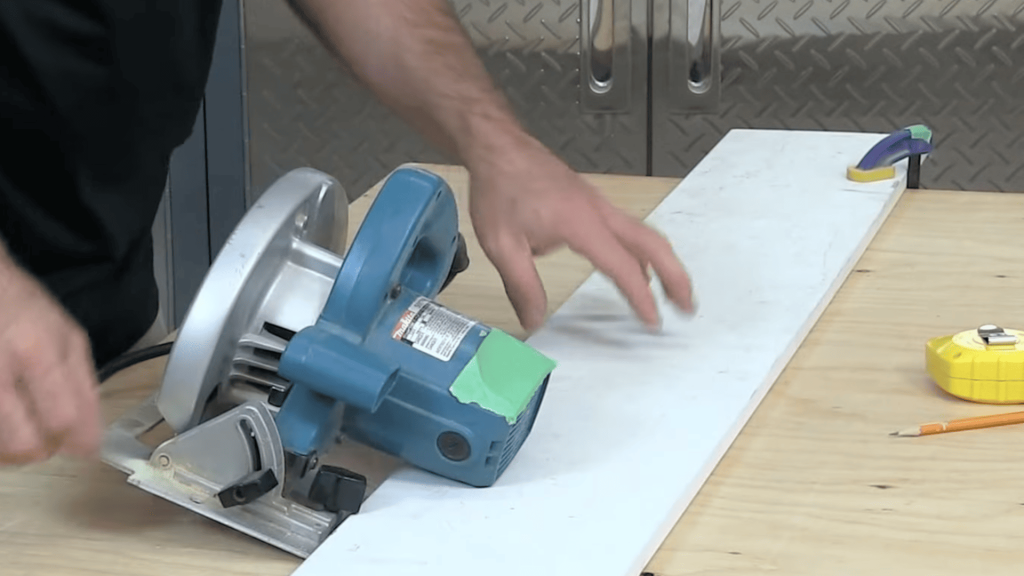
Step 7: Make Your Cut

Start the saw and let it reach full speed. Keep the baseplate flush with the guide and move slowly and steadily.
Don’t force the saw; let the blade do the work. Maintain consistent side pressure against the guide throughout the entire cut. If the saw starts to bind or wander, stop immediately and check your setup.
A smooth, steady motion produces the cleanest cuts.
Video Tutorial
I’d like to give credit to HouseImprovements for their informative video, as a reference for this guide.
Other Methods for Straight Circular Saw Cuts
The straight edge method isn’t your only option. These alternatives work well for specific cutting scenarios:
1) Speed Square Method
Hook the square’s lip over the board edge and use it as a fence. Perfect for quick 90-degree cuts with built-in accuracy.
When to use this method: Use for crosscuts up to 6-7 inches long when you need speed over maximum precision. Great for framing lumber and quick project cuts.
2) DIY Circular Saw Track
Build a simple jig using a plywood base and a fence strip. Cut a straight strip for the base and attach a fence at your saw’s offset distance.
When to use this method: Perfect for breaking down plywood sheets and making multiple identical cuts. Ideal for larger projects that require repeatable accuracy.
3) Commercial Guide Rails
Professional-grade systems with anti-splinter strips that connect for very long cuts. Higher precision but more expensive than DIY options.
When to use this method: Best for frequent cutting or professional work where maximum accuracy is required. Worth the investment if you cut regularly.
Few Tips for Making Cleaner Straight Cuts
Master these basics when learning how to make straight cuts with a circular saw:
- Let the blade reach full speed before contact – prevents grabbing and rough starts.
- Use painter’s tape over cut lines to reduce splintering.
- Cut with finished side down – blades cut upward, protecting your good surface.
- Support both cut pieces to prevent binding and breakage.
- Keep steady pressure against the guides without forcing the saw.
Common Issues To Avoid When Making Straight Cuts
- Freehanding long cuts: Use guides for cuts over 12 inches. Even small hand movements can be magnified over distance, resulting in significant curves.
- Ignoring saw offset: Measure blade-to-baseplate distance (usually 1-2 inches). Your cut will be off by this distance if you don’t account for it.
- Using dull blades: Replace when cutting requires force or burns wood. Dull blades wander, create rough cuts, and are dangerous to use.
- Cut veers off line: Check guide placement and use more clamps. Loose guides or improper setup cause the most cutting problems.
- Saw kicks back: Set proper blade depth and support material well. Kickback happens when the blade binds or you cut too deeply.
The Bottom Line
Mastering how to make straight cuts with a circular saw transforms your woodworking from frustrating to fulfilling.
The techniques in this guide are effective because they eliminate guesswork and rely on proven methods that professionals use daily.
Start with the straight edge method for longer cuts and the speed square for shorter crosscuts. Practice measuring your saw’s offset distance until it becomes second nature.
Remember, even experienced woodworkers use guides – there’s no shame in setting yourself up for success.
The difference between amateur and professional results isn’t talent or expensive tools. It’s understanding how to make straight cuts with a circular saw using proper technique and simple guides.
Take time to set up correctly, and your cuts will be straight every time.
Your next project deserves clean, accurate cuts. Which method will you try first?