

Open any home magazine and you’ll notice one thing immediately: beautifully styled shelves that look effortless yet perfectly curated. Most homeowners struggle with this exact challenge – their shelves either look cluttered, empty, or just plain boring.
But what if you could change your shelves from storage chaos into stunning focal points that guests actually notice and compliment?
The secret lies in understanding a few simple styling principles that professional interior designers use every day. These aren’t complicated rules or expensive tricks – just practical techniques that work in any room, with any budget.
In this guide, you’ll learn the exact step-by-step process to style your shelves like a seasoned pro. From choosing the right mix of items to creating visual balance, we’ll cover everything you need to turn your shelves into showstoppers.
Ready to give your shelves the makeover they deserve?
5 Creative and Practical Ideas to Style Shelves Like a Pro
Transform your shelves from cluttered storage into beautiful displays with these simple yet effective styling techniques, which work in any room.
1. The Rule of Thirds
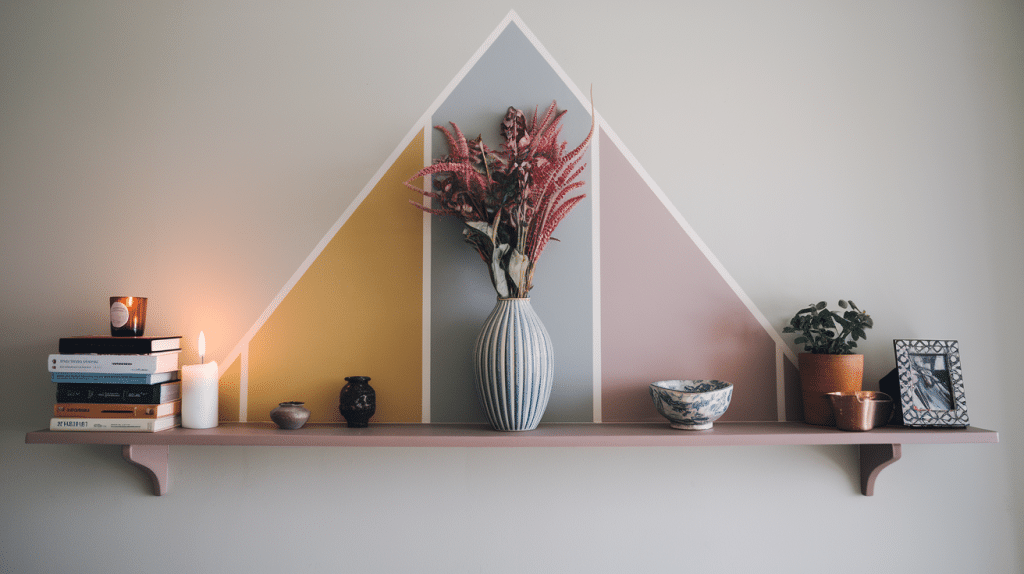
Master the art of balanced styling by dividing your shelf into three equal sections.
Start by looking at your shelf as three separate zones. Each zone should have a different purpose and visual weight. This method stops your shelves from looking messy or boring.
- Left Section Setup: Place 2-3 books flat on top of each other. Add a small decorative item on top like a candle or small sculpture. This creates a solid foundation for your display.
- Middle Section Focus: Choose one taller item as your focal point. A medium-sized vase, table lamp, or framed photo works well here. This item should be the tallest piece in your arrangement.
- Right Section Balance: Mix 2-3 smaller items of different heights. Try a small plant next to a picture frame, or combine a decorative bowl with a mini figurine.
The key is to make each section feel distinct while still working together as a cohesive whole display.
Pro Tip: Use the tallest item in your middle section to anchor the entire shelf, then build outward with shorter pieces to create a natural flow.
2. Layer Art and Accessories
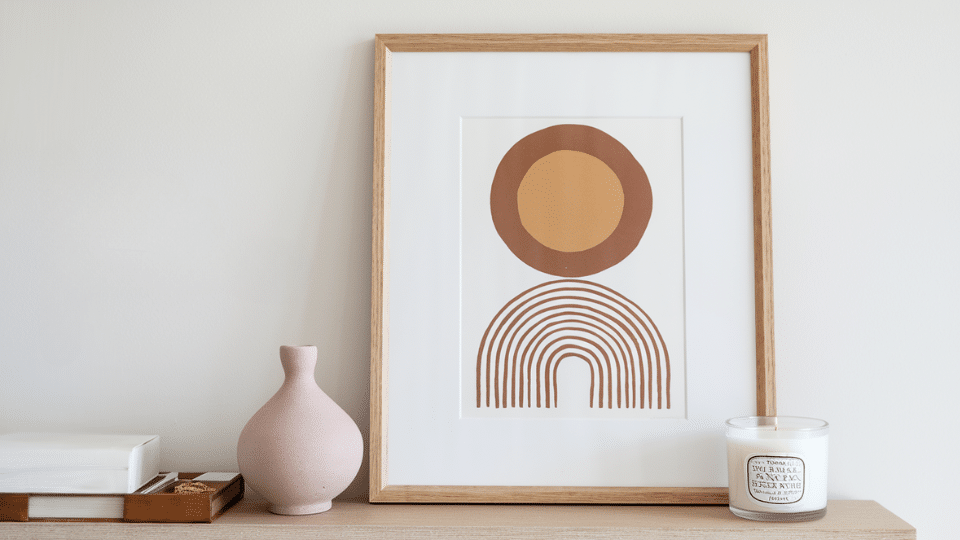
Create depth and visual interest by placing artwork behind your decorative items.
This technique gives your shelves a lived-in, collected feel that looks effortless yet intentional. It works especially well on deeper shelves where you have room to layer.
- Setting Up Your Layers: Lean a framed print or artwork against the back wall of your shelf. Choose frames that complement your room’s color scheme. The frame doesn’t need to be perfectly centered.
- Adding Front Elements: Place smaller decorative objects in front of the artwork. Leave some of the frame visible – you don’t want to hide it completely. Small vases, candles, or decorative boxes work perfectly here.
- Height Variation: Mix different heights in your front layer. A short, wide bowl next to a tall, narrow vase creates visual tension that keeps the eye interested.
This method works particularly well on floating shelves, bookcases, and console tables where you want to maximize visual impact.
Pro Tip: Choose artwork that’s slightly wider than your front objects to create a nice backdrop effect – this makes your display look more intentional and put-together.
3. Mix Materials and Textures
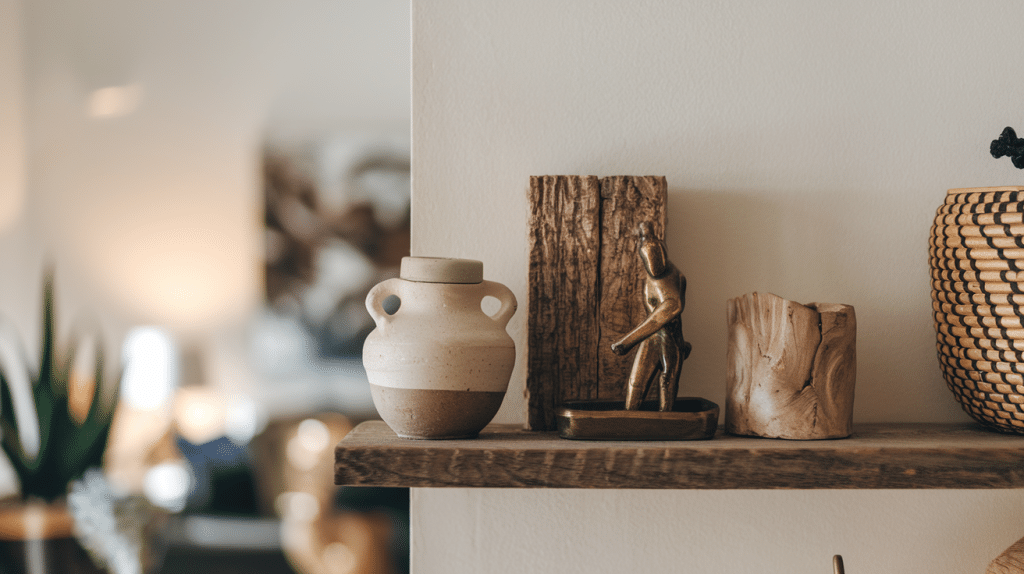
Combine different materials to add richness and personality to your shelf styling.
Your shelves should tell a story through a variety of textures and materials. This approach prevents your display from looking flat or one-dimensional.
- Material Combinations: Pair smooth ceramics with rough wood pieces. Add metal accents, such as brass candlesticks or copper bowls. Include woven elements, such as small baskets or rope-wrapped vases.
- Texture Play: Mix glossy surfaces with matte finishes. Combine hard materials, such as glass or stone, with soft elements, like fabric-covered books or woven placemats used as shelf liners.
- Color Coordination: When mixing materials, maintain a cohesive color palette. Choose 2-3 primary colors and let different textures add the variety instead of relying on bold color contrasts.
- Visual Weight Balance: Distribute heavier-looking materials (like dark wood or metal) evenly across your shelf. Don’t cluster all the heavy pieces on one side.
Pro Tip: Follow the 60-30-10 rule – 60% of one main material (like wood), 30% of a secondary material (like ceramic), and 10% of an accent material (like metal) for the most pleasing mix.
4. Use Plants for Freshness and Softness
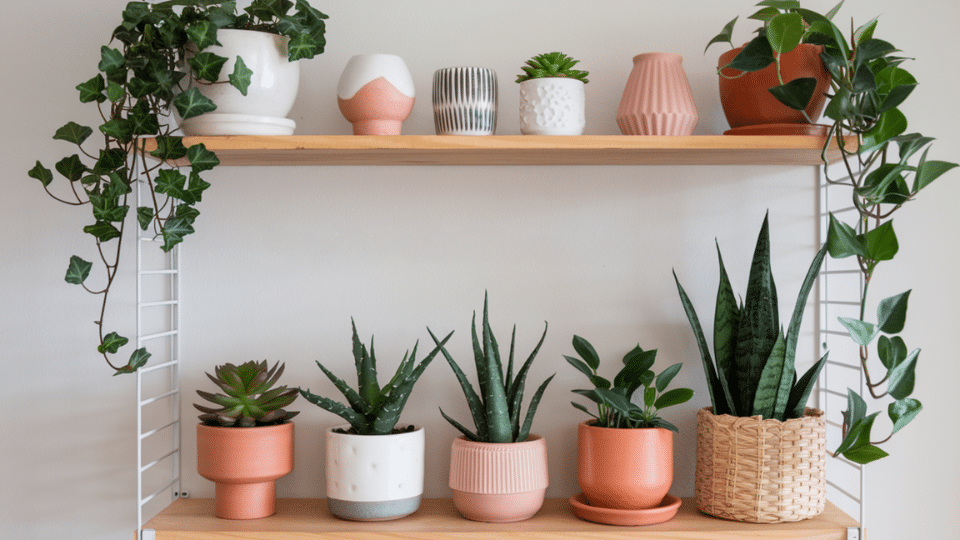
Add life and natural beauty to your shelves with carefully chosen greenery.
Plants instantly make any shelf display feel more alive and welcoming. They add organic shapes that contrast beautifully with geometric objects and straight lines.
- Plant Placement Strategy: Use trailing plants on higher shelves, allowing their vines to cascade down. Small potted plants work well on lower shelves where they’re easier to water and maintain.
- Low-Maintenance Options: Choose plants that thrive in your room’s lighting conditions. Snake plants, pothos, and ZZ plants are forgiving options that don’t need daily attention.
- Alternative Greenery: If you struggle with live plants, try high-quality artificial plants or dried elements like eucalyptus, pampas grass, or cotton stems in tall vases.
- Container Choices: Use planters that match your overall design scheme. Ceramic pots, woven baskets, or simple terracotta containers all work well, depending on your style.
Pro Tip: Group plants in odd numbers (1, 3, or 5) and vary their heights and pot sizes to create a more natural, collected look that doesn’t feel too structured.
5. Curate Personal Collections
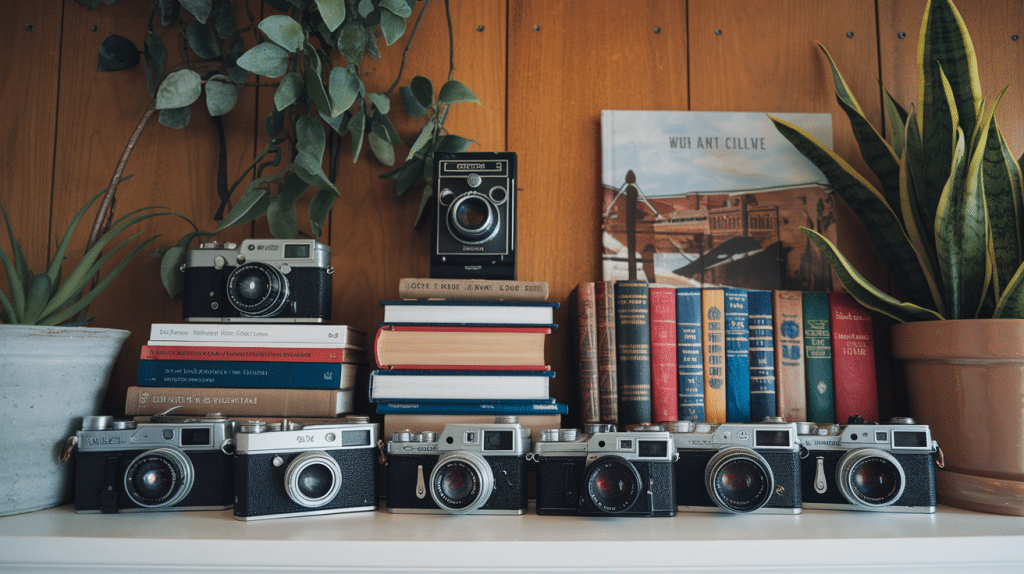
Change your shelves into a reflection of your personality by showcasing meaningful objects.
The most interesting shelves tell your story. Personal collections create conversation starters and make your space feel authentically yours.
- Collection Ideas: Display travel souvenirs from different trips together on one shelf. Group vintage cameras, antique books, or handmade pottery. Small sculptures or figurines also work well when grouped.
- Arrangement Principles: Group similar items together rather than scattering them. This creates more visual impact and makes your collection feel intentional rather than random.
- Size and Scale: Mix different sizes within your collection to create a visually appealing display. If you collect ceramic bowls, display various sizes together. This adds visual interest while maintaining cohesion.
- Rotation Strategy: Don’t feel pressured to display everything at once. Rotate pieces seasonally or whenever you want a fresh look. Store extra pieces safely and swap them out regularly.
Pro Tip: Use the “odd number rule” when grouping collections – arrangements of 3, 5, or 7 items look more natural and pleasing to the eye than even numbers, which can feel too structured and formal.
Common Mistakes to Avoid: Style Shelves
1. Overcrowding: Filling every inch of shelf space with items creates visual chaos and makes it hard for the eye to focus on any single piece. Leave breathing room between objects.
2. Lack of Focal Points: Without a clear star item on each shelf, your display looks scattered and unfocused. Choose one standout piece per shelf to anchor the entire arrangement.
3. Ignoring Negative Space: Space isn’t wasted space – it’s essential for creating balance and letting your displayed items shine. Don’t feel pressured to fill every gap.
4. Using Only One Height: Items that are all the same height create a flat, boring display. Mix tall, medium, and short pieces to add visual rhythm and interest.
5. Forgetting About Scale: Placing tiny objects next to oversized items without transitional pieces creates awkward proportions. Use medium-sized items to bridge the gap between extremes.
Conclusion
Styling shelves doesn’t have to be complicated or expensive. With these five simple techniques, you can change any shelf into a beautiful display that reflects your personal style.
Remember to divide your space using the rule of thirds, layer artwork with accessories, and mix different materials for visual interest.
Plants add life to your displays, while personal collections make your space feel authentic and meaningful.
The key is finding a balance between filled and empty space. Avoid overcrowding and always include a focal point on each shelf. Practice these methods one shelf at a time, and soon you’ll have a home that looks professionally styled.
What’s your favorite shelf styling tip? Try one technique this weekend and see how it changes your space. Share your results in the comments below!