

Are you tired of having to move the party inside when the rain starts falling? A well-built outdoor bar with a roof solves this problem.
Most outdoor spaces lack proper shelter for year-round enjoyment, leaving homeowners frustrated when weather interrupts their gatherings.
A thoughtfully designed outdoor bar with a solid roof creates a protected space that works in any season. The right design ensures that you and your guests remain comfortable while enhancing the property’s value.
This guide will walk you through planning and building your perfect outdoor bar. We’ll cover everything, from selecting styles and materials to the building process and electrical requirements.
You’ll learn exactly what makes an outdoor bar both beautiful and practical for years of use.
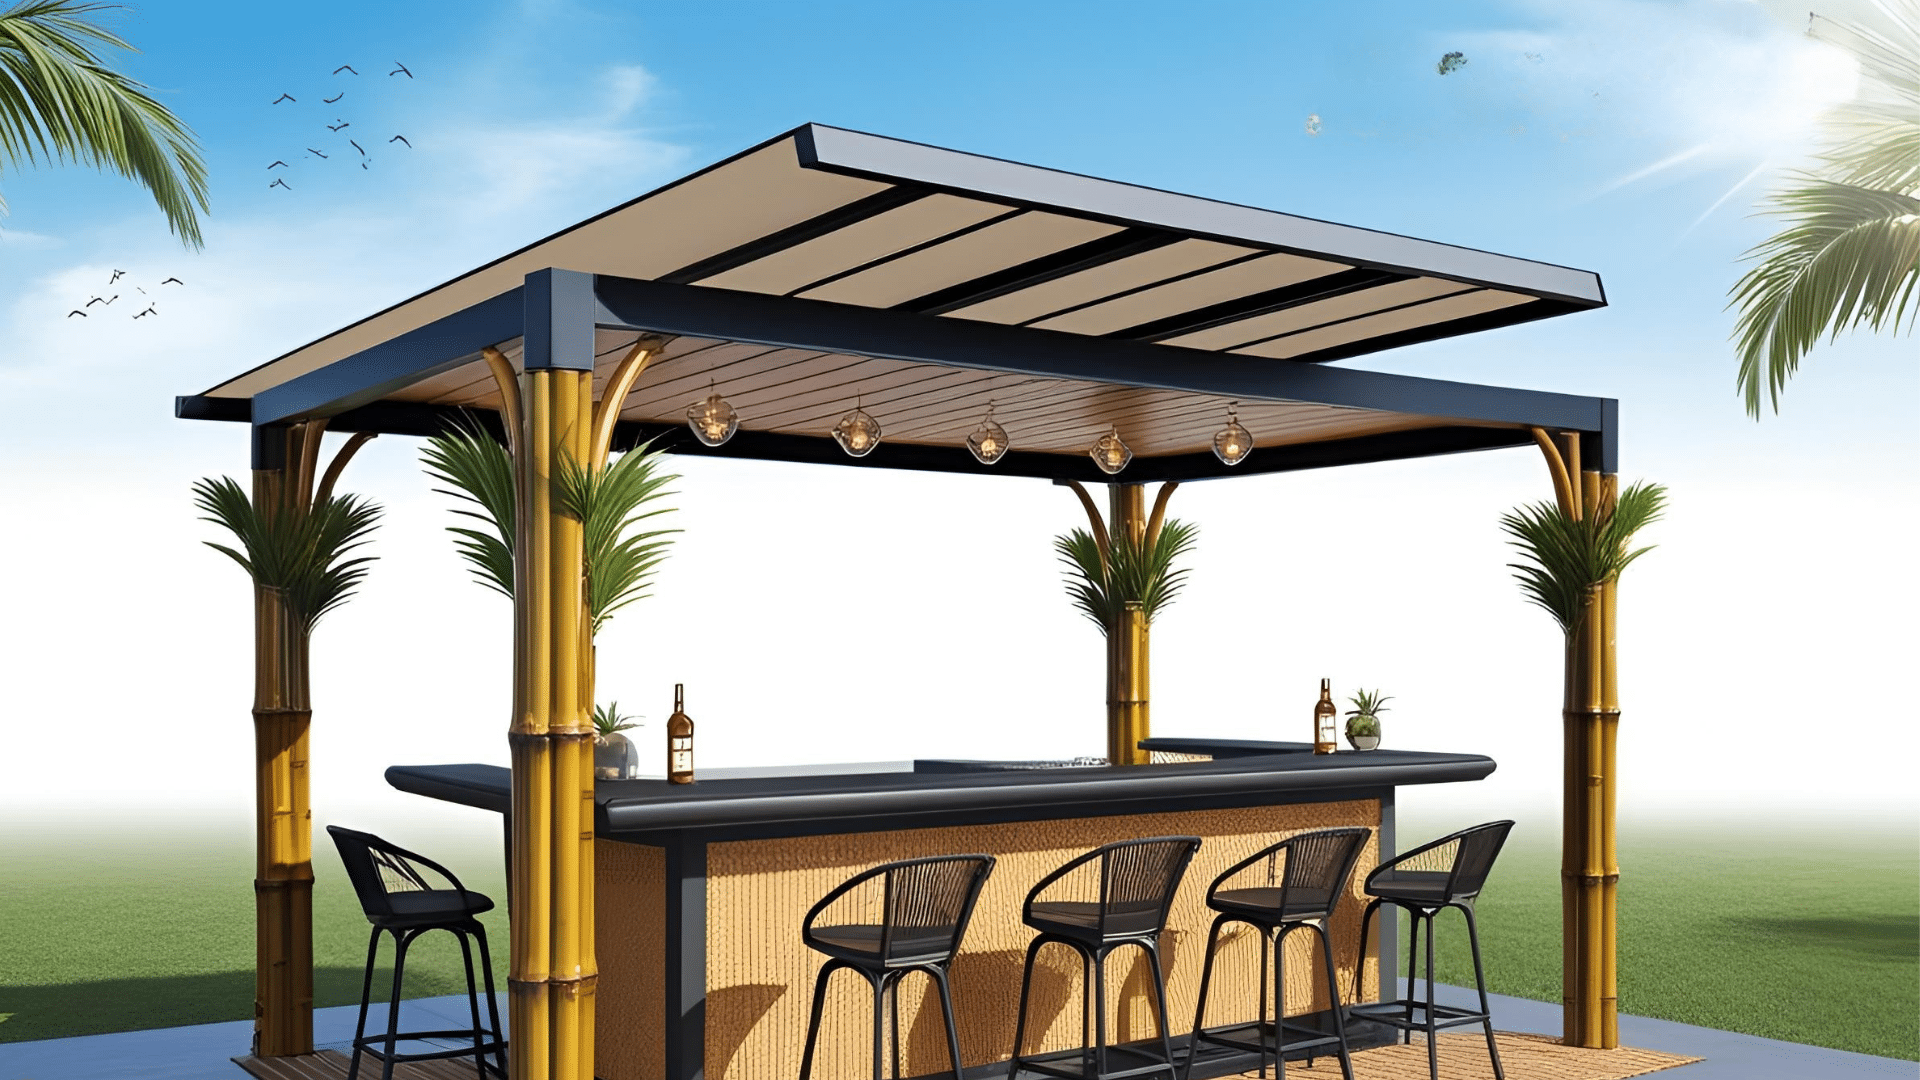
Why is a Professional Outdoor Bar with Roof Needed?
An outdoor bar with a roof offers numerous benefits for your home. It shields you from rain and sun, allowing you to use the space all year round.
When summer brings hot days, the roof creates shade and keeps everyone cool while they enjoy drinks.
Your bar equipment and furniture also stay safe from weather damage. When friends visit, they’ll have a comfortable spot to gather, no matter if it’s sunny, windy, or rainy. The roof allows you to add useful extras like fans, lights, and speakers without worrying about water damage.
You can style the roof to match your home’s aesthetic, making the entire area feel cohesive and well-planned. A good roof turns a simple outdoor bar into a true living space.
It adds value to your home and creates a special place for making memories with family and friends. The space becomes more useful and stays in better shape over time with this simple addition.
Designing the Perfect Outdoor Bar for Your Space
Change your outdoor area into a stylish and functional entertainment hub with a custom-designed bar that complements your space and lifestyle.
1. Style and Theme
The style of your outdoor bar sets the mood for gatherings. A modern bar features clean lines and smooth surfaces, creating a fresh look. Rustic bars bring warmth with raw wood and stone details. Tropical styles add a touch of fun with bamboo and vibrant colors.
Traditional bars offer timeless charm with classic woods and familiar shapes. Your choice should match your home’s style. Consider the experience you want your guests to have when they visit. A bar can be casual and laid-back or neat and tidy, based on your needs.
2. Size and Layout
The right size for your bar depends on your space and how you plan to use it. A basic bar needs at least 6 feet of counter length and 3 feet of depth. Add 2 feet of space per seated guest. Leave 3-4 feet behind the bar for the person making drinks to move freely.
Think about the flow of people. Put the bar where it won’t block paths to other areas. Ensure guests can easily access the bar from their seating spots. Plan for 4-6 seats at the bar itself, with additional seating available nearby if needed.
3. Materials
For the bar structure, treated lumber is a suitable option and costs less than other alternatives. Cedar and redwood naturally resist rot, but they are more expensive. For counters, concrete stands up to weather and spills. Granite and stone look great, but they need more care.
For floors, concrete pavers are a tough and simple option. Wood decking feels nice, but it requires more maintenance.
Consider how much time you want to dedicate to care. Some materials may look better, but they require more work to maintain their good shape. Others are simple but still look nice with less work.
4. Roof Design
The roof shape changes how your bar looks and works. A gable roof has two sloping sides and sheds water well. A hip roof has slopes on all sides and handles wind better. A flat roof is relatively simple to build, but it requires effective drainage.
A pergola-style roof with slats allows some sunlight to pass through while providing spots of shade. For roof materials, metal is a durable option that requires minimal maintenance.
Wood looks natural but requires more upkeep. Polycarbonate panels allow light to pass through while blocking UV rays. Match your roof style to your local weather and the amount of sun or shade you prefer.
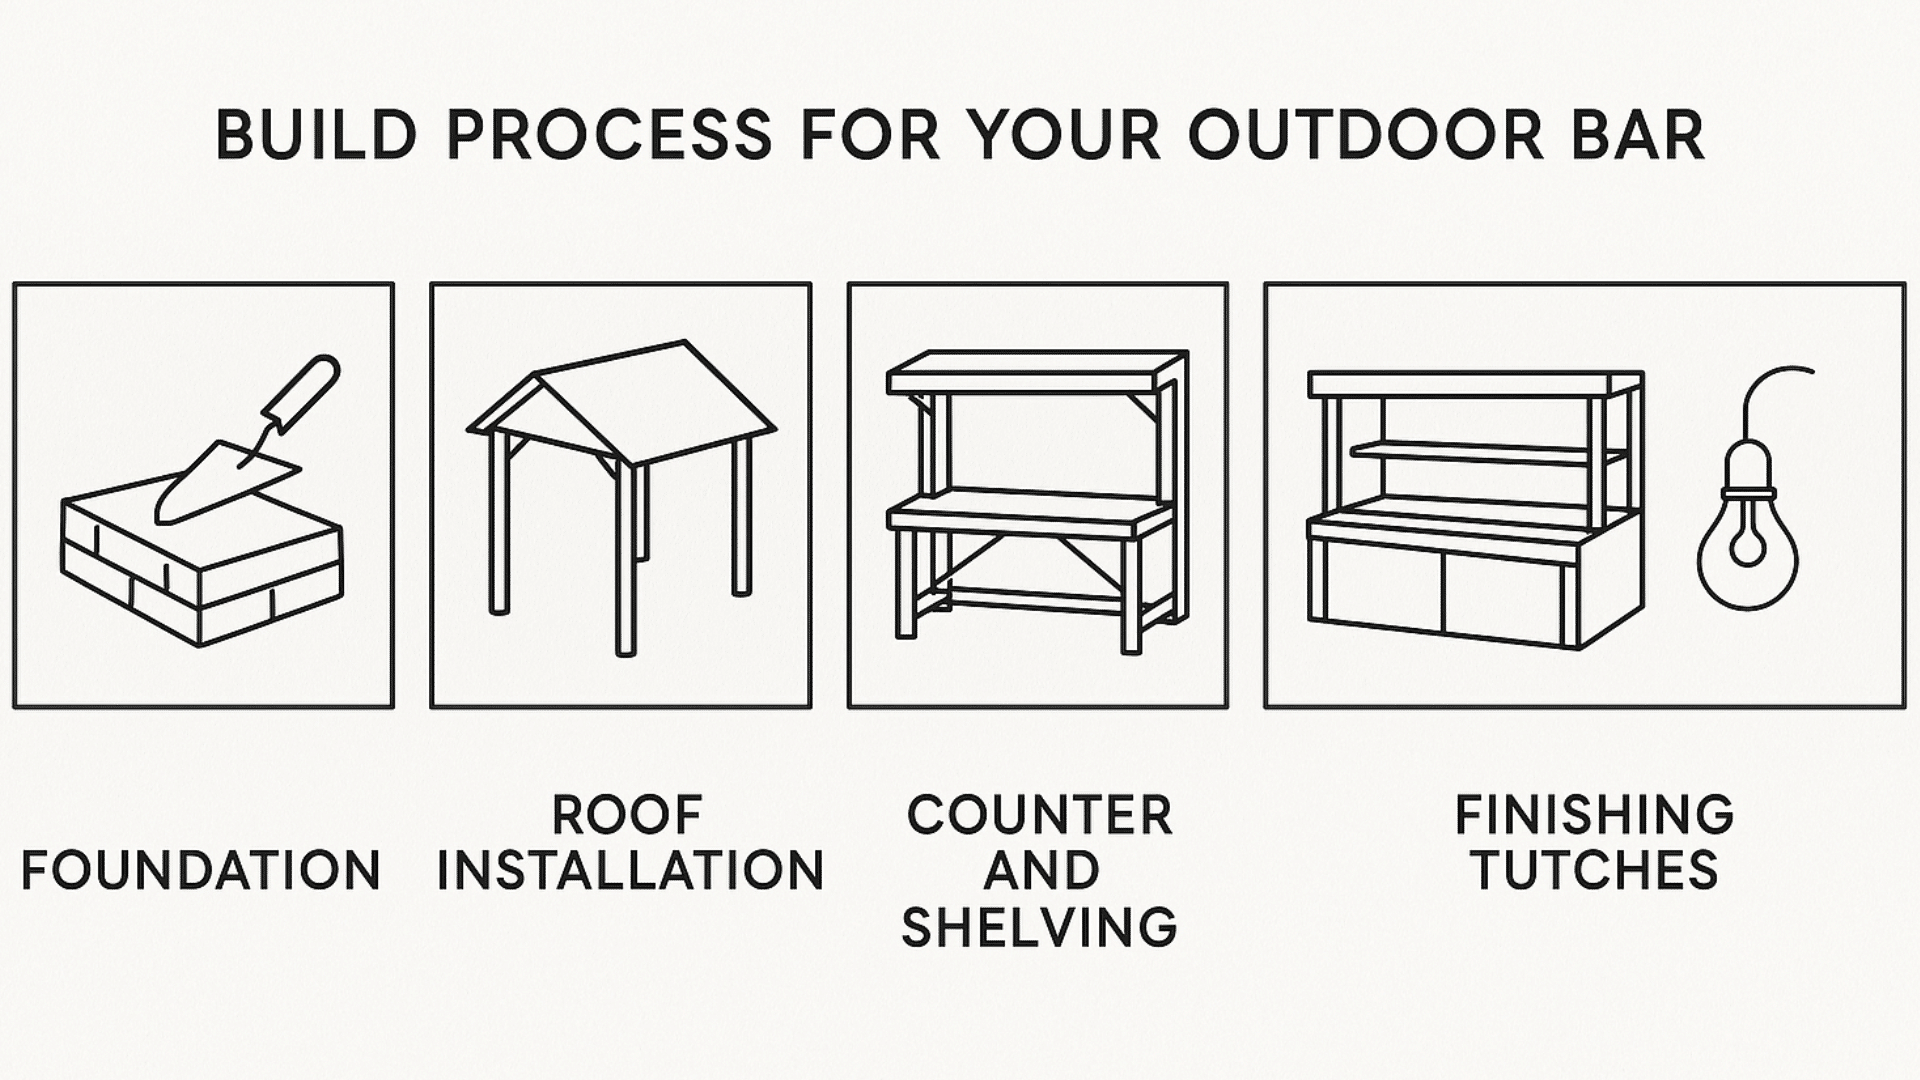
Essential Stages in Building an Outdoor Bar
Material Choices for a Long-Lasting Outdoor Bar:
| Component | Material Options | Description |
|---|---|---|
| Bar Counter | Granite, Concrete, Weather-Resistant Wood | Durable, easy to clean, and weather-resistant. |
| Bar Back Shelving | Open Shelves, Cabinets, Hanging Racks | Offers accessible or hidden storage for bar supplies. |
| Seating | Weather-Resistant Wood, Metal, Synthetic Resin | Sturdy, easy to maintain, and comfortable for outdoor use. |
| Roof Material | Polycarbonate Panels, Metal Sheeting, Wood Rafters | Provides protection and enhances style. |
1. Foundation
A solid foundation is key to a lasting outdoor bar. Start with a flat area, marking the bar’s footprint with stakes and string. Remove 4-6 inches of soil and add a layer of gravel for drainage. For a simple bar, a base of compacted crushed stone is a suitable choice. For heavier structures, pour a concrete slab 4 inches thick, incorporating rebar for added strength.
Allow the concrete to cure for at least 48 hours before construction. If you prefer a less permanent option, level stone pavers can be a suitable choice for smaller bars. The most important part is making sure the base is level and can support the weight without shifting.
2. Roof Installation
Begin by adding horizontal beams across the top of your vertical posts. These beams must be strong enough to support the weight of the roof. Add rafters every 16-24 inches, sloping them for water runoff. Install roof sheathing across the rafters as a base for your roofing material.
Apply your chosen roof covering. Metal panels offer durability and simple installation. Wood shingles add a natural touch but need more care. Polycarbonate panels allow light to pass through while keeping rain out. Ensure all seams are sealed to prevent leaks, and install gutters as required.
3. Counter and Shelving
The counter is what your guests will notice most. Build a strong frame to support the counter material. For outdoor use, concrete, stone, or sealed hardwood works best. Ensure the surface is smooth, level, and has a slight slope for water runoff.
Add a toe kick at the bottom for comfort when sitting. Build shelving behind the bar for storage, keeping bottles and glasses within easy reach. Install a bar rail along the edge for comfort and to prevent spills from running off.
4. Finishing Touches
With the structure complete, add the elements that make your bar functional. Install weather-rated electrical outlets for appliances such as blenders, refrigerators, or lighting fixtures. Use GFCI outlets for safety near water. Add lighting under the bar overhang and overhead for evening use.
If you want running water, install a small sink with proper drainage. Ensure that all electrical and plumbing work complies with local codes. Add cabinet doors to protect supplies from the weather, and consider a small fridge for keeping drinks cold.
Landscaping
The area around your bar matters too. Add plants in pots to soften the look and create a sense of privacy. Use outdoor rugs to define the space and add comfort to your feet. Consider adding a path from your home or patio to the bar.
String lights overhead create a warm glow for evening gatherings. Add outdoor art or signs to match your bar’s theme. These final touches help blend your bar into the yard, making the space feel complete and welcoming.
Electrical and Lighting Plan
- Lighting Design: String lights and recessed spots create a warm, inviting atmosphere.
- Power Requirements: Install at least four GFCI outlets on separate circuits for appliances.
- Safety Considerations: Use only outdoor-rated, weatherproof fixtures and conduit.
Water Supply and Drainage
- Sink and Water Access: Run PEX tubing from your home’s water supply with shut-off valves.
- Drainage System: Install a gray water drain field or connect to existing drainage pipes.
Furniture and Decor
- Seating Options: Choose water-resistant stools with metal frames and synthetic cushions.
- Bar Tools and Accessories: Stock with shakers, jiggers, and glassware on shelves behind the bar.
- Decor: Add potted plants, weather-resistant art, and themed signs that fit your style.
Budgeting and Timeline
| Category | Details |
|---|---|
| Cost Estimate | Breakdown of materials, labor, and equipment costs for each part of the bar (e.g., counter, roof). |
| Timeline | Estimated time for each construction stage: planning, foundation, framing, installation, finishing. |
| Contingency Plan | Extra budget for unforeseen expenses or delays, such as material price fluctuations or weather issues. |
Conclusion
Your outdoor bar with a roof will become the heart of your outdoor space. This project offers more than just a place to serve drinks—it creates a spot for making memories with friends and family.
By focusing on a strong foundation, high-quality materials, and proper electrical setup, you’ll build a bar that withstands the weather and the test of time. The right lighting turns your bar from a daytime spot into an evening retreat with the flick of a switch.
Remember that planning is key to success. Take time to choose the style, size, and features that match how you’ll use the space. Start with the basics and add features as needed.
Ready to start building? Gather your materials, check local building codes, and turn your outdoor space into a year-round gathering place. Your perfect outdoor bar awaits—and the next party is just around the corner.
Frequently Asked Questions
How Much Does an Outdoor Bar with a Roof Typically Cost to Build?
Costs range from $1,500 for DIY basics to $10,000+ for custom builds with water and power.
Do I Need a Permit to Build an Outdoor Bar on My Property?
Most areas require permits for structures over 120 square feet or those with electrical wiring.
How Long Does It Take to Build an Outdoor Bar with a Roof?
A simple structure can be completed in a weekend; complex bars with utilities require 2-3 weeks.
What’s the Best Way to Protect My Outdoor Bar During Winter Months?
Cover all surfaces, drain water lines, unplug electronics, and add a fitted tarp over the entire structure.