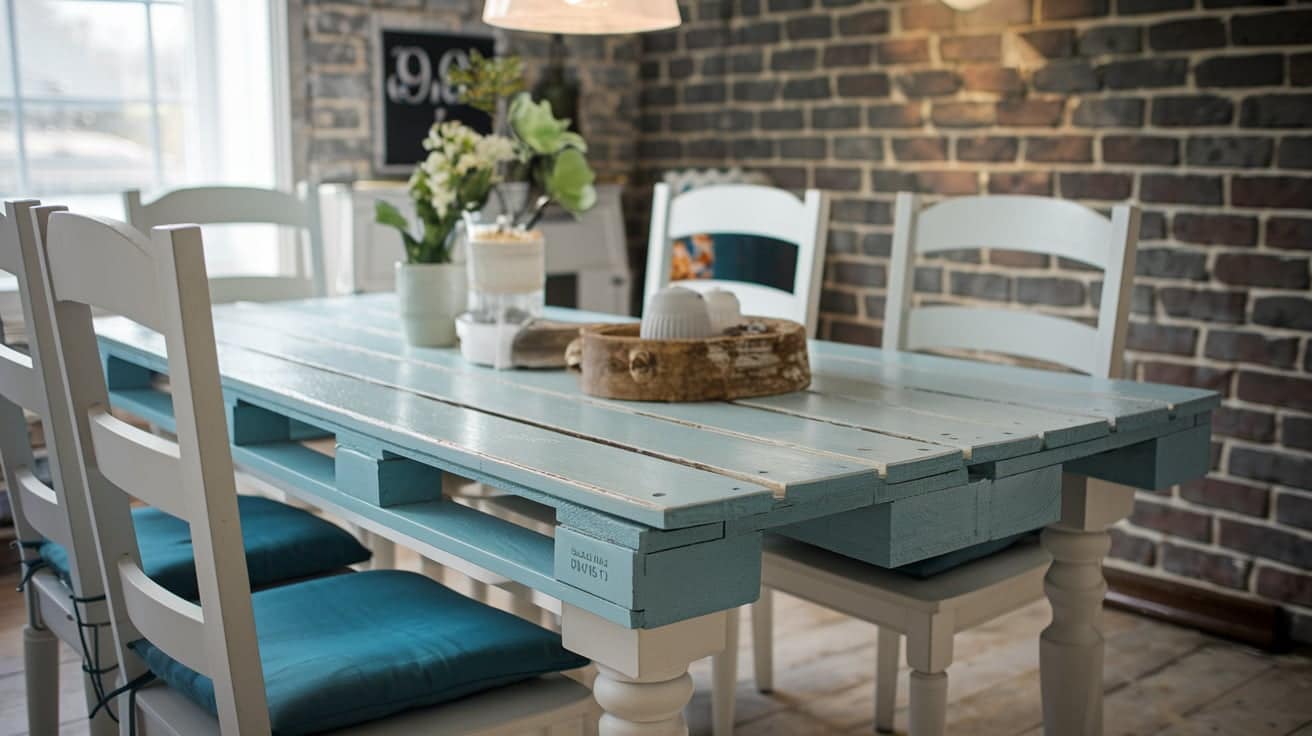

Tired of staring at that ugly orange oak table every morning? You’re not alone.
Most people think they need to spend hundreds on new furniture, but I’ve been making over tables for years without buying anything brand new. From roadside rescues to glass inlay disasters, I’ve changed them all using simple techniques that anyone can master.
I’m sharing four proven table makeover ideas that cost under $50 each. No fancy tools required, just step-by-step instructions that work. Let’s turn your old table into something you’ll love showing off.
What if I told you that the gel stain method could refresh your table without any sanding? Or that a $20 can of chalk paint could turn your grandmother's dated dining set into a stunning farmhouse centerpiece? These aren't just Pinterest dreams, they're real methods I use in my own home.
Why Are DIY Table Makeovers So Popular Right Now?
- Pinterest and Instagram showcase thousands of stunning before-and-after transformations daily, making DIY makeovers look achievable and inspiring millions to attempt similar projects at home.
- New dining tables now cost $500-800 for basic models that were $300 just three years ago, while DIY makeovers deliver identical visual impact for under $50 total.
- Younger generations prioritize reducing waste by preventing solid wood furniture from reaching landfills, opting for eco-friendly restoration over the wasteful consumption of new products.
- Vintage tables from the 1970s-80s feature solid wood construction that is vastly superior to today’s particleboard furniture, providing better foundations for renovation projects.
- DIY allows homeowners to achieve exact color, finish, and style visions without store limitations or paying expensive custom furniture markups for personalized pieces.
- Most table makeovers are complete in one weekend, yielding dramatic visual results that provide satisfying transformation experiences, boosting confidence for future DIY projects.
Idea 1: Glass Inlay Table to Modern Farmhouse
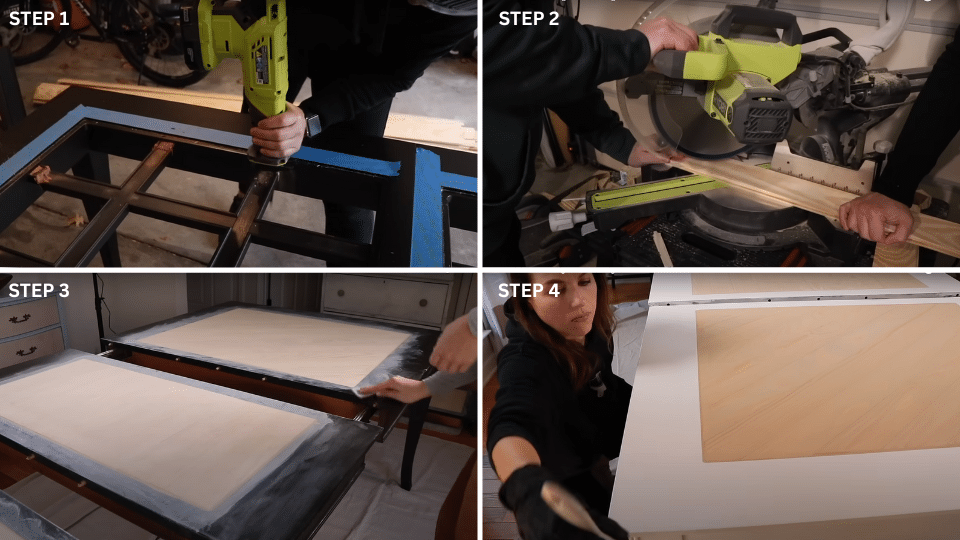
Convert a dated glass inlay table into a modern farmhouse centerpiece by replacing the glass with wood slats, filling and sanding smooth, and applying a custom paint.
| Tools | Materials |
|---|---|
| Rotex sander (or orbital sander) | house Beige paint |
| 60, 150, 220 grit sandpaper | Water-based stains (Greystone, Natural, Sun Bleach) |
| 220 sanding pad | Oil-based gel stain |
| Measuring tape | Paint (Gesso White, Old White, Black/Navy) |
| Saw | Wood conditioner |
| Screwdriver or drill | Wood filler |
| Synthetic brushes | Water-based varnish (General Finishes) |
| Foam brushes/sponges | Dixie Bell Gator Hide |
| Artist brushes | Clear varnish (Jolie brand) |
| Lint-free cloths | Annie Sloan wax |
| Painter’s tape | Bronze gilding wax |
| Wood slats (horizontal & vertical pieces) |
Step 1: Remove Glass & Install Wood
Remove old glass carefully and measure spaces. Cut horizontal wood pieces for the sides and vertical slats for the middle. Fit the wood pieces into the glass spaces and secure them properly.
Common Mistake: Not measuring twice before cutting wood pieces.
Step 2: Fill & Sand Smooth
Apply wood filler to the gaps between the new wood and the existing table. Let dry overnight completely. Use a sander to smooth all areas, starting with coarse then fine grit.
Common Mistake: Not letting wood filler dry completely, causing rough finish.
Step 3: Stain the Wood Top
Make a wash with equal parts water and Farmhouse Beige paint. Apply in sections and wipe excess immediately with a lint-free cloth for even color.
Common Mistake: Not wiping excess stain quickly enough, causing dark blotchy spots.
Step 4: Paint Base & Seal
Sand base with 220 grit, clean, then paint with Gesso White. Apply 2-3 coats of water-based varnish on top, 2 coats on the base.
Common Mistake: Painting over slick surface without sanding first for proper adhesion.
Idea 2: Orange Oak Game Table Update
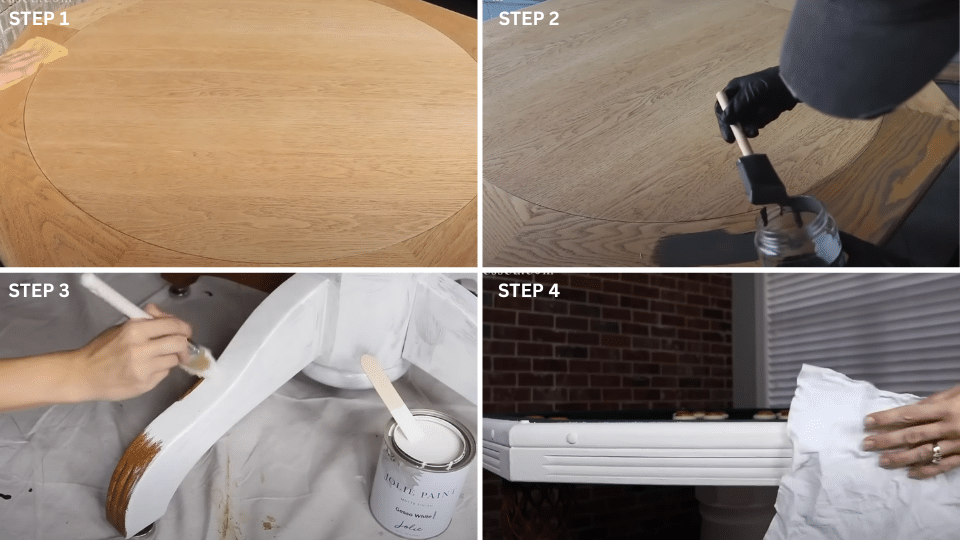
Refresh an outdated orange oak game table with a smooth sanded finish, Greystone stain for a weathered look, a crisp white-painted base, and a durable clear coat for a clean, modern farmhouse vibe.
Tools and Materials Required
| Tools | Materials |
|---|---|
| Orbital sander | 60 grit and 150 grit sandpaper |
| Synthetic brushes | Water-based wood conditioner |
| Foam brushes/sponges | Water-based Greystone stain |
| Lint-free cloths | White paint (for table base) |
| Painter’s tape | General Finishes High Performance Flat |
| 220 grit sandpaper |
Step 1: Sand & Condition Wood
Remove the existing orange oak finish using 60-grit sandpaper, then 150-grit sandpaper. Apply water-based wood conditioner to prevent uneven stain absorption on oak.
Common Mistake: Skipping wood conditioner, resulting in blotchy, uneven stain results.
Step 2: Apply Greystone Stain
Apply water-based Greystone stain evenly across the tabletop. Don’t worry if it looks orange when wet – it dries to a proper gray-brown color.
Common Mistake: Panicking when the stain looks orange initially; it needs proper drying time.
Step 3: Paint Base White
Paint the table base in a contrasting white color while protecting the freshly stained top with tape. This creates a modern two-tone appeal.
Common Mistake: Getting white paint on the freshly stained wood top surface.
Step 4: Apply Clear Protective Finish
Use General Finishes High Performance Flat. Apply three thin coats to the tabletop and two coats to the base. Sand lightly between coats for a smooth finish.
Common Mistake: Applying coats too thick, causing bubbles and uneven texture throughout.
Idea 3: Free Roadside Table Rescue
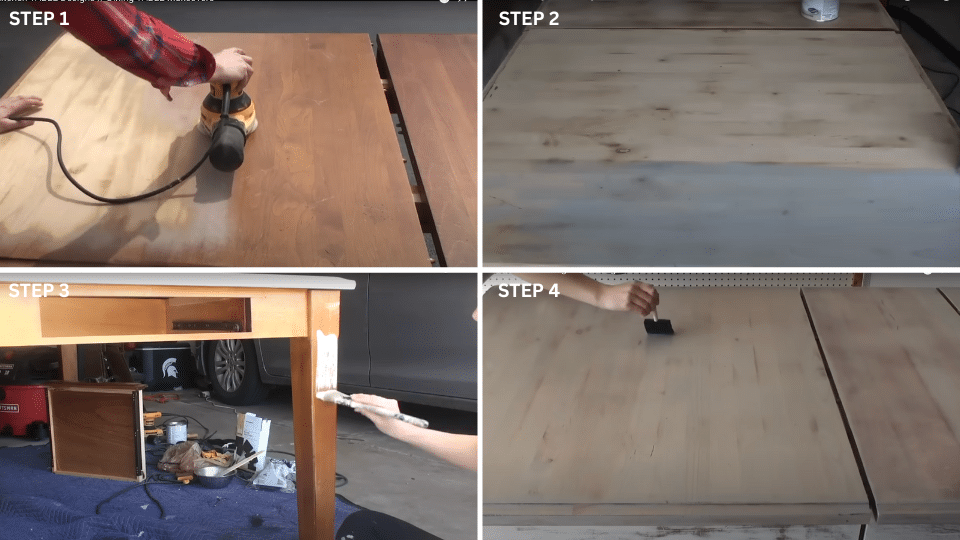
Turn a free roadside find into a charming farmhouse treasure with deep cleaning, a weathered Sun Bleach-stained top, authentically distressed chalk-painted base, and a sealed surface for lasting beauty.
Tools and Materials Required
| Tools | Materials |
|---|---|
| Scrub brush/sponge | Soap and water |
| Orbital sander | Oil-based Sun Bleach stain |
| 60, 150 grit sandpaper | Annie Sloan Old White chalk paint |
| Synthetic brushes | General Finishes High Performance Flat |
| Lint-free cloths | |
| Sandpaper (for distressing) |
Step 1: Clean & Assess Table
Check for structural damage and loose joints. Clean thoroughly with soap and water to remove all dirt and grime buildup.
Common Mistake: Failing to check for structural issues before initiating the entire makeover process.
Step 2: Sand & Stain Tabletop
Eradicate the existing finish from the top surface. Apply oil-based Sun Bleach stain for a gray weathered look. Wipe excess according to directions.
Common Mistake: Not sanding enough and having the stain sit on top of the old finish.
Step 3: Paint & Distress Base
Use Annie Sloan Old White chalk paint on the apron and legs. Sand the edges and high-wear areas to expose the wood underneath for an authentic look.
Common Mistake: Over-distressing and making it look fake instead of naturally worn over time.
Step 4: Seal Top Only
Apply General Finishes High Performance Flat to the tabletop only. Leave the distressed base unsealed for an authentic farmhouse appearance and texture.
Common Mistake: Sealing distressed paint and losing the authentic, naturally worn texture completely.
Idea 4: No-Sand Gel Stain Method

Easily refresh a dated finish with the no-sand gel stain method: just clean, apply thin coats of gel stain, allow it to cure properly, and seal with a water-based topcoat for a rich, durable update.
Tools and Materials Required
| Tools | Materials |
|---|---|
| Synthetic brushes | Oil-based gel stain |
| Lint-free cloths | Cleaner (degreaser or wax remover) |
| Foam brushes/applicators | Water-based polyurethane topcoat |
| 220 grit sandpaper |
Step 1: Clean Existing Surface
Remove dirt, grease, or wax buildup with the appropriate cleaner. The surface should be clean, but it doesn’t need to be stripped down completely.
Common Mistake: Not cleaning properly, allowing gel stain to sit on top of dirt and grime.
Step 2: Apply Gel Stain in Thin Coats
Paint oil-based gel stain directly over the existing finish using a brush. Apply multiple thin coats rather than one thick coat for even coverage.
Common Mistake: Trying to get full coverage in one thick coat, causing very uneven results.
Step 3: Apply Water-Based Topcoat
Test the topcoat in a hidden area first. Apply 2-3 thin coats of water-based polyurethane, sanding lightly between each coat with 220 grit.
Common Mistake: Not testing first and discovering compatibility issues on all visible table areas.
Video Tutorial
I want to acknowledge Christina Muscari for the insightful video, which served as a key reference in compiling this guide.
Pro Tips for Success
Before you dip into your table makeover, follow these expert tips to save money, stay safe, and get professional-looking results every time.
1. General Guidelines
- Always work in well-ventilated areas when using stains and finishes
- Test all products on hidden areas first
- Take your time – rushing leads to mistakes
- Use quality brushes and tools for better results
2. Money-Saving Tips
- Look for free tables on the roadside or marketplace.
- Buy quality tools once rather than cheap tools multiple times.
- Water-based products are safer and easier to clean up.
- Consider two-tone finishes to hide imperfections.
3. Safety Reminders
- Wear appropriate safety gear (masks, gloves, eye protection).
- Dispose of oil-soaked rags properly to prevent fire.
- Keep the workspace organized and clean.
- Read all product labels and follow the manufacturer’s instructions.
How Do DIY Dining Table Makeovers Save You Money?
DIY dining table makeovers aren’t just creative; they’re a smart way to save hundreds while upgrading to better quality furniture.
1. The Shocking Price Difference
New dining tables cost between $400 and $ 1,200 at furniture stores. Most expensive makeover? Just $47 in supplies. The glass inlay costs a total of $32. The orange oak update requires $28. Roadside rescues need only $15 worth of materials.
2. What You’re Paying For
Furniture retailers mark up pieces 200-400% from wholesale. Shoppers pay for showroom rent, sales commissions, and massive profit margins. Makeovers skip those extra costs and work with solid wood that’s often better quality than today’s new pieces.
3. Free Furniture is Everywhere
People discard perfect tables because they look dated, not because they are broken. Solid wood pieces frequently appear on Facebook Marketplace, at estate sales, and during roadside finds. That “ugly” 1980s oak table? It was built to last decades and needs the right treatment.
Paint vs. Stain: What Works Best for Dining Tables?
Choosing between paint and stain comes down to personal style and the quality of the wood. Paint hides imperfections and adds boldness, while stain enhances the natural beauty and character of the wood.
| Feature | Paint | Stain |
|---|---|---|
| Appearance | Bold, opaque color that hides wood grain | Natural, transparent finish that enhances grain |
| Best For | Modern, vintage, or bold statement looks | Rustic, farmhouse, or traditional aesthetics |
| Durability | Durable with a good topcoat, but may chip over time | Penetrates wood for long-lasting color |
| Wood Condition Needed | Can hide flaws, good for damaged wood | Requires smoother, high-quality wood |
| Application Difficulty | Easier to apply, especially chalk or mineral paint | Requires more prep (sanding, conditioning) |
| Maintenance | Easier to touch up or repaint | May require a full refinish for repairs |
| Drying Time | Dries faster, especially with water-based paints | Longer drying and curing times |
| Custom Look | Can be distressed or layered creatively | Can be stained in layers or washed for tone |
If your dining table has beautiful wood and you want a timeless, organic look, stain is your best friend. However, if you’re looking for a dramatic change, want to match modern interiors, or need to cover up flaws, painting is the ideal solution. Either method can breathe new life into your space when paired with the right finish.
Conclusion
These four table makeover ideas prove you don’t need expensive furniture to create a beautiful dining space. From glass inlay replacements to no-sand gel stain methods, each technique offers a budget-friendly path to furniture you’ll love.
The real value goes beyond saving money. When you make over a table yourself, you’re working with solid wood construction that often surpasses today’s mass-produced furniture. Additionally, you receive the exact style and finish that complements your home.
Ready to start your first project?
Select the method that best suits your table’s current condition and your skill level. Remember to test products in hidden areas first, work in well-ventilated spaces, and take your time for the best results.
Which table makeover idea will you try first? Share your comments below, and don’t forget to save this guide for your next furniture project.