
Ever stared at an empty toilet paper roll and thought, “There must be something more creative to do with this than just recycling”? I’ve found a brilliant way to transform these humble cardboard tubes into stunning flowers that never wilt!
In this guide, I’ll show you how to create stunning floral decorations using materials you already have at home.
From gathering your supplies to showcasing your finished blooms, I’ve got you covered with step-by-step instructions and creative ideas.
This eco-friendly craft project is perfect for crafters of all ages and skill levels.
Get ready to impress your friends with beautiful decorations that they’ll never believe started as bathroom waste!
The Magic of Cardboard Flower Crafting
Before jumping into the nitty-gritty of creation, let me share why this project has become one of my favorites. Cardboard tube flowers aren’t just eco-friendly—they’re incredibly versatile, allowing for endless creativity.
Unlike real flowers, these blooms last forever, requiring no water or sunlight. Plus, there’s something deeply satisfying about converting something so ordinary into a decoration worthy of display.
The beauty of these flowers lies in their adaptability. You can make them rustic and natural or vibrant and whimsical, depending on your decorating style. They work beautifully as standalone art pieces or can be incorporated into larger craft projects.
And the best part? The materials cost practically nothing!
5 Simple Steps to DIY Toilet Paper Roll Flowers
Convert everyday cardboard tubes into deft blooms with this eco-friendly craft that’s perfect for sustainable home decor or thoughtful handmade gifts.
1. Gathering Your Upcycling Supplies
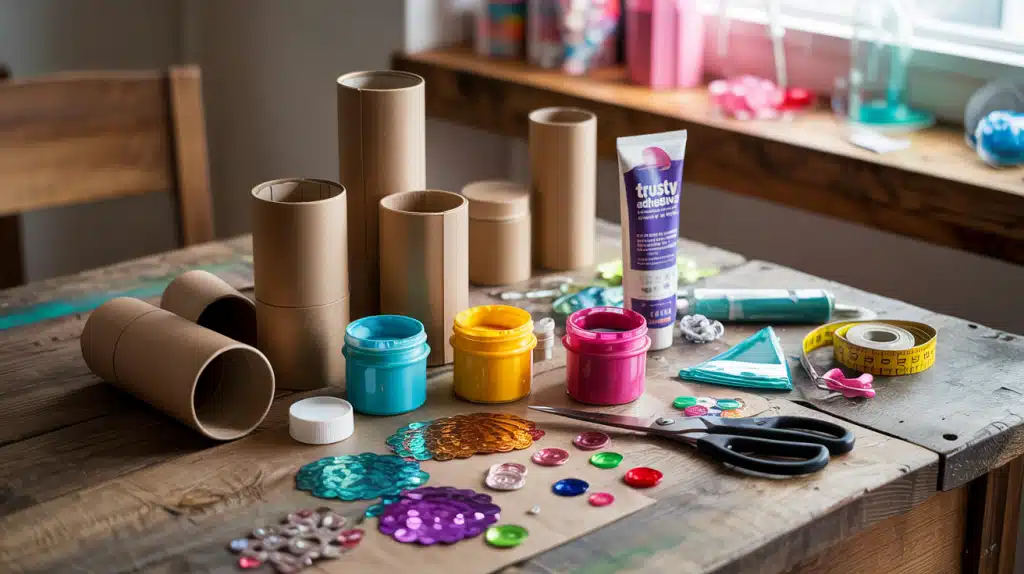
Before we jump into crafting mode, let’s round up everything you’ll need:
- Several empty cardboard tubes (the more you’ve “saved,” the bigger your bouquet)
- Your trusty adhesive (regular craft glue works, but hot glue guns speed things up)
- Sharp scissors for precise cutting
- Colorful paints, markers, or even spray paint for finishing touches
- Decorative elements like sequins, beads, or those random craft supplies you bought years ago
- Measuring tools if you’re the precise type
Don’t worry if your craft stash isn’t magazine-worthy. The beauty of this project is working with what you have.
Those random buttons at the bottom of your sewing kit? Perfect flower centers! That glitter from three Christmases ago? Ideal for petal accents!
2. Converting Tubes into Petals
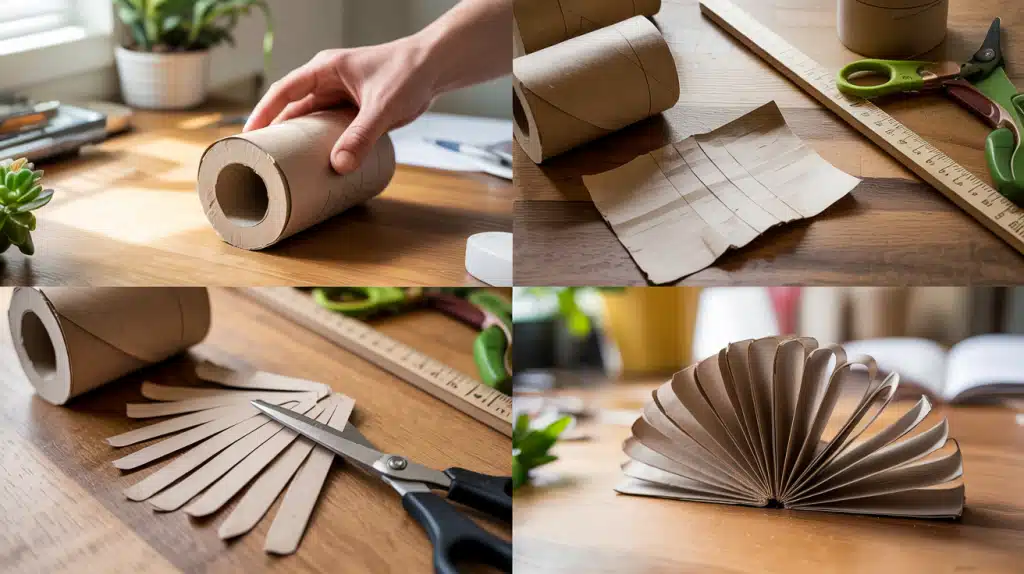
Now for the fun part – getting those tubes ready for their floral mutation:
- Start by gently pressing your cardboard tube flat. Don’t crush it completely; you want a neat fold on each side.
- For delicate flowers like daisies, mark thin strips (about 1/4 inch wide) along the length of your flattened tube. For statement blooms like sunflowers, go wider with 1/2 to 1-inch strips.
- Cut carefully along your marks, stopping about half an inch from the bottom to keep all petals connected.
The secret to natural-looking flowers is welcoming imperfection. Varying your petal widths slightly creates that genuine, organic feel. Remember – even real flowers have quirks and asymmetries!
3. Crafting Your Cardboard Blooms
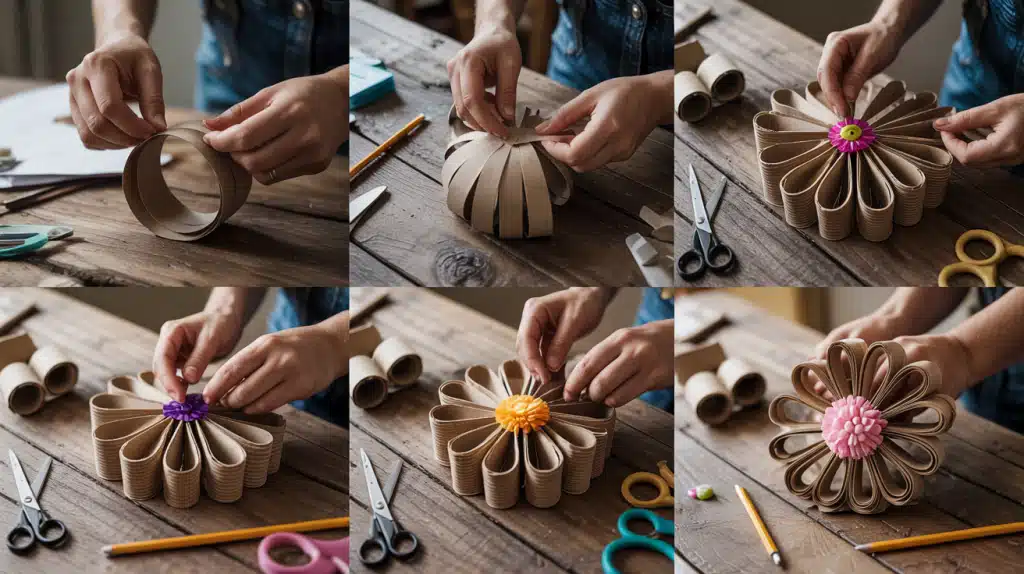
With your prepared tube in hand, it’s time to convert it from cut cardboard into beautiful blooms:
- Gently bend your connected strips outward, forming a circular shape with the petals radiating from the center.
- For multi-layered flowers, create several petal rings in different sizes, then stack and glue them together with the largest on the bottom.
- Finish with a decorative center – buttons work wonderfully, but don’t be afraid to experiment with small pompoms, beads, or even tiny origami shapes.
For a professional touch, curl the tips of your petals slightly outward using a pencil or the blunt side of your scissors. This simple step adds dimension and makes your flowers look remarkably realistic despite their humble origins.
4. Adding Color and Character
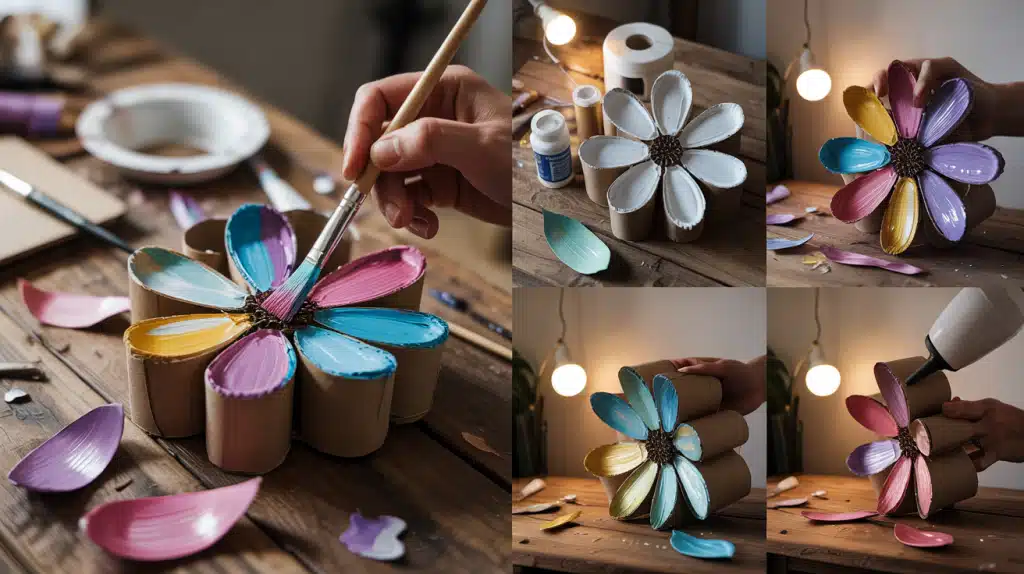
Plain cardboard has its charm, but a splash of color brings your creations to life:
- Choose colors that complement your home decor or go wild with vibrant hues that stand out.
- Consider ombré effects by blending colors from dark at the base to lighter at the tips.
- For extra pizzazz, add a touch of glitter, metallic paint, or even a light dusting of clear varnish for shine.
Painting before assembly gives you precision, while painting after assembly helps you visualize the complete look. Can’t decide? Try both approaches with different flowers and see which you prefer. For a quick-dry solution, set your hairdryer to low heat and watch the magic happen in minutes.
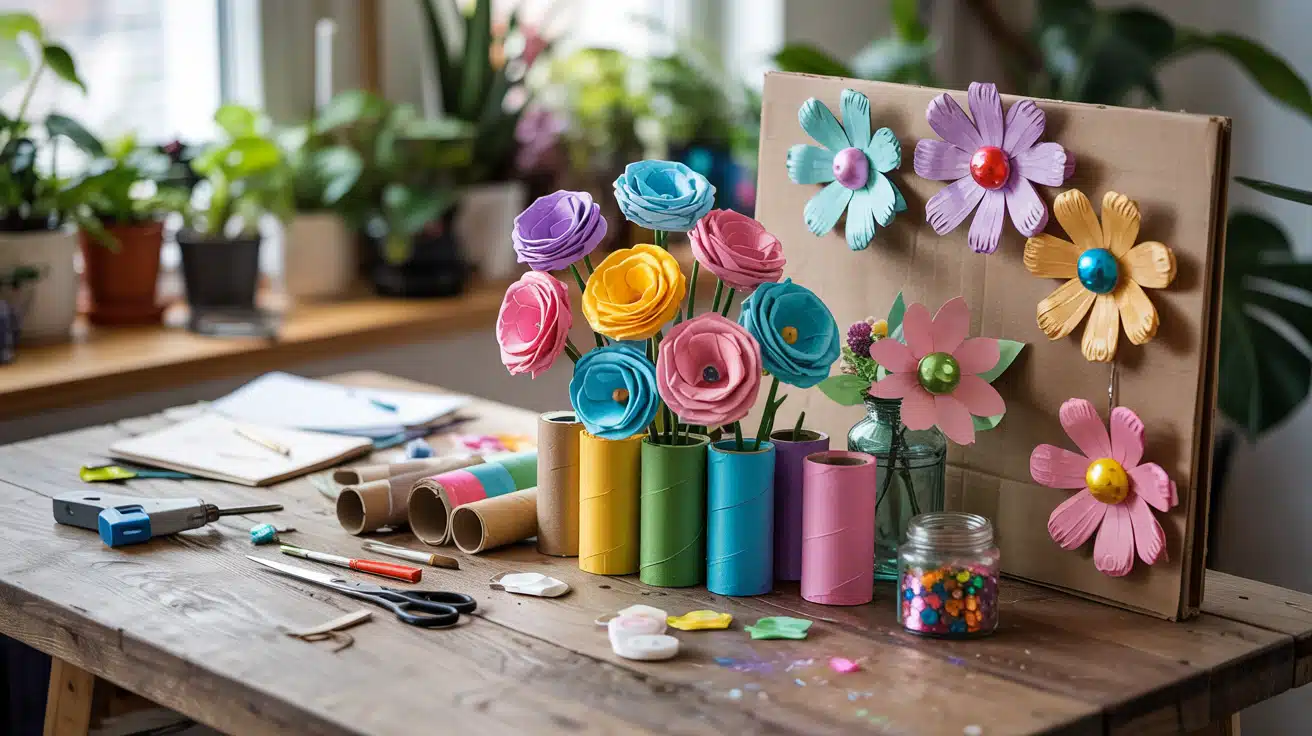
5. Showcasing Your Cardboard Garden
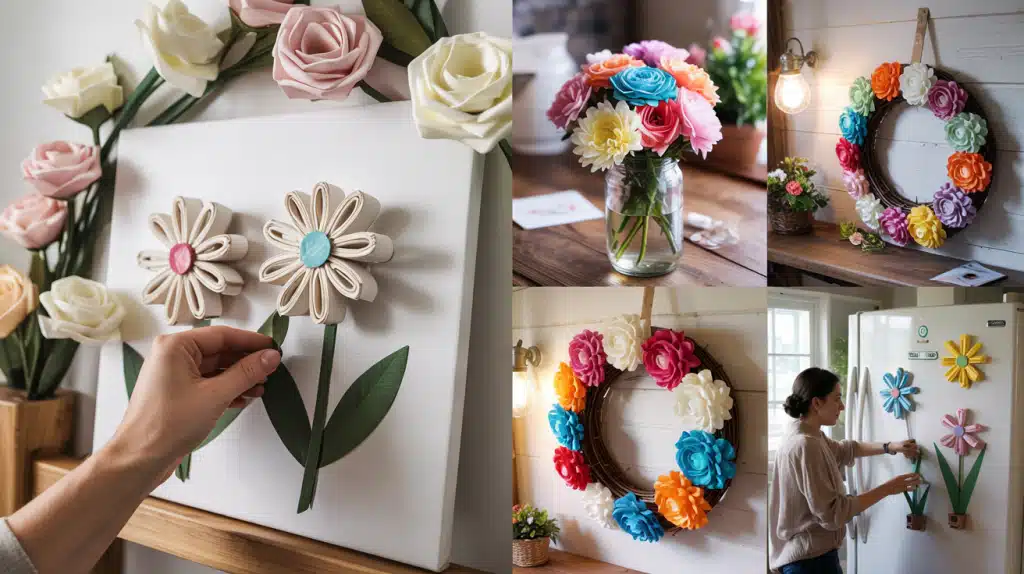
You’ve created beautiful blooms – now let’s put them to work:
- Create a statement wall piece by attaching various-sized flowers to a canvas or embroidery hoop.
- Fashion a never-wilting bouquet by attaching flowers to painted wooden dowels or sturdy straws.
- Make a stunning wreath by arranging your flowers in a circle on a cardboard base.
- Add magnets to smaller blooms for functional refrigerator art.
- These versatile creations work everywhere from nurseries to office spaces. Group similar colors for an elegant monochromatic look, or embrace the rainbow for a playful, eclectic vibe. The beauty is in the versatility – change them seasonally or whenever your decor mood shifts!
Taking Paper Roll Flowers Craft to the Next Level
Creative Variations and Expert Tips
Ready to take your toilet paper roll floristry to the next level?
- Experiment with different cutting techniques – try fringing the edges, creating pointed petals, or scalloped borders.
- Combine different paper tubes (paper towel rolls create jumbo blooms perfect for statement pieces).
- Create roses by rolling thin strips of cardboard into spirals instead of cutting petals.
- Add leaves by cutting simple shapes from green-painted cardboard and attaching them to your stems.
The most successful crafters know the secret isn’t perfection – it’s playfulness. Try techniques you’ve never used before, combine unexpected materials, and don’t be afraid to make “happy accidents” part of your design.
Crafting Community
This simple project has surprising social benefits, too:
- Perfect for crafternoons with friends – compare techniques and styles over coffee and conversation.
- Ideal for intergenerational crafting – grandparents, parents, and kids can all participate regardless of skill level.
- Great for classroom activities that combine creativity with lessons about recycling and sustainability.
There’s something wonderfully connecting about converting something destined for the trash into something beautiful together. Plus, the “wow, you made that from WHAT?” reactions are priceless conversation starters.
Conclusion
As you admire your collection of cardboard blooms, take a moment to appreciate the expedition from ordinary tube to extraordinary art.
These handmade flowers bring unique charm to any space while giving new purpose to items typically discarded.
The joy of toilet paper roll crafting extends beyond the finished product—it’s about embracing creativity, finding beauty in the overlooked, and perhaps sparking conversations when guests discover the surprising origin of your decor.
Whether displayed as wall art, arranged in a vase, or gifted to friends, these blossoms carry the special touch that only handmade items possess.
Your cardboard garden stands as delightful proof that imagination converts the mundane into something magical.
Frequently Asked Questions
Are Toilet Paper Roll Flowers Cheaper than Real Flowers?
Toilet paper roll flowers are significantly cheaper than real flowers, requiring only recycled materials and basic craft supplies for creation.
How Long Will Toilet Paper Roll Flowers Last?
Toilet paper roll flowers can last for years if kept in dry conditions away from sunlight, dust, and humidity.
How Do You Make Toilet Paper Roll Flowers Last Longer?
Protecting toilet paper roll flowers with clear sealant spray, storing in dust-free containers, and keeping away from moisture extends their lifespan considerably.