
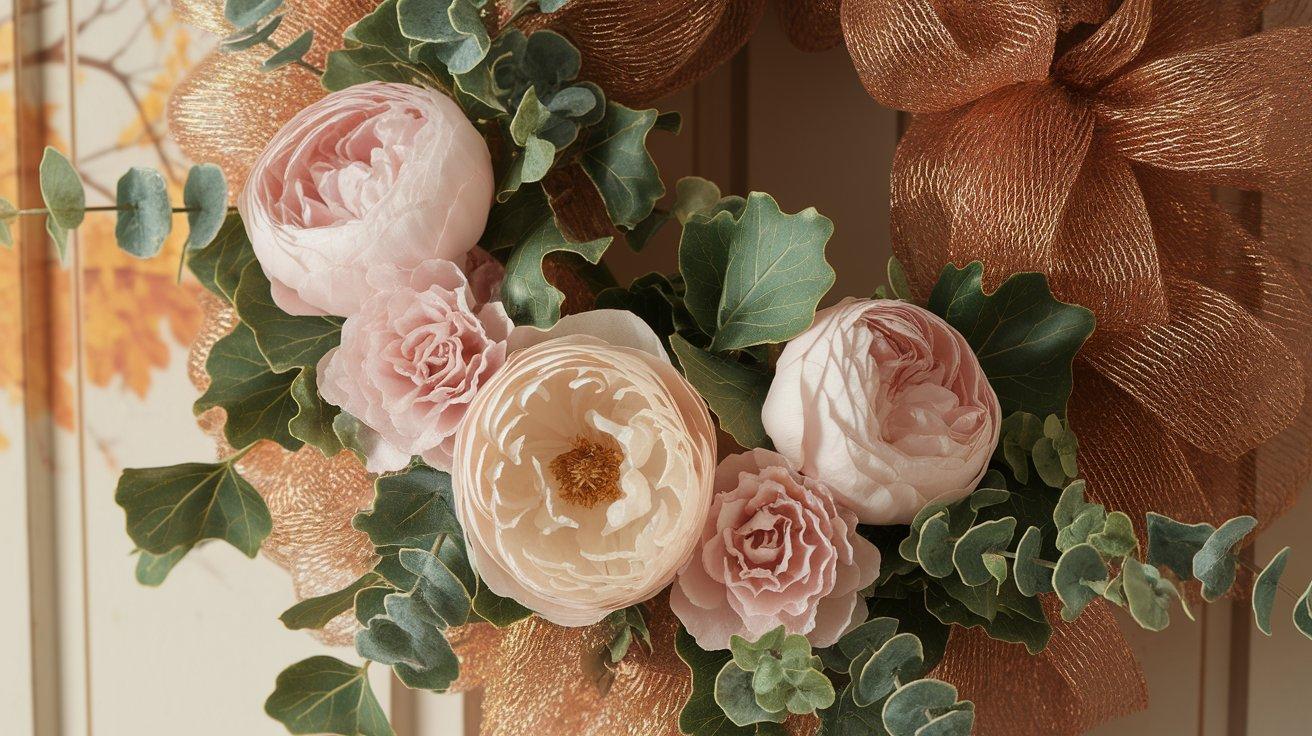
A rose gold flower wreath is a gorgeous decoration that adds grace and charm to any space. Its shimmering metallic petals and delicate ombre effect create a beautiful focal point, whether displayed on a front door, in an entryway, or at a special event.
Crafted from soft, durable fabric mesh, this wreath offers a stylish alternative to traditional store-bought designs, making it both affordable and attractive.
The intricate layers of petals and braided center allow for endless customization, making it a perfect year-round accent.
Whether you’re looking to add a touch of sophistication to your home or create a thoughtful, handmade gift, this wreath is sure to leave a lasting impression.
Why Choose a Rose Gold Flower Wreath?
A rose gold flower wreath is a luxurious and attractive decoration that adds a touch of classiness and warmth to any space.
With its shimmering metallic petals and delicate ombre effect, this wreath effortlessly catches the light, creating a sparkling focal point for your front door, entryway, or special event.
Crafted from soft fabric mesh, it combines beauty and durability, offering a stylish yet affordable alternative to store-bought wreaths.
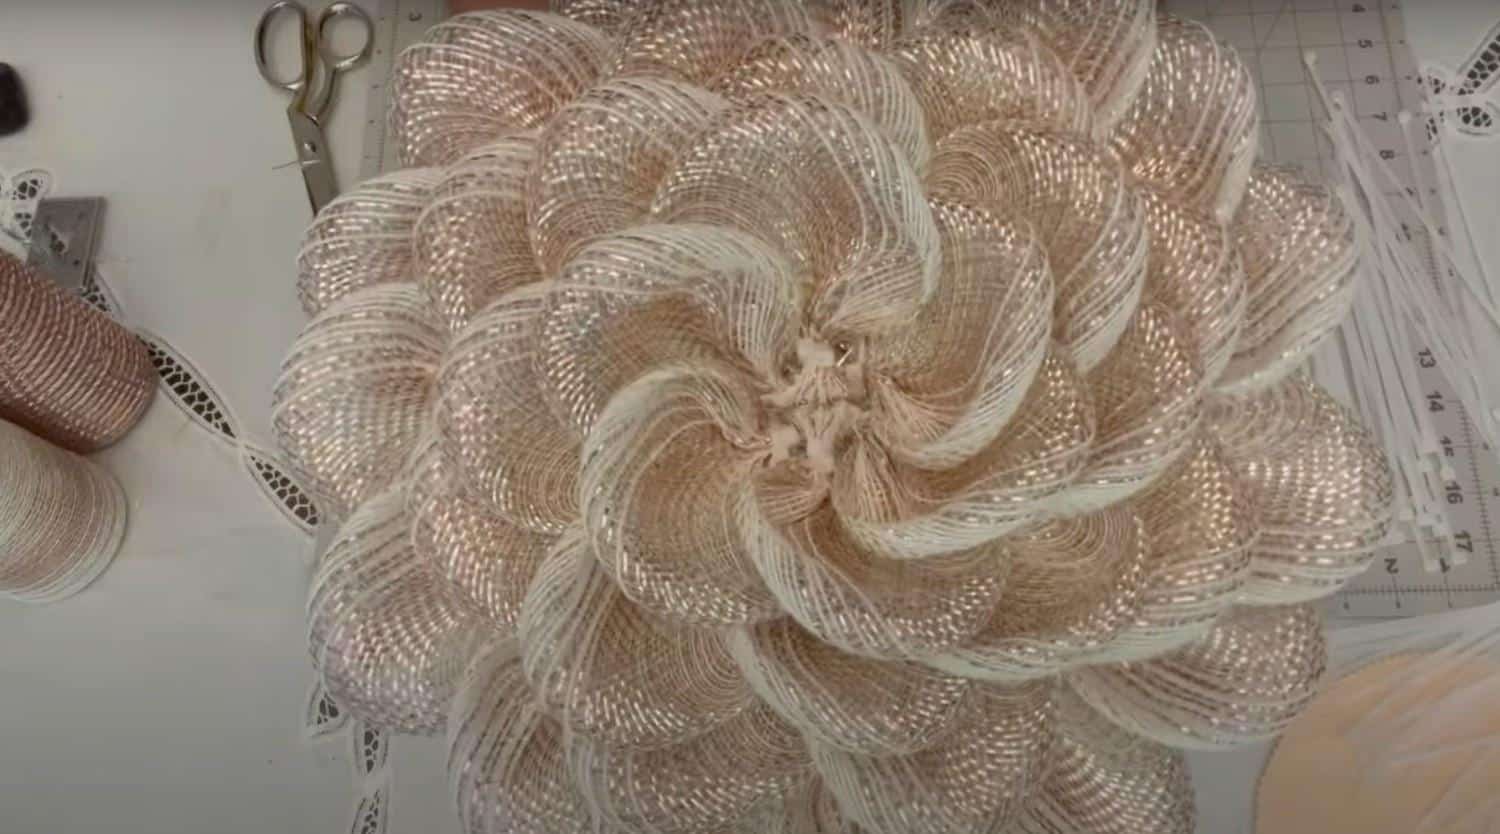
The design, featuring multiple layers of carefully arranged petals, culminates in a beautiful braided rose gold center, making it a perfect year-round accent piece that can be easily customized for any season or celebration.
Whether displayed on your door or gifted to a loved one, this wreath is a showstopper that adds charm and sophistication wherever it’s placed.
DIY Rose Gold Flower Wreath: A Step-by-Step Guide
Tools and Materials Needed
| Item | Description | Purpose |
|---|---|---|
| Wire wreath frame | 8-inch size from Dollar Tree | Base structure for the wreath |
| Ombre mesh | 1 roll, 10-inch metallic rose gold fabric mesh | Creates flower petals (from craftoutlet.com) |
| Metallic mesh | 10-inch rose gold metallic foil mesh | Creates braided center decoration |
| Zip ties | 8-inch length (40-45 pieces) | Secures petals and attaches components |
| Hot glue gun | With glue sticks | Assembles braided center and felt backing |
| Cutting tools | Rotary cutter and scissors | Cuts mesh and trims excess materials |
| Cutting mat | Any size that fits your workspace | Protects the work surface during cutting |
| Felt | Flesh-colored, cut into a circle | Creates a clean backing to protect doors |
| Pipe cleaners | 2-3 pieces | For hanging a wreath and securing the center |
Step 1: Prepare Your Wreath Frame
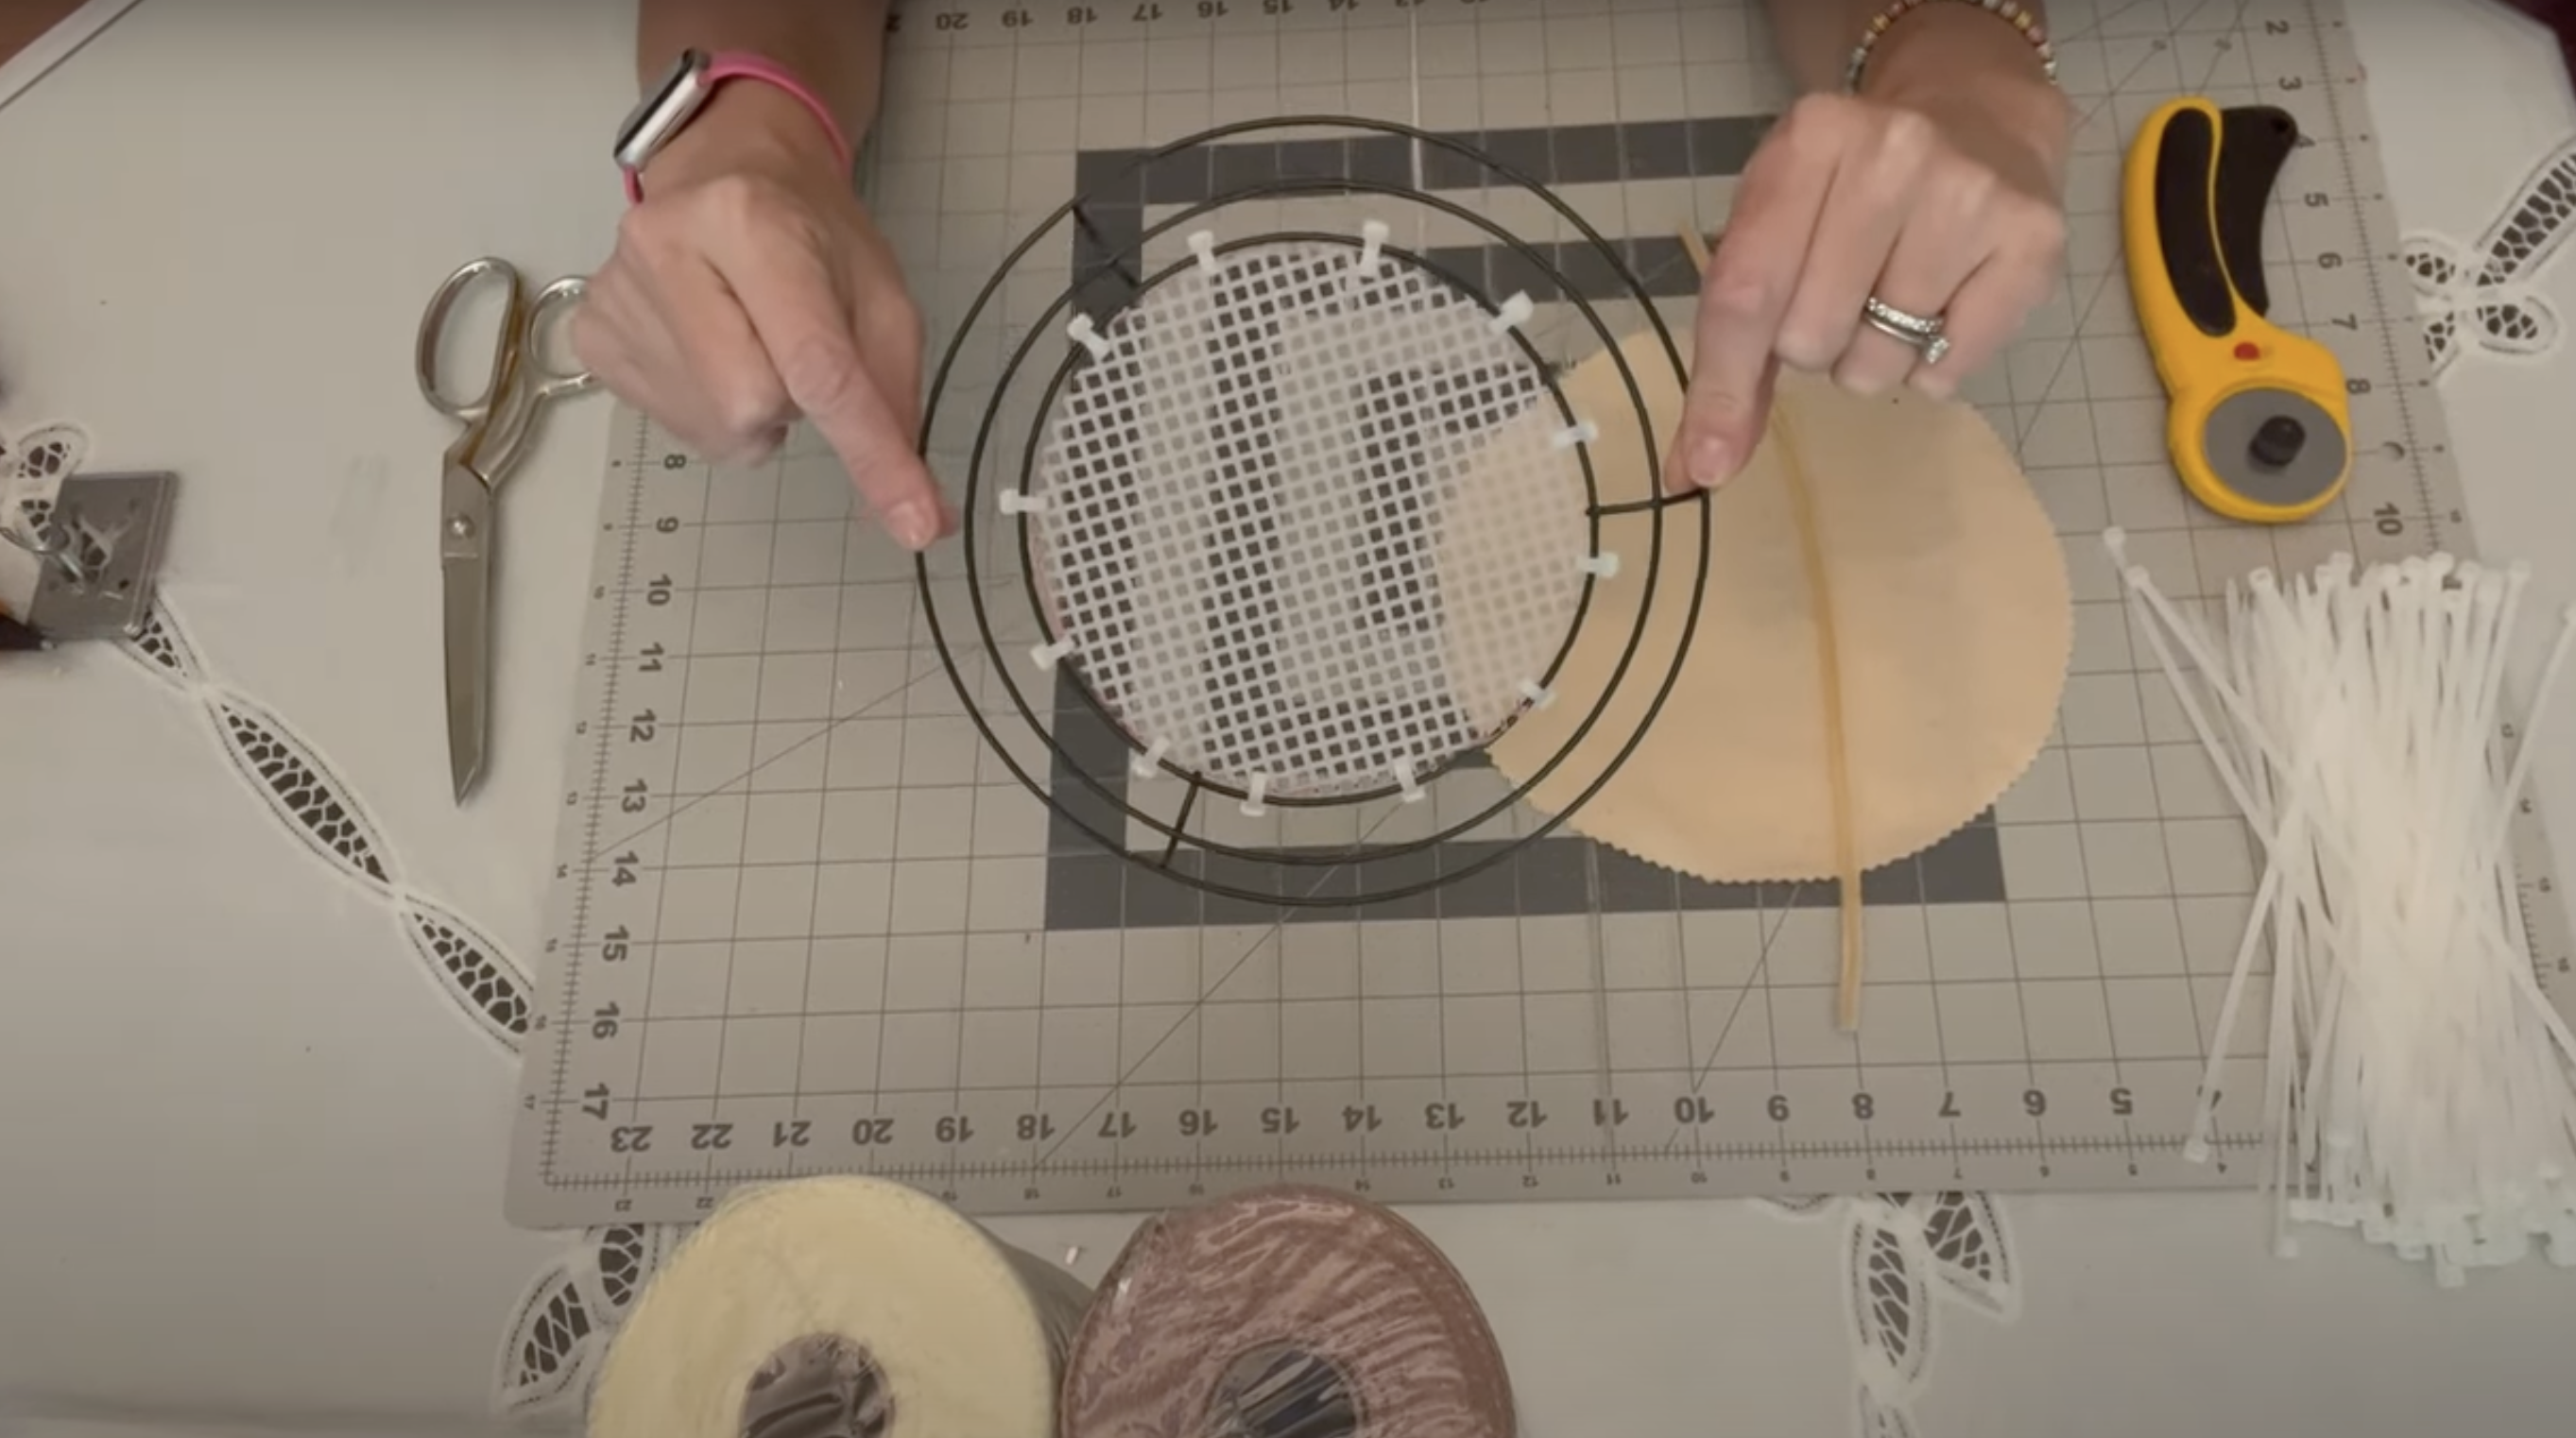
Attach a circular piece of plastic mesh to your 8-inch wire frame using zip ties, ensuring it is centered properly.
Flip the frame over to create a bowl-like shape, which allows petals to curve upward naturally.
This orientation positions the outer metal edge as the front of your flower, providing the foundation for your flower design.
The plastic mesh backing ensures your petals will maintain their position throughout the creation process.
Step 2: Cut Your Mesh Squares
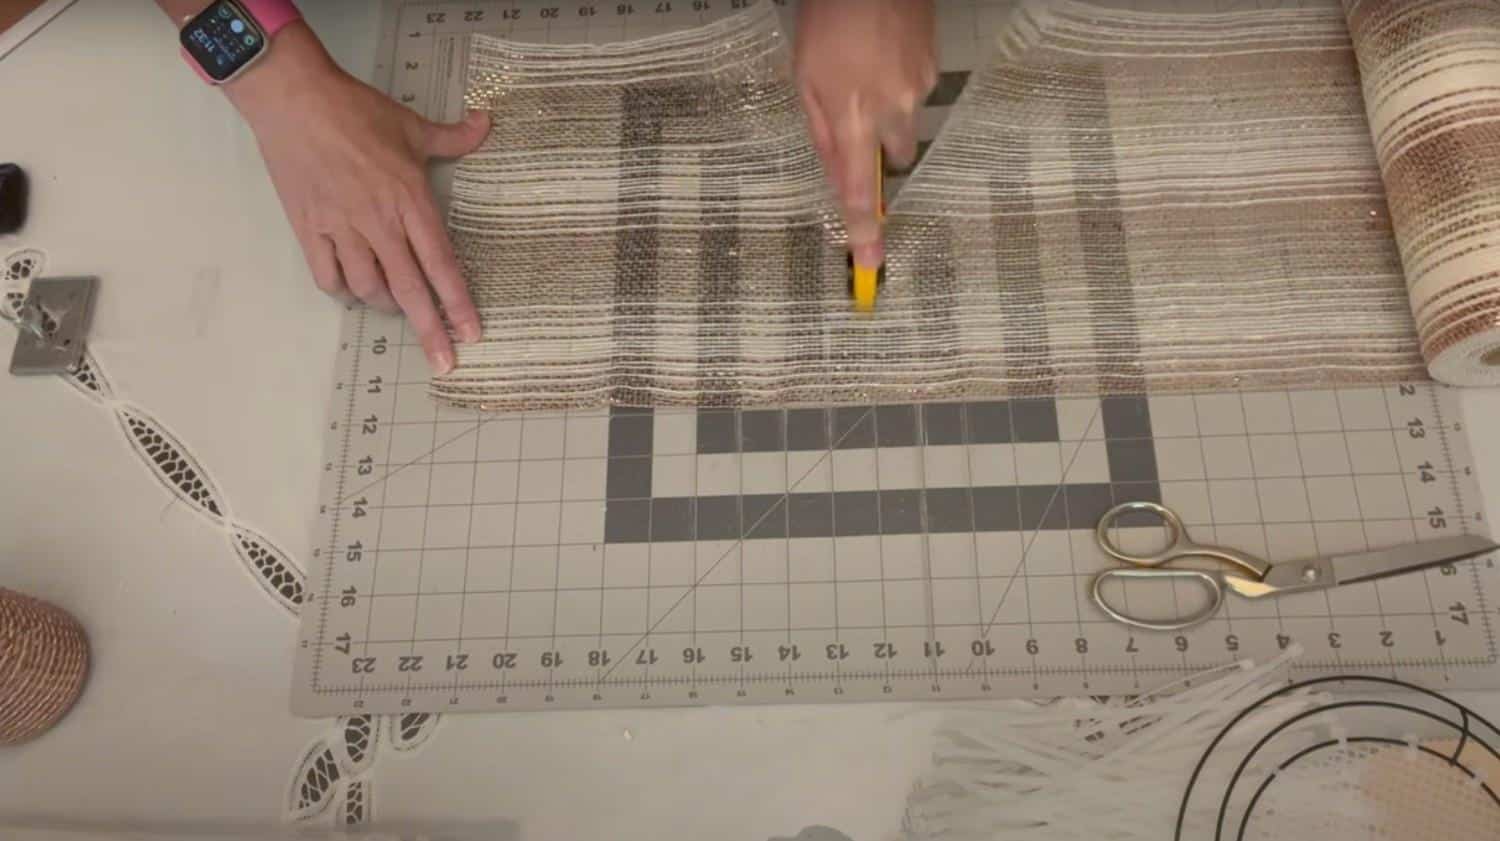
Using a rotary cutter, slice your 10-inch-wide rose gold ombre mesh into perfect 10-inch squares. One roll yields approximately 35-36 squares, enough for this project.
The rotary cutter creates clean edges without the singeing that would occur with a wood burner.
Work on your cutting mat to protect your surface while ensuring straight, even cuts for uniform petals.
Step 3: Create Flower Petals

Fold each mesh square diagonally into a triangle, bringing the lower left corner to the upper right. Gather the mesh across the middle section, then pull both loose ends into the center where you’ve pinched.
Secure with a zip tie and shape into a curved bowl form. Trim excess mesh below the zip tie for a clean look.
This clever design tucks away cut edges to prevent fraying. Continue making about 35-36 petals for your wreath.
Step 4: Attach the First Row of Petals
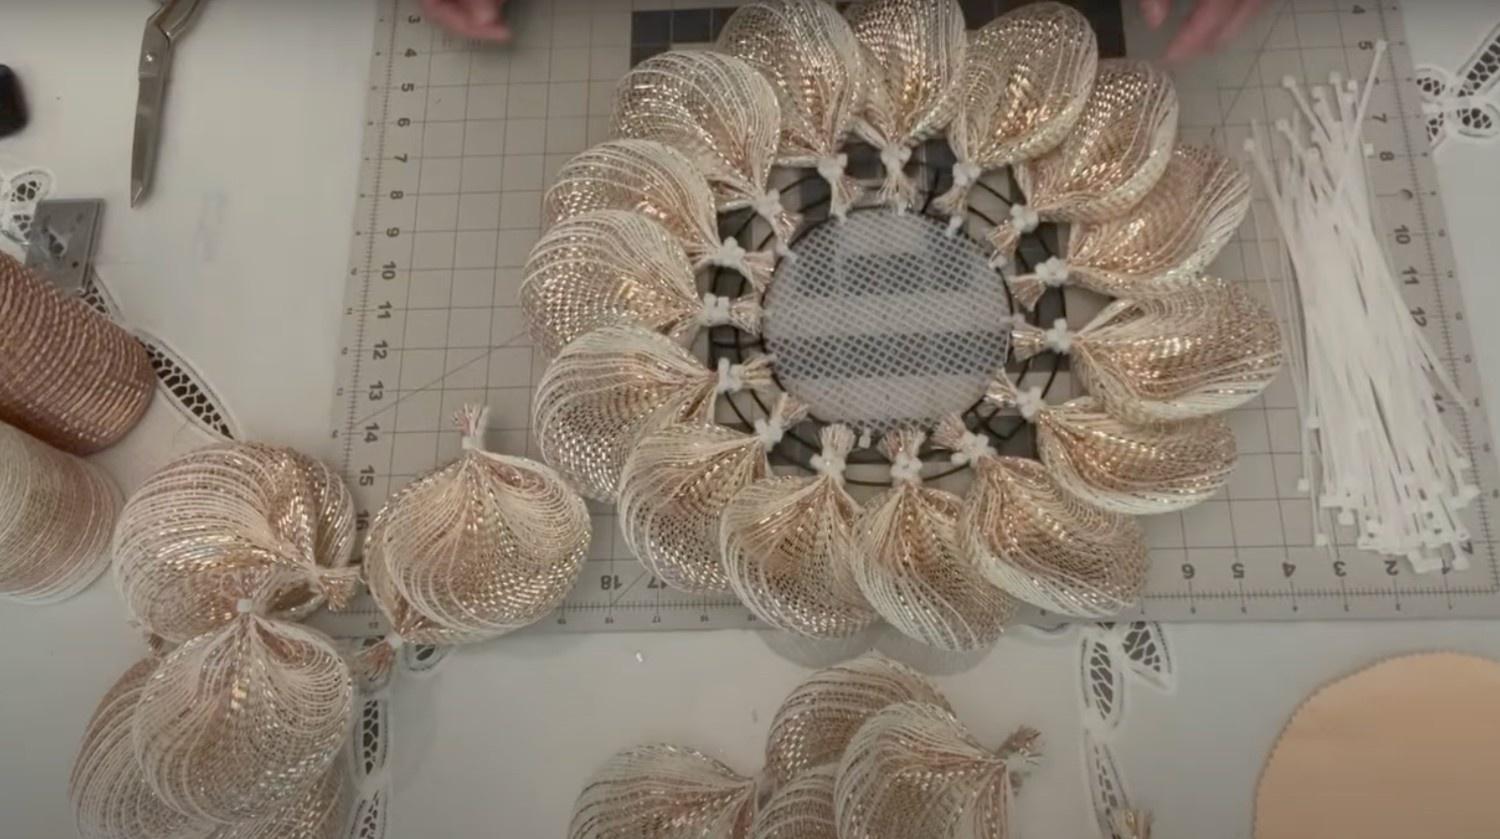
Secure 15 petals around the outer wire of your wreath frame, using two zip ties per petal in opposite directions to keep them properly aligned.
Overlap each petal slightly with its neighbor to create a swirling pattern and fuller appearance.
This outer row establishes the overall 15-inch diameter of your wreath and serves as the foundation for your flower design.
Step 5: Create the Second Row of Petals
Add 8 petals for your second row, placing them along the border where your plastic mesh begins.
Position petals at the 12, 3, 6, and 9 o’clock positions first, then fill the remaining spaces evenly.
For this row, you only need one zip tie per panel, as the plastic mesh provides stability. Continue the overlapping pattern for a cohesive, flowing design.
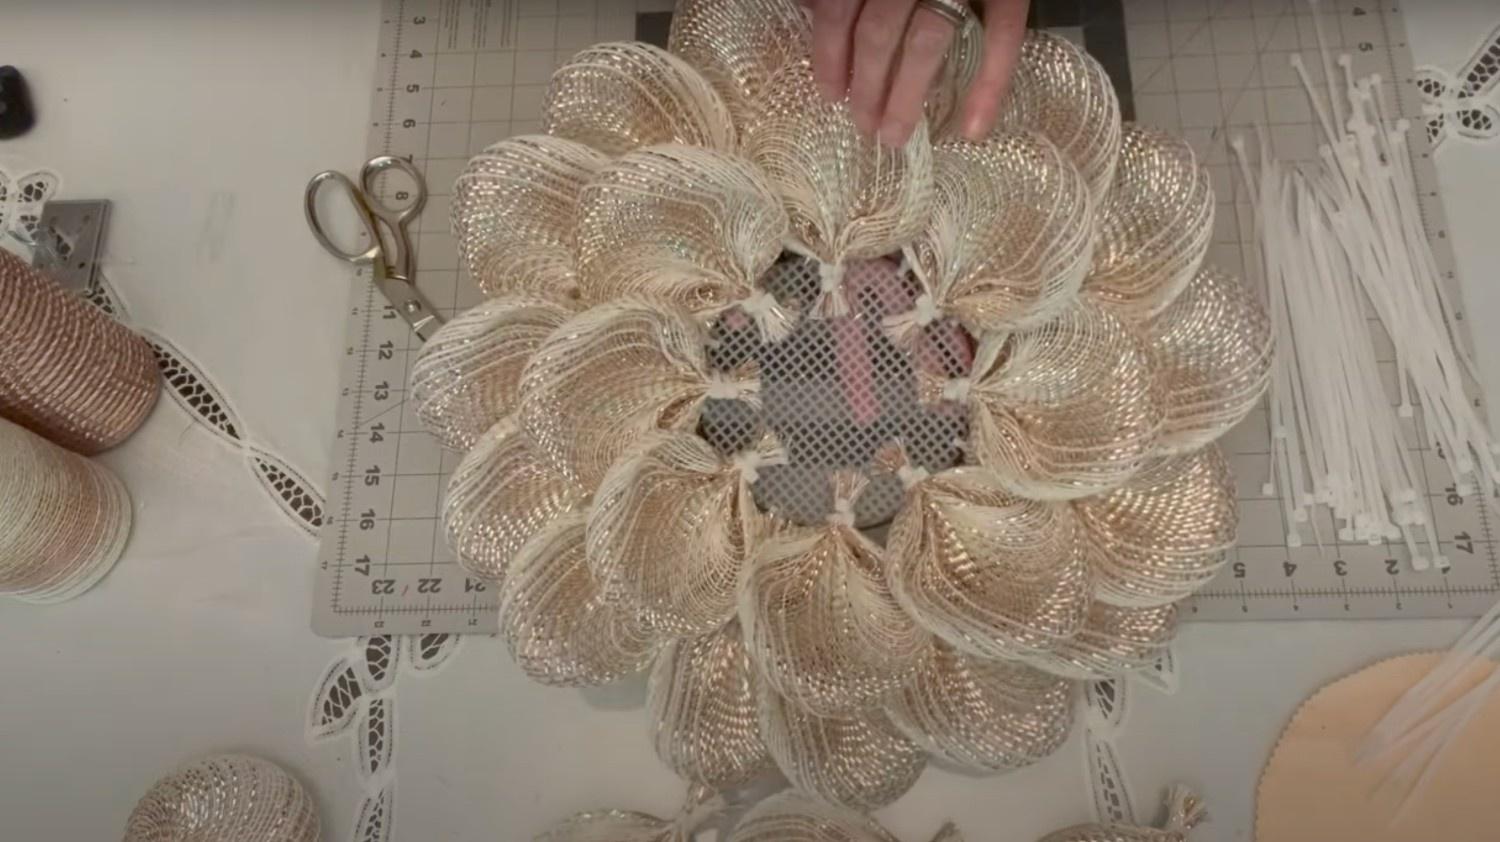
Step 6: Add Third Row of Petals
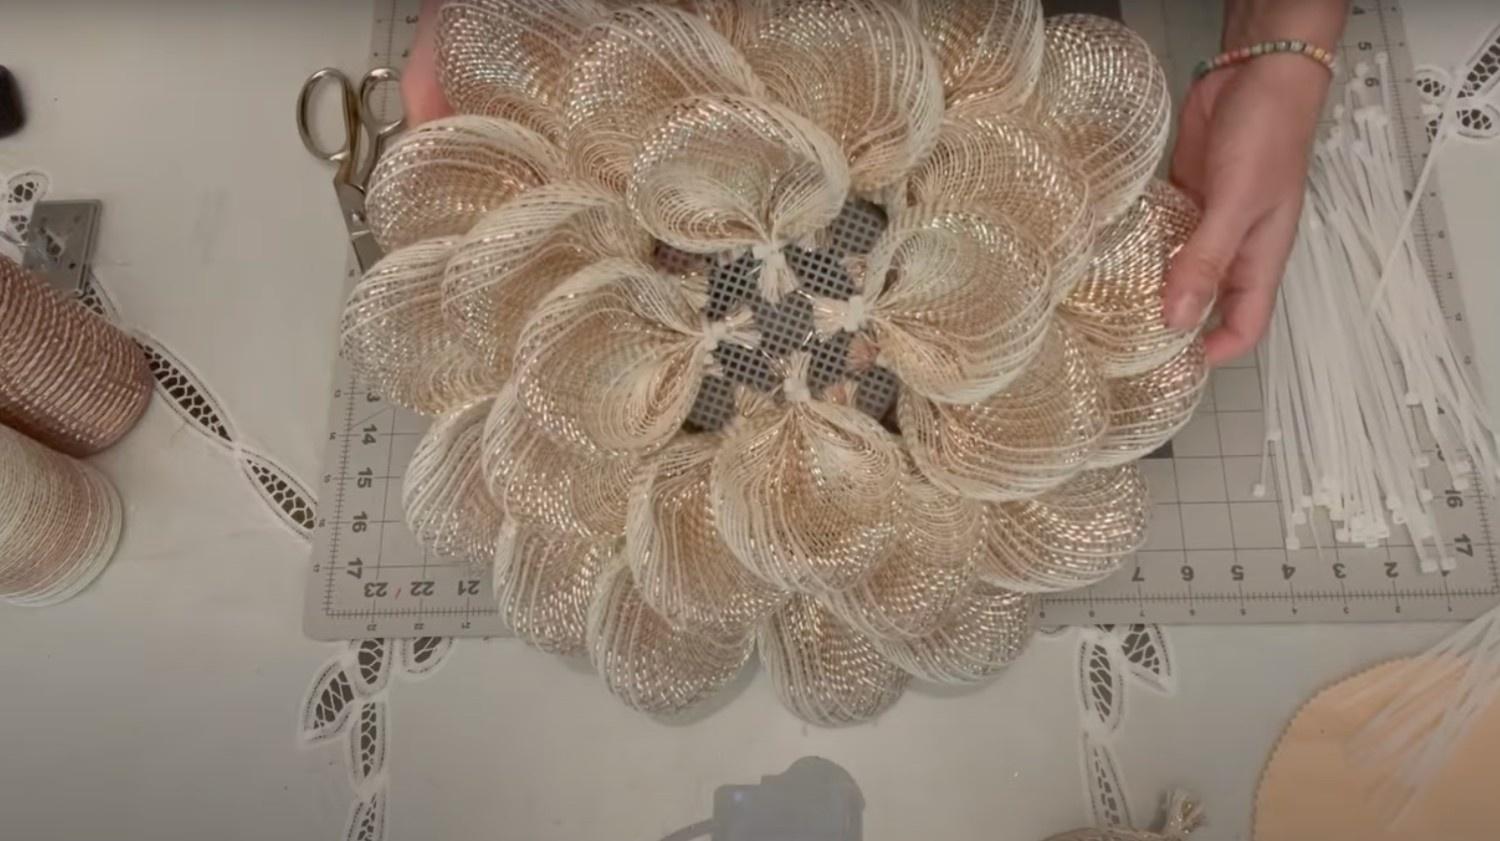
Place 8 more petals for your third row, positioning them slightly closer to the center. Offset these petals to fill the gaps between the second row petals rather than aligning directly.
This staggered arrangement adds depth and creates a more natural flower appearance. Secure each with a single zip tie, approximately one inch inward from the second row.
Step 7: Complete the Center Row of Petals
For the final center row, place the 6 petals tightly in the small center circle. Start with one petal, then put another directly across from it, adding the remaining four on either side.
These petals will sit more snugly together, creating a compact center for your braided centerpiece.
The thin mesh allows for tight placement without creating bulk. Shape gently and tuck in any stray strands.
Step 8: Create Braided Center
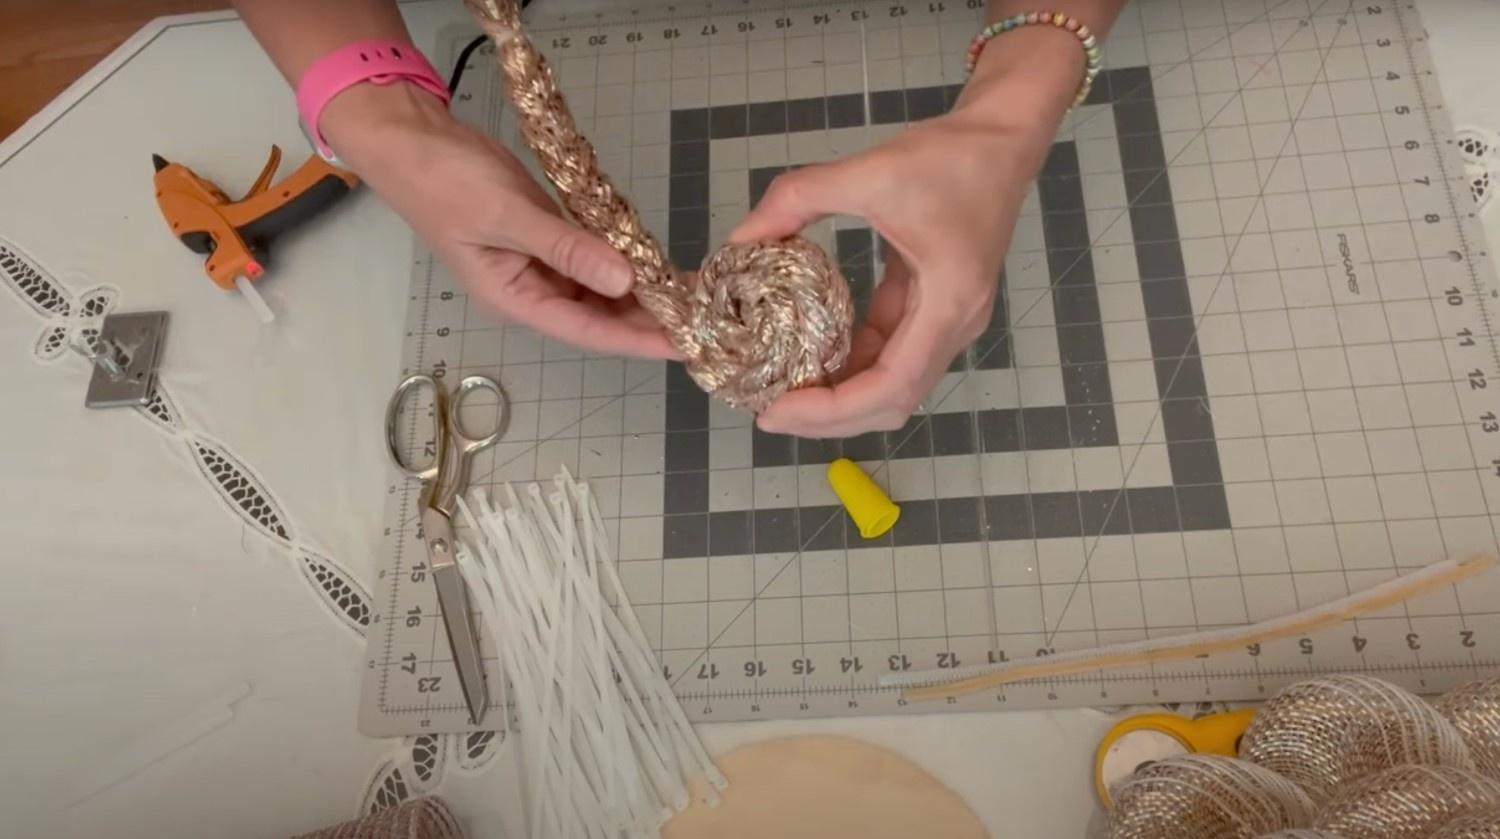
Cut three 3-foot lengths of solid rose gold metallic mesh. Accordion-fold one end of all pieces together and secure with a zip tie.
Braid the lengths together and secure the other end when finished. Form the braid into a tight circle, working from the center outward, and secure it with hot glue as you go.
Attach this braided center to your wreath using a pipe cleaner threaded through opposite sides, positioning centrally.
Step 9: Add Finishing Touches
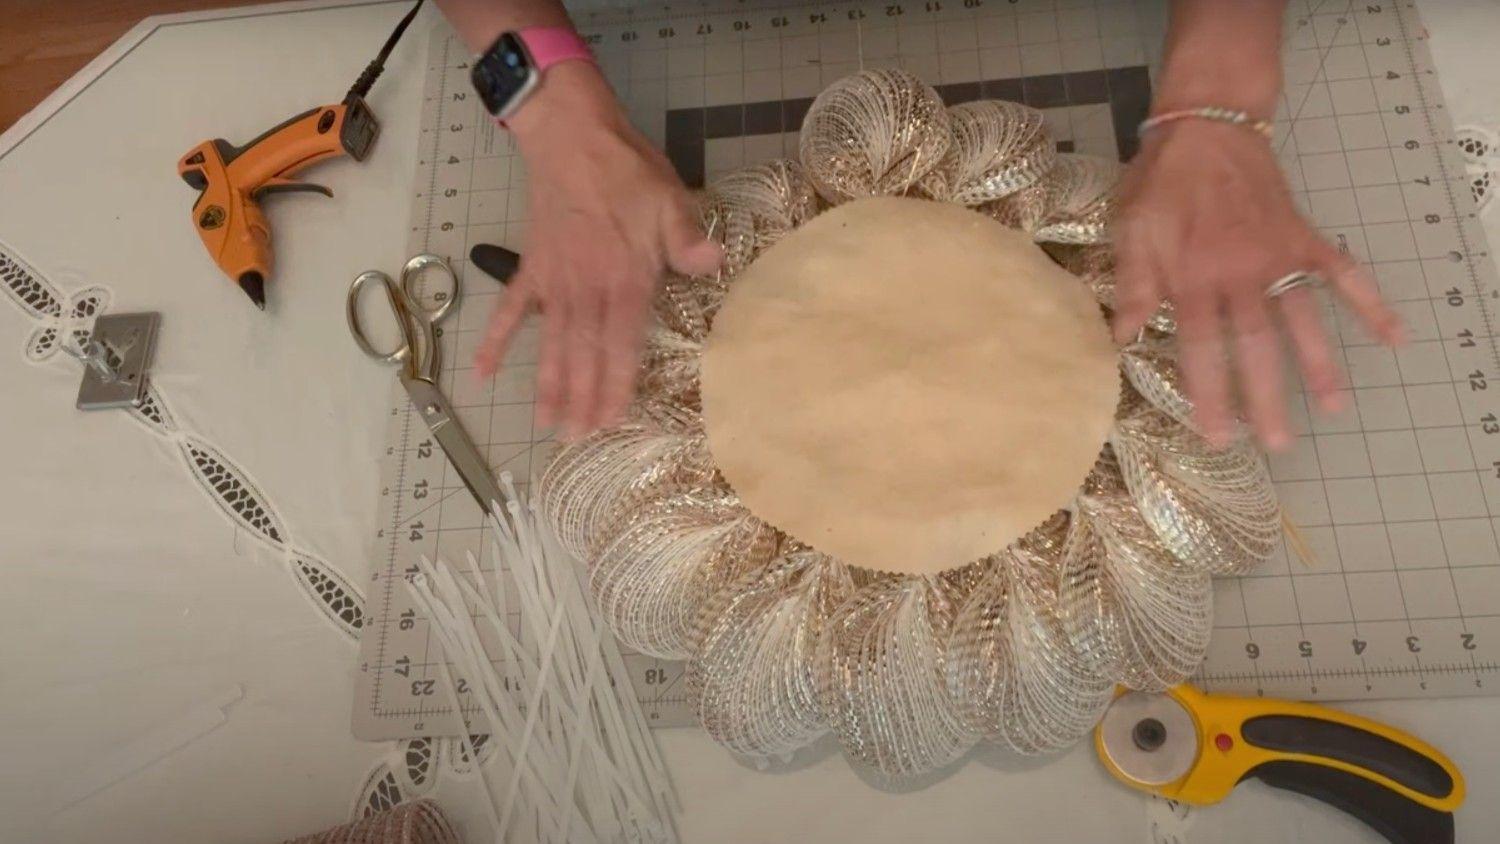
Complete your wreath by adding a pipe cleaner to the back for hanging. Cut flesh-colored felt into a circle sized to cover the back of your frame and attach with zip ties around the perimeter to protect your door from scratches.
Trim any visible zip tie ends and tuck in stray mesh strands for a professional finish. Your 15-inch diameter rose gold flower wreath now sparkles with dimension and elegance, ready for display.
Video Tutorial
Check out this YouTube video for a detailed step-by-step Tutorial by The Door Doctor Handcrafted Wreaths
Additional Wreath Design Ideas
1. Seasonal Wreath
-
Elements: Metallic rose gold mesh, silk peonies or roses, greenery like eucalyptus or ivy.
-
Explanation: This design combines shimmering metallic petals with soft floral accents and natural greenery. It’s perfect for any season and adds a sophisticated, timeless look to any space.
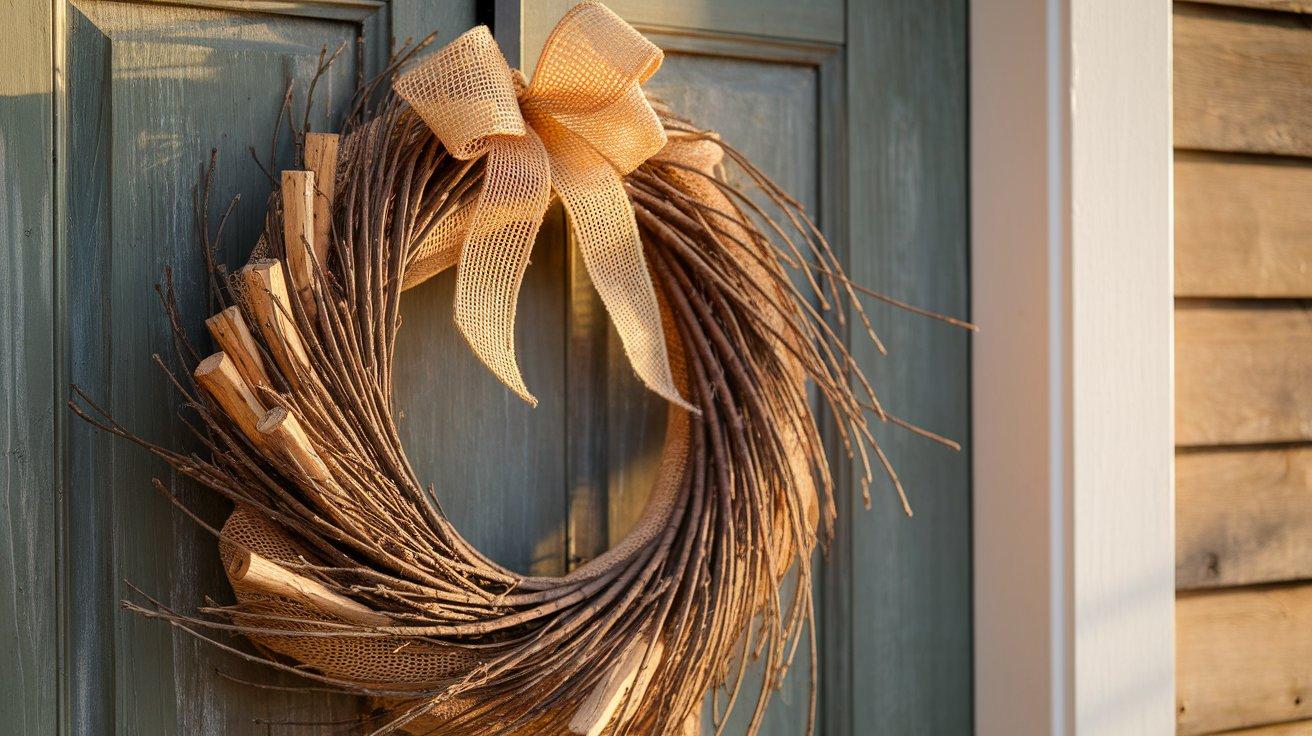
2. Rustic Charm Wreath
-
Elements: Burlap mesh, wooden accents, twigs, and a burlap bow.
-
Explanation: This wreath embodies a cozy, farmhouse aesthetic, utilizing natural, earthy materials such as burlap and wood. The rustic charm brings a warm, inviting vibe, ideal for homes with a country or rustic aesthetic.
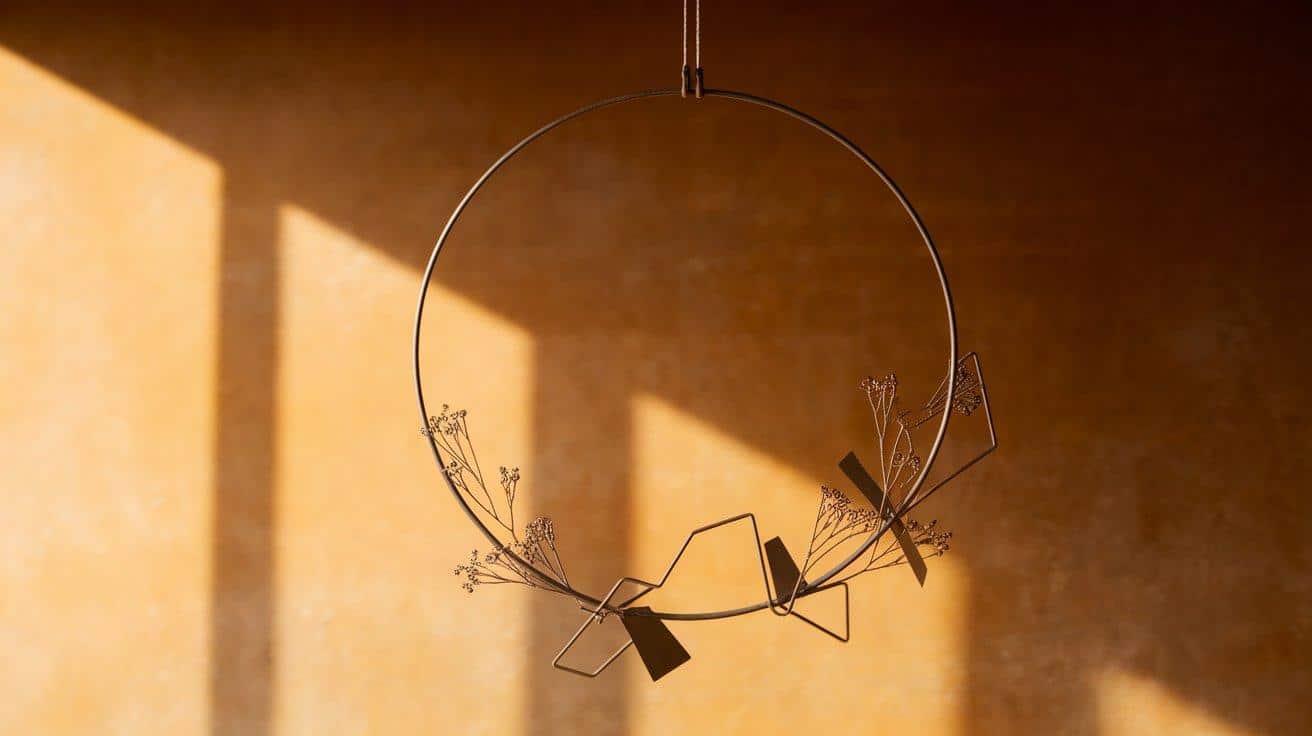
3. Modern Minimalist Wreath
-
Elements: Simple wire frame, metallic accents, and geometric shapes.
-
Explanation: For a sleek, contemporary look, this wreath features a minimalistic design with clean lines and metallic accents. It’s perfect for modern homes or spaces that lean toward a more refined, stylish feel.
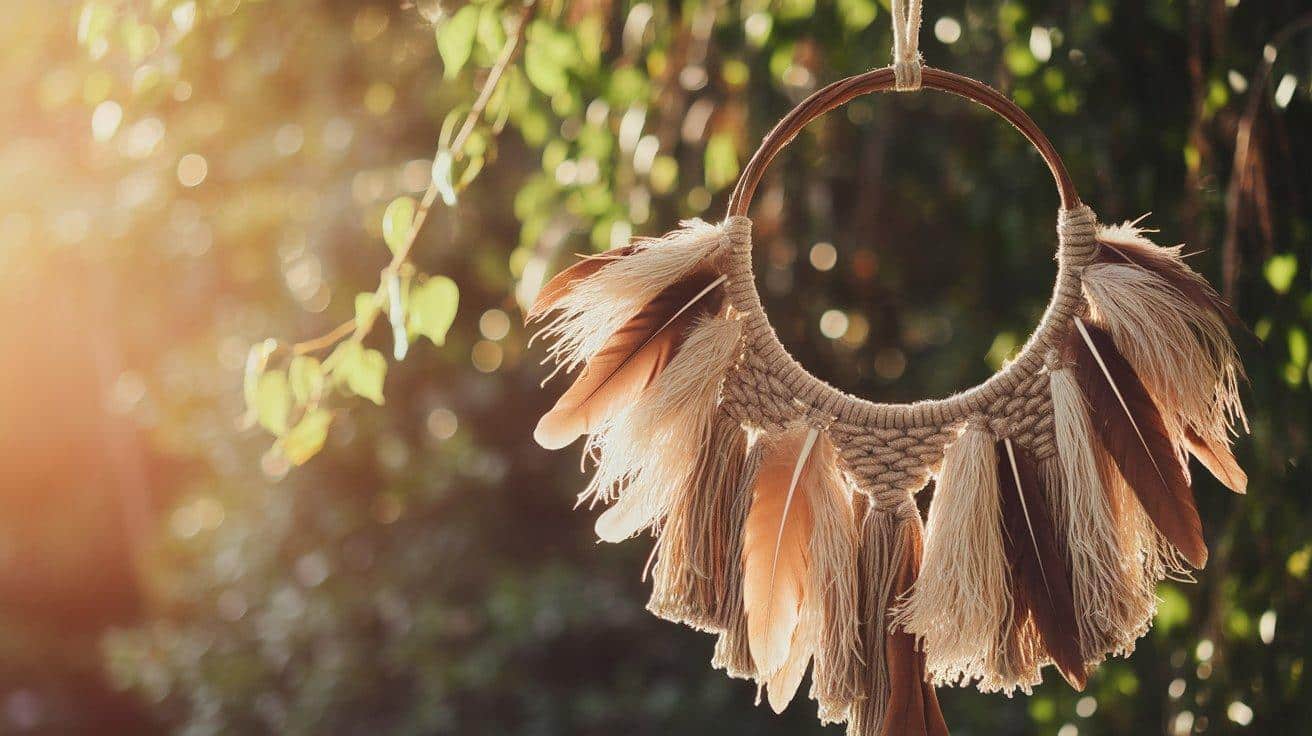
4. Boho Chic Wreath
-
Elements: Earthy tones, feathers, wooden beads, and macramé accents.
-
Explanation: A boho-inspired wreath that combines natural elements like feathers and wooden beads with a relaxed, artistic vibe. The macramé accents add texture and personality, making it perfect for a laid-back, bohemian space.
5. Holiday-Themed Wreath
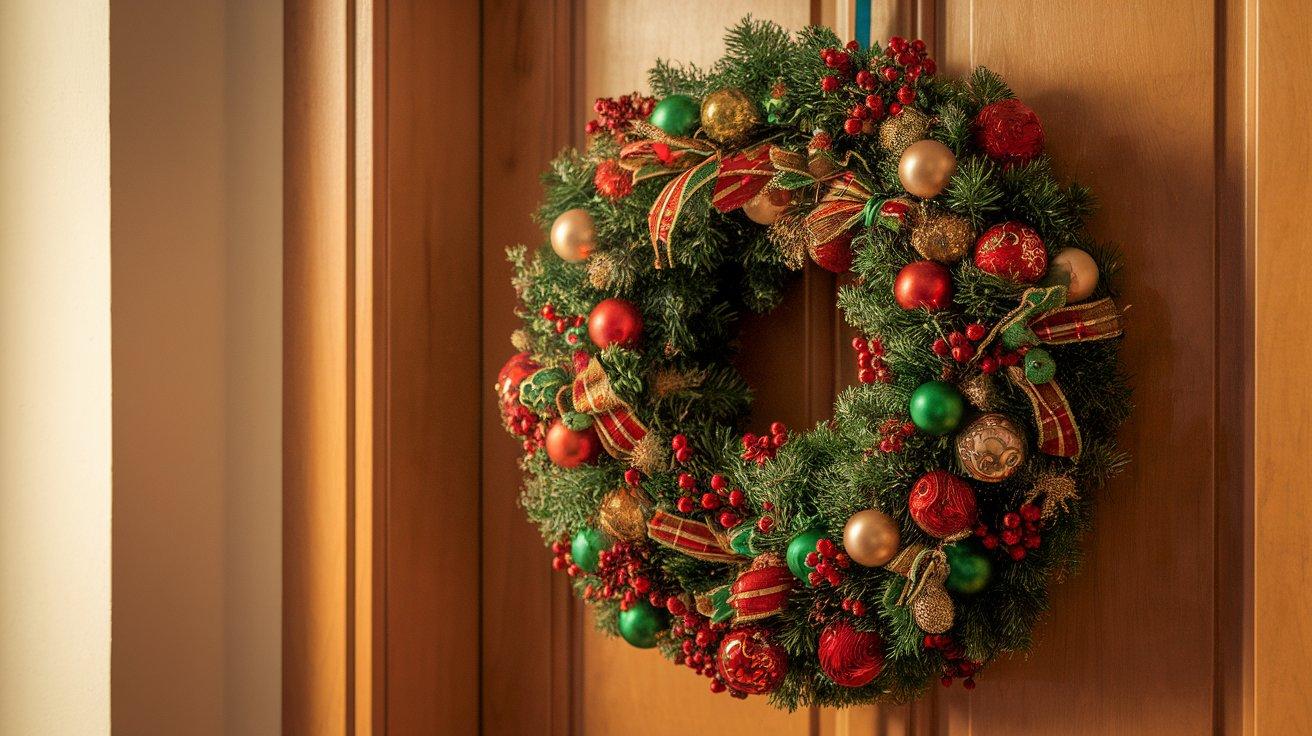
-
Elements: Seasonal colors (red, green, gold), small ornaments, and festive ribbons.
-
Explanation: This wreath is designed specifically for the holidays, incorporating classic festive colors and traditional decorations, such as ornaments and ribbons. It’s a cheerful addition to your home during the Christmas season or any other seasonal celebration.
These design ideas offer a range of styles, from luxury to rustic and festive, making it easy to create a wreath that suits your taste and decor.
Eco-Friendly Crafting Tips
-
Use recycled materials, such as old fabric, paper, or cardboard, for the bases of your wreaths.
-
Opt for natural fibers, such as jute, hemp, or cotton, instead of synthetic materials.
-
Choose biodegradable mesh or fabric for a sustainable look.
-
Repurpose leftover materials from other projects, such as scrap ribbons or unused floral elements.
-
Avoid using single-use plastic by opting for reusable or recyclable crafting supplies.
-
Use non-toxic, eco-friendly glue and paints for a safer, greener project.
-
Minimize waste by measuring carefully to reduce excess material.
-
Store materials in reusable containers to avoid plastic waste.
Keeping Your Flower Wreath Fresh: Essential Care Guide
1. Protecting from Weather Elements – To preserve your mesh flower wreath, keep it out of direct sunlight and away from harsh weather conditions. Sunlight can fade the metallic colors, while rain and humidity can distort the shape and cause mildew to form. Display the wreath in a covered area, such as a porch, and bring it indoors during extreme weather to protect its appearance.
2. Cleaning Your Wreath- Regularly clean your wreath to maintain its beauty. Use a hair dryer on a cool setting to blow away dust. For stubborn dirt, gently wipe with a damp microfiber cloth. Avoid chemical cleaners, as they can damage the metallic finish. Let the wreath air dry completely after cleaning.
3. Storage Solutions- Store your wreath in a large plastic container with a secure lid, using acid-free tissue paper to protect it from damage. Avoid stacking heavy items on top, and keep it in a climate-controlled area to prevent damage. If space is tight, hang the wreath in a closet and cover it with a pillowcase.
4. Seasonal Refreshing- Refresh your wreath for different seasons by adding small decorative elements, such as silk flowers, seashells, or ribbons, to suit the season. These can be attached with hot glue and removed easily when the season changes.
5. Repairing Damaged Petals- If petals become misshapen or loose, gently reshape or reattach them using zip ties. For damaged metallic petals, replace them with leftover mesh or repurpose material from inconspicuous areas. Regularly check for minor damage to prevent bigger repairs.
Things to Avoid During DIY Flower Wreath
| Mistake to Avoid | Better Alternative | Quick Fix |
|---|---|---|
| Using a wood burner on fabric mesh | Use a rotary cutter for clean, precise cuts | Apply heat cautiously at a low setting if already burned |
| Placing petals without overlapping | Overlap each petal slightly for fullness and a swirl effect | Gently adjust existing petals and add extras to fill gaps |
| Using only one zip tie for the outer row petals | Use two zip ties in opposite directions for proper alignment | Add a second zip tie in the opposite direction to stabilize |
| Pulling petals too tightly when shaping | Shape gently, maintaining the natural bowl curve | Loosen overly tight petals by gently stretching the fabric |
| Exposing to harsh weather | Display in covered areas or bring inside during extreme conditions | Apply clear weather sealant spray to protect the finished wreath |
Conclusion
Your completed rose gold flower wreath isn’t just a decoration—it’s a statement piece that upgrades your entire entryway! The dimensional petals catch light from every angle, creating a mesmerizing sparkle that draws the eye and welcomes guests with warmth and style.
What makes this project so satisfying is how simple materials convert into something truly extraordinary through just a few clever techniques.
The versatile metallic finish works beautifully across seasons and complements virtually any door color or home style.
With proper care, your wreath will maintain its showstopping beauty for years to come. Whether displayed on your door or given as a thoughtful, handmade gift, this sparkling creation proves that professional-looking decor doesn’t require professional-level skills—just creativity and the right guidance!
Frequently Asked Questions
Is It Cheaper to Make Your Wreath?
Yes, making your wreath is generally cheaper than buying a pre-made one, especially if you already have some of the materials.
What Does a Wreath on The Front Door Mean?
A wreath on the front door symbolizes a warm welcome, the passing of seasons, and a spirit of hospitality. It can also represent holidays or good luck.
Does a Wreath Have to Be Round?
No, a wreath doesn’t have to be round. While traditional wreaths are typically circular, they can be crafted in various shapes, such as squares, rectangles, or even heart-shaped designs, depending on the desired look.
