Want to add a special touch to your windows without spending much? Wood valances offer a simple way to make your windows stand out. Many homeowners find standard window treatments dull, but adding a wood valance can change any room.
Our tested guide shows 8 wood valance styles plus a bonus DIY project you can make at home. These designs work well with any home style, from traditional to modern. The best part? You’ll save money while learning useful woodworking skills.
In this guide, you’ll find clear instructions for creating beautiful wood valances. The DIY project uses basic tools and materials you can find at local stores.
We’ll show you the process, from measuring to installation. Ready to start making your windows look better? Let’s begin with these 8 creative ideas and an easy DIY guide.
8 Modern Wood Valance Ideas You Can Try
1. Simple Panel Design

This basic wood piece adds a clean look to any room. The white matte finish works well with light curtains, making your windows stand out without being too noticeable.
The straight lines fit perfectly in today’s homes, while the smooth surface stays free from dust. Perfect for bedrooms or living spaces where you want the windows to blend with white or gray walls.
This style suits homes with basic decor and creates a fresh feel. The design allows light to flow freely while hiding curtain hardware neatly above.
2. Natural Wood Window Topper

Old barn wood brings warmth to this window treatment. The marks and knots in the wood tell stories of its past use, making each piece special. Browns and grays in the wood match well with simple cotton or rough-textured curtains.
Small metal touches and green plants complete the country house feel. This style fits well in kitchens, dining rooms, or any space where you want to add natural elements. The wood’s texture creates interest without needing extra decorations.
3. Pattern-Cut Wood Design

This window piece shows off detailed wood cuts in rich brown tones. The shapes catch light and create shadows that change throughout the day.
Black window frames and light curtains make the wood patterns stand out more. This style works well in main living areas where people gather and notice details.
The dark wood brings warmth to rooms with plain walls and simple furniture. Each cut in the wood adds depth without making the room feel busy.
4. Split-Color Wood Choice

This design mixes glossy black with light wood tones. The two colors create a strong look that draws attention upward. The style matches well with white window coverings and soft-colored bedding.
It’s perfect for bedrooms where you want to make windows a main feature. The mix of colors lets you match both light and dark room items. The finish stays bright and easy to clean.
5. Storage-Top Wood Frame

This useful window topper holds small items while looking good. The light wood color matches well with white walls and plain furniture. Books, small plants, and special items find homes on top, making good use of window space.
It works great in reading nooks or social areas where you want to show off personal items. The wood brings natural warmth while serving a clear purpose. Easy to reach height makes changing displays simple.
6. Smooth-Edge Wood Detail

Brown wood with soft curves tops this large window. The finish catches light nicely while hiding curtain parts above. This works perfectly in home offices, where clean lines help you focus.
The curves soften the look of straight window blinds. The wood’s color adds warmth to work spaces without taking attention away from important tasks. It suits spaces where you spend lots of time looking at screens.
7. Lined Wood Window Frame

Small spaces between wood pieces create an interesting top for your window. The black paint makes it stand out against light walls and curtains.
This style fits dining rooms where you want to add something special without being too fancy. The spaces between wood pieces let some light through while still hiding curtain hardware.
It makes windows look bigger without heavy decorations. The matte finish stays looking fresh with simple cleaning.
8. Workshop-Style Wood Top

This design puts dark wood and black metal together for a city apartment feel. The metal parts make it look strong while the wood keeps it from feeling cold.
It matches brick walls and modern lighting perfectly. Great for spaces where you mix old and new styles. The wood and metal create a strong frame for your window without blocking light.
Perfect for spaces with high ceilings and open floor plans.
Easy DIY Wood Valance (Step-By-Step Guide)
Tools and Materials Needed
Tools Required
| Tools Required | Description/Specification |
|---|---|
| Table Saw | For straight cuts in wood pieces |
| Miter Saw | For angled cuts and corners |
| Clamps | To hold pieces while glue dries |
| Sanding Block | For smooth wood preparation |
| Sandpaper | 220 grit for fine finishing |
| Brad/Pin Nailer | For secure assembly |
| Caulk Tool | For clean caulk application |
Materials Required
| Materials Needed | Quantity/Specification |
|---|---|
| Pine Wood | ¾-inch thickness |
| Cove Trim | For decorative edges |
| Wood Glue | Strong bonding adhesive |
| CA Glue | Medium strength |
| Pin Nails | Headless for clean finish |
| White Caulk | Flexible trim variety |
| Primer | Wood-suitable base coat |
| Paint | Your selected color |
| Window Glazing | White, for nail holes |
Installation Guide
Step 1: Prepare the Wood Pieces
Start with ¾-inch pine wood. Set your table saw to cut the main piece at 4½ inches width. For the top section, cut strips measuring 1½ inches wide.
Take careful measurements of your window opening, then add 1½ inches to this measurement – this extra length ensures proper coverage.
Make this cut with your miter saw to guarantee a clean, straight edge. Double-check all measurements before cutting, as precise cuts at this stage make later steps much simpler.
Step 2: Size the Top Piece
Position your cove trim along the main piece to find the right overhang. Mark where you want the overhang to sit – a ¾-inch overhang often works well.
Using these measurements, cut your top piece 1½ inches longer than your main piece. This extra length provides proper coverage and creates a balanced look. Test fit the pieces together before moving to the next step.
Step 3: Assembly Process
Apply an even layer of wood glue between the main and top pieces. Use clamps to hold everything firmly in place – this prevents shifting while the glue sets.
While the pieces are clamped, add headless pin nails to reinforce the bond. These tiny nails provide extra strength without being visible in the final product.
Let the glue dry completely according to the manufacturer’s instructions before moving forward.
Step 4: Add Trim Details
Start your trim work by cutting the cove trim front piece at 45-degree angles. Make straight cuts for the side pieces. Test everything to ensure proper fit before final attachment.
Apply medium CA glue to hold the trim pieces temporarily in place. Once positioned correctly, secure all trim pieces with pin nails. These small nails will be hidden in the final finish.
Step 5: Finishing Steps
Take your time with sanding, using 220-grit sandpaper on all surfaces. Pay extra attention to the end grain areas, as these need more work to achieve smoothness.
Once sanded, apply white flexible caulk along all joints. Use your caulk tool to create clean, professional-looking lines. Let the caulk dry completely before moving to the painting stage.
Step 6: Paint Application
Begin with a coat of primer on all surfaces. Once dry, sand the primed surface lightly to ensure smoothness. Apply your first coat of paint, making sure to cover all areas evenly.
Allow proper drying time, then add your second coat. This two-coat method provides better coverage and a more durable finish. Let the final coat dry thoroughly before handling.
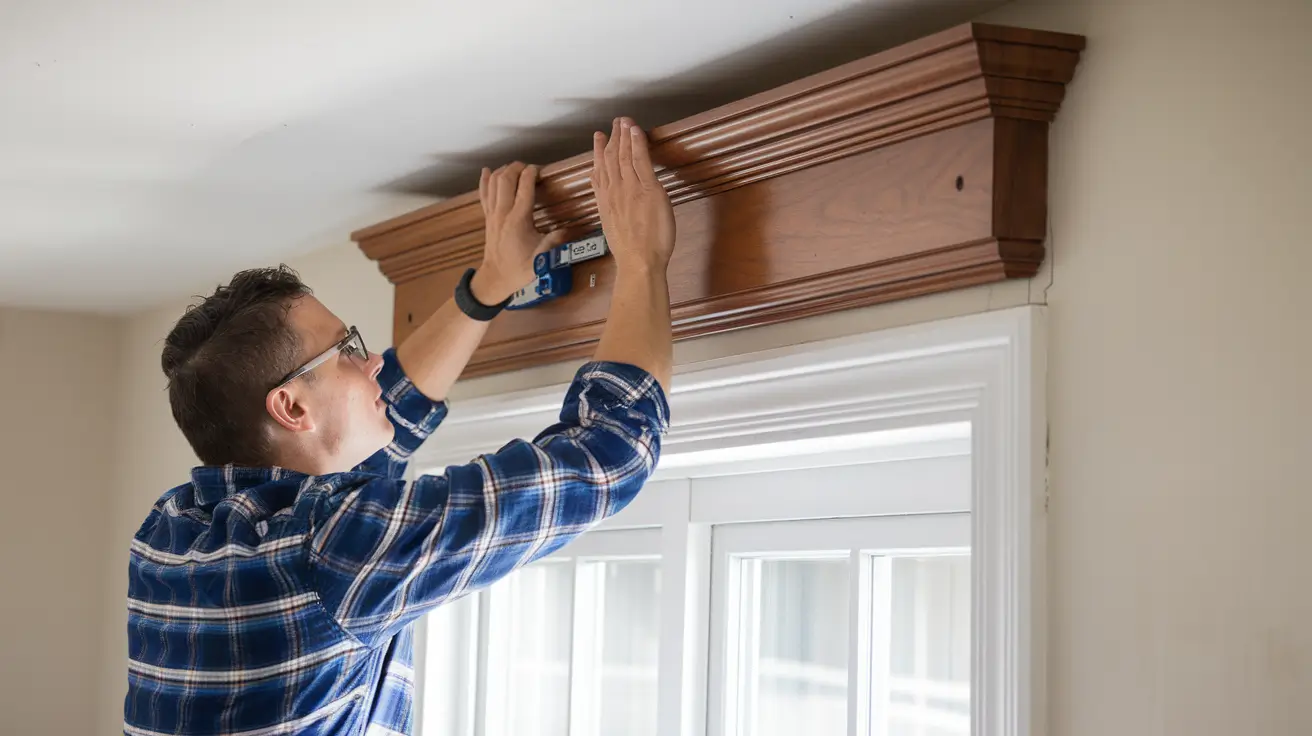
Step 7: Final Installation
Position your completed valance carefully over the blind mechanism. Make sure the blind wand moves freely before securing anything.
Use brad nails to attach the valance permanently. Fill any nail holes with white window glazing. Once the glazing dries, apply touch-up paint to these spots. Take a step back and check that everything looks even and properly aligned.
Video Tutorial
Check out this YouTube video by How I Do Things DIY for a detailed step-by-step tutorial on Installing a Wood Valance.
Maintenance and Care for Your Wood Valance

Cleaning and Dusting Tips
Keep your wood valance looking fresh with these simple care steps:
1. Use a soft microfiber cloth for weekly dusting. A light touch prevents scratches.
2. Clean with a slightly damp cloth once every three months. Avoid soaking the wood.
3. Mix mild soap with water for stubborn spots. Test on a hidden area first.
4. Dry immediately with a clean, soft cloth to prevent water marks.
5. Apply furniture polish twice yearly to protect the wood finish.
6. Keep blinds and valance away from direct water exposure.
Repairing Minor Damage
Fix small issues quickly to maintain your valance’s appearance:
For Small Scratches
- Fill with a matching wood marker or crayon
- Blend carefully with the surrounding finish
- Allow to dry completely
For Loose Trim
- Clean the area with rubbing alcohol
- Apply wood glue to loose sections
- Hold with painter’s tape until dry
- Touch-up paint if needed
Paint Touch-Ups
- Sand-affected area lightly
- Clean dust with a tack cloth
- Apply thin layers of paint
- Let each layer dry fully
Conclusion
A wood valance brings more than beauty to your windows – it adds value to your home. This guide showed how simple tools and basic materials create professional results.
We covered each step, from measuring and cutting to the final paint touch-ups.
By following these steps, you’ve learned that making your valance saves money while giving you full control over style and design. The satisfaction of completing this project yourself adds to its worth.
Our easy-care tips will help maintain your valance’s beauty for years. With proper cleaning and quick repairs, your wood valance will continue to enhance your windows and complement your home’s character.
Every glance at your finished work will remind you of your successful do-it-yourself skills.
