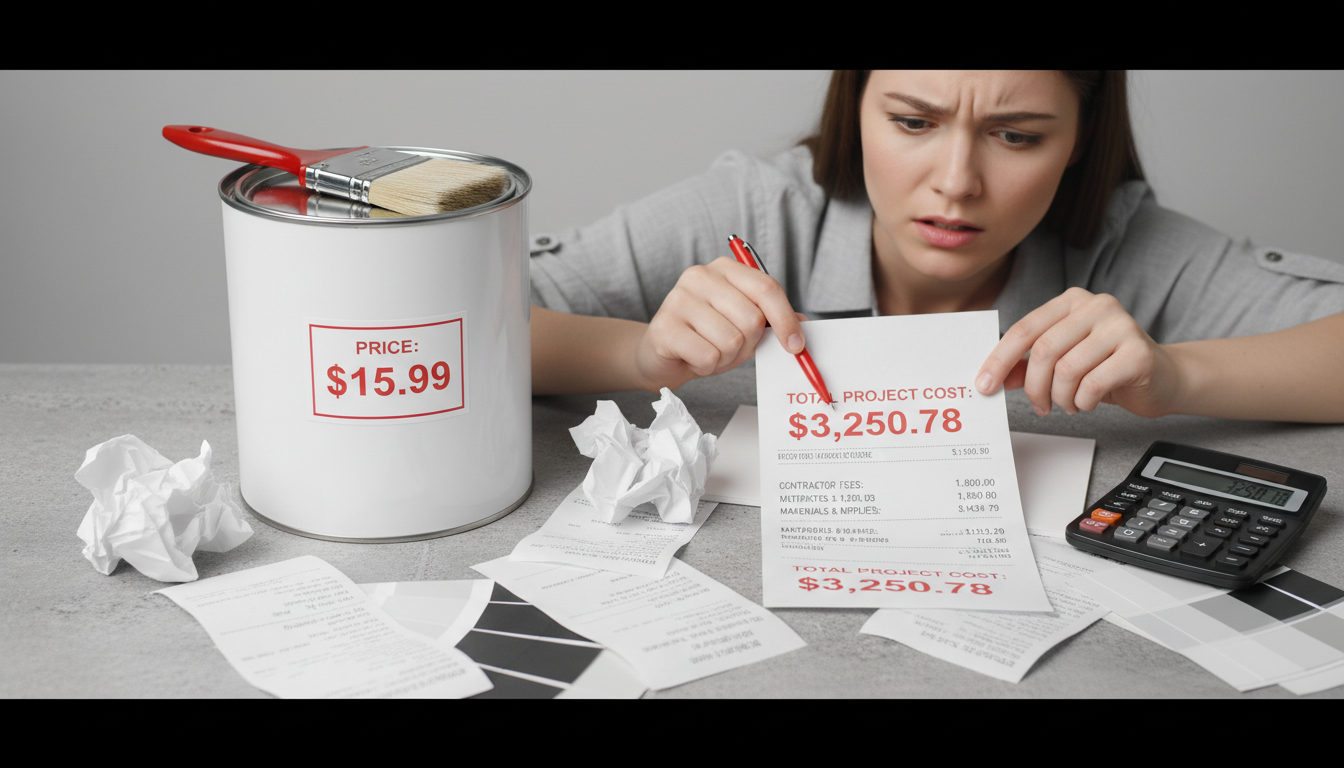

The Real Cost of Paint (AKA: Why That $70 Gallon Isn’t What’s Ruining Your Budget)
If you’ve ever stood in the paint aisle clutching two gallons like they’re rival babies you must choose between one is $28 and one is $78 and thought, “Well, there goes my entire remodel budget,” I’m here to gently shake your shoulders (lovingly) and tell you the truth:
Paint is usually only about 10-20% of the total cost of a painting project.
The rest is the stuff nobody gets excited about: prep, supplies, and labor. That’s the part that sneaks up behind you in a trench coat and pickpockets your wallet while you’re busy debating eggshell vs satin.
So let’s talk about what actually makes up the cost, how to estimate your paint needs without crying, and how to avoid the classic “half a wall done, out of paint, it’s 9pm” tragedy.
The quick and dirty way I budget a paint job (no spreadsheet required)
Here’s the simple flow I use when I’m trying to get a realistic number in my head:
- Measure your walls (I’ll show you the easiest way in a second).
- Estimate gallons using a realistic coverage number.
- Decide if primer is happening (sometimes yes, sometimes you can skip it sometimes it’s non-negotiable).
- Add supplies (because tape and roller covers aren’t free, unfortunately).
- Decide: DIY or hire it out (labor is the main event).
- Add a buffer (because houses love surprises).
My personal rule: add 10-15% “because my house is a liar” money to any estimate. It’s not pessimism. It’s experience.
How much paint do you actually need? (Spoiler: less than you think… until it’s more.)
Before you compare brands, grab a tape measure and do this:
1) Measure wall area the easy way
- Measure the perimeter of the room (add all wall lengths)
- Multiply by ceiling height
- Subtract doors/windows if you feel like being precise (I’m lazy precise: I subtract one door and call it a day)
Wall area ≈ perimeter × height
2) Convert that to gallons
Most paints claim around 350 sq ft per gallon… in a perfect world where walls are smooth, colors are agreeable, and you are painting in a magical unicorn showroom.
In normal life houses, I like this formula:
Gallons = (Wall area ÷ 350) × number of coats
And here’s my real life tip: the second coat usually uses less paint than the first (the wall isn’t drinking it like iced coffee anymore). So two coats isn’t always exactly double. Still, if you’re budgeting? Assume you’ll need it.
Things that mess with coverage (in the most annoying way)
- Texture (hello orange peel and knockdown): plan on using 15-25% more
- Dark to light color change: you may need an extra coat (or primer more on that below)
- Thirsty walls (fresh drywall patches, old chalky paint): they soak it up like a sponge with a grudge
My boring but saving your sanity advice
Round up. Always. I would rather you have half a gallon left for touch ups than be sprinting to the store with wet paint hands and a roller tray in your sink.
Paint price tiers: what I actually think is worth it
Yes, paint ranges from “why is this so cheap” to “does this come with a small pony.” But the trick is to think in coverage + coats, not just sticker price.
Here’s the vibe:
- Budget paint ($15-$35/gal): Fine for closets, guest rooms, ceilings, or anything you don’t touch much. Often needs 2-3 coats.
- Mid-range ($35-$50 ish/gal): My sweet spot for most walls. Usually covers better and takes two coats without drama.
- Premium ($50-$80+): Worth it in kitchens, bathrooms, kids’ rooms, hallways places where you will wipe, bump, scuff, and generally live.
- Designer ($100+/gal): You’re paying for a very specific look or color story. If that’s your joy, go forth. If you’re doing it because TikTok told you to… maybe don’t.
My unpopular (or maybe popular?) opinion: premium paint is often cheaper long term if you’re hiring out. If a better product saves a coat or lasts longer you’re saving on the part that costs the most: labor.
Finish (sheen) choices: the one that will make you mutter later if you pick wrong
You don’t need a chart. You need the real talk:
- Flat/Matte: Gorgeous. Forgiving on bumpy walls. Also: shows marks and touch ups can be fussy.
- Eggshell: The classic “most rooms” option. Soft, slightly wipeable, doesn’t scream “I’m shiny!”
- Satin: My go to for busy houses. More durable, more washable, still not overly glossy.
- Semi gloss: Trim, doors, cabinets. Also shows every bump, brush mark, and questionable patch job you ever made at 11pm.
If you have kids, dogs, or a hallway that functions like a tiny airport runway? Satin is your friend.
Primer: when it’s non-negotiable (and when you can stop buying extra steps)
Primer is not always necessary, but sometimes it’s the only thing standing between you and a blotchy, peeling mess that will haunt your dreams.
Use primer when:
- You’re painting new drywall
- You have stains (water, smoke, mystery spots that look like a crime scene)
- You’re going dark to light
- You’re painting over a glossy surface
- You’re switching from oil based to latex
You can often skip primer when:
- You’re repainting the same color
- The existing paint is in good shape and not glossy
- You’re not dealing with stains or weird texture issues
And yes, “paint + primer in one” exists. Sometimes it’s fine. Sometimes it’s like using a 2 in 1 shampoo/conditioner on hair that needs actual help. Use your judgment (and if you’re covering new drywall, just prime it future you will send you a thank you note).
The hidden costs that actually wreck your budget (hello, supplies and prep)
This is where people get blindsided.
Supplies add up fast
Even DIY, you’ll likely need some combination of:
- decent rollers and covers
- angled brush(es)
- painter’s tape (or don’t, if you’re a brave freehand wizard)
- trays, liners
- drop cloths
- caulk, spackle, sandpaper
You can easily spend $100-$300 just getting set up, especially if you’re starting from scratch. And if you’re buying six sample pots because you want an exact color match and you “just want to be sure”… yeah. Been there. My wall looked like a paint chip quilt.
Prep is the wildcard
Prep is what makes the final paint job look expensive… and it’s also what eats time like a hobby.
- Light prep: wiping down, filling a few holes
- Medium prep: sanding rough trim, caulking gaps, spot priming stains
- Heavy prep: wallpaper removal, skim coating, repairing damage
If you’re hiring a painter, prep is often where the quote jumps, because it’s labor heavy and unpredictable.
DIY vs hiring a pro: my honest “it depends” checklist
DIY makes sense if:
- It’s one room
- You’ve got standard ceilings
- You’re doing a same color (or close) refresh
- You can tolerate a bit of mess and inconvenience
- You don’t mind your weekend turning into a drop cloth themed sitcom
Hire a pro if:
- You’re doing multiple rooms (setup/cleanup becomes a whole thing)
- You have tall ceilings, stairwells, awkward angles
- There’s a lot of prep
- You’re painting cabinets (I’m not saying you can’t DIY cabinets… I’m saying I respect you if you do, and I don’t want that life again)
Also: if you DIY, double your time estimate if you’ve never painted much. Painting is simple, yes. It is not always fast. Especially when you realize you have to move furniture, patch walls, sand, vacuum dust, tape, cut in, roll, wait, repeat… and then clean everything.
If you’re getting painter quotes, here’s what I’d want to see (so you don’t get burned)
A legit quote should spell out:
- what surfaces are included (walls? ceilings? trim?)
- number of coats
- what paint line/finish they’re using
- primer plan (what kind, where, or why not)
- what prep is included (patching, sanding, caulking)
- cleanup/disposal
If someone promises one coat coverage with bargain paint on a big color change… I would squint. Hard.
And if two bids are wildly different, it’s usually not because one painter has discovered a secret discount portal. It’s because they’re skipping prep, skipping coats, or not including something you assumed was included.
How to save money without doing something you’ll regret later
A few ways to shrink the total without cutting quality where it counts:
- Paint during the off season. Late fall through early spring can mean better scheduling (and sometimes better pricing).
- Bundle rooms. Painters charge for setup/cleanup. Do more at once, often pay less per room.
- Do minor prep yourself. Filling nail holes, light sanding, removing outlet covers easy wins.
- Buy paint on sale. The big holiday weekends can be great for this.
- Spend your “good paint” money where life happens. Hallways, kitchens, bathrooms, kids’ rooms. Put cheaper paint in the guest room nobody uses except your aunt once a year.
The mindset shift that makes paint budgets make sense
If you remember one thing, make it this:
Stop obsessing over the per gallon price and start thinking in total project cost.
Because paint is rarely the big spender. Labor and prep are. And the smartest budgeting decisions are the ones that reduce coats, reduce rework, and make the finish last longer.
So measure your space, be realistic about prep, round up your gallons, and give yourself a little buffer for the inevitable surprise (there’s always one).
Then go pick your color using SW 6189 color details and try not to buy seven samples. (I support you either way, but I will gently judge you from the paint aisle.)