
Split Stair Landings: The Stuff Inspectors Always Catch (And Yes, It’s Usually the Tape Measure)
If you’re designing a split stair an L-turn, a switchback, any of those “ooh fancy” stairs with a landing in the middle let me save you a little heartbreak:
The #1 way these get kicked back at plan check is measuring the landing diagonally and calling it a day.
I’ve watched smart, experienced people do it. I’ve also watched the inspector do that slow blink that says, “I’m not mad, I’m just disappointed.” Then everybody loses two weeks and $800 in redesign time. Fun!
So let’s talk about what inspectors actually care about on split stair landings: how you measure, how big it needs to be, and the usual “gotchas” (headroom, door swings, rails, etc.) that pop up right when you think you’re done.
(Obligatory: codes vary by jurisdiction and edition, and your AHJ is the final boss. But you already knew that.)
Step Zero: Figure Out Which Code Is Running Your Life
Before you start drawing landing rectangles like you’re playing Tetris:
- IBC is typically your world for commercial buildings, public spaces, apartments, common stairs.
- IRC is typically for single family homes and townhouses (up to three stories).
- ADA (and/or ANSI A117.1, depending on your jurisdiction) can layer on top when the building is public/government/needs accessible egress components.
If you’re in an industrial setting, OSHA can also show up to the party with extra rules. (Nothing like a surprise guest with a clipboard.)
If you only take one thing from this whole post: pick the code path first, because landing sizing can flip depending on whether ADA/accessible requirements are in play.
The Landing Size Rules Everyone Thinks They Know (Until the Turn Happens)
Inspectors usually zoom in on three things first:
- Landing depth (in the direction you’re walking)
- Landing width (side to side)
- Slope (yes, they will absolutely put a level on it)
Landing depth (the “how far forward can you step without dying” dimension)
Here’s the big pattern I see in the field:
- Commercial / IBC logic often allows landing depth to be the stair width, up to a typical cap around 48″ (depending on your adopted code/amendments).
- If ADA/accessible requirements apply, landing depth often becomes 48″ minimum—OR the stair width if the stair is wider.
Translation:
If your stair is wider than 48″, ADA-ish requirements often push you to make the landing wider/deeper than you planned to manage space cost and fit, because it may need to match the clear stair width instead of stopping at 48″.
I’ve seen more than one gorgeous switchback stair get value engineered into a sad little mess because someone sized the landing for IBC alone… then ADA got triggered late. Don’t be that project.
Landing width (the “don’t pinch me into a wall” dimension)
Landing width generally needs to be at least:
- the stair width, and
- at least as wide as any door opening onto it (whichever is larger)
Also: “stair width” usually means clear width between handrails, not “framing to framing because it sounded nice on paper.”
Slope (aka: the part that fails because concrete guys are human)
Typical limit you’ll see enforced: max 1:48 slope in any direction (about 2%).
And yes including diagonally. That’s the sneaky part.
If you can throw a 4 foot level down and you’re seeing more than about 1 inch of rise at the far end, somebody’s going to have a conversation.
The Diagonal Measuring Trap (The One That Ruins Everyone’s Week)
Okay. This is the big one.
When you have a landing at a turn, you cannot measure “corner to corner” and call that the landing depth. Inspectors want the landing depth measured in the direction of travel.
How to measure it so you don’t get roasted at inspection
Imagine walking up the first flight:
- At the top tread, measure straight ahead onto the landing. That’s landing depth for the first flight.
- Now imagine you turn the corner to start the next flight.
- Measure straight ahead again (now in the new direction of travel). That’s landing depth for the second flight.
So for a basic L-stair, what you really need is essentially two compliant “forward” depths, not one dramatic diagonal number that looks great in CAD and fails in real life.
Quick visual reality check:
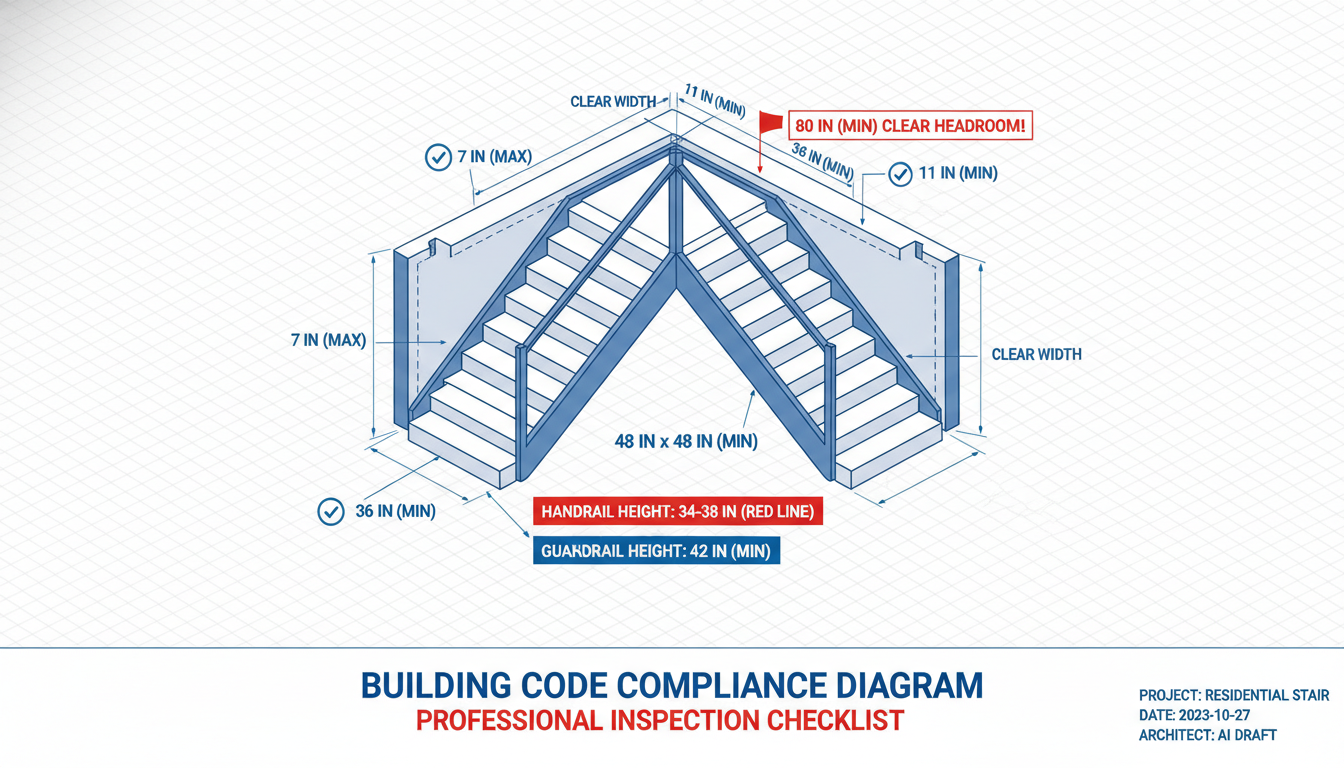
If you’ve got a 36″ wide stair, you should be thinking in the neighborhood of a 36″ x 36″ landing at a simple 90° turn measured in those two independent directions.
Switchbacks (U-stairs) are the same idea: the direction change still needs compliant depth for each travel direction.
Three More “Gotchas” That Love Split Stairs
1) The 12 foot rise per flight rule
A flight can’t just climb forever like it’s trying to reach heaven.
Common rule: max 12′ vertical rise per flight before you need a landing. (And yes, landings at top and bottom too.)
Measure it finished floor to finished floor. Not subfloor. Not “we’ll figure it out after tile.” Finishes have a way of turning “we’re fine” into “we’re 1/4 inch over” and then everyone hates everything.
2) Switchback headroom (the sneaky ceiling punch)
Minimum headroom you’ll see enforced: 80″ (6′-8″), measured vertically from a line connecting tread nosings to whatever is above.
Switchbacks get tight because the stair runs under itself. The lower flight is basically walking into the underside of the upper flight like it’s a low bridge.
My favorite (sarcasm) is when this isn’t discovered until framing, when someone is standing there with a tape measure and a sinking feeling.
Do yourself a favor: draw a section or use a quick 3D check and confirm you’ve got that 80″ clearance at the worst spot usually near the landing/turn area.
3) Door swings onto landings (aka: the “why is this door bullying me?” problem)
If a door opens onto a landing, you typically have limits like:
- Door can only project a small amount into the required landing depth when fully open (often cited around 7″, depending on code/edition).
- The door swing can’t reduce the clear landing width below a minimum percentage (commonly enforced as not less than 50% of required width).
And if accessible clear floor space is required near that landing? The door swing can mess with that too. Doors are very rude like that.
Step Consistency: Where Stairs Become Lawsuits (So Codes Get Picky)
If you’ve ever walked down a stair where one riser is slightly taller, you know the feeling: your body expects one thing and gets another and suddenly you’re doing that little panic hop like a newborn deer.
Codes are strict here for good reason.
Typical numbers you’ll see:
- Commercial (IBC/ADA-ish):
- Tread depth: often 11″ min
- Riser height: often 4″-7″
- Variation tolerance can be tight (ADA often cited around 3/16″. IBC often around 3/8″, depending on what’s governing)
- Residential (IRC):
- Tread depth: often 10″ min
- Riser height: up to 7 3/4″
- Variation tolerance often around 3/8″
Where it goes wrong on split stairs: the last riser before the landing and the first riser after the landing. Those two love to drift because everyone starts “making it work” around the landing framing.
My personal rule: if you only re-check two risers, re-check those.
Handrails and Guards: The Inspector’s Other Favorite Hobby
If landing sizes are the appetizer, rails are the main course.
Handrail basics (the numbers inspectors recite in their sleep)
- Height: typically 34″-38″ measured from tread nosings
- Graspability matters (round is easiest to get right)
- Wall clearance is usually required (commonly 1 1/2″ minimum) so a human hand can actually… you know… grab it.
The extension rule that gets people
Handrails often must extend beyond the top and bottom risers.
Commonly enforced ideas:
- Top of flight: extend at least 12″ past the top riser in the direction of travel before turning/ending/returning.
- Bottom of flight: IBC often wants an extension about one tread depth. ADA/accessible rules are often stricter commonly one tread depth plus 12″.
And yes, inspectors will flag the cute detail where the rail curves immediately at the top riser. It’s adorable. It’s also usually noncompliant.
Guards (so nobody swan dives off your landing)
If the landing or stair edge is more than about 30″ above the floor below, you generally need guards.
Common checks:
- Guard height: often 42″ minimum (commercial)
- Openings: the classic 4″ sphere rule (no big gaps for kids/pets/chaos)
If ADA/Accessible Requirements Apply: Two Fast Reality Checks
Winders on accessible routes: nope
Those pie shaped treads at a turn (winders) might be allowed in some non-accessible situations depending on code and local amendments, but they’re generally a no-go on an ADA-accessible route.
If the stair is part of required accessible egress components or otherwise triggers accessibility provisions, plan on a flat landing at the turn.
Other ADA-ish things that can affect the landing layout
Depending on building type/occupant load/local enforcement, you may need things like:
- Wheelchair clear floor space (commonly referenced as 30″ x 48″) located out of the main path in certain scenarios
- Detectable warnings in some locations/jurisdictions (this varies a lot ask before you assume)
This is where I stop guessing and start emailing the AHJ, because local interpretation is everything.
My “Don’t Get a Redline” Checklist Before You Submit Plans
If you want your drawings to feel inspector friendly (instead of “choose your own adventure”), here’s what I’d personally double check:
- Call out the code edition (IBC/IRC year) and any local amendments you know are relevant.
- State whether ADA/accessible provisions apply and why (or confirm it with the AHJ).
- Label stair width as clear width between handrails (if that’s what you’re using).
- At the landing turn, dimension depth in both directions of travel (not diagonally never diagonally).
- Show headroom at switchbacks in section (don’t make them “trust you”).
- Flag the “hot spots”: top handrail extension, bottom extension, transition risers, landing slope.
- If a door swings onto the landing, dimension the door in the open position and show what clear space remains.
If you do that, you’re basically handing the reviewer a tidy little package that says, “Look, I already checked the stuff you were going to ding me for.” And that’s a beautiful thing.
The Punchline: Measure Like an Inspector, Not Like an Optimist
Split stairs aren’t hard because they’re complicated. They’re hard because they look simple, and that’s when people get casual about split stair design basics.
So when you’re laying out that landing, do this one tiny mental trick: walk it in your head.
Step off the last tread. Walk straight. Turn. Walk straight again. Measure those two directions independently. Confirm headroom. Confirm door swings. Confirm rails don’t do anything cute but illegal.
Do that, and you’ll dodge the most common split stair inspection drama without having to “fix it in the field,” which is the construction version of “I’ll just Google my symptoms.”