
Starting out with clay feels overwhelming when you don’t know where to begin. I’ve been there. Too many options, no clear starting point, and nothing to show for it.
Clay sculpture is one of the most forgiving creative hobbies out there. No kiln, no expensive tools, no experience needed.
Here you’ll find clay sculpture ideas for every skill level. Beginner projects, home décor pieces, miniatures, functional items, and finishing tips all in one place.
What Makes Clay Sculpture a Great Creative Hobby
Clay sculpture is one of those hobbies that surprises you. You sit down expecting a mess and end up with something you actually want to keep on your shelf.
It costs almost nothing to get started. A basic pack of air-dry clay runs a few dollars, and most of the tools you need are already in your kitchen drawer.
There’s no kiln required for most beginner projects. Air-dry clay does the work on its own, which means you can create from anywhere, a kitchen table, a dorm room, or a tiny apartment.
The results are both decorative and functional. You can make something pretty or something useful, and sometimes both at the same time.
What keeps most people going is how fast the learning curve moves. A few sessions in, and you’ll already notice a real difference in what your hands can do.
Types of Clay You Can Use for Sculpting Ideas
Not all clay is the same, and picking the right one makes a bigger difference than most beginners expect.
| Type | Best For | Drying Method | Skill Level |
|---|---|---|---|
| Air-dry clay | Home décor, beginner projects, larger pieces | Dries naturally at room temperature | Beginner |
| Polymer clay | Miniatures, jewelry, fine detail work | Baked in a regular oven | Beginner to intermediate |
| Earthen clay | Traditional pottery, bowls, and sculptural forms | Kiln fired | Intermediate to advanced |
| Oil-based clay | Modeling, prototypes, non-permanent work | Does not dry or harden | All levels |
| Paper clay | Lightweight sculptures, detailed textures | Air dries, or kiln-fired | Beginner to intermediate |
| Epoxy clay | Small repairs, strong, durable sculptures | Hardens by chemical reaction | Intermediate |
| Self-hardening clay | Classroom projects, quick décor pieces | Air dries without baking | Beginner |
| Porcelain clay | Delicate fine art, smooth finished pieces | Kiln fired | Advanced |
Start with air-dry or polymer clay if you’re just getting into sculpting. The other types are worth trying once you have a better feel for the craft.
Tools and Materials You Need for Clay Sculpting
|
Quick Clay Sculpture Ideas for Beginners
These are the cute clay projects that got me hooked. Simple, fast, and satisfying even on the first try.
1. Simple Pinch Pots
Pinch pots are the first thing most people make with clay, and for good reason. All you do is press your thumb into the center of a clay ball and slowly pinch the walls up and out. No tools required.
They work great as small candle holders, ring dishes, or just decorative bowls on a shelf. Once dry, a coat of acrylic paint makes them look polished and intentional.
| Clay Type | Skill Level | Drying Time | Tools Needed |
|---|---|---|---|
| Air-dry or earthen clay | Beginner | 24 to 48 hours | Hands only |
2. Clay Beads
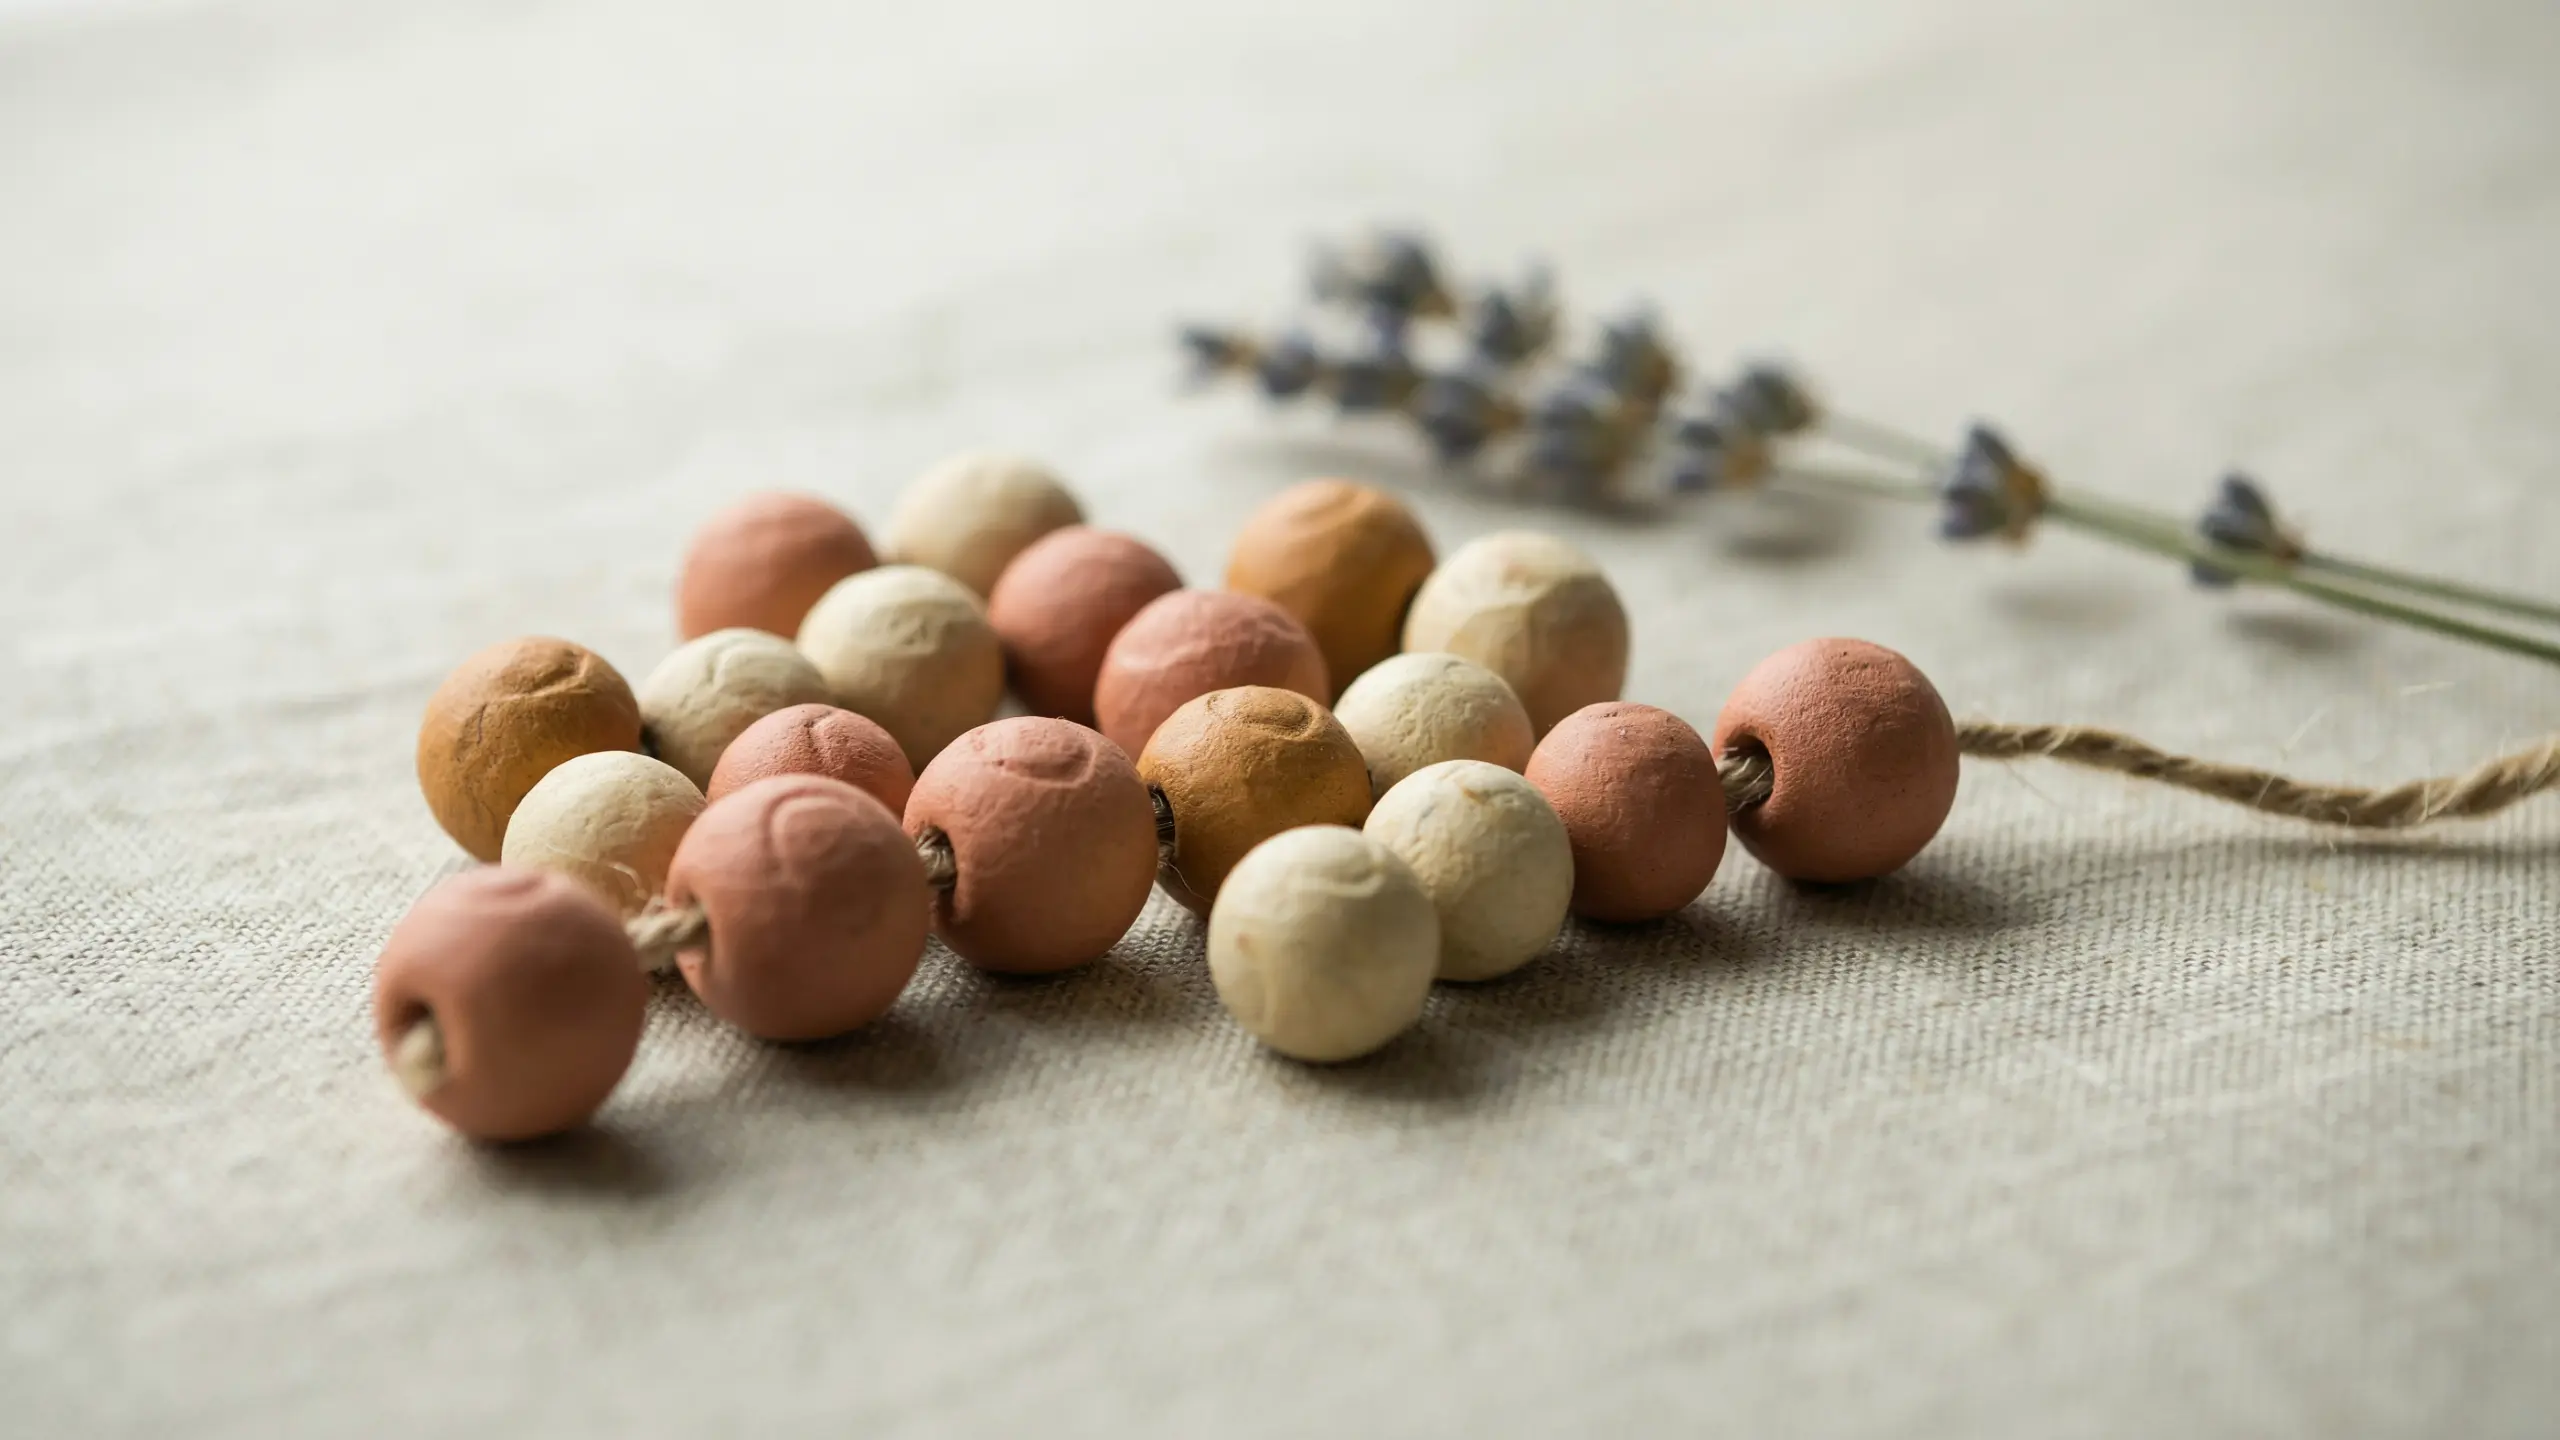
Clay beads are one of the easiest ways to make something wearable from scratch. Roll small pieces of clay into smooth balls or cylinders, poke a hole through the center with a toothpick, and let them dry.
You can make them uniform for a clean look, or go freeform for a more textured, organic look. Paint them in earthy tones, pastels, or bold colors once fully dry.
| Clay Type | Skill Level | Drying Time | Tools Needed |
|---|---|---|---|
| Polymer or air-dry clay | Beginner | 24 hours or bake 15 to 30 mins | Toothpick, rolling surface |
3. Coil Hearts
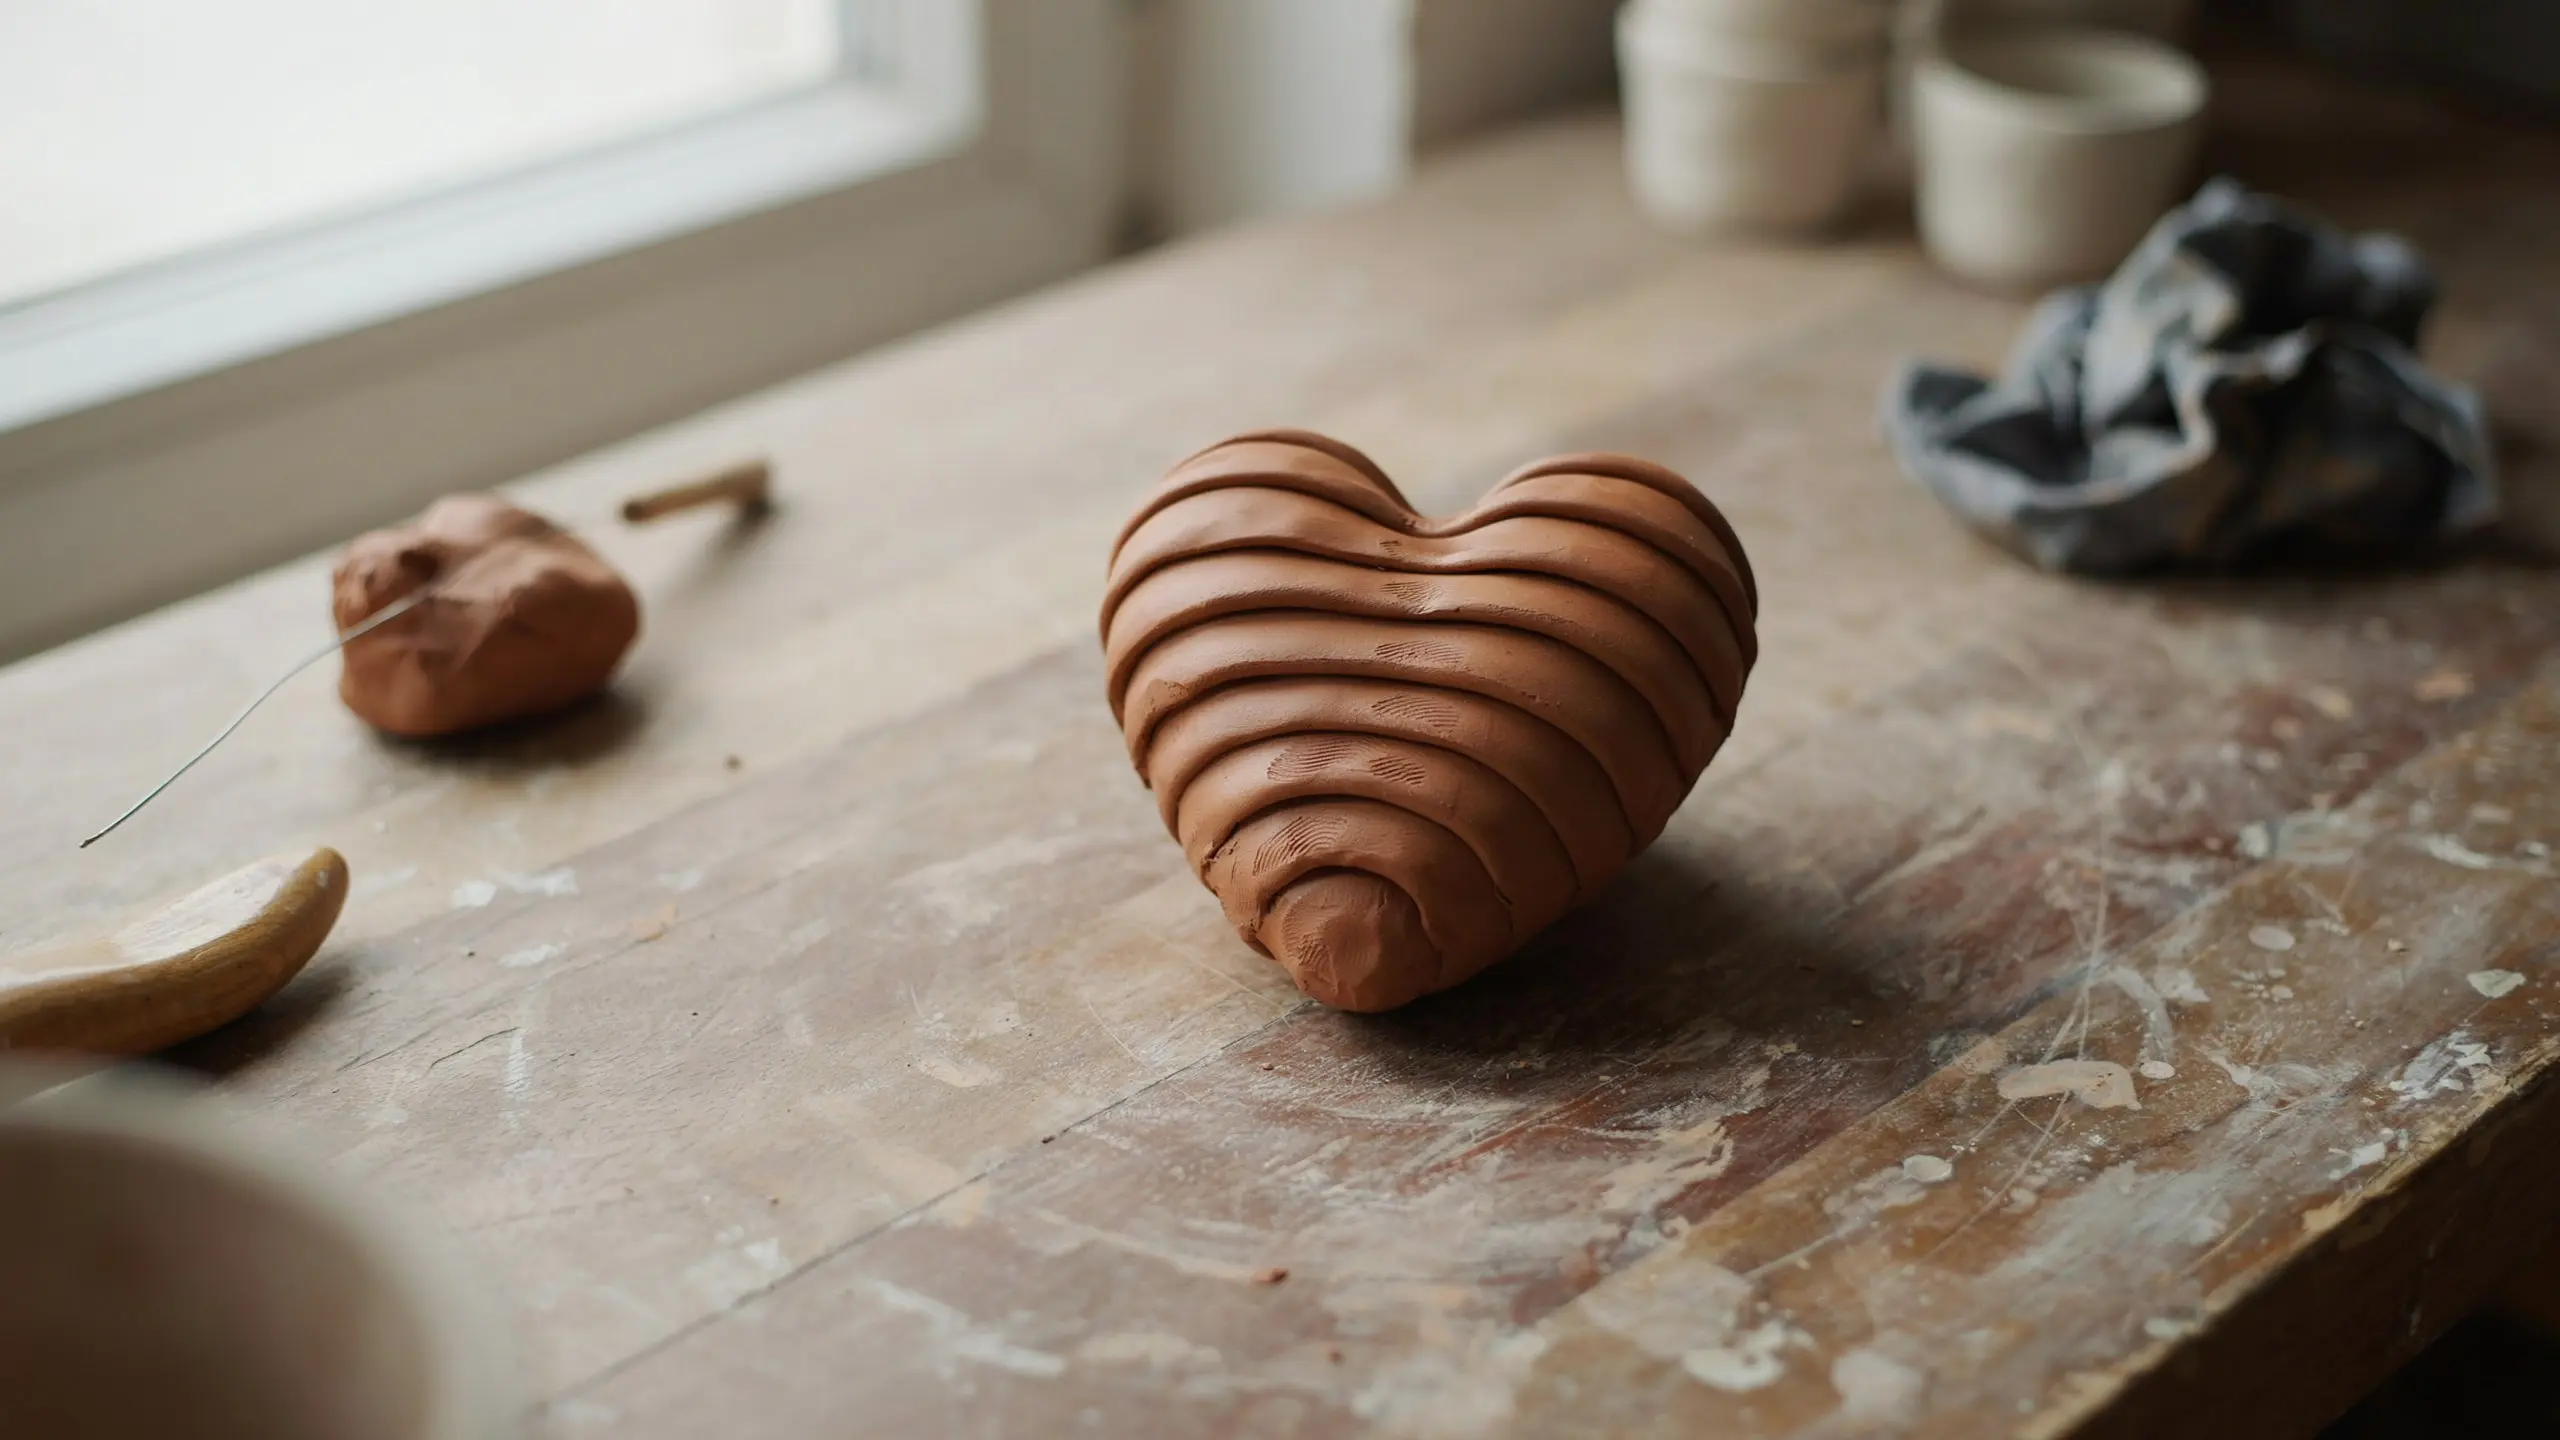
Coil hearts are made by rolling clay into a long thin rope and shaping it into a heart. Press the ends together firmly and smooth the join so it holds. Flat or slightly dimensional, both versions look great.
These make sweet gift toppers, wall hangings, or fridge magnets if you press a small magnet into the back before drying. A simple idea that always turns out better than expected.
| Clay Type | Skill Level | Drying Time | Tools Needed |
|---|---|---|---|
| Air-dry clay | Beginner | 24 to 36 hours | Hands, flat surface |
4. Mini Abstract Shapes
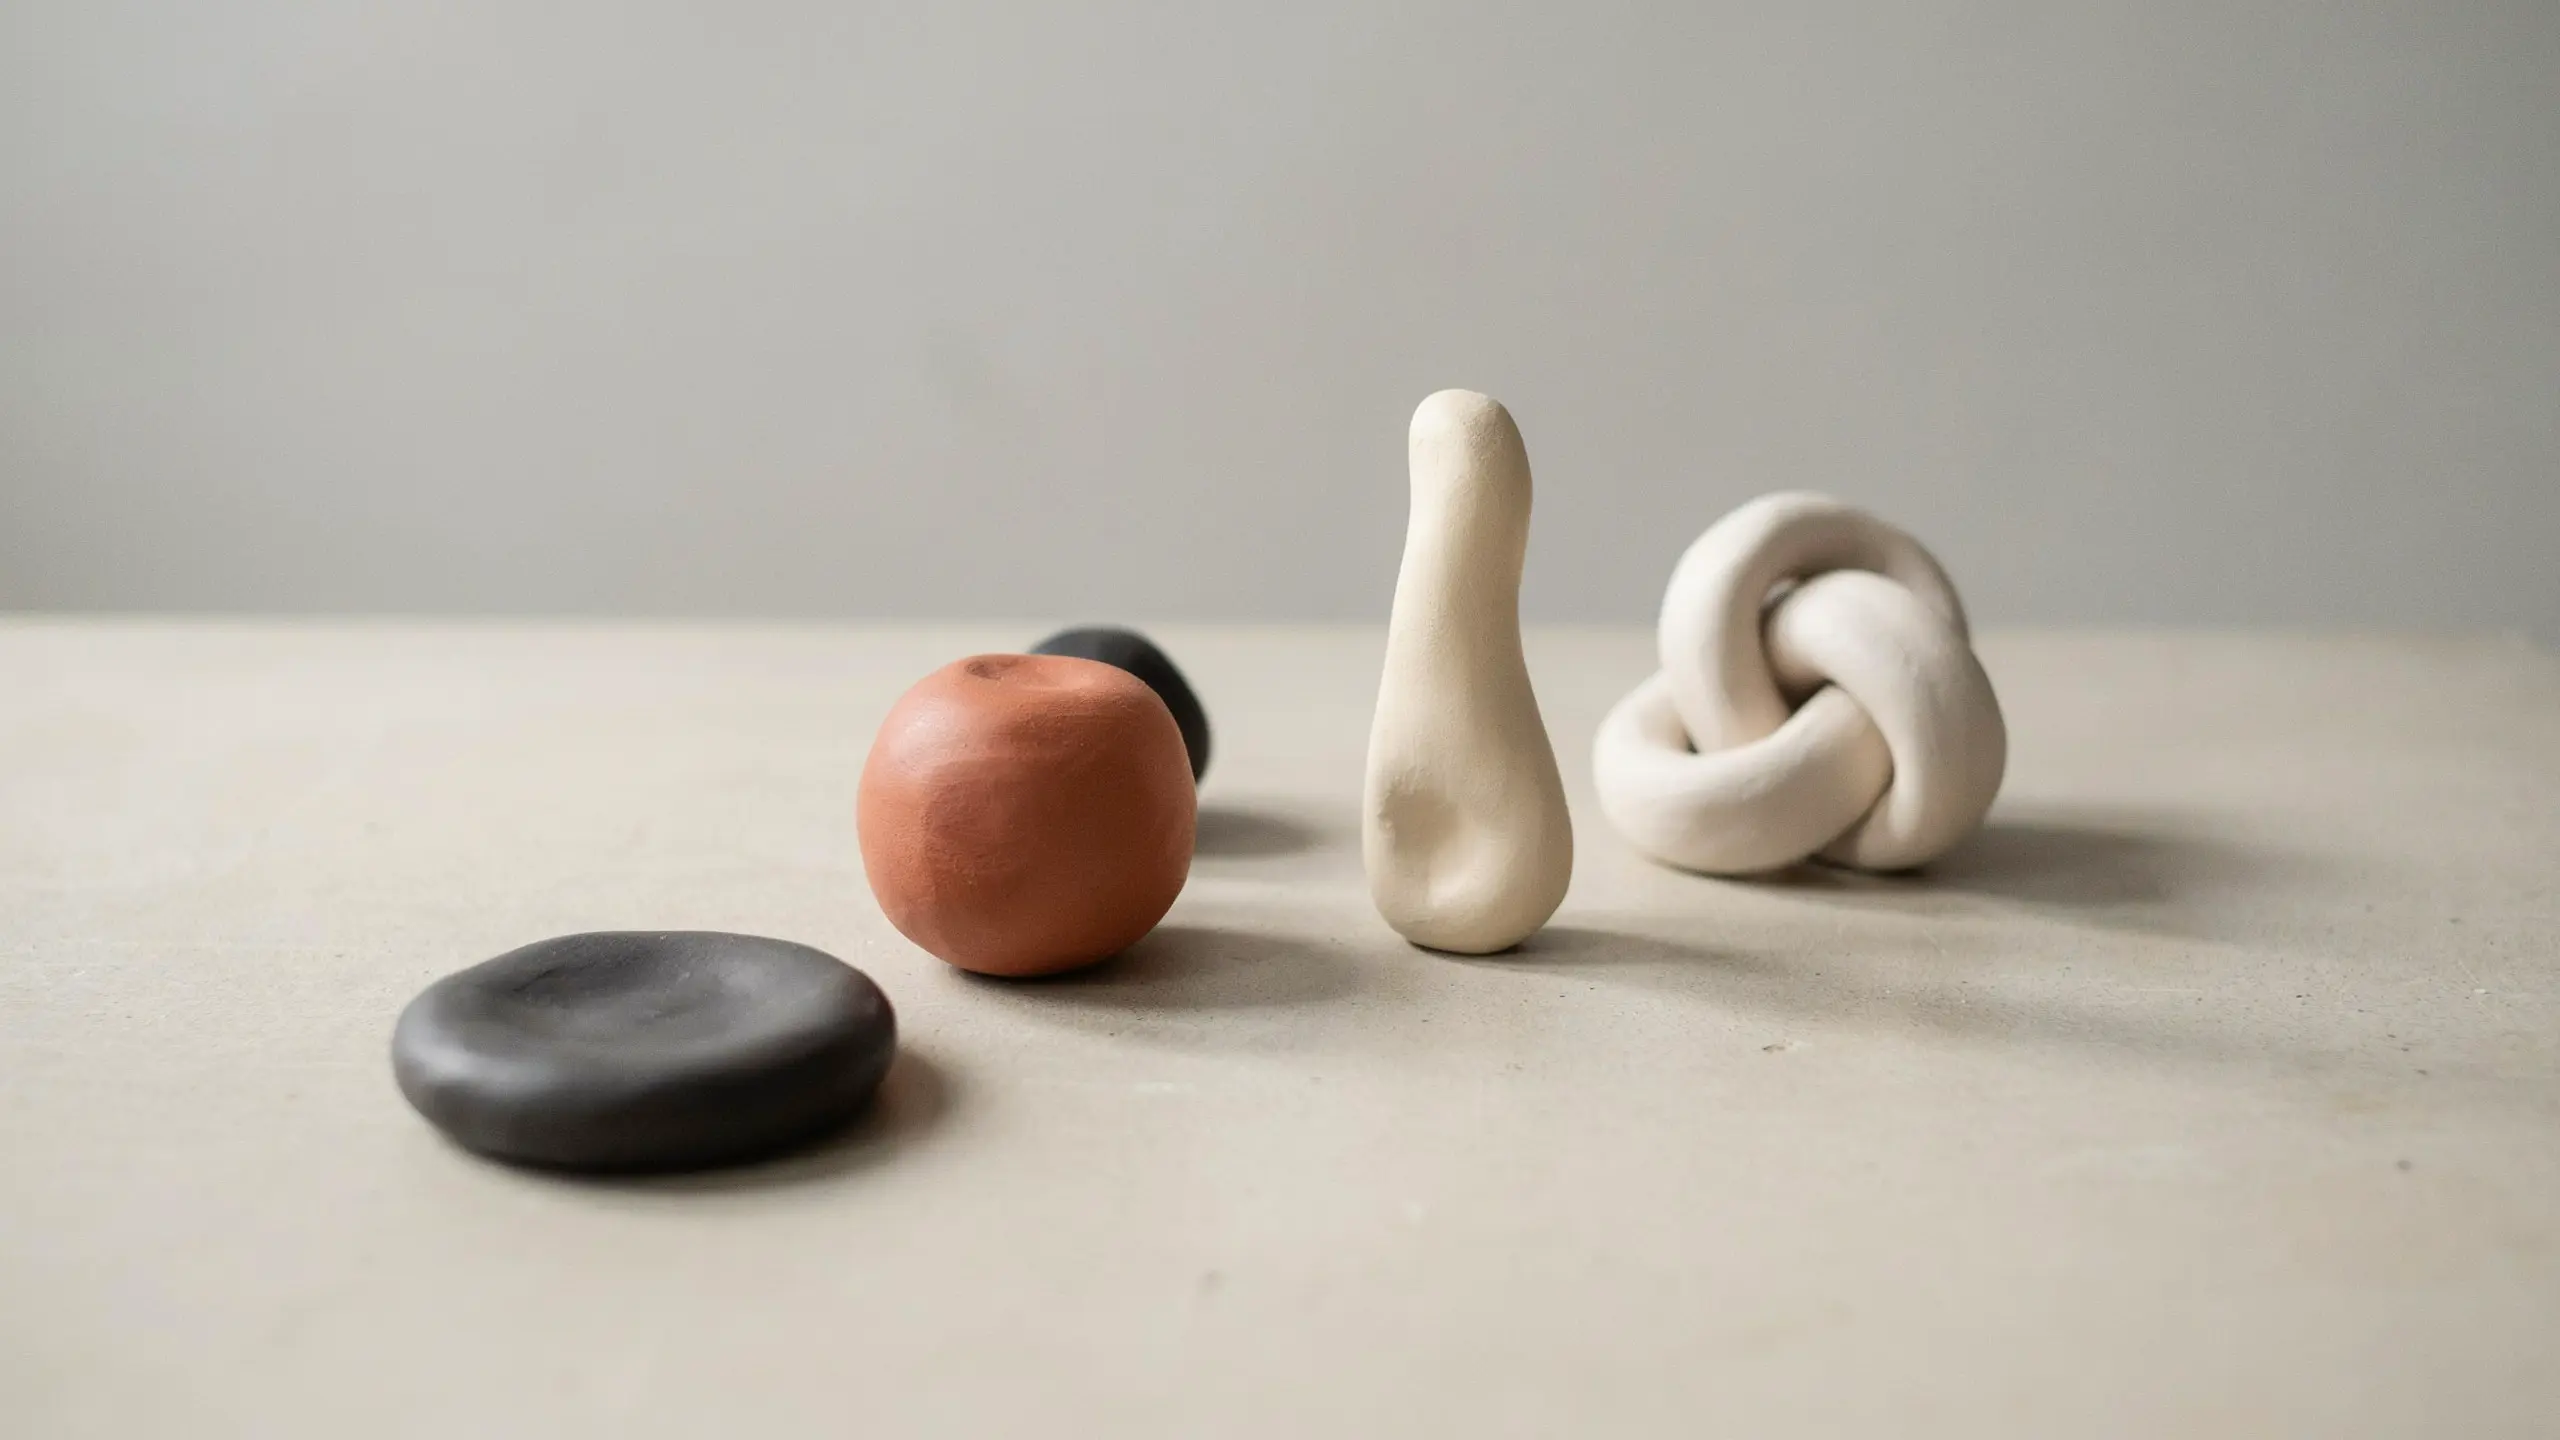
Abstract clay shapes are perfect when you want to create without following any rules. Pinch, pull, twist, and press the clay into whatever form feels right. No reference needed.
These small sculptures look surprisingly good grouped together on a shelf or desk. Sand them lightly after drying for a smoother finish, then seal or paint depending on the look you’re going for.
| Clay Type | Skill Level | Drying Time | Tools Needed |
|---|---|---|---|
| Air-dry or polymer clay | Beginner | 24 to 48 hours | Hands, sandpaper |
Every project in this section takes under an hour to make. That’s what makes them such a good starting point.
Cute Clay Sculpture Ideas for Home Décor
Some of the most satisfying clay projects are the ones that end up sitting pretty on a shelf. These are the ideas that started filling up my space fast.
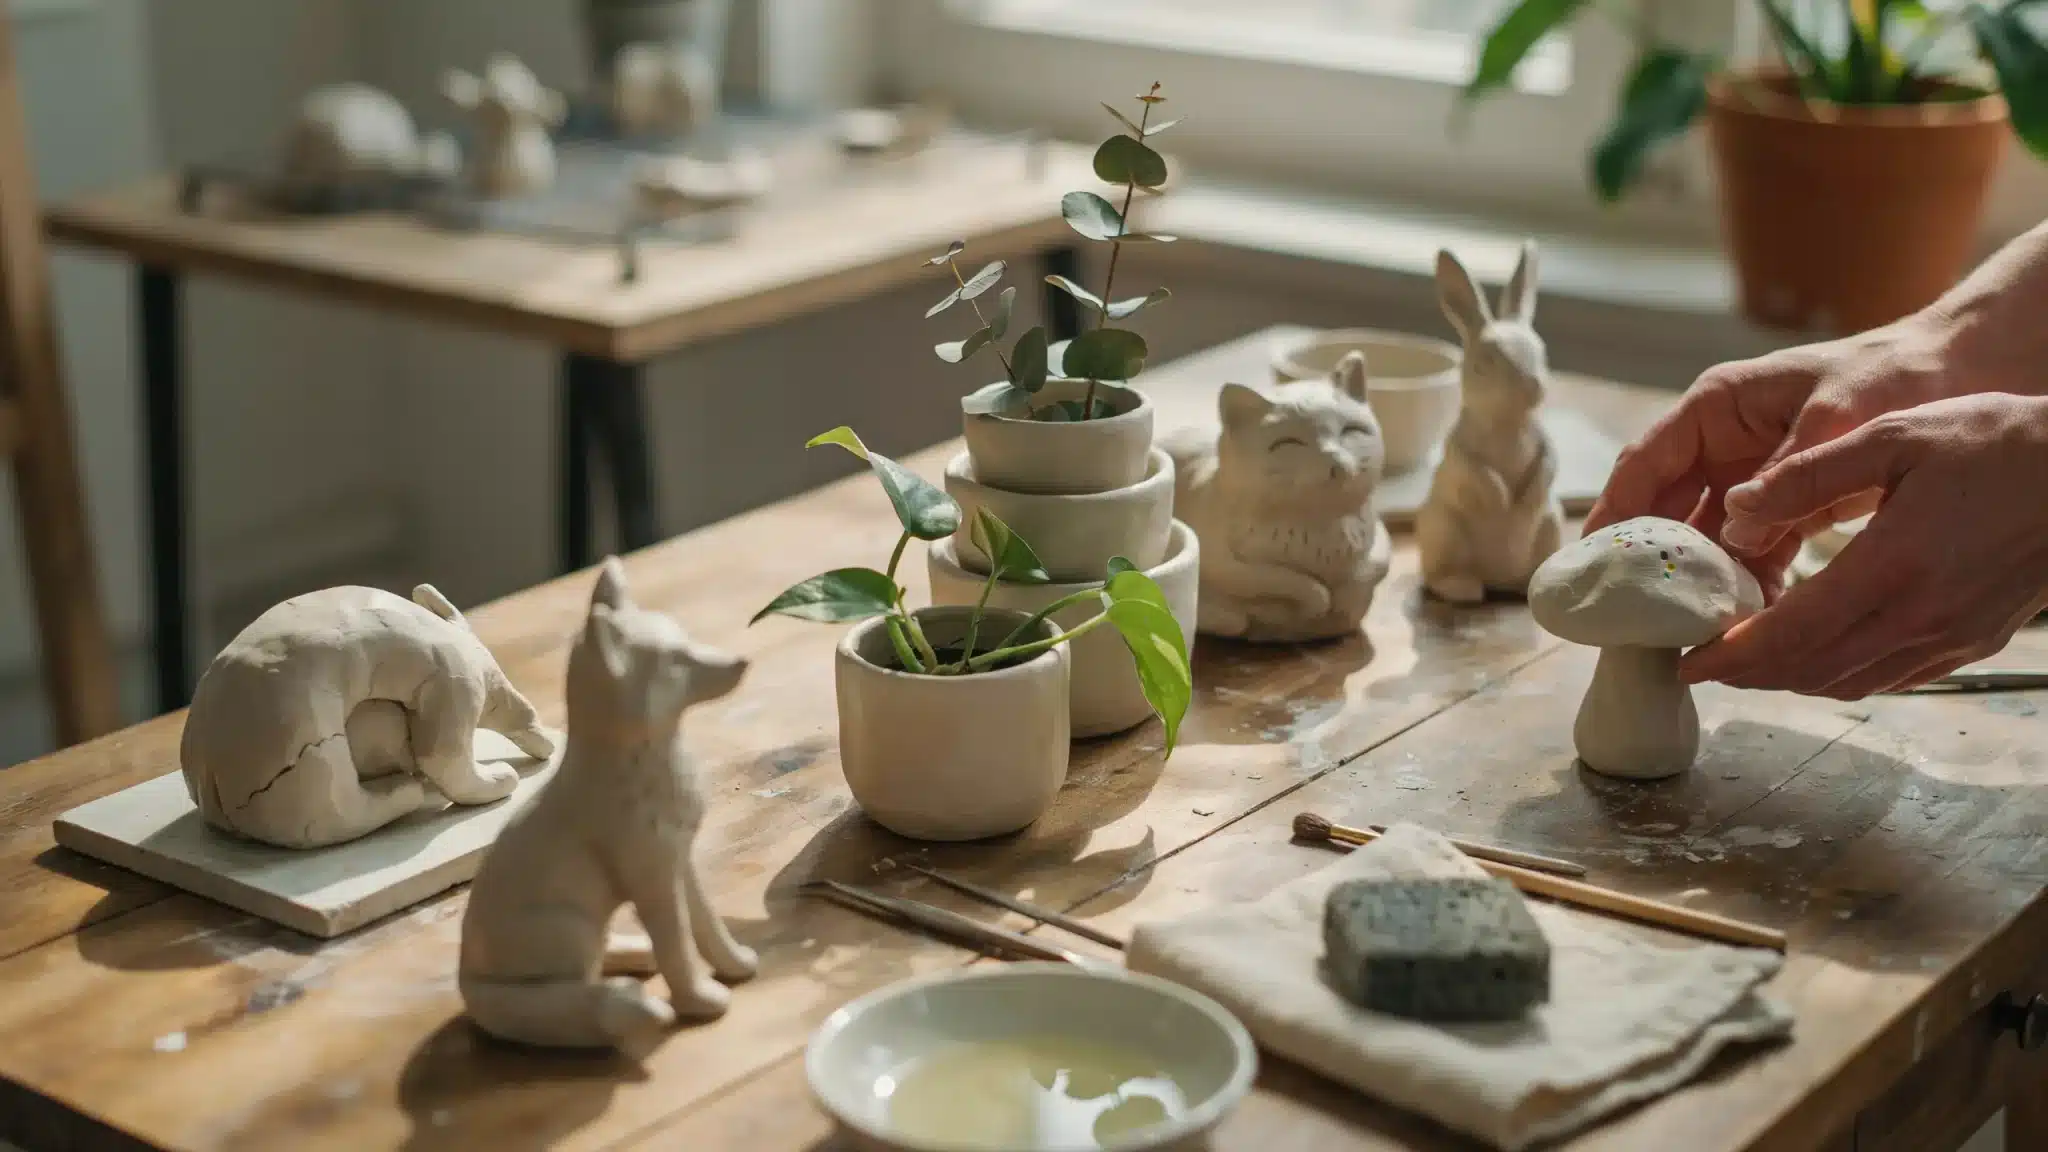
5. Animal Figurines
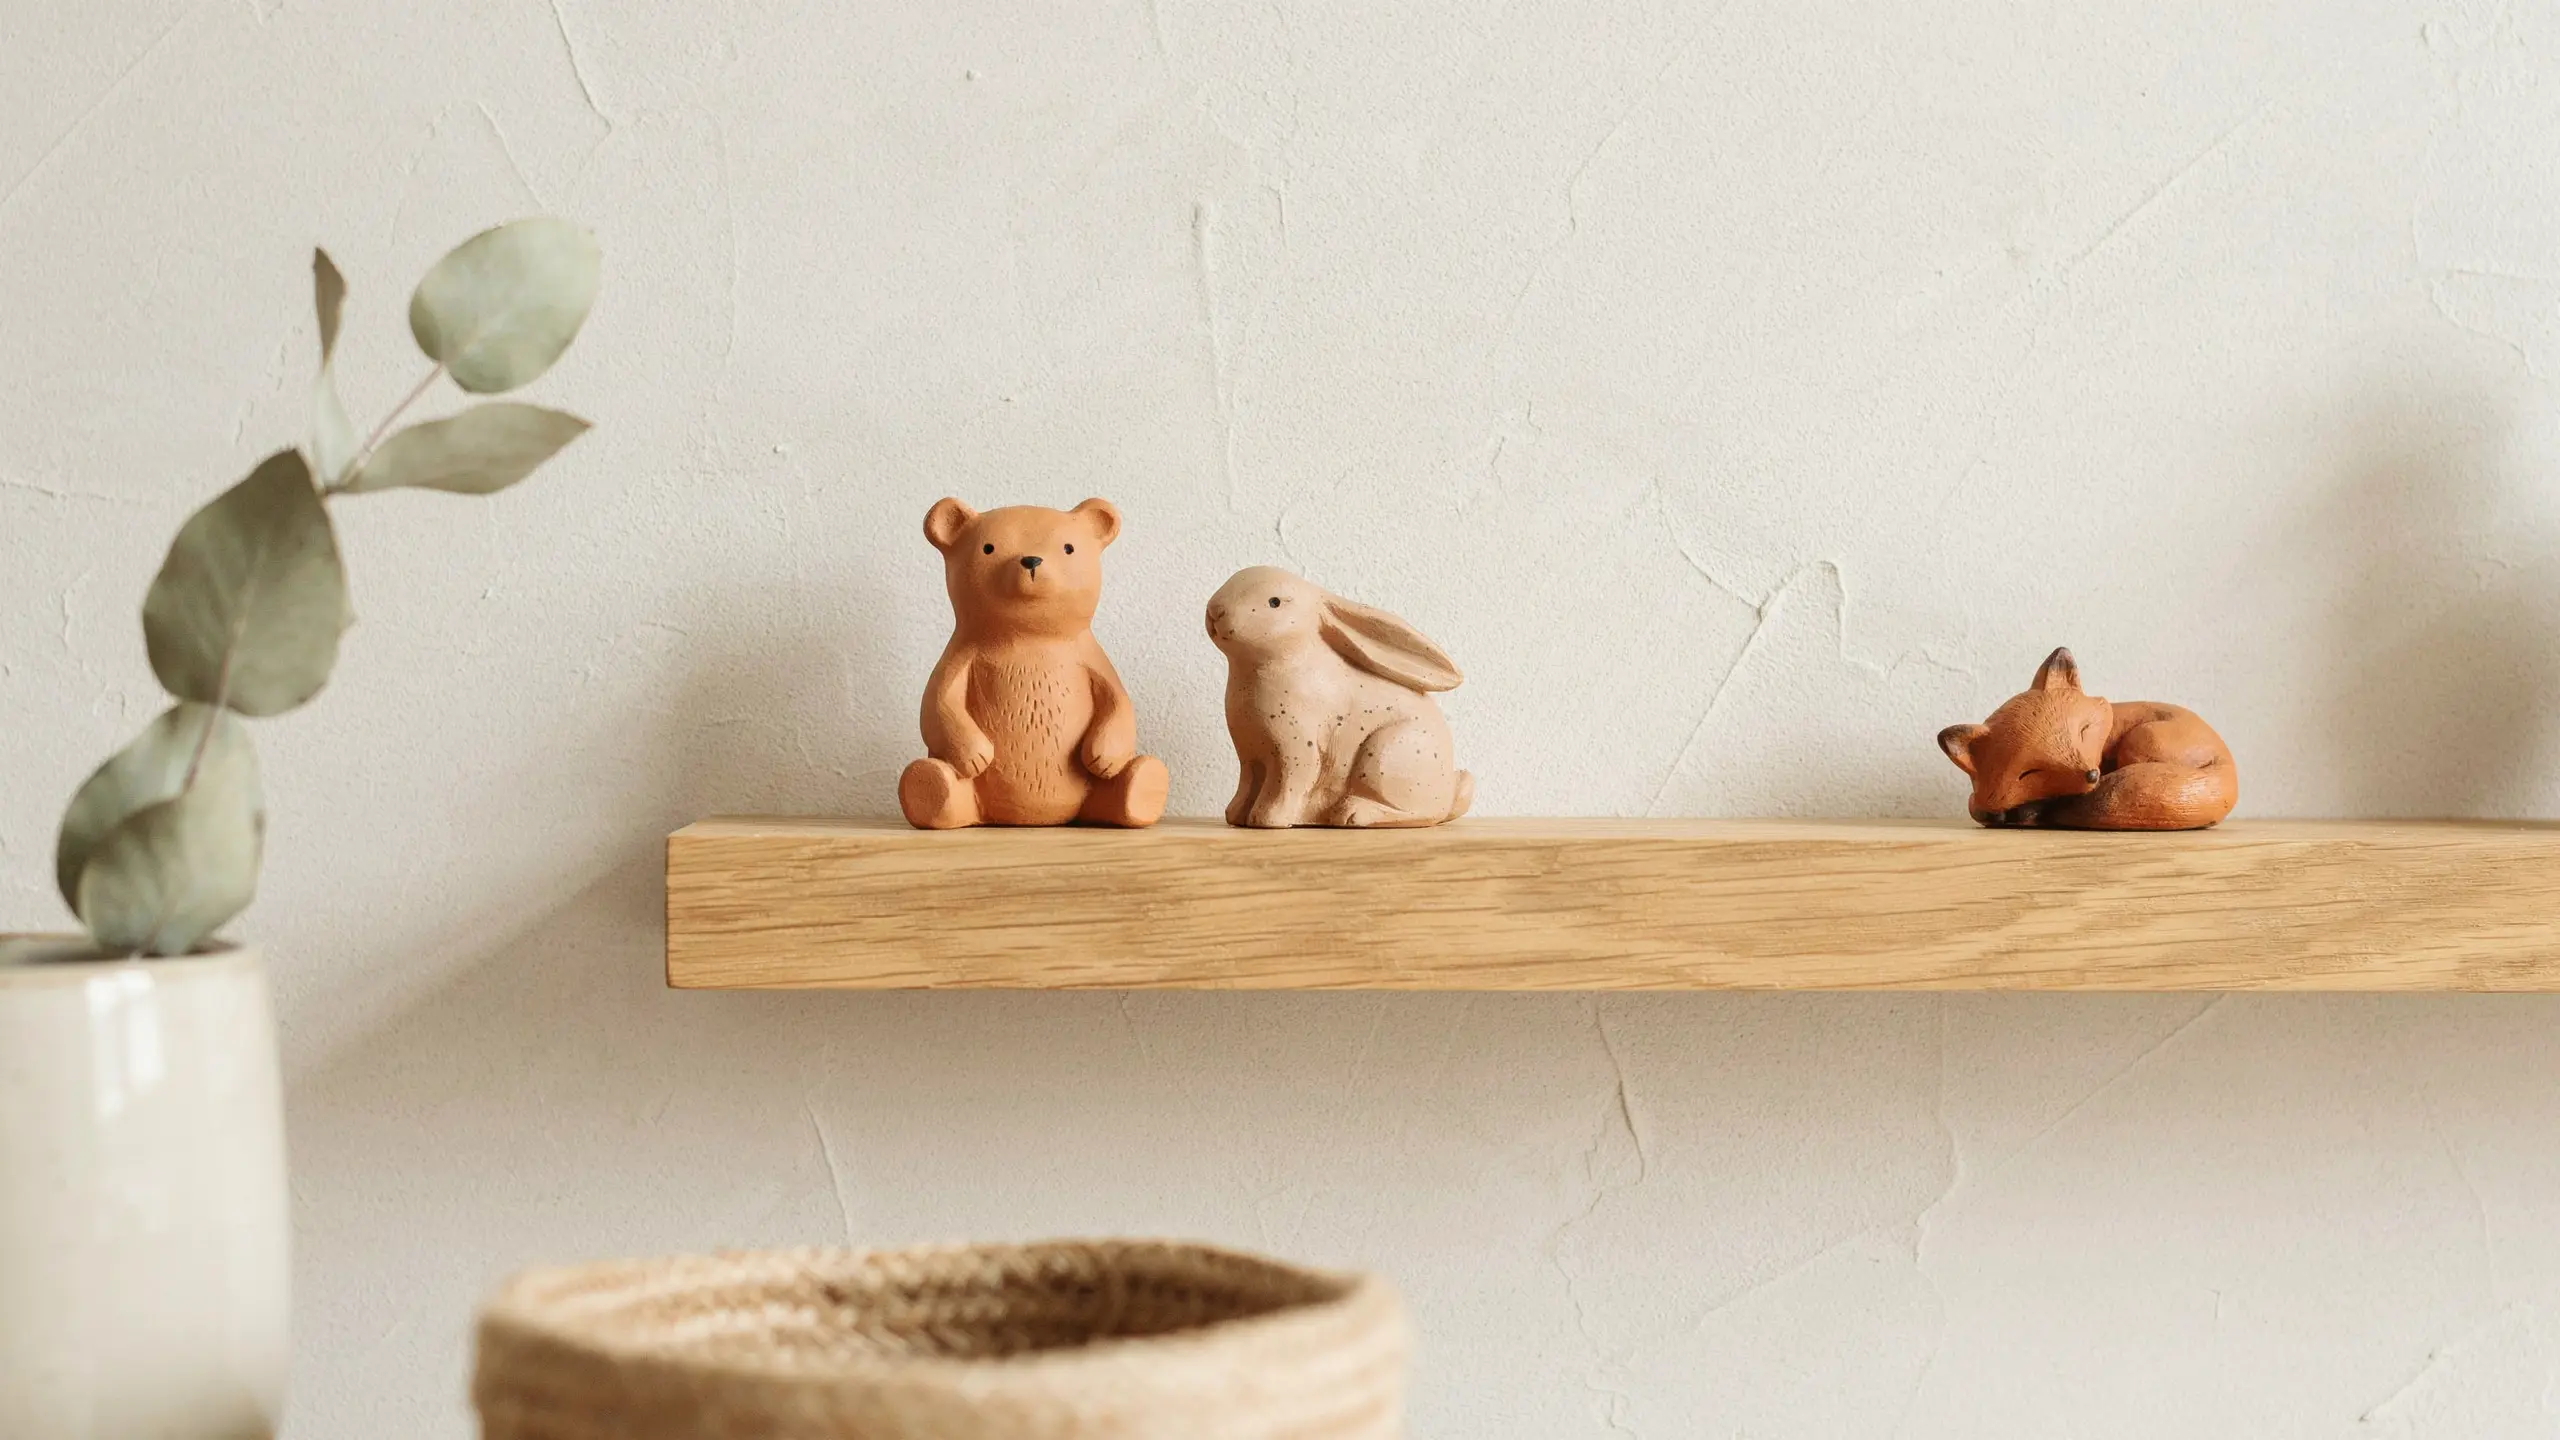
Small animal figurines are among the most-searched clay projects online, and they’re easier to make than they look.
Start with a basic body shape, add legs, ears, and a tail, and refine the details with a toothpick or sculpting tool.
Cats, bears, and bunnies are great starting points because their shapes are forgiving and don’t require perfect symmetry. A little paint and a matte sealant finish make these cute clay figures look shelf-ready.
| Clay Type | Skill Level | Drying Time | Tools Needed |
|---|---|---|---|
| Air-dry or polymer clay | Beginner to intermediate | 24 to 48 hours | Sculpting tool, toothpick, paint |
6. Mushroom Sculptures
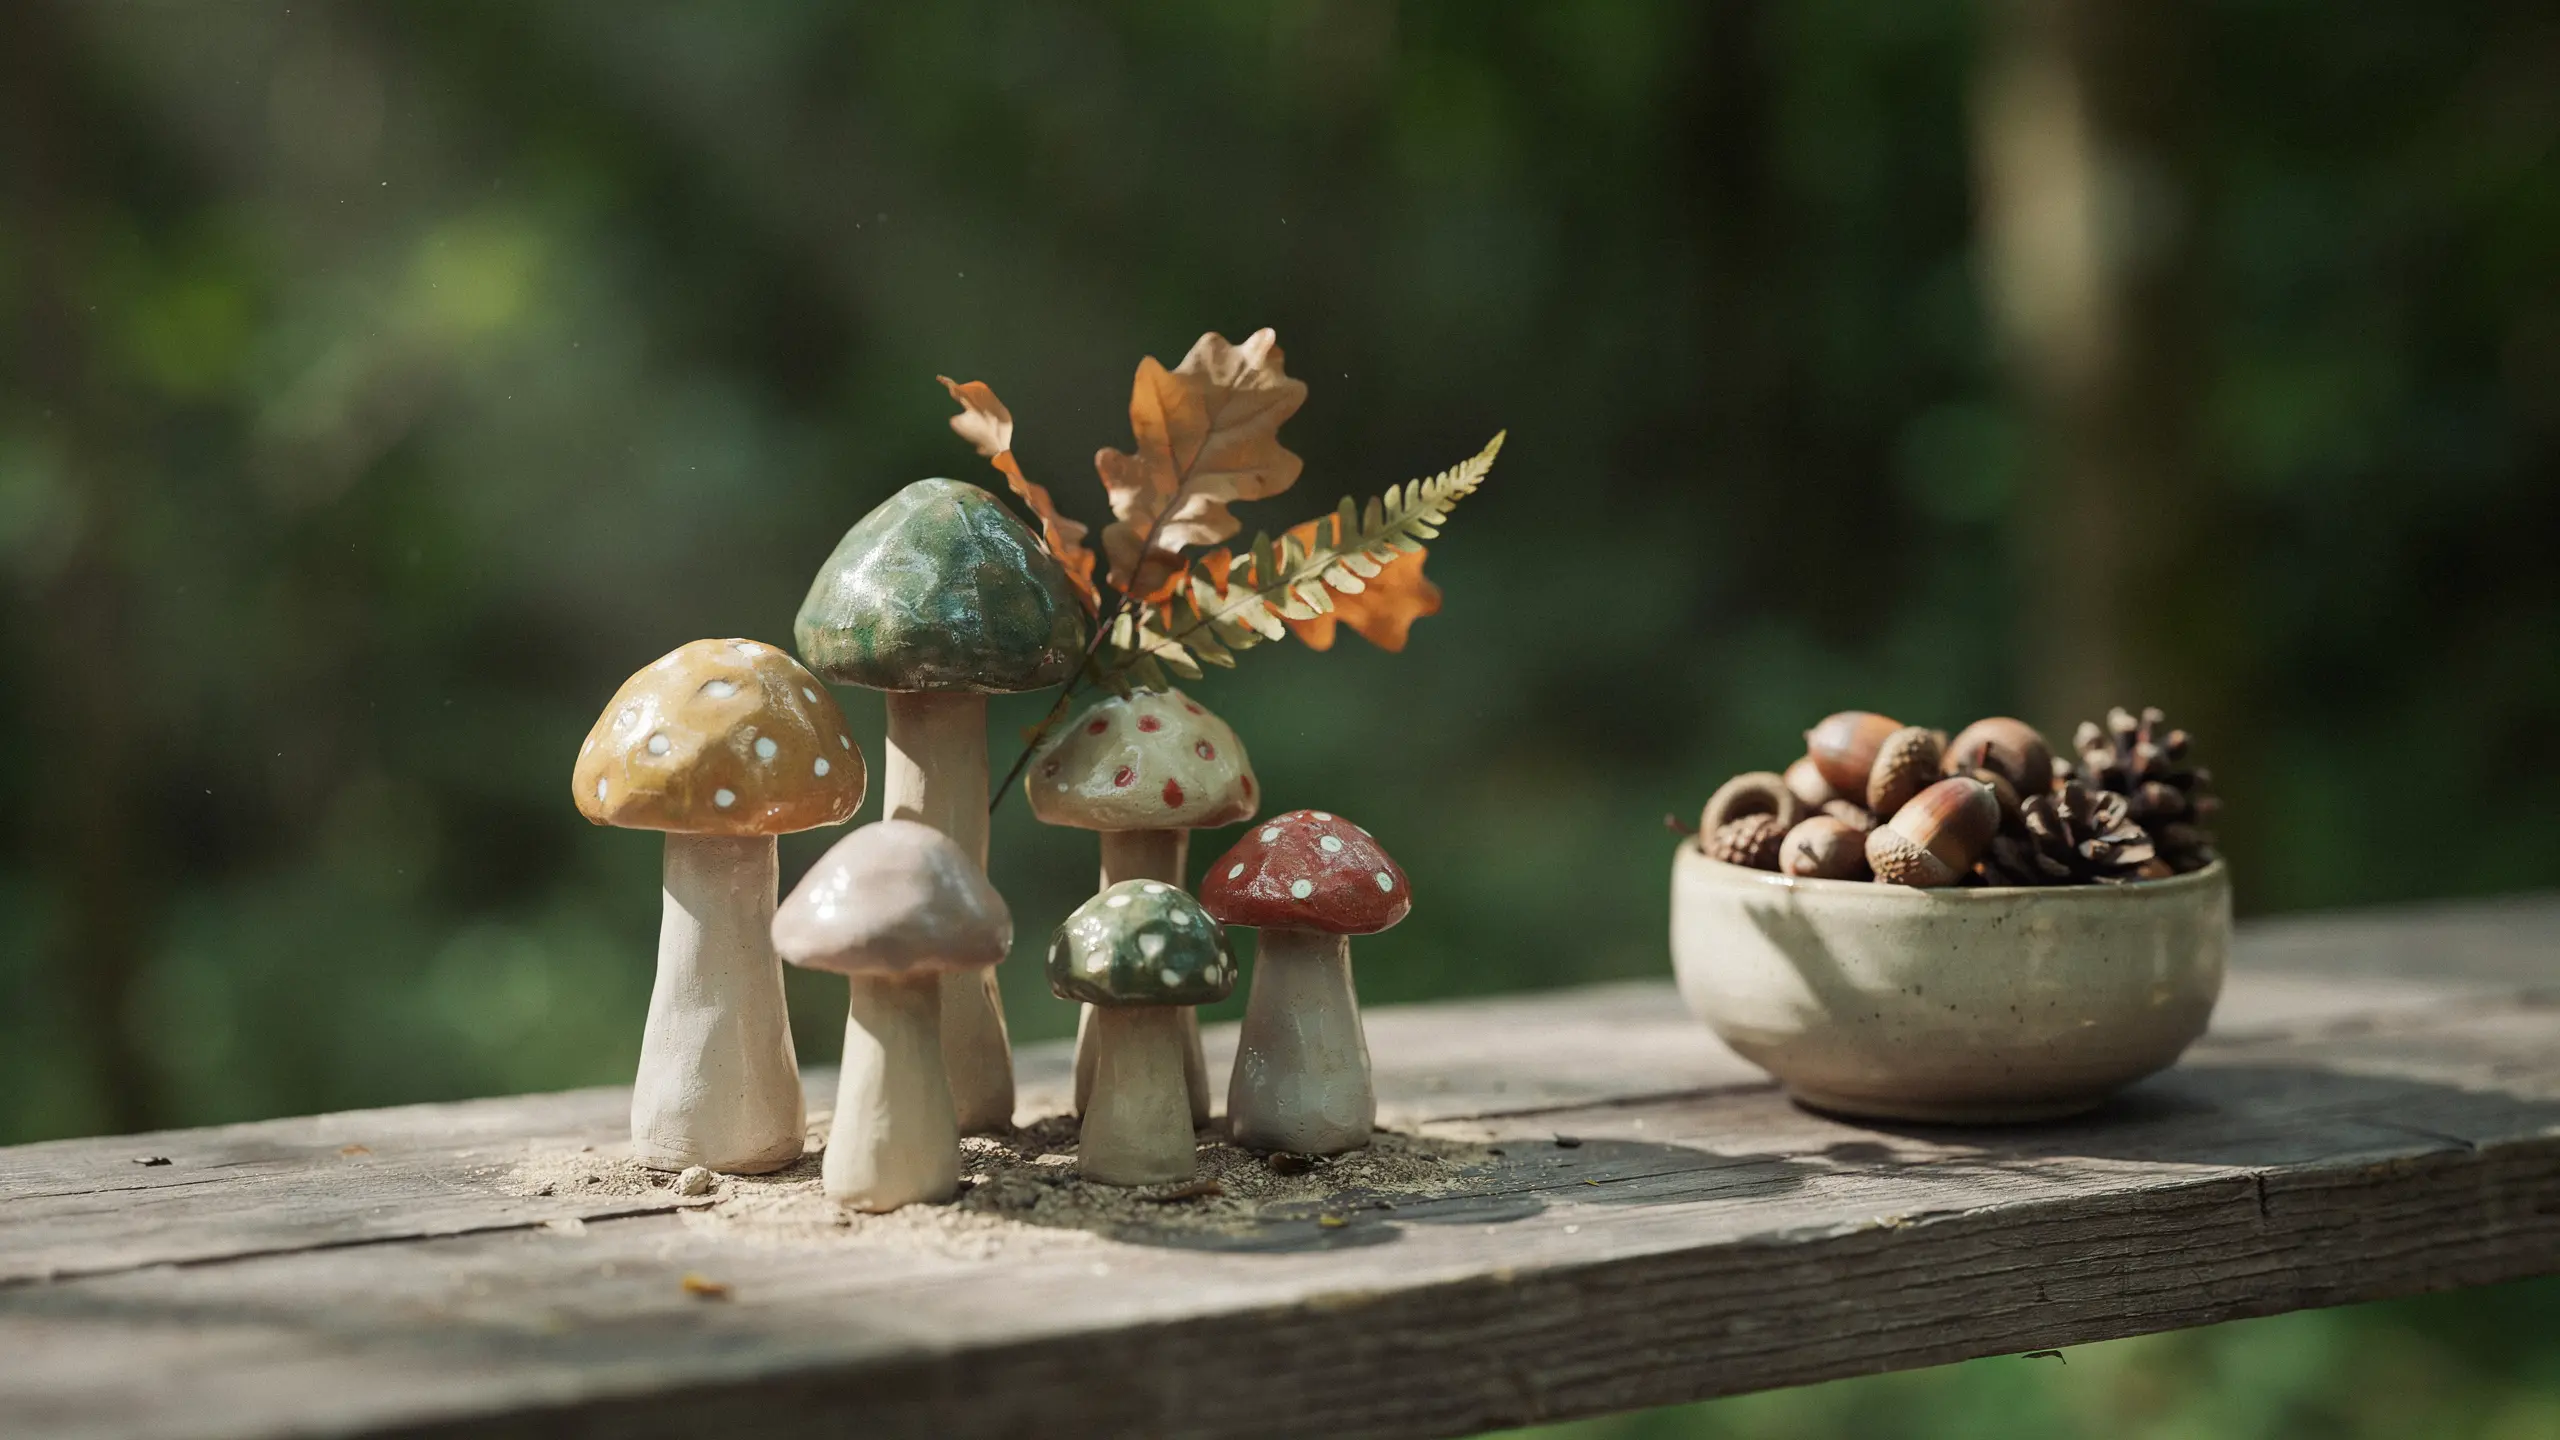
Mushroom sculptures have become one of the most popular clay décor trends, and it’s easy to see why.
The shape is simple, the variations are endless, and they fit into almost any aesthetic from cottagecore to modern minimal.
Roll a thick base for the stem, flatten a wider piece for the cap, and press them together. Add spots, texture, or a glossy finish to give each one its own personality.
| Clay Type | Skill Level | Drying Time | Tools Needed |
|---|---|---|---|
| Air-dry clay | Beginner | 24 to 36 hours | Hands, toothpick, acrylic paint |
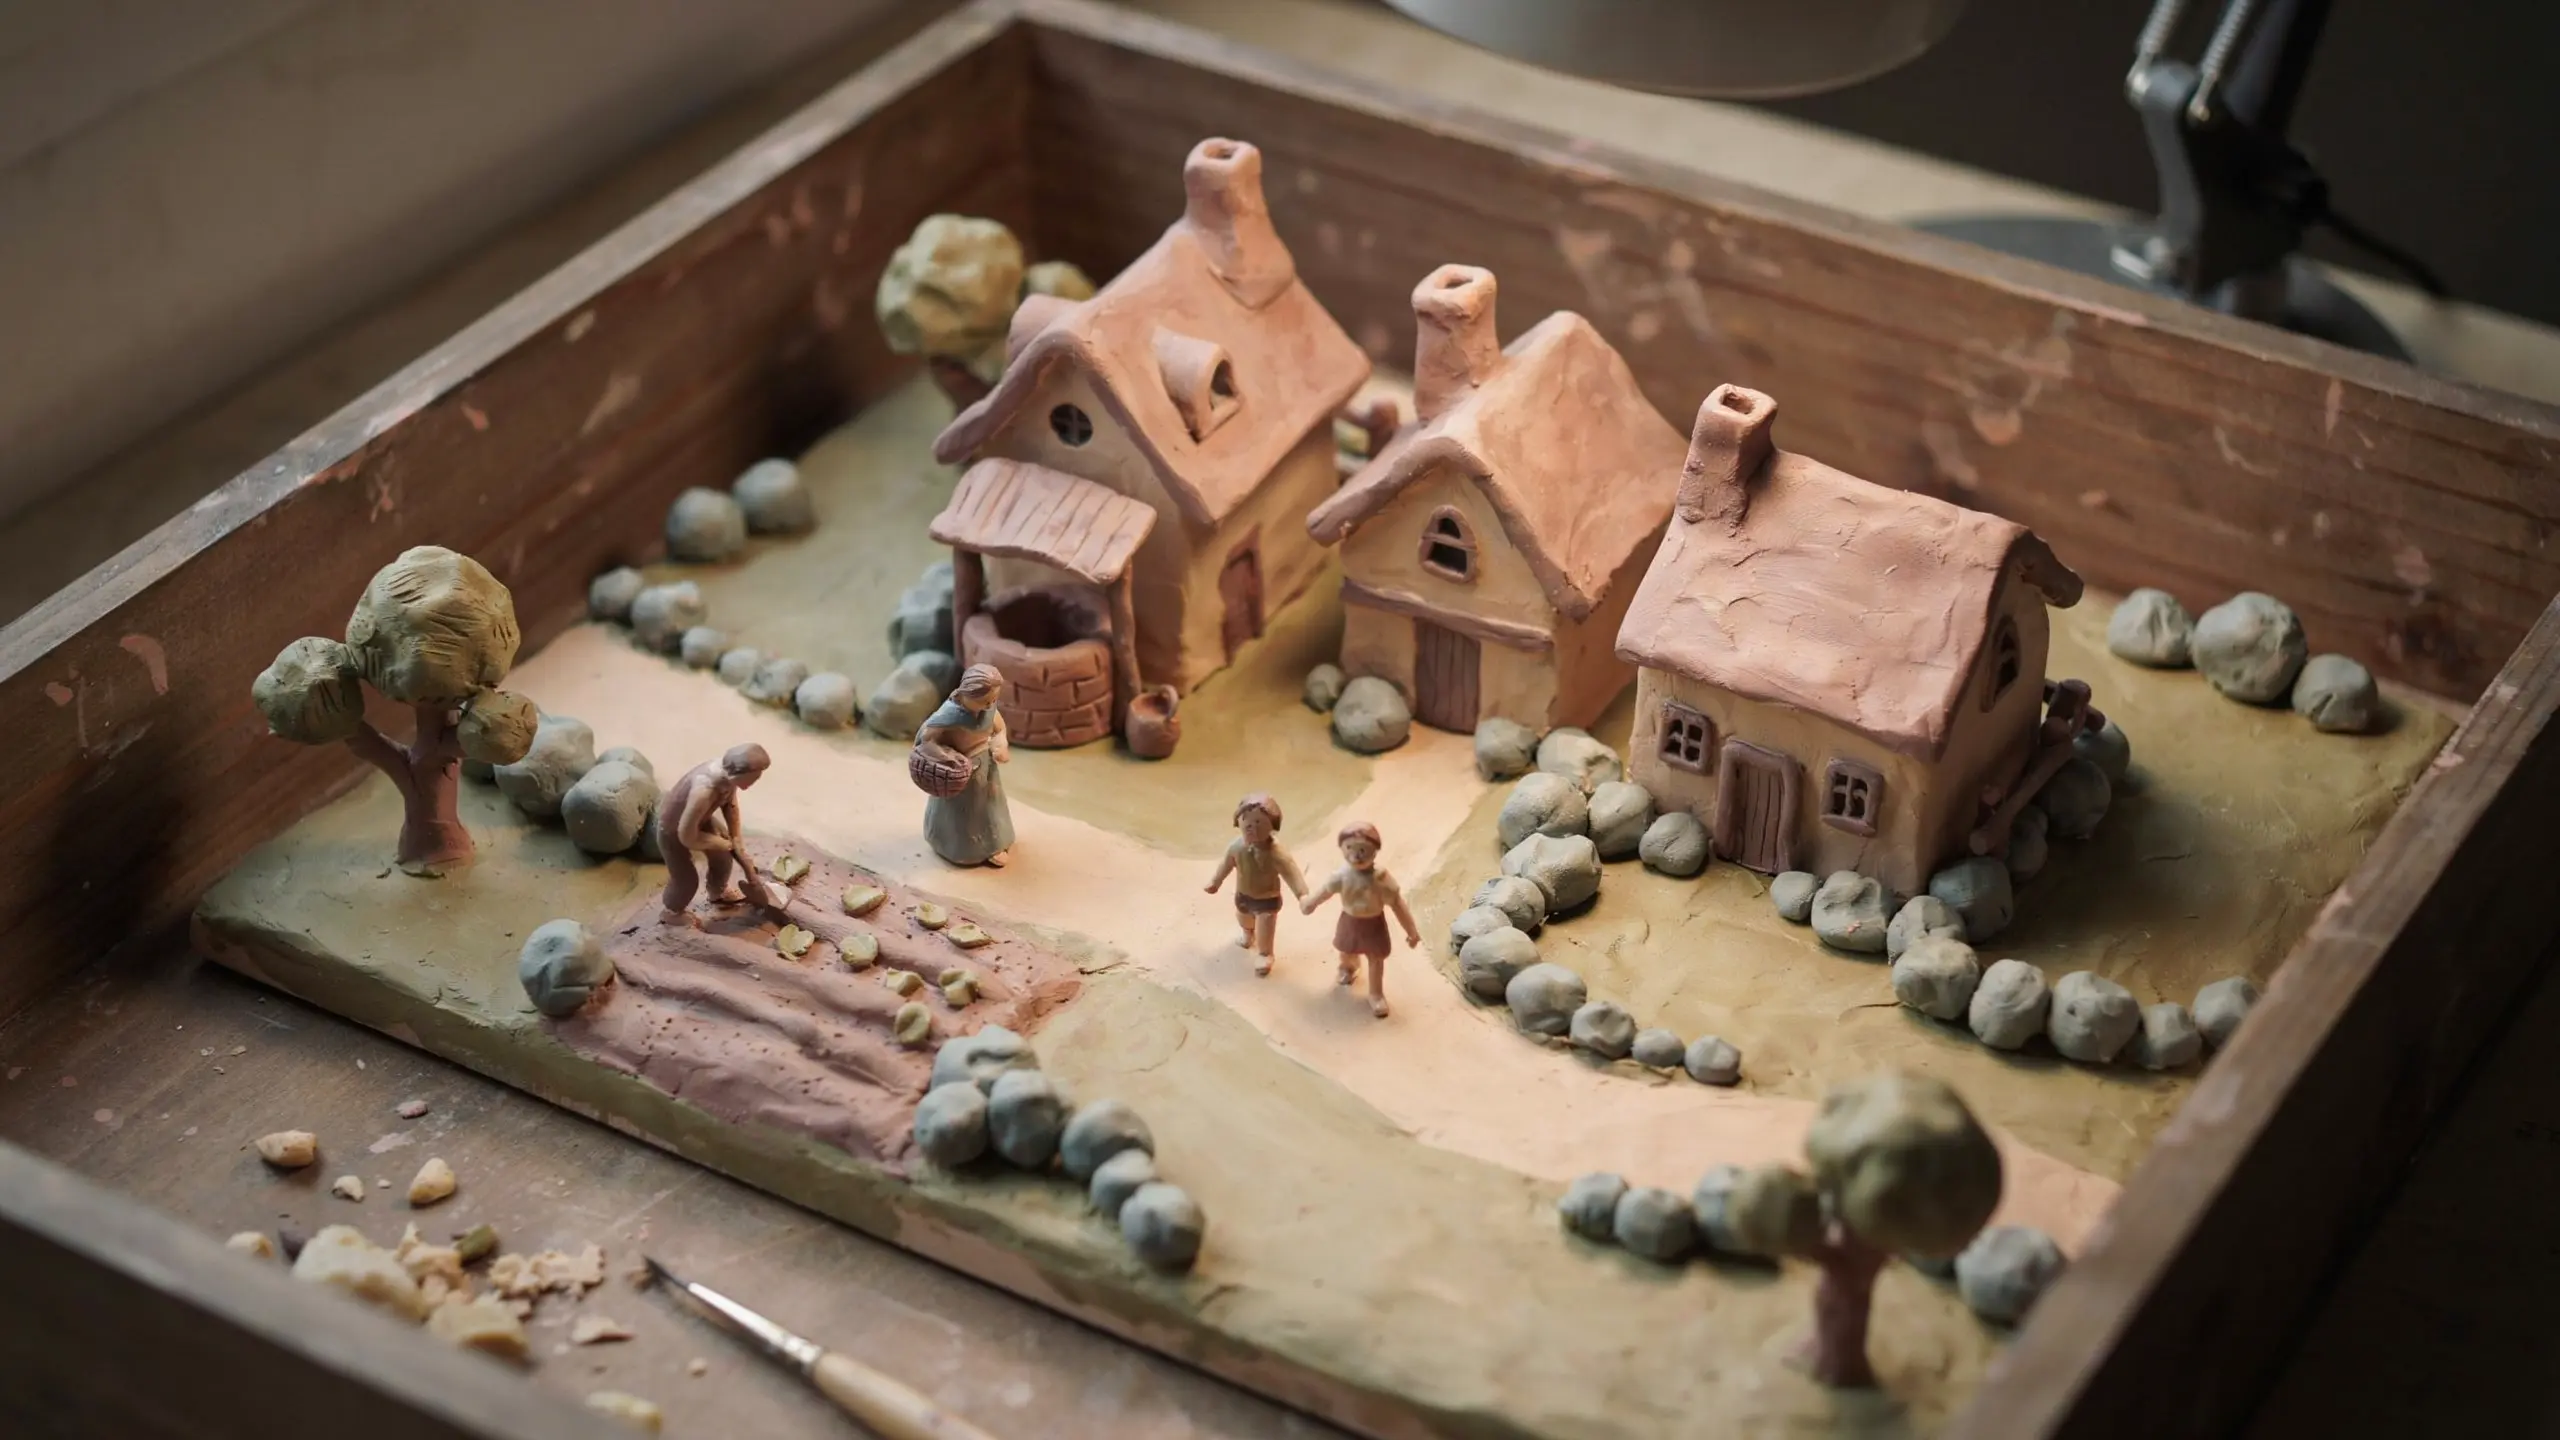
7. Fairy House Miniatures
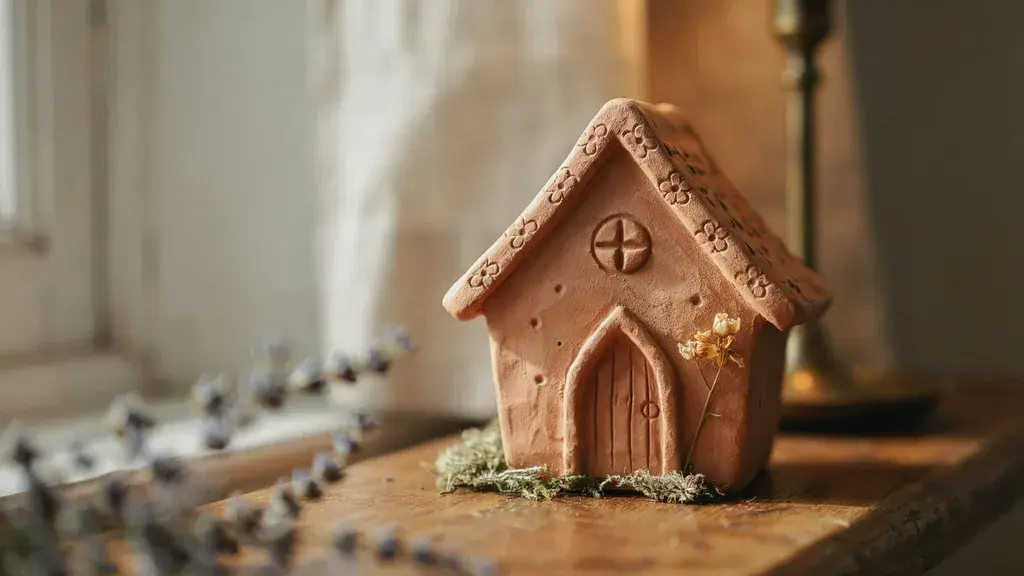
Fairy house miniatures take a little more patience, but the results are worth every minute. Think tiny doors, mossy rooftops, small windows, and uneven stone textures pressed into the walls.
These work beautifully as standalone shelf pieces or grouped together into a little scene. Use a textured tool or the edge of a comb to add surface detail before the clay dries.
| Clay Type | Skill Level | Drying Time | Tools Needed |
|---|---|---|---|
| Air-dry clay | Intermediate | 48 to 72 hours | Sculpting tools, comb, toothpick, paint |
8. Tiny Decorative Busts
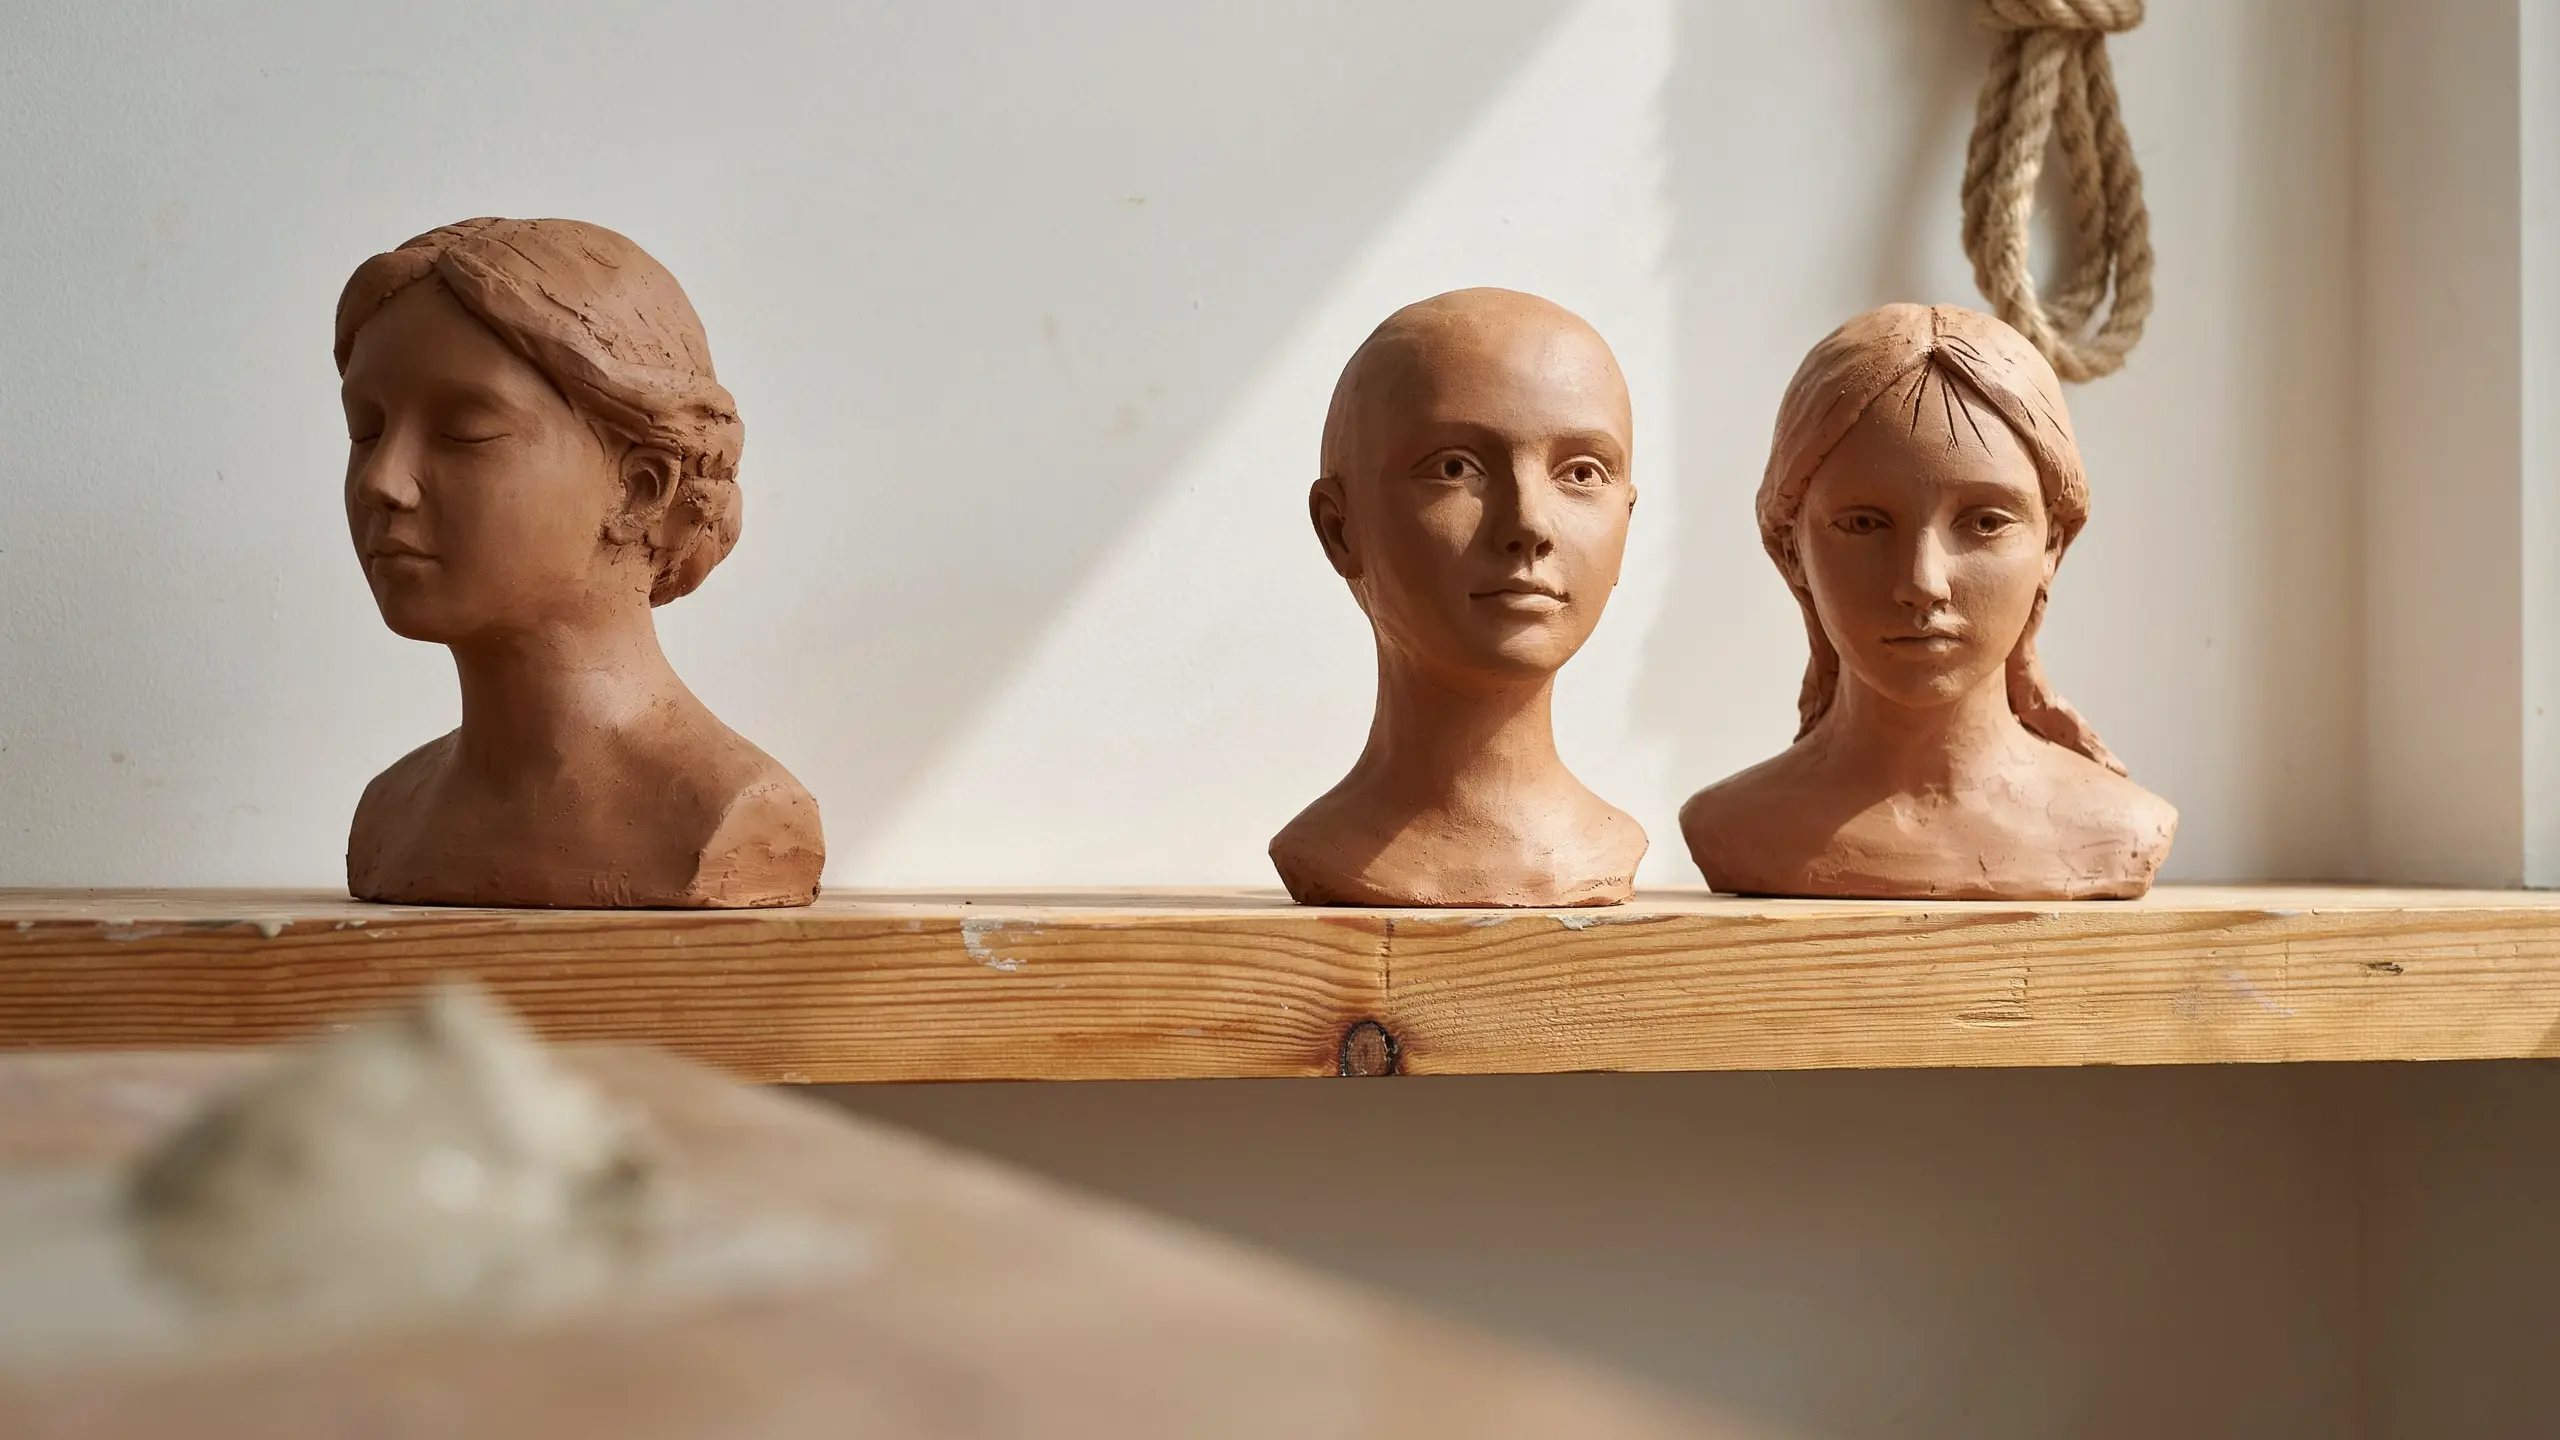
Mini busts are one of those clay projects that look far more advanced than they actually are. A simple head-and-shoulders shape with basic facial features is all it takes to make something that looks like it belongs in a gallery.
Keep the features subtle and the finish neutral for a clean modern look. These work especially well in pairs or sets of three on a bookshelf or side table.
| Clay Type | Skill Level | Drying Time | Tools Needed |
|---|---|---|---|
| Air-dry or polymer clay | Intermediate | 48 hours | Sculpting tool, sandpaper, paint |
Once you start making clay pieces for your home, it’s hard to stop. Every empty shelf starts to look like an opportunity.
Functional Clay Sculpture Ideas You Can Use Daily
The best part about clay is that it doesn’t have to just sit there looking pretty. These are the projects that actually earn their spot in your home.
9. Ring Holder Sculptures
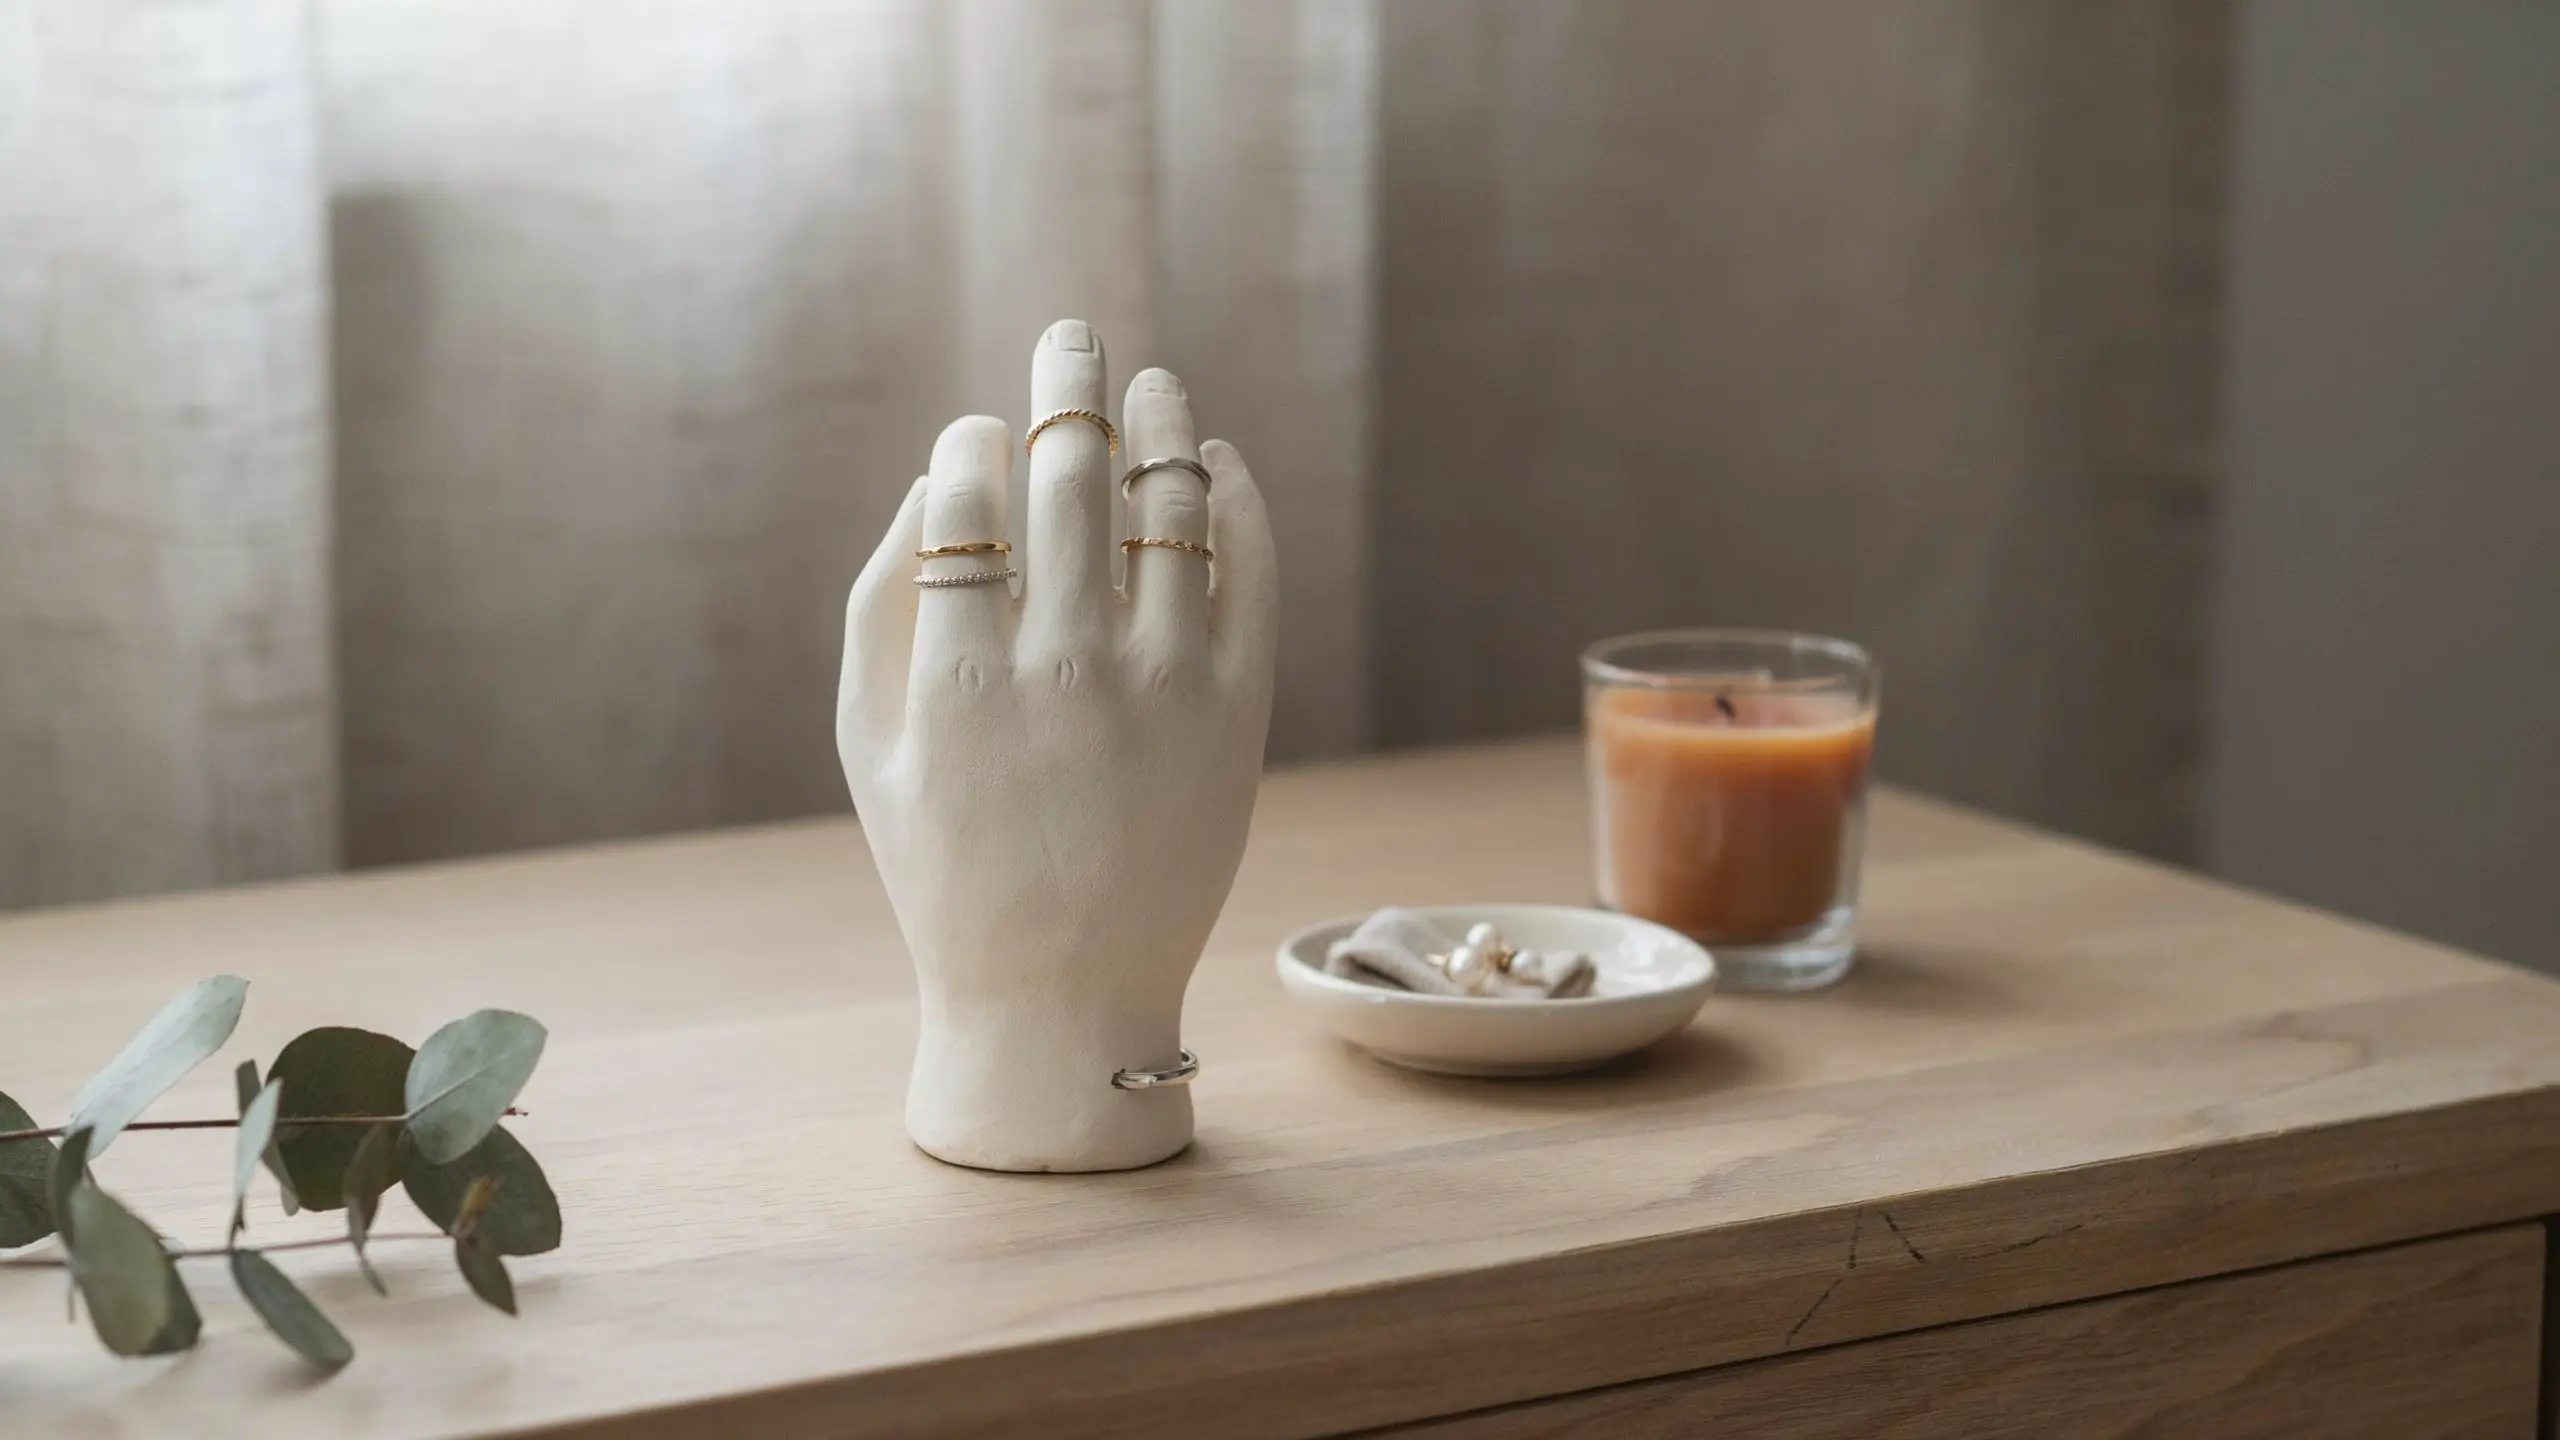
A ring holder is one of the most practical things you can make with clay. Shape a hand with fingers slightly spread, let it dry completely, and use it to store rings, bracelets, or earrings right on your dresser.
It looks intentional, keeps your jewelry organized, and takes less than an hour to shape. Paint it in a neutral tone or leave it natural for a minimalist finish.
| Clay Type | Skill Level | Drying Time | Tools Needed |
|---|---|---|---|
| Air-dry clay | Beginner to intermediate | 48 hours | Sculpting tool, sandpaper, paint |
10. Jewelry Dishes
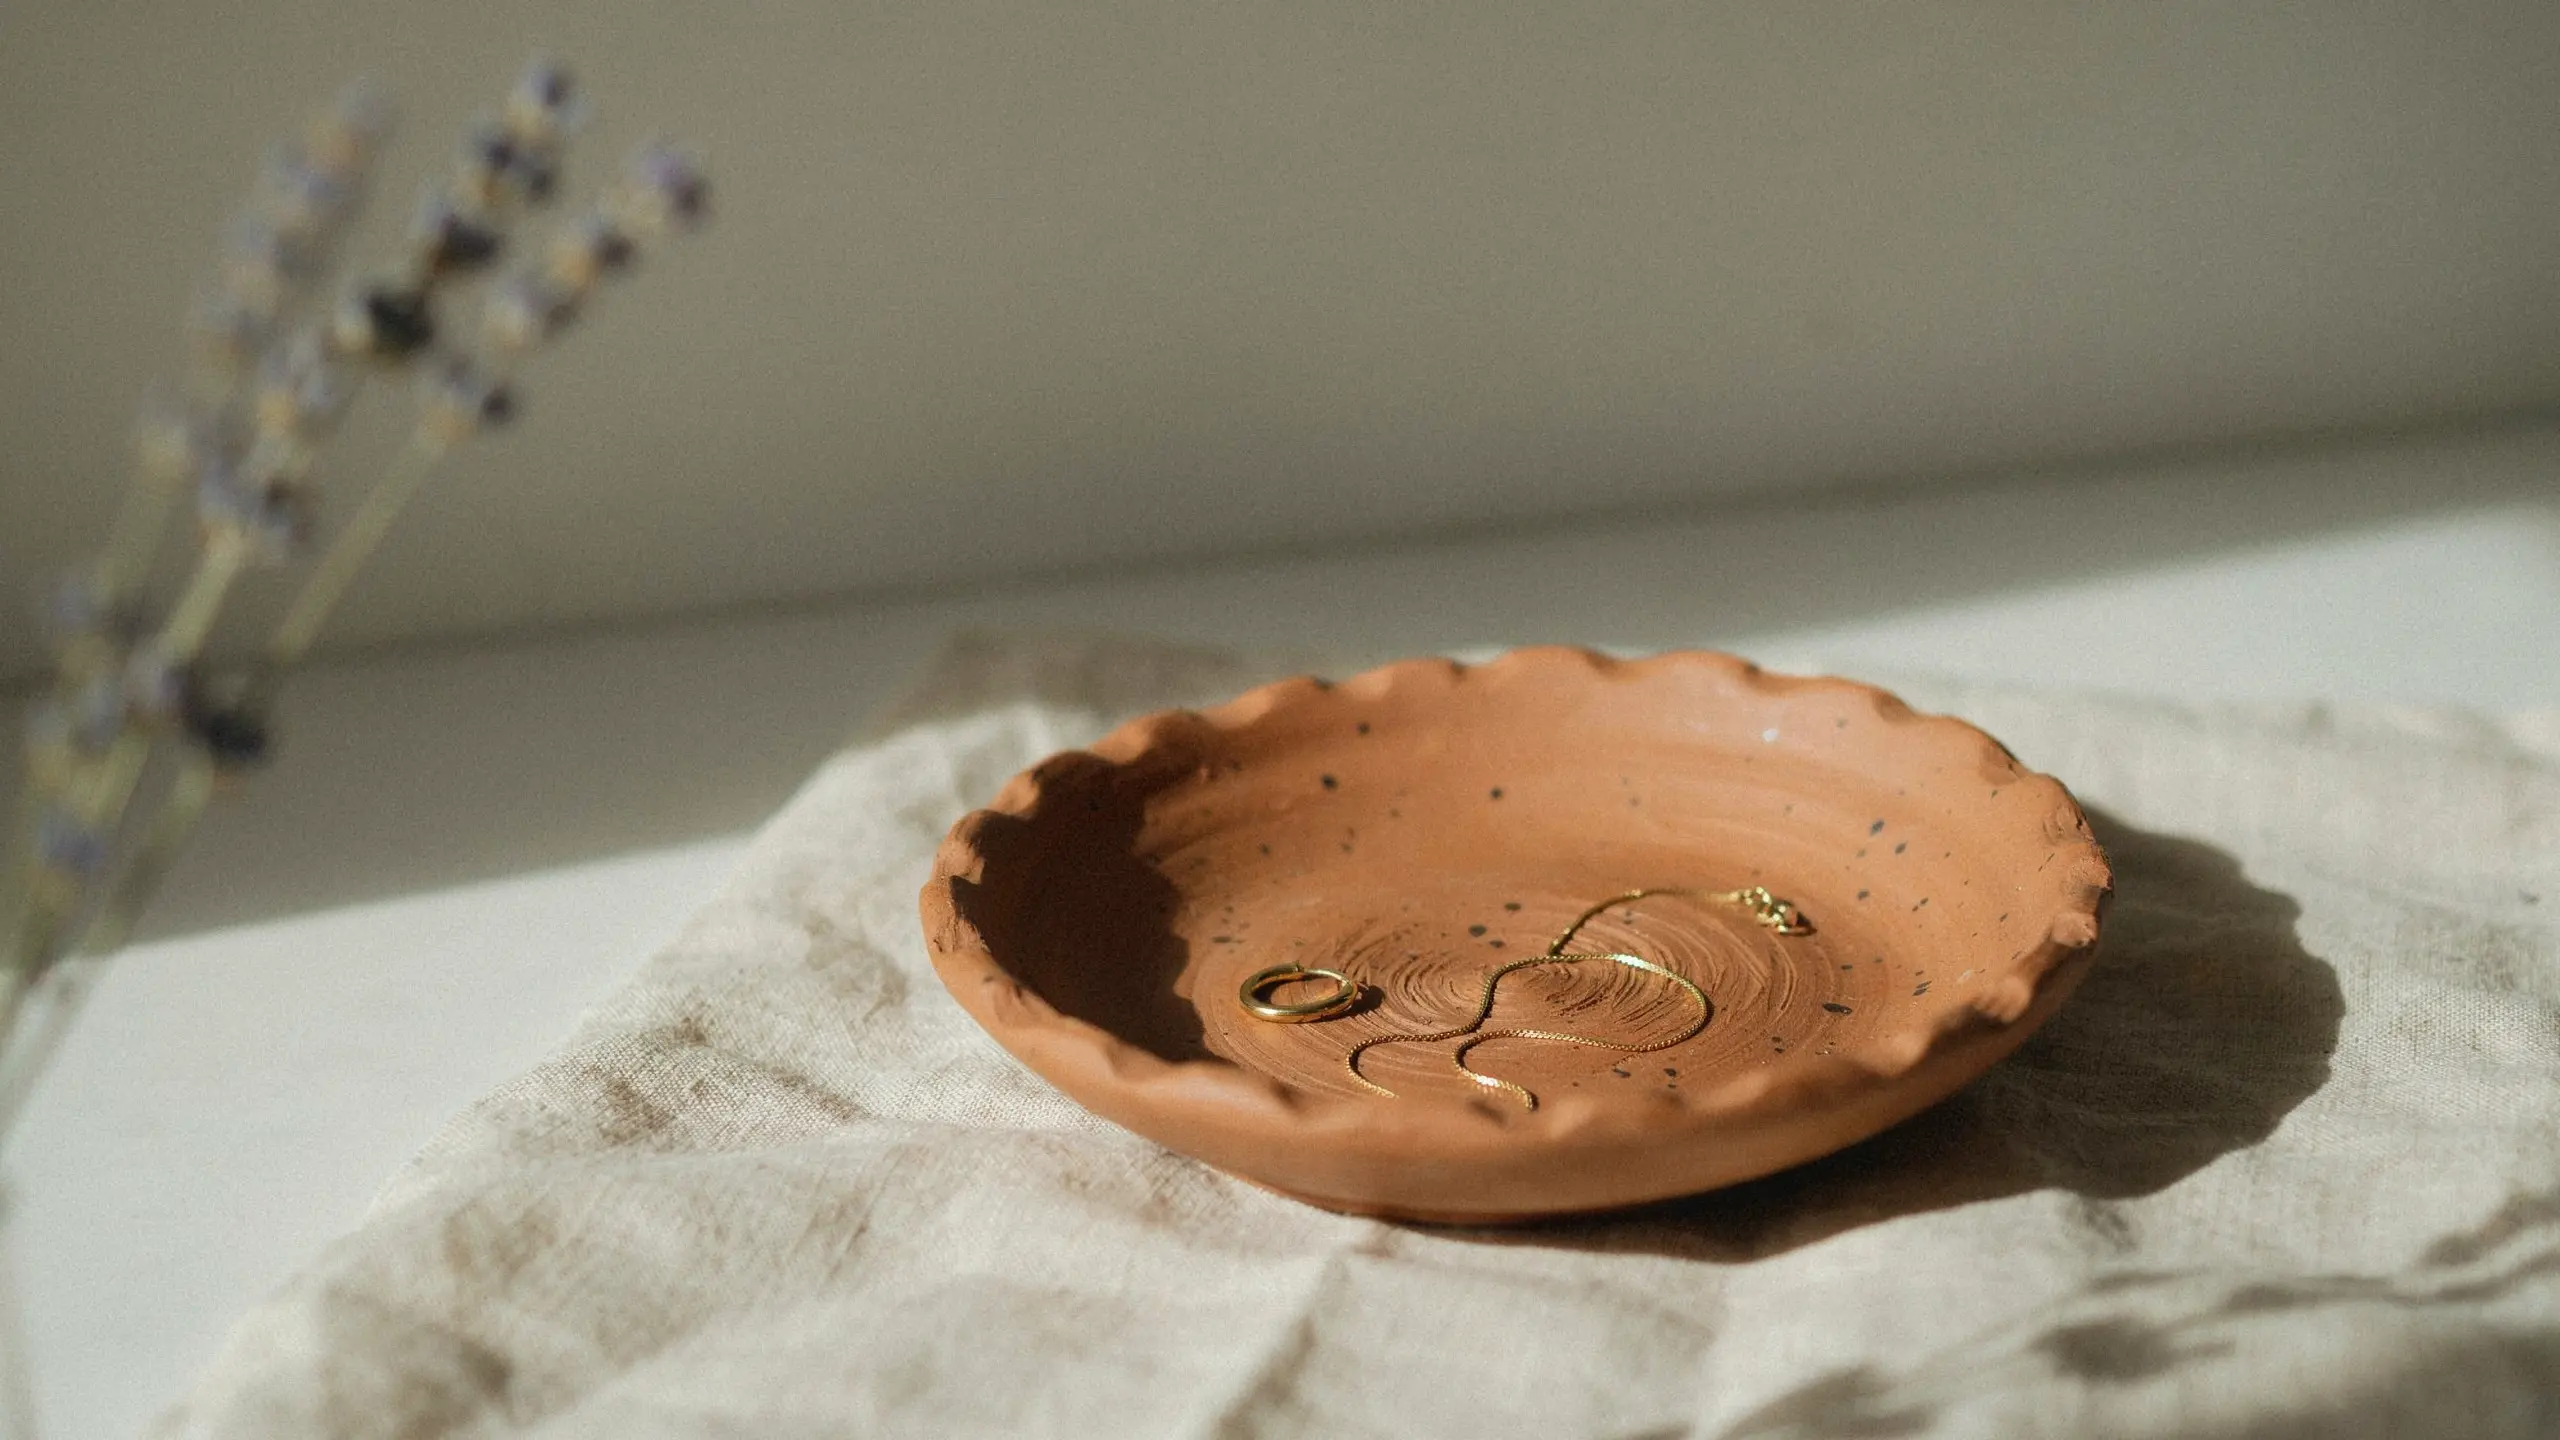
Jewelry dishes are flat, shallow clay pieces that hold small accessories on a nightstand or vanity. Press a ball of clay flat, curl the edges slightly upward, and smooth everything out before it dries.
Stamp a leaf, a flower, or a simple pattern into the surface before it sets for added texture. A glossy sealant gives it a finished ceramic look without the need for a kiln.
| Clay Type | Skill Level | Drying Time | Tools Needed |
|---|---|---|---|
| Air-dry clay | Beginner | 24 to 36 hours | Rolling pin, stamp or leaf, sealant |
11. Coasters With Textures
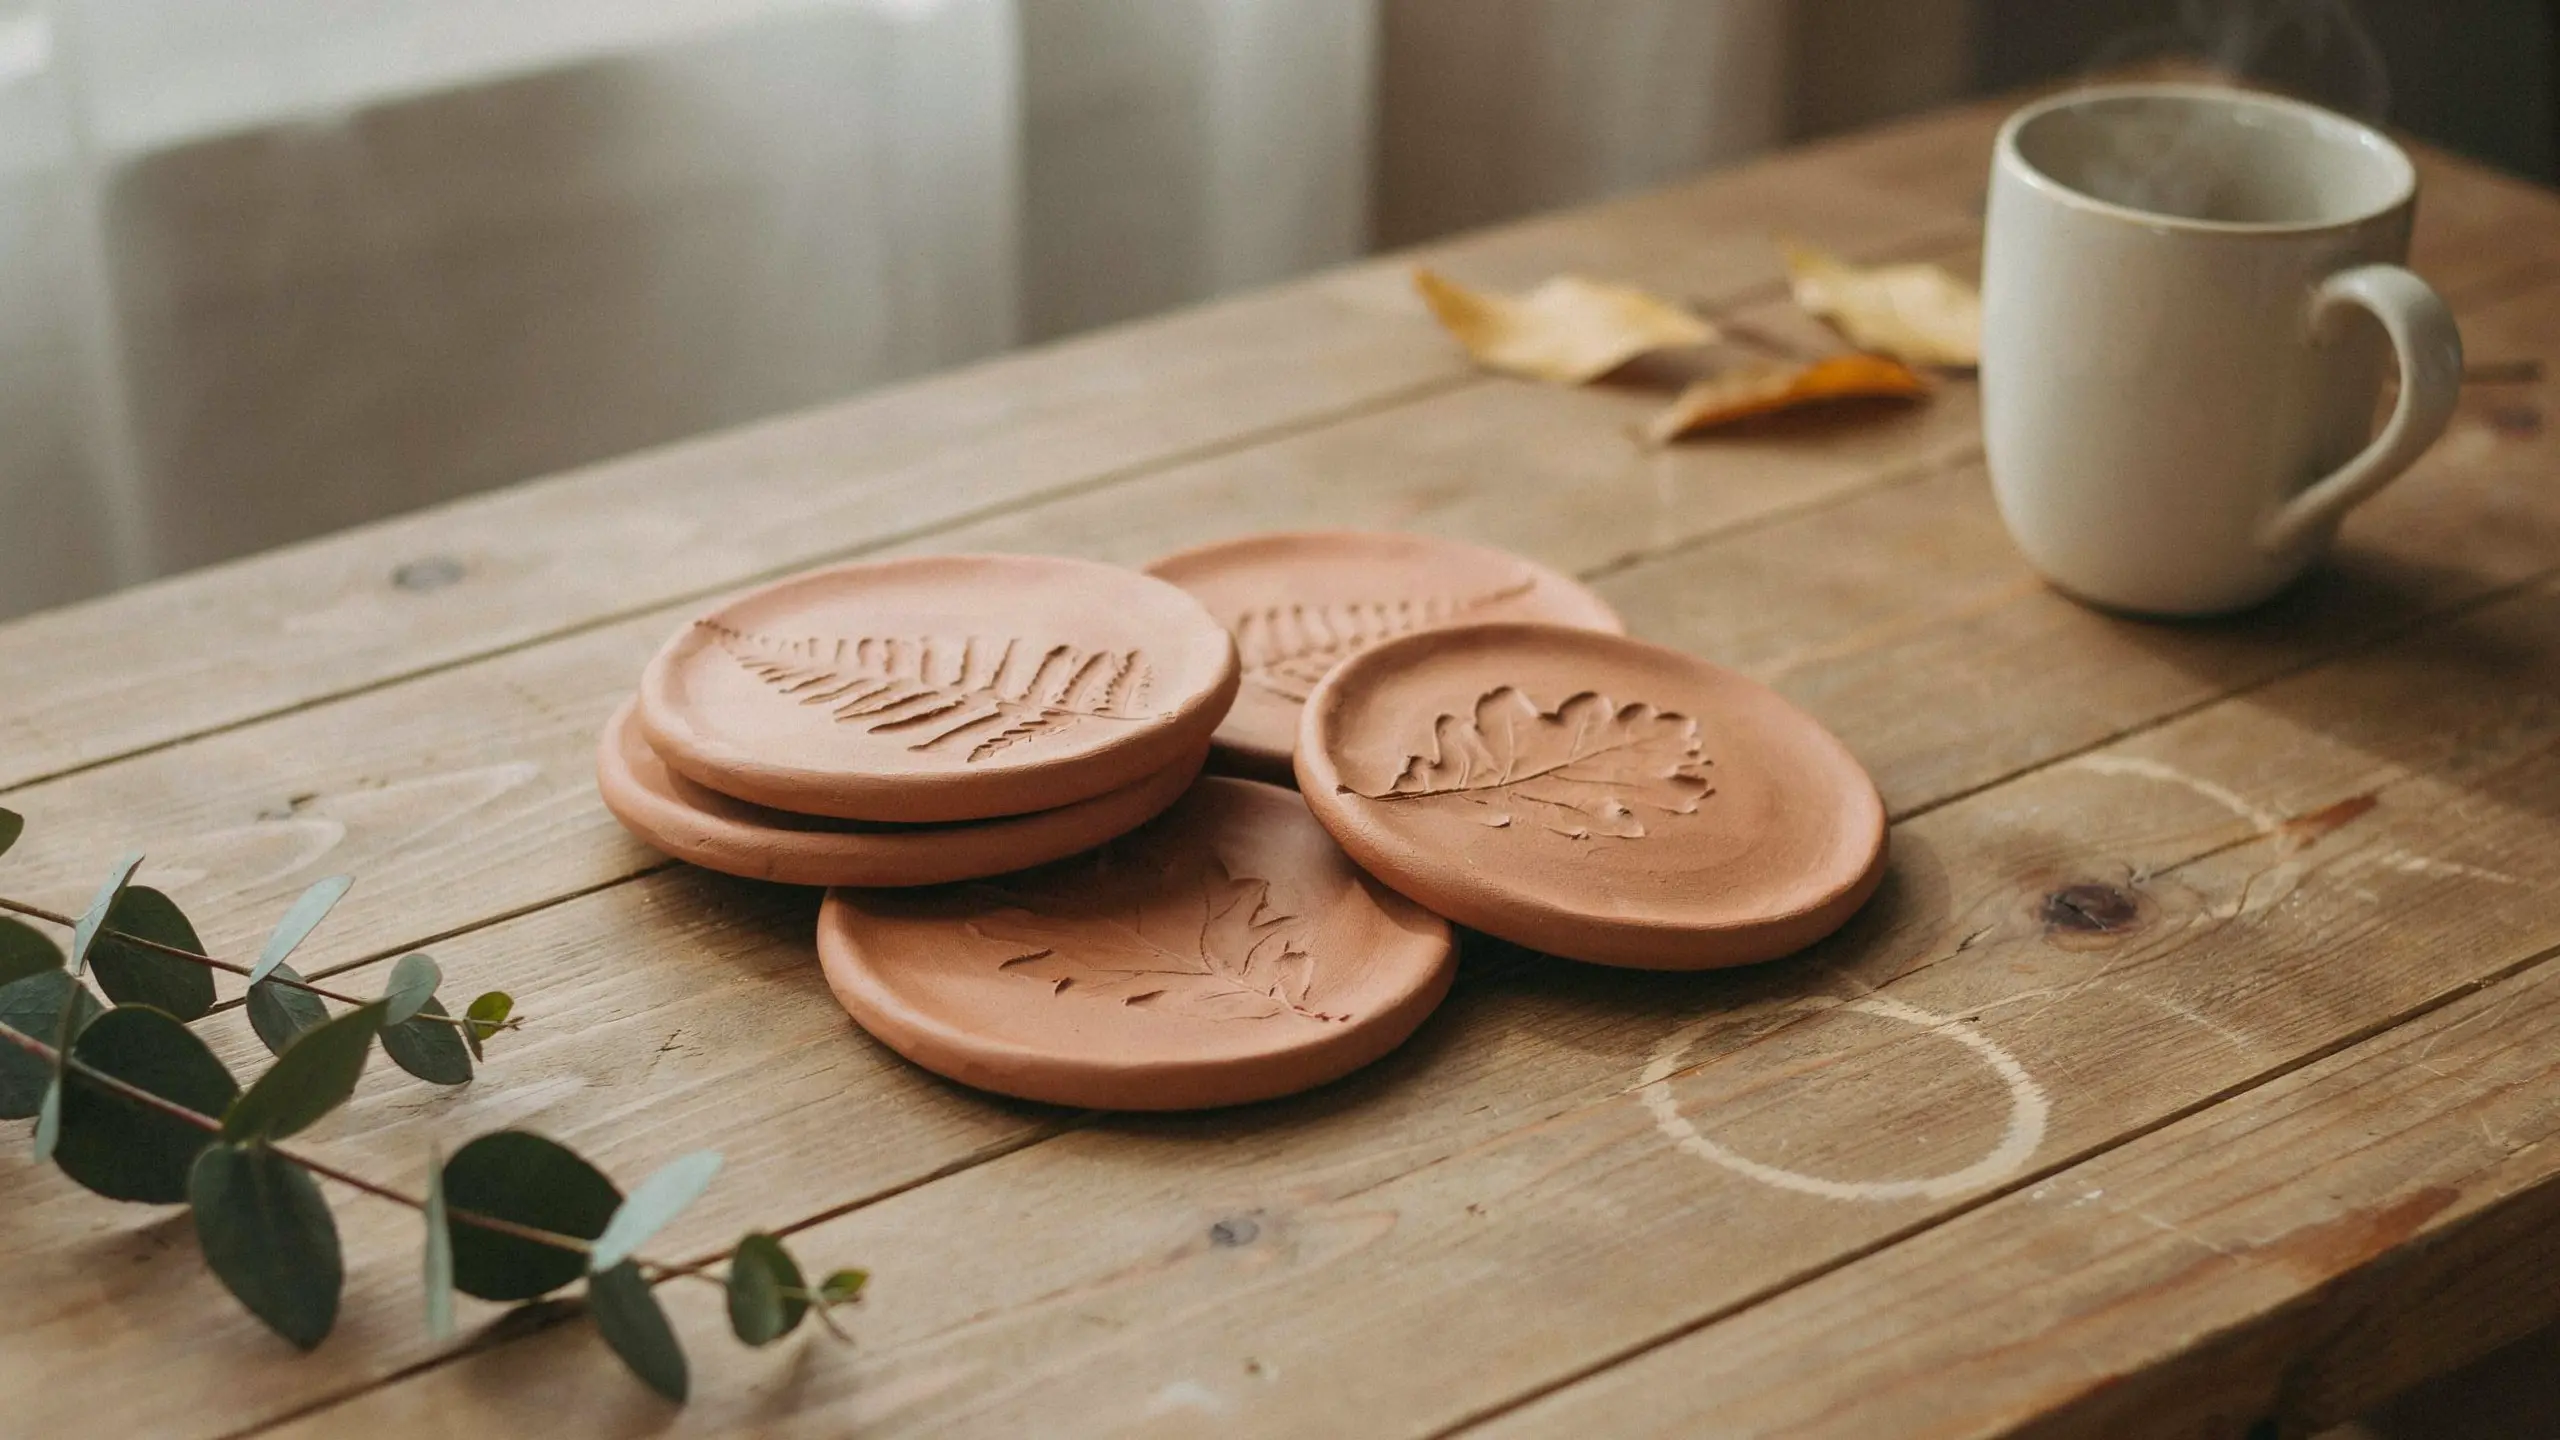
Clay coasters are thicker, sturdier pieces that protect your surfaces while adding a handmade touch to any table.
Roll out a flat slab, cut it into circles or squares, and press textures into the surface using leaves, fabric, or a sculpting tool.
Seal them well once dry so they hold up to daily use. These also make great gifts because they look far more expensive than they are to make.
| Clay Type | Skill Level | Drying Time | Tools Needed |
|---|---|---|---|
| Air-dry or earthen clay | Beginner | 48 to 72 hours | Rolling pin, cutter, texture tool, sealant |
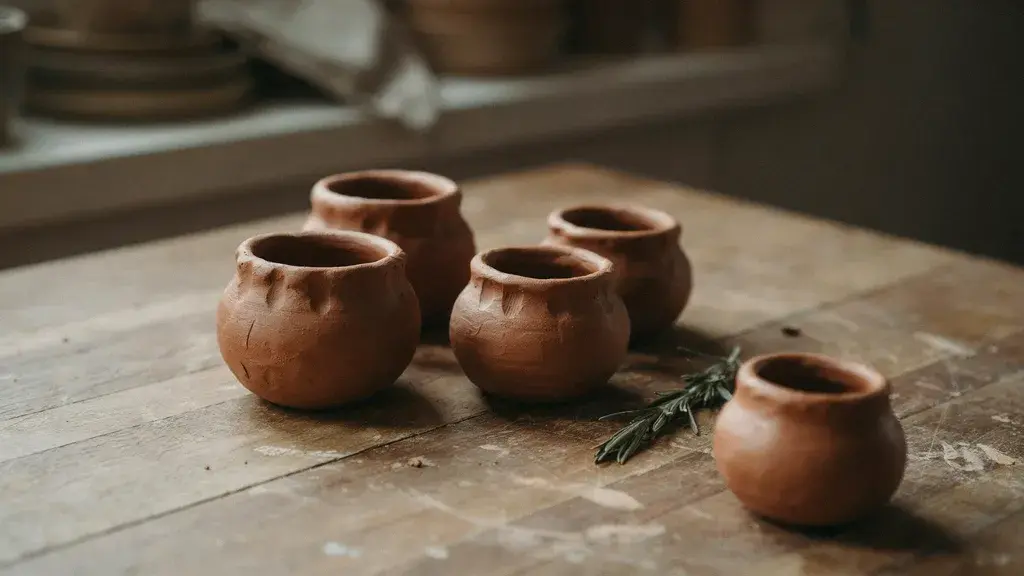
12. Mini Planters for Succulents
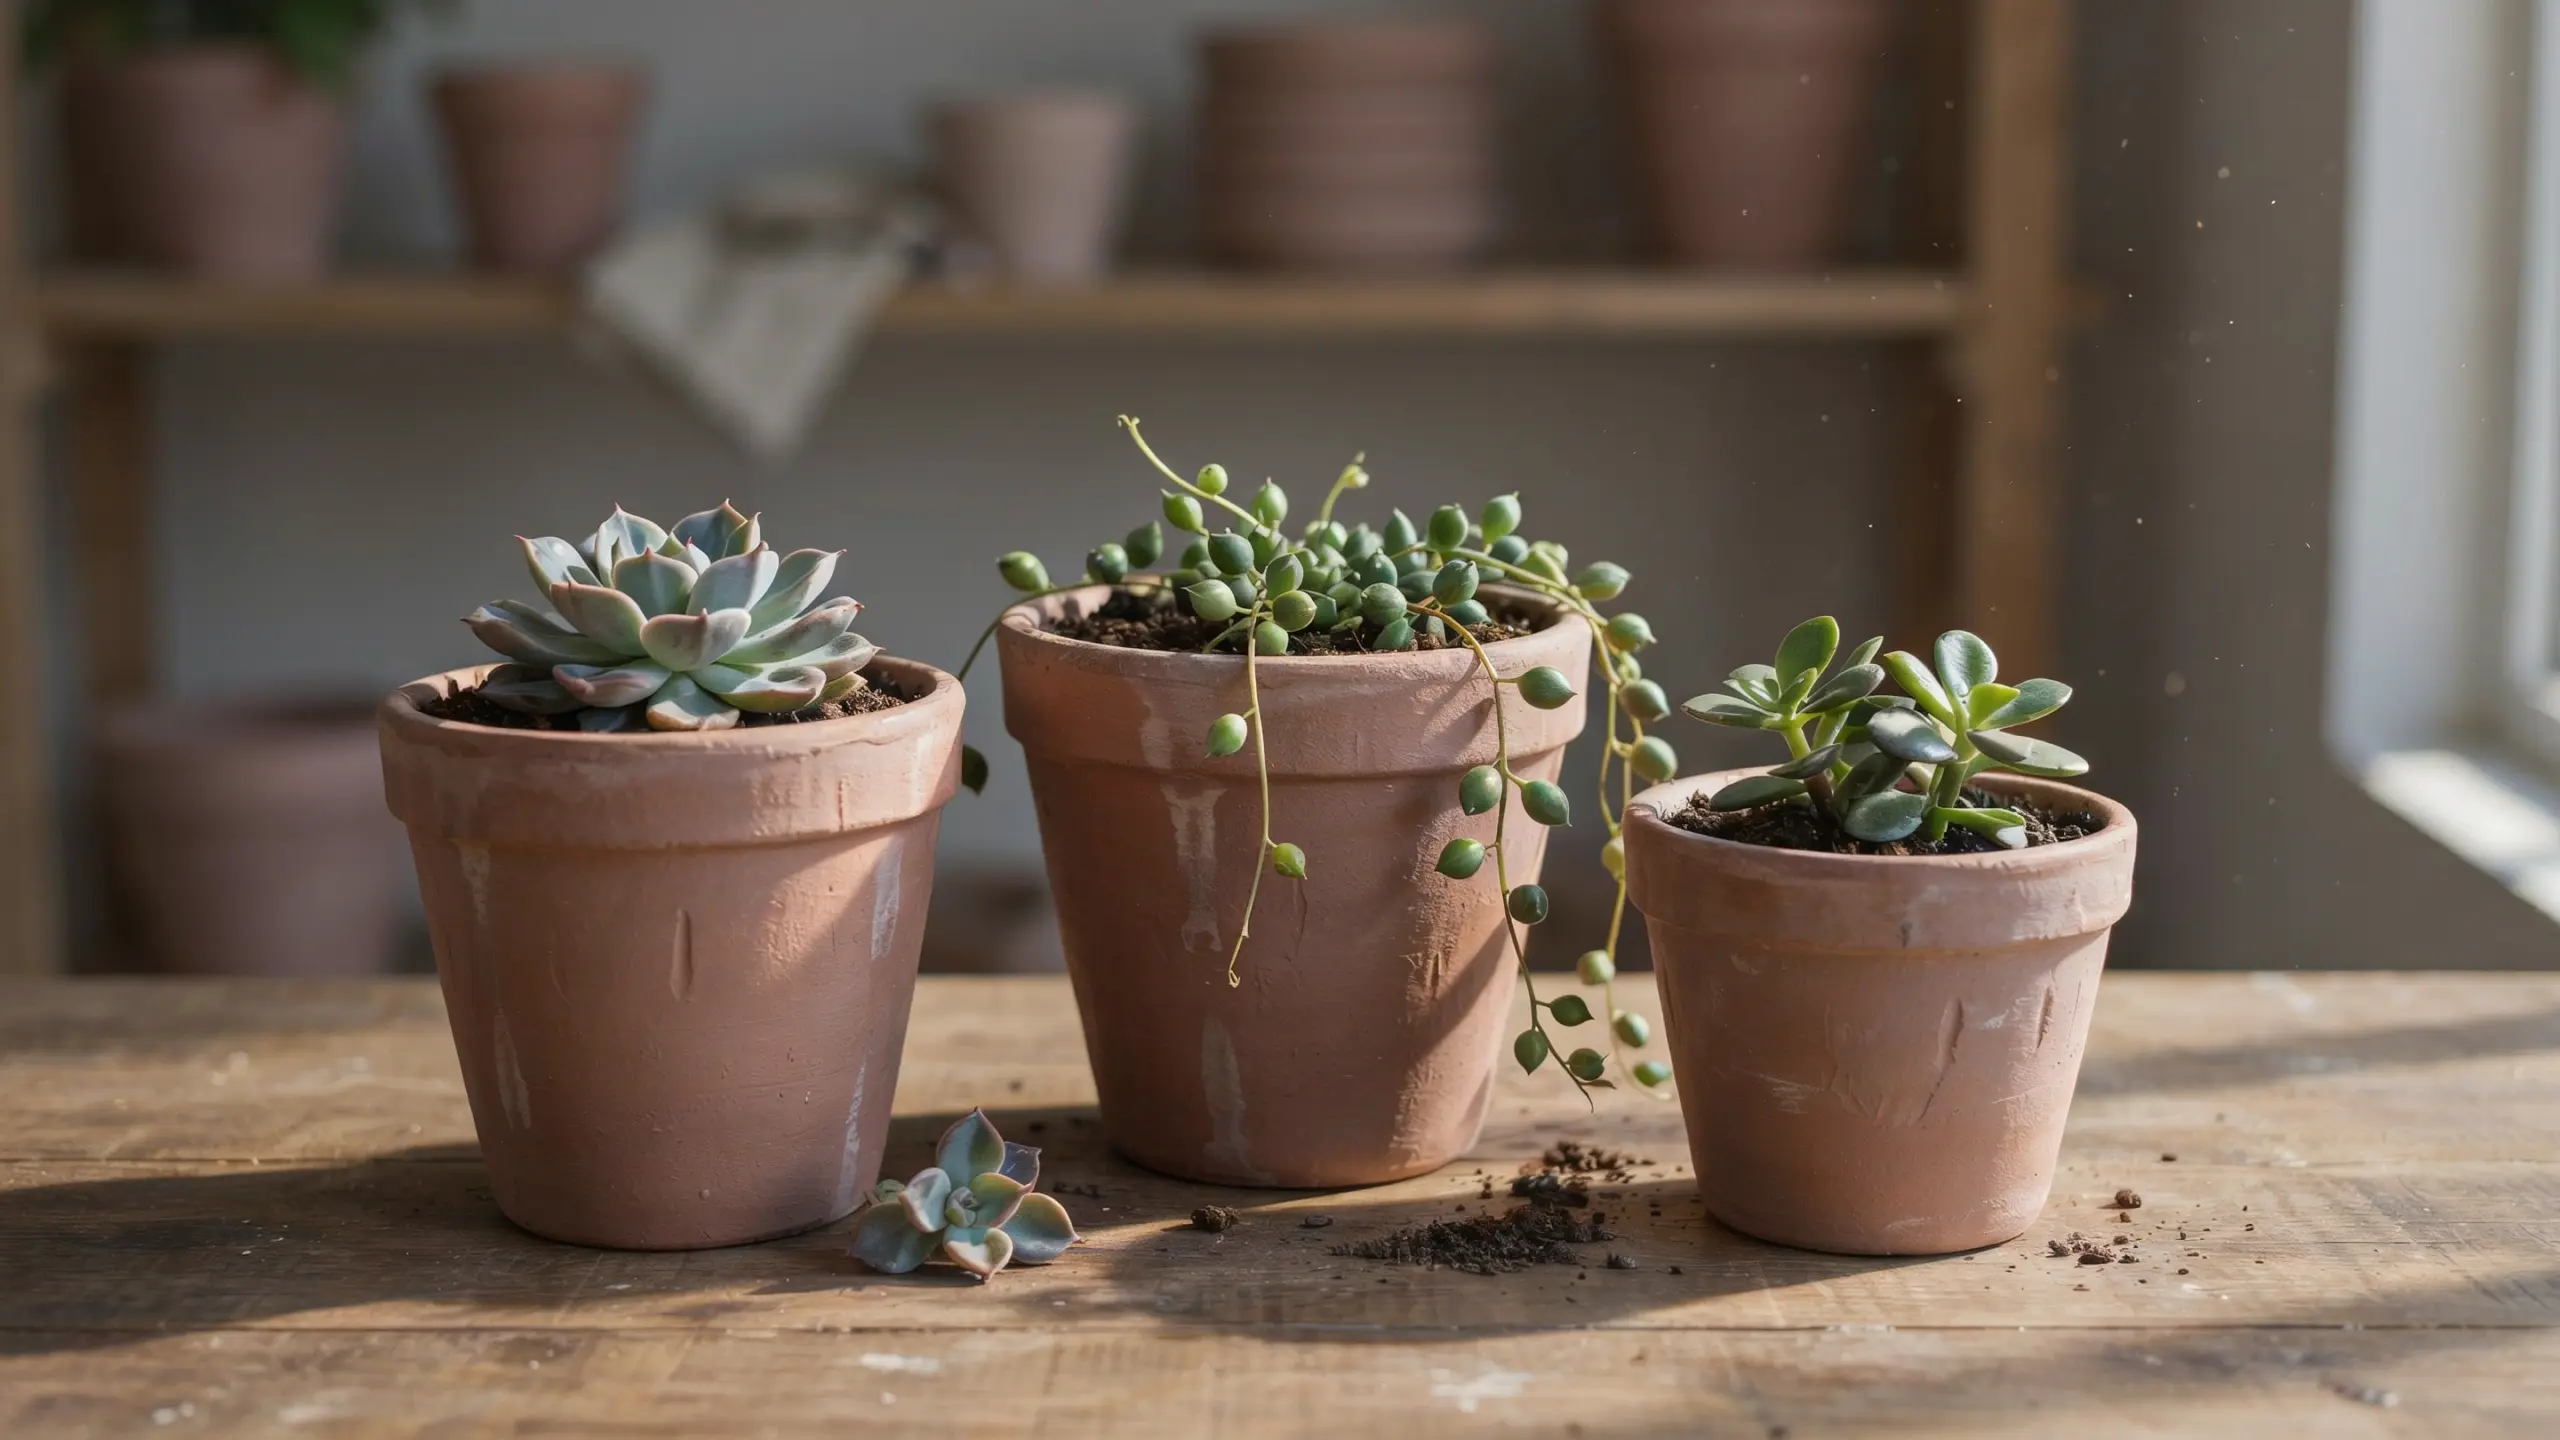
A mini clay planter is one of the most satisfying functional projects you can make. Build up the walls using the coil method, smooth the inside and outside, and poke a small drainage hole in the base before it dries.
These are perfectly sized for succulents, air plants, or small cacti. Paint them in terracotta tones or soft pastels to match your space.
| Clay Type | Skill Level | Drying Time | Tools Needed |
|---|---|---|---|
| Air-dry or earthen clay | Intermediate | 48 to 72 hours | Coiling tools, toothpick, paint, sealant |
Functional clay pieces are a great way to keep creating without running out of places to put things. Everything you make has a purpose.
Miniature Clay Sculpture Ideas for Small Details and Gifts
Miniatures take a steady hand but are highly rewarding clay projects. They also make some of the most thoughtful handmade gifts.
13. Mini Food Sculptures
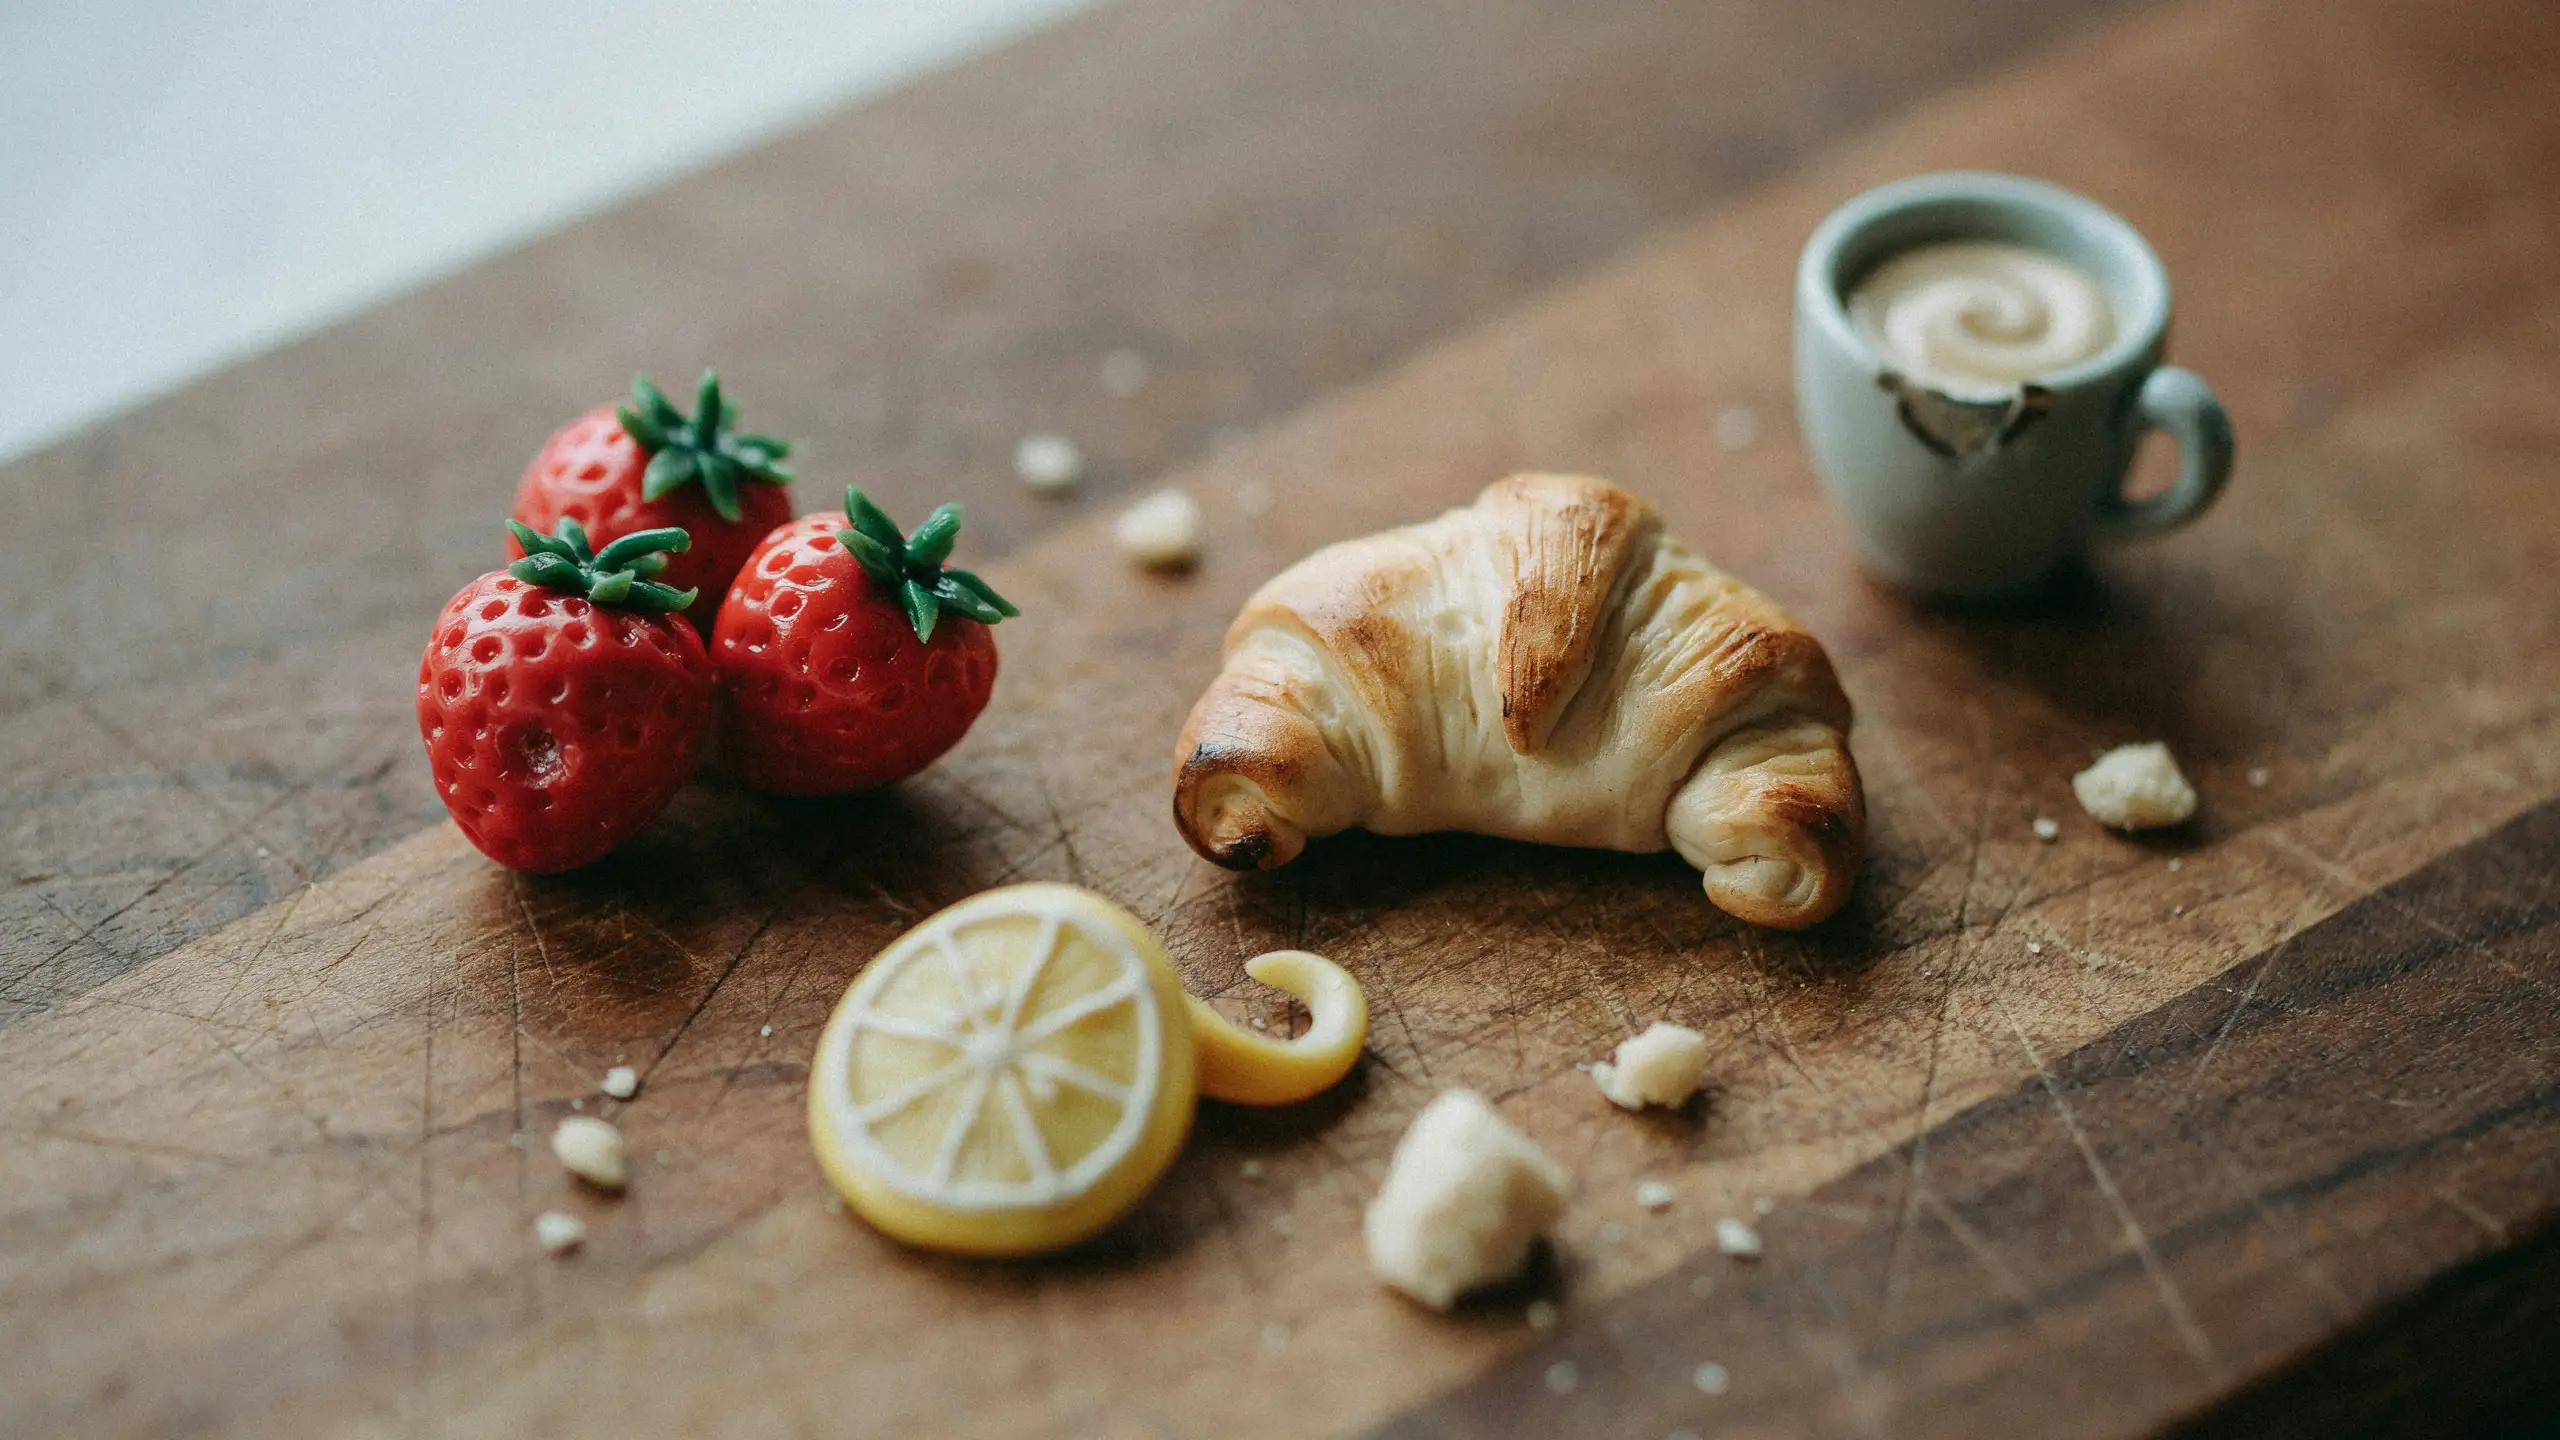
Tiny clay food is one of the most popular categories of miniatures online, from donuts with sprinkles to slices of pizza and little fruit bowls.
Use a toothpick for fine details like seeds, frosting drizzle, or texture lines. These look amazing displayed in a tiny bowl or framed in a shadow box.
| Clay Type | Skill Level | Drying Time | Tools Needed |
|---|---|---|---|
| Polymer clay | Intermediate | Bake for 15 to 30 minutes | Toothpick, sculpting tool, acrylic paint |
14. Tiny Animals
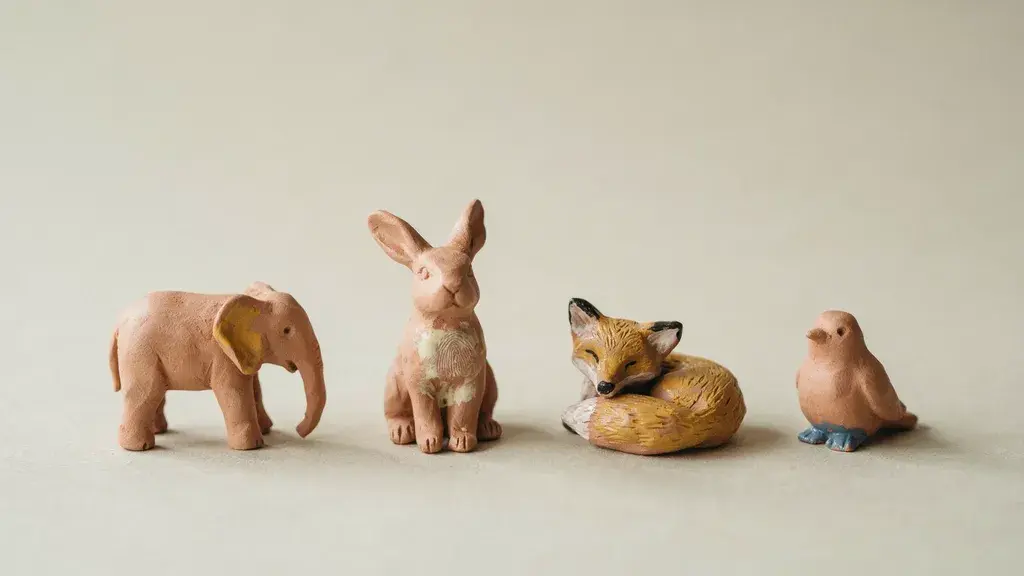
Tiny clay animals follow the same basic shapes as larger figurines, but everything is scaled down to fingertip size. A small ball for the body, tinier balls for the head and limbs, and fine toothpick details for the face.
These are especially popular as keychain charms, gift toppers, or pieces inside a miniature scene. Polymer clay works best here because it holds fine details after baking.
| Clay Type | Skill Level | Drying Time | Tools Needed |
|---|---|---|---|
| Polymer clay | Intermediate | Bake for 15 to 30 minutes | Toothpick, fine sculpting tool |
15. Fantasy Creatures
Dragons, unicorns, and other fantasy creatures are among the most-searched miniature clay ideas online. They take more time, but the process is genuinely fun. Build the body first, then add wings, horns, tails, and scales one section at a time.
Use a toothpick or needle tool to add scale texture and fine detail. Paint with metallic or iridescent acrylics for a finish that makes them look almost magical.
| Clay Type | Skill Level | Drying Time | Tools Needed |
|---|---|---|---|
| Polymer clay | Intermediate to advanced | Bake for 20 to 30 minutes | Needle tool, sculpting set, metallic paint |
16. Mini Scene Dioramas
A mini diorama is a small sculpted scene built inside a shallow box or on a flat base. Think a tiny forest floor, a miniature kitchen shelf, or a little reading nook with clay books and a lamp.
Plan the layout before you start sculpting so all the pieces fit together. These take the most time of any project here, but they are also the most impressive when finished.
| Clay Type | Skill Level | Drying Time | Tools Needed |
|---|---|---|---|
| Polymer and air-dry clay | Advanced | Varies per piece | Full sculpting set, paint, base, or box |
Miniatures are where clay sculpting feels more like an art than a hobby. Once you start, it’s hard to go back to full-size pieces.
Animal Clay Sculpture Ideas for Beginners
Animal sculptures are where most people find their style. These three are the most beginner-friendly and consistently satisfying to make.
17. Textured Stone Animal Sculptures
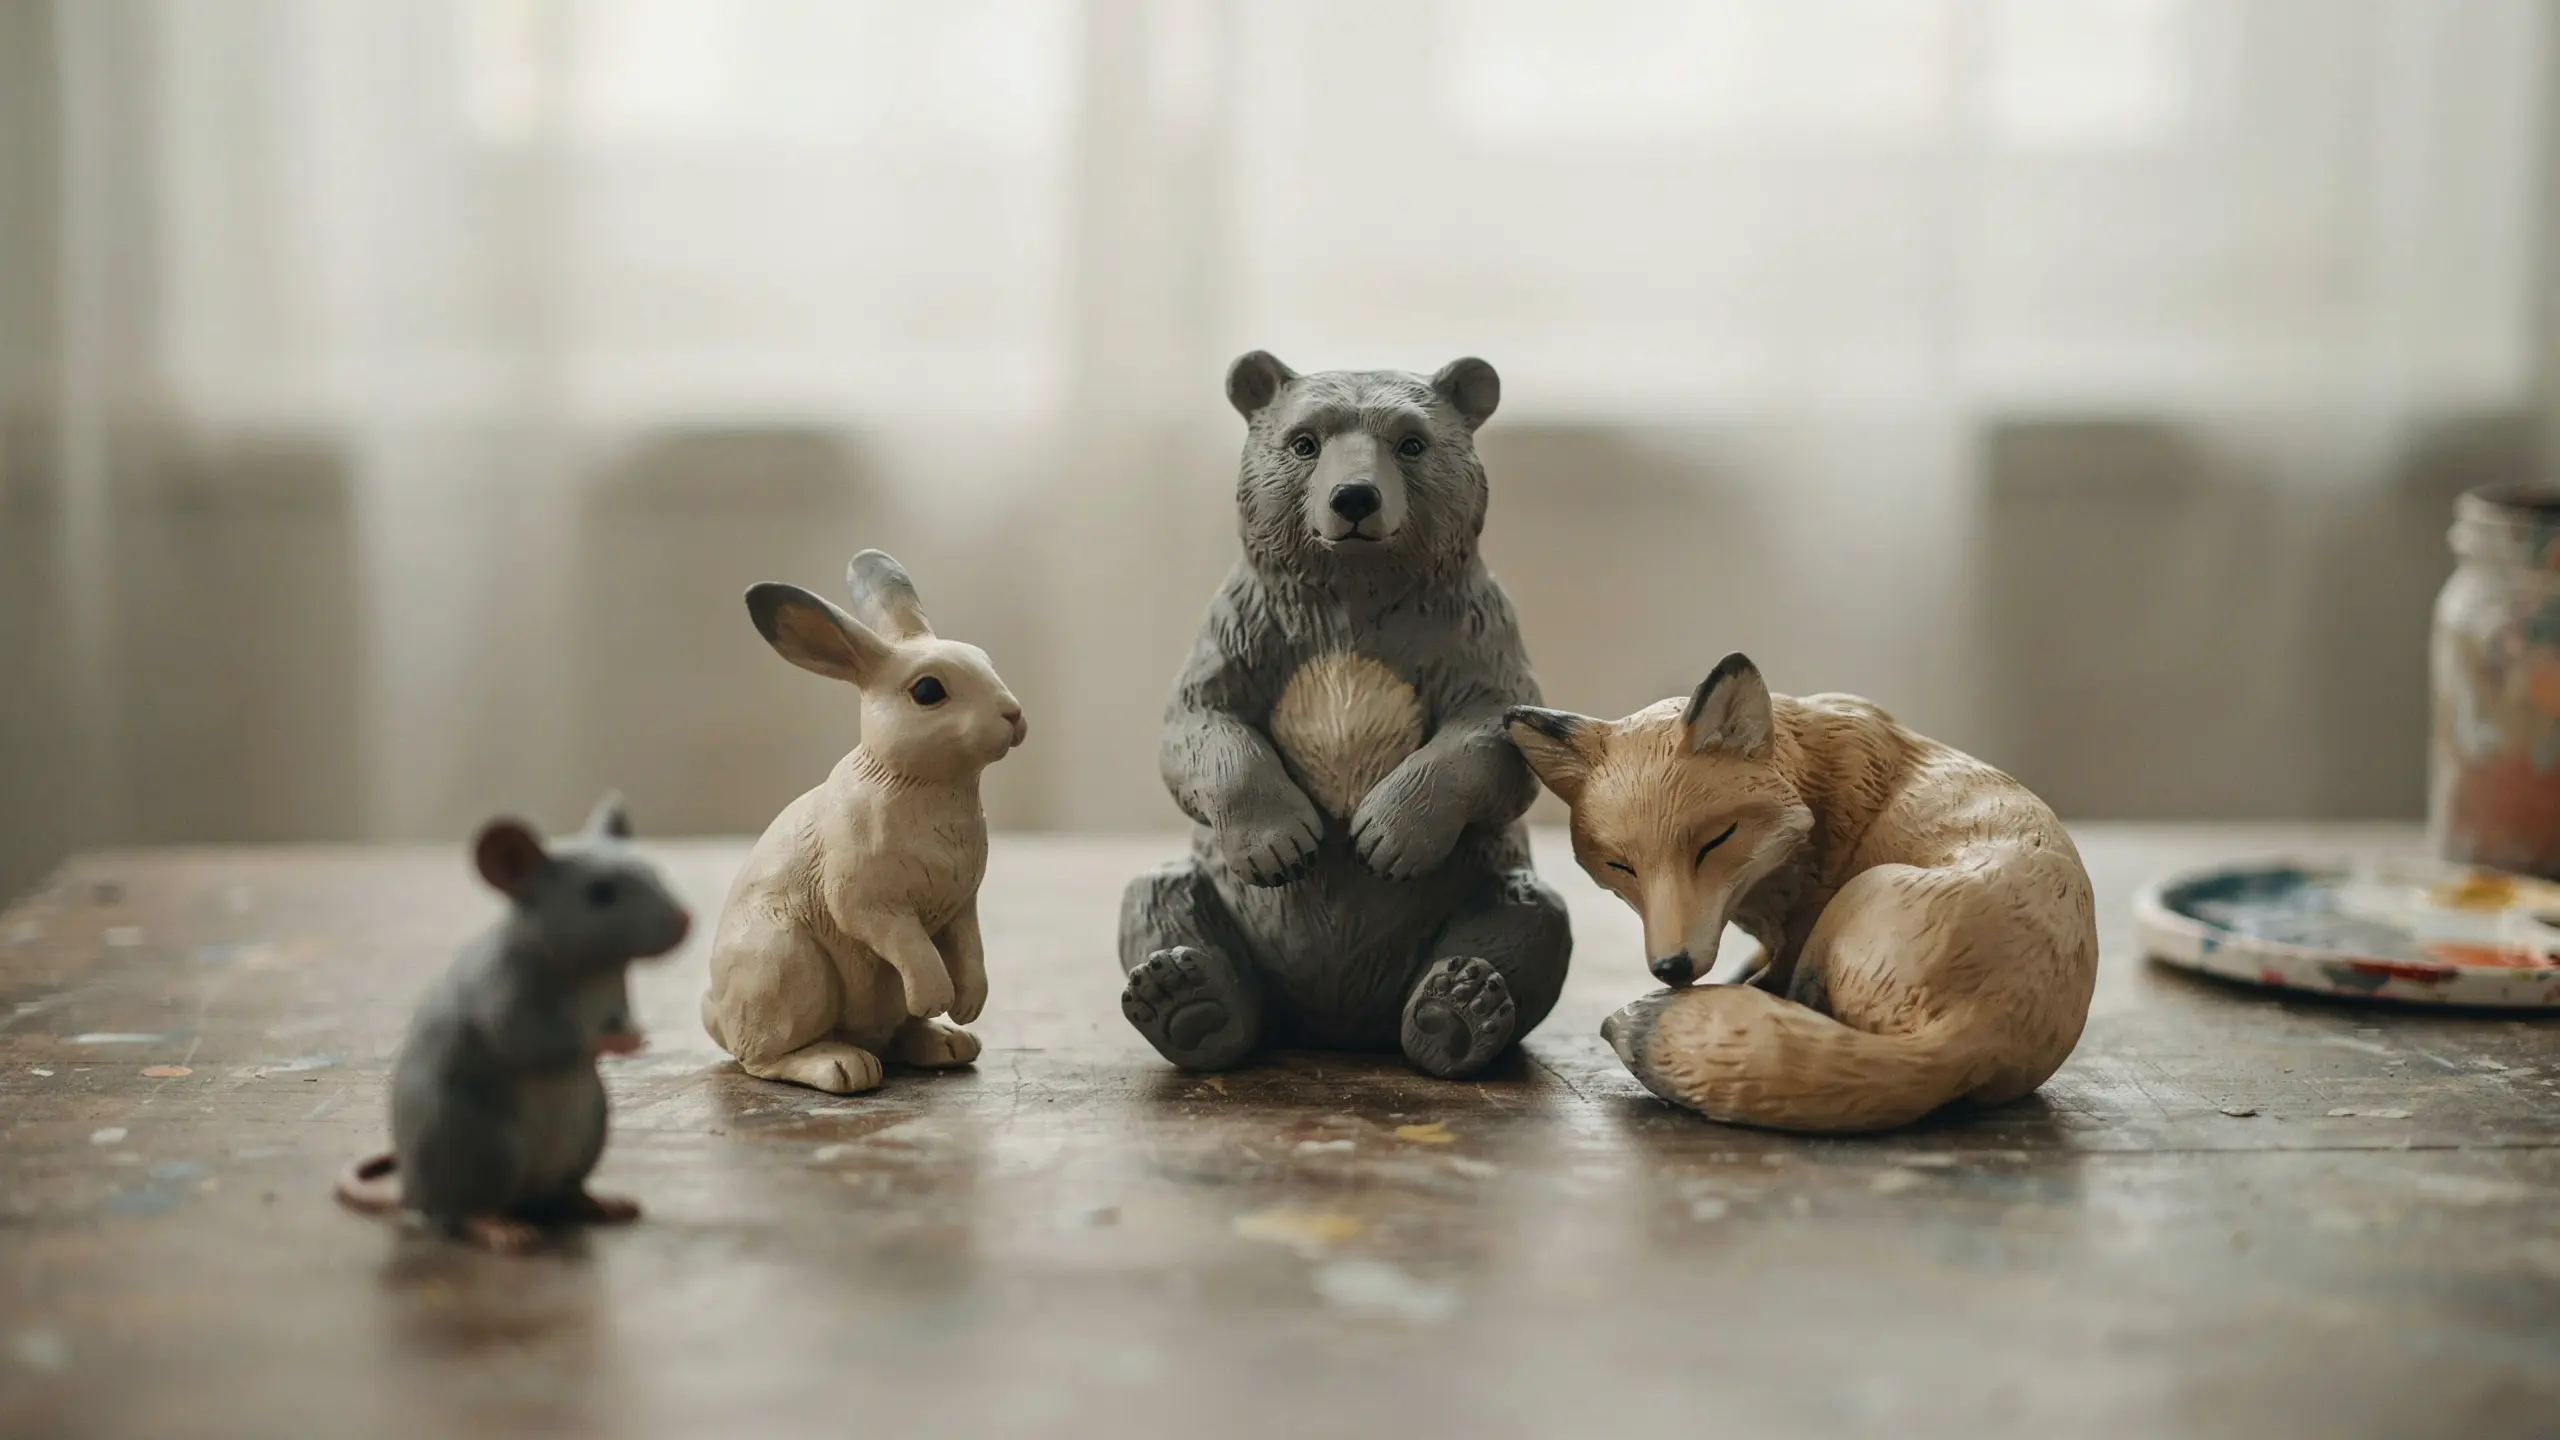
These are animal figures made to look as if they’re carved from stone, and the effect is easier to achieve than it sounds.
Shape a basic animal form, then use a toothpick or old toothbrush to press small irregular marks all over the surface before it dries.
The rough texture hides any imperfections in the shape, which makes this one of the most forgiving beginner projects. Paint in grey, beige, or charcoal tones and finish with a matte sealant for a clean stone look.
| Clay Type | Skill Level | Drying Time | Tools Needed |
|---|---|---|---|
| Air-dry clay | Beginner | 24 to 48 hours | Toothpick, toothbrush, matte sealant |
18. Flat Animal Portrait Tiles
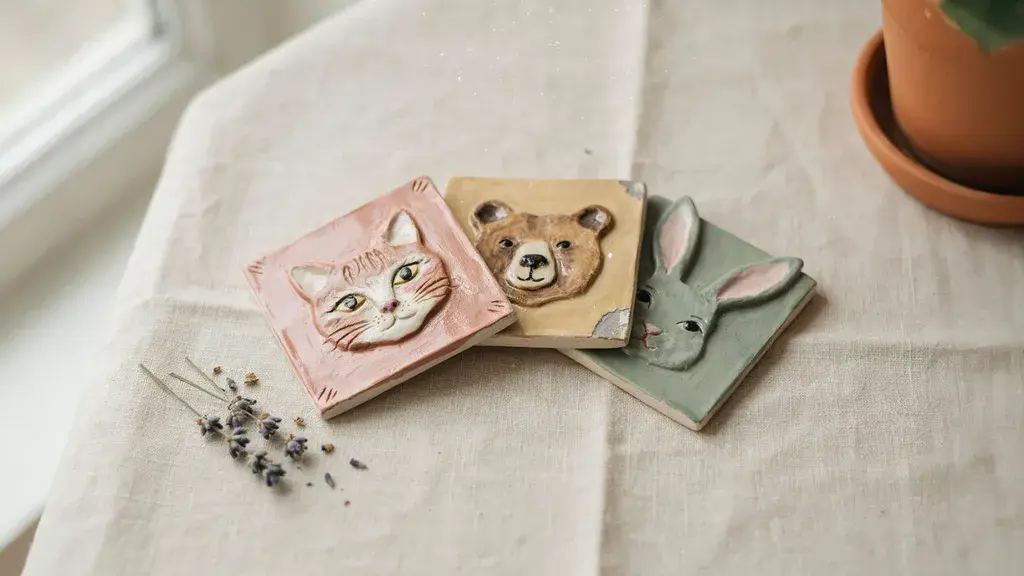
Animal portrait tiles are flat clay pieces with a raised animal face pressed or sculpted onto the surface. Think a simple bear face, a cat profile, or a rabbit head centered on a small square or circular clay slab.
These work beautifully as wall hangings, coasters, or decorative display pieces. Score a small loop into the back before drying if you want to hang them on a wall.
| Clay Type | Skill Level | Drying Time | Tools Needed |
|---|---|---|---|
| Air-dry or polymer clay | Beginner to intermediate | 24 to 48 hours | Rolling pin, sculpting tool, toothpick |
19. Simple Frogs and Turtles
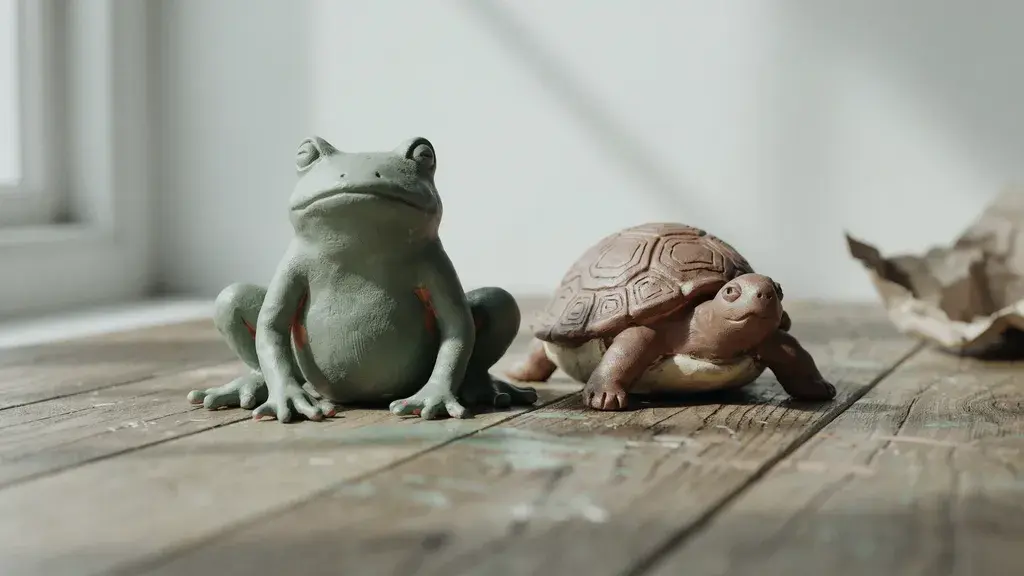
Frogs and turtles are among the simplest shapes in clay sculpting. A frog has a flattened oval body with four small legs pressed on, and a turtle has a dome shell with a head and four stubby legs.
Press simple patterns into the surface before drying for a more realistic finish. Both look great painted in greens and earthy tones.
| Clay Type | Skill Level | Drying Time | Tools Needed |
|---|---|---|---|
| Air-dry clay | Beginner | 24 to 48 hours | Hands, toothpick, texture tool, paint |
Animal sculptures are a great way to build confidence with clay. Each one helps you practice shaping, joining, and adding detail.
Fantasy and Whimsical Clay Sculpture Ideas
These projects take more time, but they also give you the most creative freedom. This is where clay sculpting gets really fun.
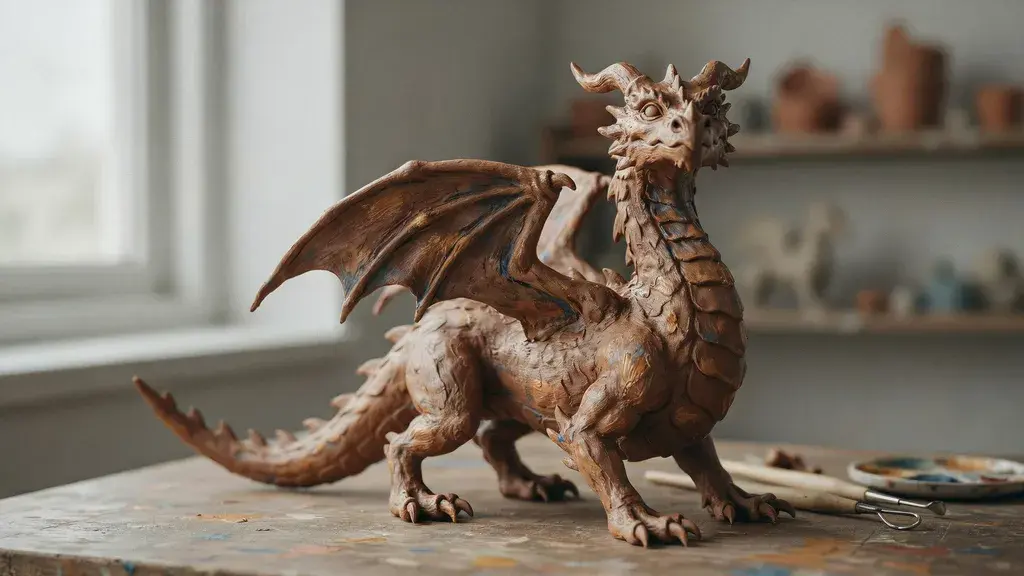
20. Dragons and Mythical Creatures

A clay dragon is one of the most rewarding sculpture projects you can take on. Start with a solid body, then build out the neck, head, wings, and tail separately before attaching everything together.
Score and slip each join point so the pieces bond properly. Add scale texture with a toothpick or needle tool, then paint with deep jewel tones or shimmery metallics for a finish that really stands out.
| Clay Type | Skill Level | Drying Time | Tools Needed |
|---|---|---|---|
| Polymer or air-dry clay | Intermediate to advanced | 48 to 72 hours or bake 30 minutes | Needle tool, sculpting set, metallic paint |
21. Enchanted Forest Mushroom Villages
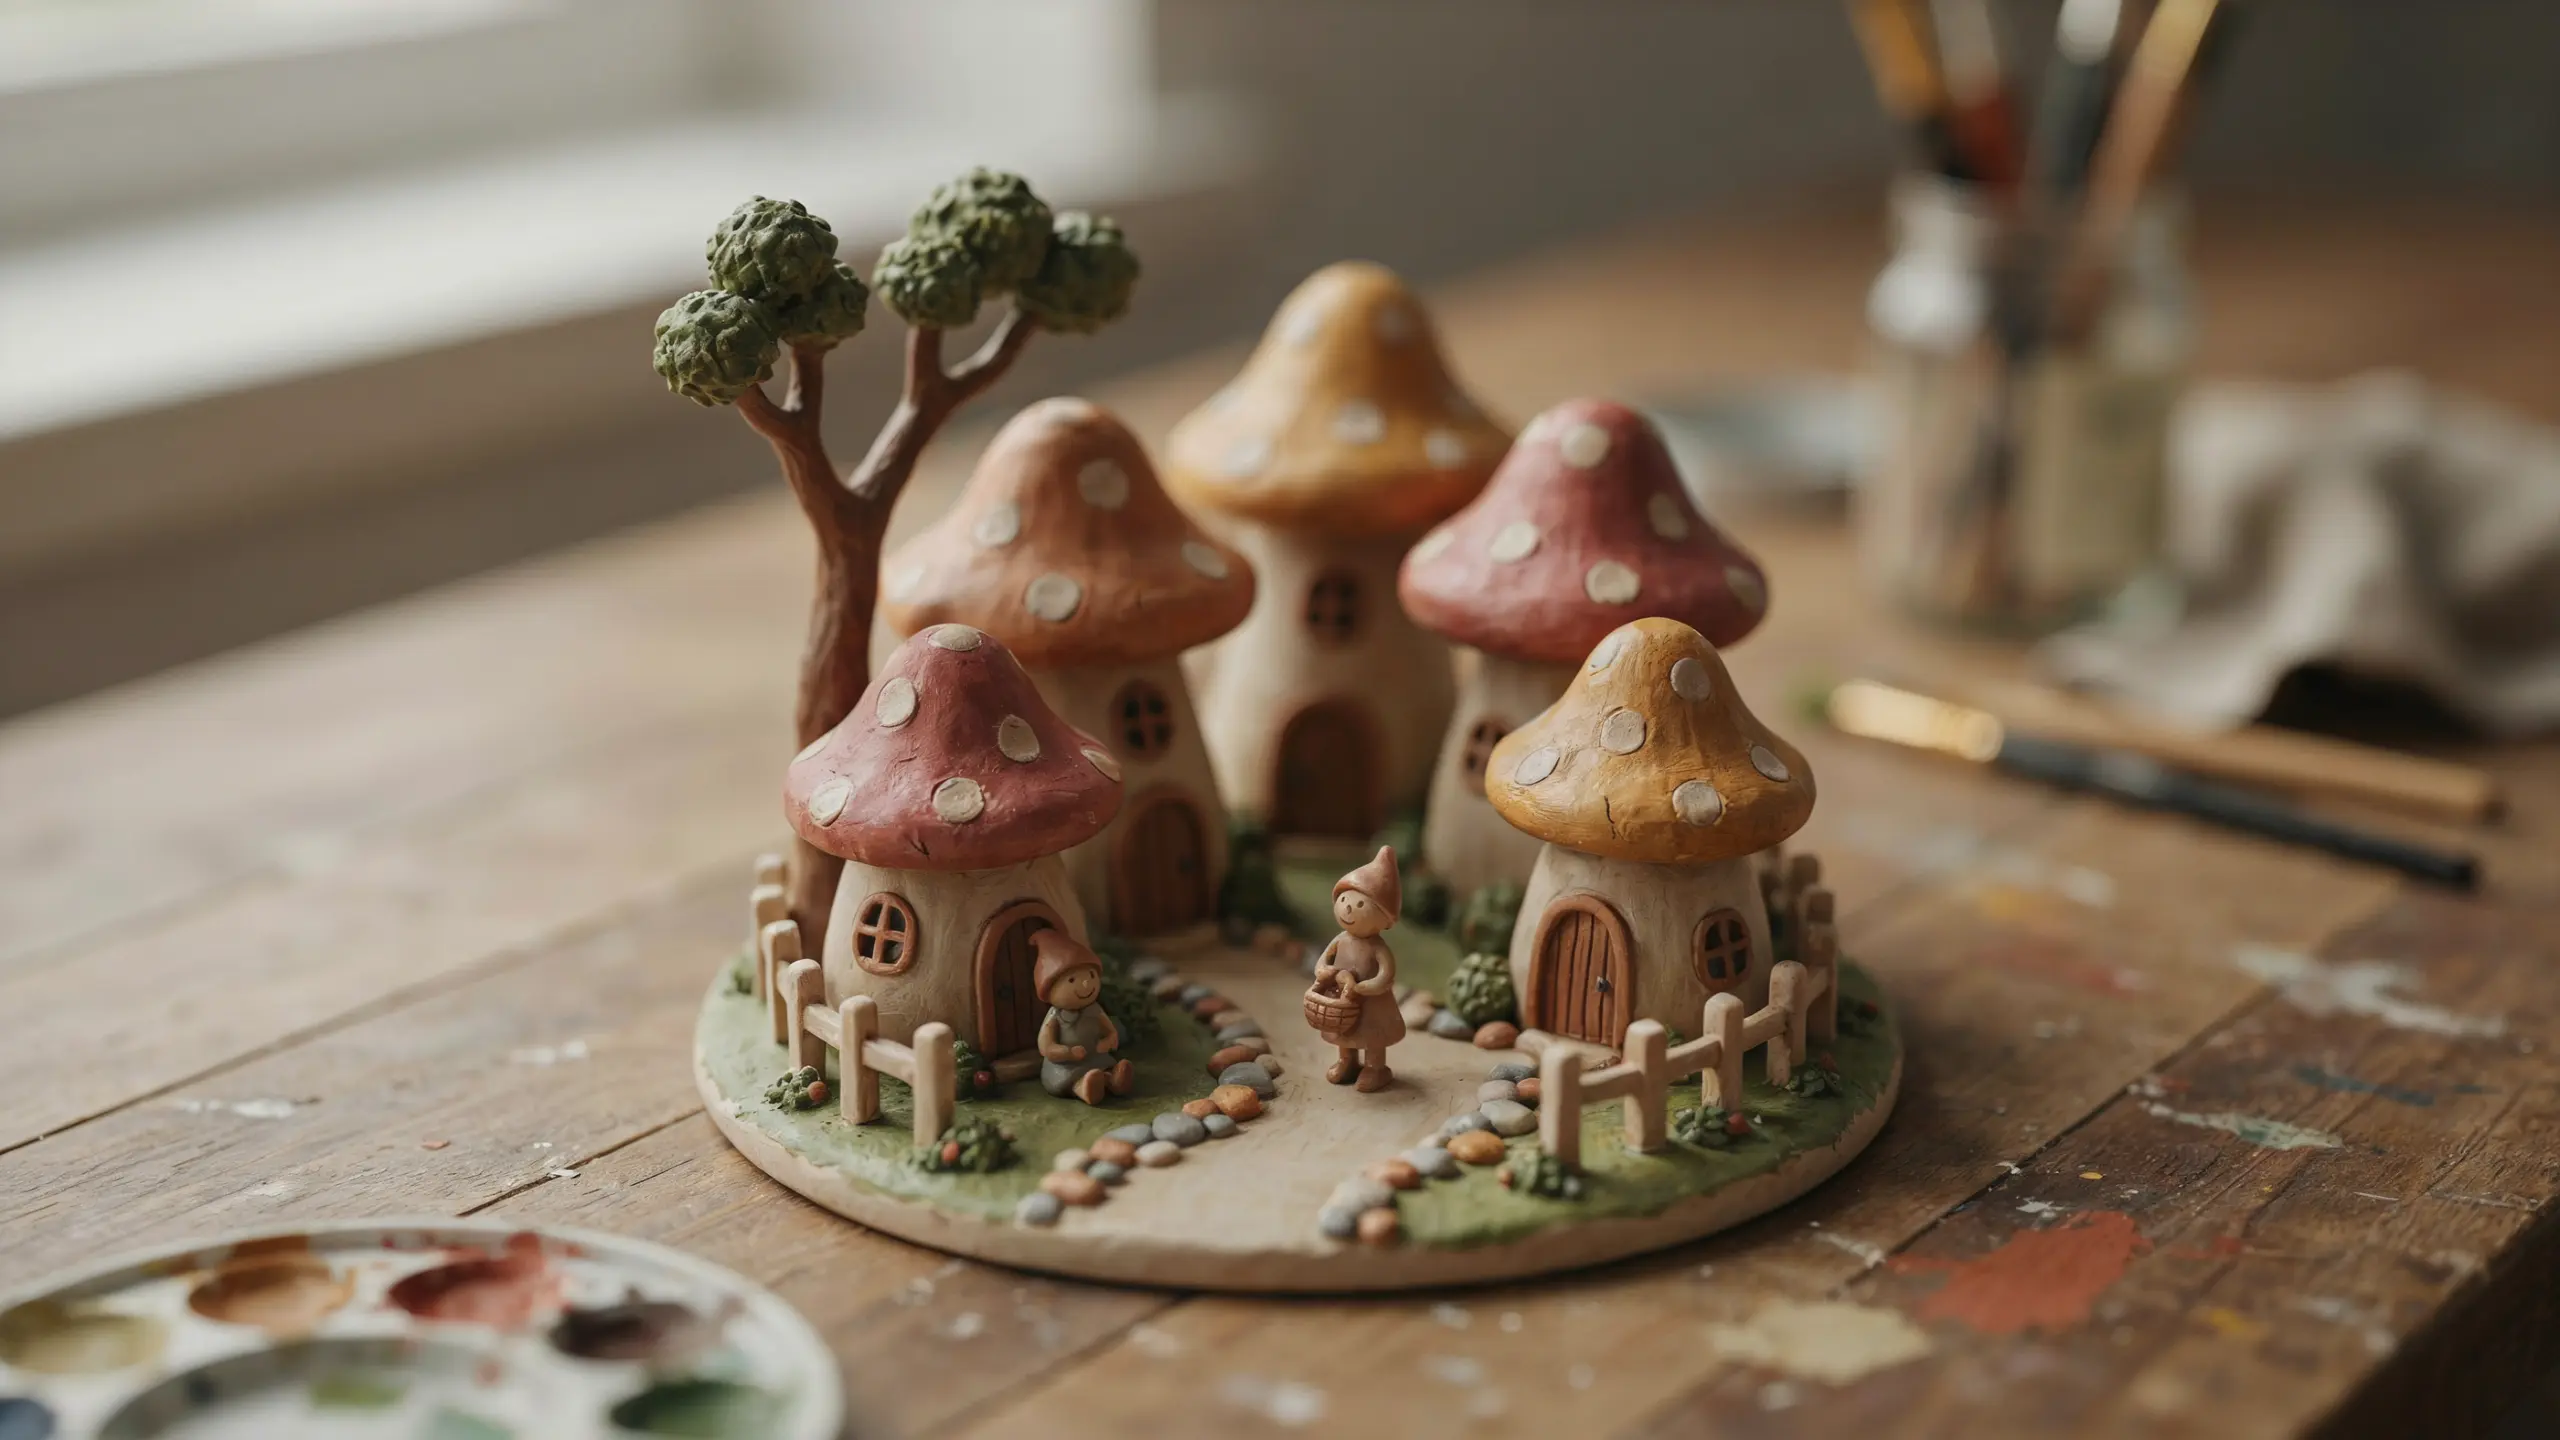
An enchanted forest mushroom village is a small scene built from multiple mushroom houses, tiny pathways, and miniature details like doors and windows pressed into each cap.
Build each piece separately, let them dry, then arrange and glue everything onto a flat clay base. Warm, earthy tones with pops of color on the caps pull the whole scene together.
| Clay Type | Skill Level | Drying Time | Tools Needed |
|---|---|---|---|
| Air-dry clay | Intermediate | 48 to 72 hours | Sculpting tools, toothpick, acrylic paint, and strong craft glue |
Fantasy clay projects are proof that the only real limit is how much time you’re willing to put in. The more detail you add, the better they get.
Clay Sculpture Techniques You Should Know
Before you start building your clay pieces, it helps to understand a few basic techniques that form the foundation of most sculptures.
- Pinching and coiling: Simple hand techniques used to shape bowls, figures, and organic forms without tools.
- Slab building basics: Rolling clay into flat sheets to create structured pieces like boxes, tiles, and walls.
- Adding texture and detail: Using tools, stamps, or natural objects to create patterns and surface interest.
- Joining pieces securely (score and slip): Scratching and moistening surfaces before attaching to ensure strong, lasting bonds.
- Smoothing and refining surfaces: Blending edges and fixing imperfections while the clay is still soft for a cleaner finish.
These core techniques make it easier to move from simple shapes to more detailed and stable clay sculptures.
Common Clay Sculpture Mistakes to Avoid
Small mistakes in clay work can affect the strength, shape, and finish of your sculpture, so it’s important to avoid them early.
- Uneven thickness in different parts of the sculpture, which leads to weak areas and cracks during drying.
- Poorly attached joints without proper scoring, causing pieces like arms, ears, or extensions to fall off.
- Using too much water while shaping weakens the clay and makes fine details harder to maintain.
- Drying the sculpture too quickly or unevenly results in surface cracks and internal stress.
- Overworking the clay after it starts to dry damages the texture and causes rough, fragile surfaces.
- Ignoring early hairline cracks, which expand over time and reduce the durability of the final piece.
These small checks during the process help ensure cleaner, stronger, and longer-lasting clay sculptures.
How to Use and Display Your Clay Sculptures
Clay sculptures can easily become part of your home décor by placing them on shelves, coffee tables, or entryway consoles where their texture and form stand out.
Grouping smaller pieces together creates a curated, gallery-like feel, while a single statement sculpture can act as a focal point in a room.
They also make thoughtful handmade gifts when paired with simple wrapping like kraft paper, fabric, or small boxes, adding a personal touch to any occasion.
For desks and shelves, choose compact designs, such as mini animals or abstract forms, that add character without taking up space.
Seasonal pieces, such as floral, festive, or themed sculptures, can be rotated throughout the year to refresh your décor naturally.
Conclusion
Clay sculpture is one of those creative outlets that gives back more than you put in. With a small investment in materials and a little time, you end up with something handmade that actually means something.
When I started, I just picked the simplest idea on my list and went from there. That’s honestly all it takes. These clay sculpture ideas are a starting point, not a limit.
Pick one that feels manageable, clear a spot on your table, and get your hands dirty. Once you make your first piece, the next one always comes easier.
Frequently Asked Questions
What Clay Is Best for Beginners Trying Sculpture Ideas?
Air-dry clay is best for beginners because it’s easy to shape, requires no baking, and is widely available.
How Do I Stop My Clay Sculpture from Cracking?
Keep thickness even and allow slow, natural drying without exposing the piece to direct heat or airflow.
Can Clay Sculptures Be Made without Any Tools?
Yes, most beginner sculptures can be made using just hands, a toothpick, and a basic cutting tool.
How Do I Make My Clay Sculptures Look More Professional?
Smooth the surface well, refine edges, and finish with acrylic paint and a protective sealant for a clean look.