
Revitalize your dining space with a custom-built farmhouse table – a budget-friendly project that adds character and charm to any home.
If your current dining table feels outdated or doesn’t fit your space properly, building your farmhouse table offers the perfect solution without the hefty price tag of retail options.
Before grabbing your tools, understanding the proper construction techniques is essential for creating a durable, functional table that will withstand years of family gatherings.
I’ll walk you through selecting quality lumber, measuring correctly, and assembling your table like a professional woodworker.
Get ready to beautify your dining area with this practical DIY guide.
Essential Tools Needed for Table Construction
To get started with table construction, it’s important to have the right tools at hand. Below is a list of essential tools you’ll need for the job:
Materials Needed
| Category | Items |
|---|---|
| Lumber |
• Four 2×10×10 Southern yellow pine boards (tabletop) |
| Hardware | • 3/8-inch hanger bolts • Wood glue • Pocket hole screws |
| Finishing Supplies | • Drop cloths • Wood filler • Stain of choice (Minwax Jacobean recommended) • Polyurethane sealer • Paint for the base (optional) • Brushes |
Tools Needed
| Category | Items |
|---|---|
| Required Tools | • Compound miter saw • Drill • Pocket hole jig • Orbital sander with 60-100 grit sandpaper • Tape measure • Speed square |
| Optional Tools | • Circular saw with straight-edge guide (helpful for trimming tabletop edges) |
Step-By-Step Guide for Table Construction
Follow these steps carefully to ensure a successful table construction. Here’s a clear, step-by-step guide to help you through the process:
STEP 1: Plan Your Dimensions & Gather Materials

For a typical dining table, plan for at least 24 inches of width per person. Our example uses a 10-foot by 38-inch table, which comfortably seats 10-12 people.
Sketch your design, noting measurements for the tabletop, apron placement, and leg positioning. Ensure your dining space has at least 36 inches of clearance around all sides of the planned table.
Pro Tips:
- Take your dining room measurements with you when purchasing materials
- Select the straightest boards with minimal knots for easier construction
- Buy approximately 10% extra material to account for potential mistakes
STEP 2: Construct The Apron Frame
Cut your 2×4s to create the apron frame that will support your tabletop. For our 10-foot table, we cut two pieces to 112 inches in length and two to 33 inches in width.
Make 45-degree miter cuts at each end to achieve a professional-looking corner joint. Assemble using wood glue and 3-inch screws, checking corners with a speed square to ensure 90-degree angles.
Next, cut an additional 2×4 piece to create cross supports inside your apron frame. For our table, we cut four 30-inch pieces and spaced them approximately 22.5 inches apart. These supports provide crucial stability to prevent the tabletop from sagging over time.
Pro Tips:
- Using a stop block on your miter saw ensures consistent cut lengths
- Pre-drill holes before adding screws to prevent wood splitting
- If your 2×4s have slight bends, use clamps to straighten them during assembly
STEP 3: Prepare & Attach The Legs

For the table legs, cut four 4×4 posts to 30 inches in length. Ensure all cuts are square and even for proper table balance.
Cut small triangular pieces from 2×4 lumber to create corner gussets that will connect the legs to the apron frame. Attach these gussets to the inside corners of the apron frame using wood screws.
Pre-drill holes through the gussets for hanger bolts that will connect the legs. Position each leg in a corner of the apron frame, aligning with the pre-drilled gusset holes. Insert hanger bolts through the gusset into the legs and tighten securely.
Pro Tips:
- Place screws on the inside of the apron rather than the outside for a cleaner look
- Use two hanger bolts per leg for maximum stability
- Check that all legs are straight and properly aligned before fully tightening
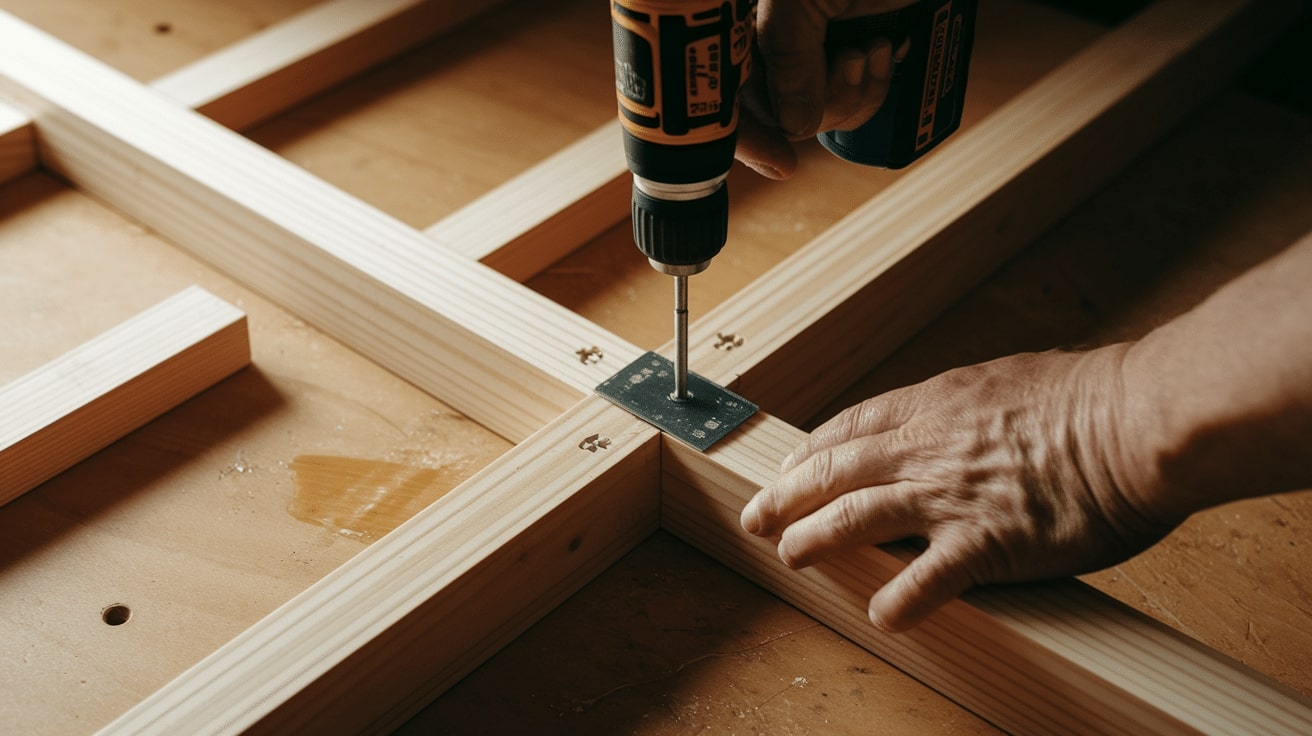
STEP 4: Assemble The Tabletop

Arrange your 2×10 boards side by side to create the tabletop. Use pocket-hole joinery to connect the boards securely.
Pre-drill pocket holes along the edges of each board (except the outer edges of the end boards), apply wood glue to the joining edges and connect using pocket hole screws.
For a 10-foot table, you’ll need approximately 10 pocket holes per board jto oin. This provides excellent strength while keeping the fasteners hidden beneath the table.
Pro Tips:
- Test your pocket hole depth on scrap wood to ensure screws don’t penetrate through the top surface.
- Use clamps, if available, to hold boards tightly together while attaching
- Alternate the direction of your boards (crown up/down) for the flattest possible surface
STEP 5: Connect All Components

Position the apron frame centered on the underside of the tabletop. For our table, we inset the apron 2 inches from the sides and 4.25 inches from the ends.
Mark these positions carefully, then attach the apron to the tabletop using pocket hole screws from underneath. Be sure to use shorter screws than standard pocket hole recommendations to avoid penetrating the top surface.
Once attached, turn the table upright and check for stability. If there’s any wobble, slightly loosen the hanger bolts, adjust the legs, and retighten.
Pro Tips:
- Measure inset distances at multiple points to ensure the apron is perfectly centered.
- Have a helper assist when turning the assembled table upright
- If attaching a large tabletop, work in sections to ensure proper alignment
STEP 6: Sand The Entire Table

Sand the entire table thoroughly, starting with 60-grit sandpaper for rough spots and progressing to 100-grit for a smooth finish.
Pay special attention to the tabletop surface and any areas where different pieces join. Fill any gaps or screw holes with wood filler, then sand again when dry.
Be careful around edges and corners – you want them smooth enough to prevent splinters but not so rounded that they lose the characteristic farmhouse look.
Pro Tips:
- Sand in the direction of the wood grain for the best finish
- Vacuum between grits to remove all dust
- After final sanding, wipe down the table with a slightly damp cloth to reveal any spots that need additional attention.
STEP 7: Finish With Stain & Sealer

Apply your chosen stain according to the manufacturer’s instructions. For our table, we used Minwax Jacobean for a rich, dark finish. Apply using a cloth or brush, working in the direction of the wood grain.
Once the stain has dried completely (typically 24 hours), apply at least three coats of polyurethane sealer for durability, allowing proper drying time between coats. A clear satin finish gives the perfect farmhouse look without being too shiny.
Pro Tips:
- Test your stain on scrap wood from your project to confirm the color
- Apply thin coats of polyurethane rather than one thick coat for better durability
- Allow at least 72 hours of curing time before placing items on your newly finished table
Maintaining Your Handcrafted Table

Proper care of your handcrafted table requires regular dusting with a soft cloth and occasional treatment with wood-specific products to prevent drying and cracking.
You can maintain your furniture’s natural beauty by promptly wiping spills, using coasters for drinks, and applying quality furniture wax every few months to nourish the wood and protect your investment.
Keep these in Mind for Long-Term Care:
- Regular Cleaning: Use a soft cloth with mild soap and water; avoid harsh chemicals that can damage the finish
- Protect From Moisture: Use coasters under drinks and wipe up spills promptly.
- Prevent Scratches: Use placemats or a tablecloth for everyday meals
- Periodic Refreshing: Apply furniture polish or conditioning oil every 3-6 months to maintain the finish
Final Thoughts
After completing several farmhouse table projects, I can confirm that they’re absolutely worth the effort.
Success depends on taking your time with each step—proper planning and allowing adequate drying time between finishing stages make all the difference.
I’ve learned that if your first coat of stain or sealer doesn’t look perfect, that’s completely normal. Multiple thin coats will give you that smooth, professional finish you’re looking for.
Looking to refresh your dining area without spending a fortune? Building your farmhouse table is the smart approach. The Satisfaction you’ll achieve is worthwhile.
Are you ready to create a centerpiece for family gatherings that will last for generations? Let’s build that farmhouse table together!
