
Peeling paint is one of the most common home problems, and it rarely fixes itself.
Whether it shows up on a bathroom ceiling, an exterior wall, or a window frame, it is always a sign that something went wrong beneath the surface.
Over the years, I have seen the same mistakes made repeatedly. People repaint over the problem without fixing the cause, and the peeling comes back within months.
Knowing what type of paint failure you are dealing with, why it happened, and how to repair it the right way makes all the difference.
What is Peeling Paint and Why Does it Happen?
Peeling paint is paint that has lost its grip on the surface beneath it. It lifts, curls, and separates from the wall, ceiling, or trim in strips or sheets.
This happens when the bond between the paint film and the surface breaks down. Moisture is the most common reason, but poor preparation, wrong products, and temperature issues all play a role.
The paint does not fail at the surface; it fails at the bond line. Paint sticks through mechanical and chemical bonds, and when those bonds break, peeling follows.
The main reasons it fails include moisture seeping through from behind, surface contamination such as grease or dust, skipped priming or sanding steps, incompatible paint products, and poor temperature or humidity conditions during application.
Sources consistently identify moisture, poor surface preparation, and adhesion failure as the leading causes of paint failure.
Types of Paint Failure and What Each One Looks Like
Each paint failure looks and behaves differently. Knowing which one you have helps you choose the right fix before you start scraping, sanding, or repainting.
Use the examples below to compare what you see on your walls, ceiling, trim, or exterior surfaces.
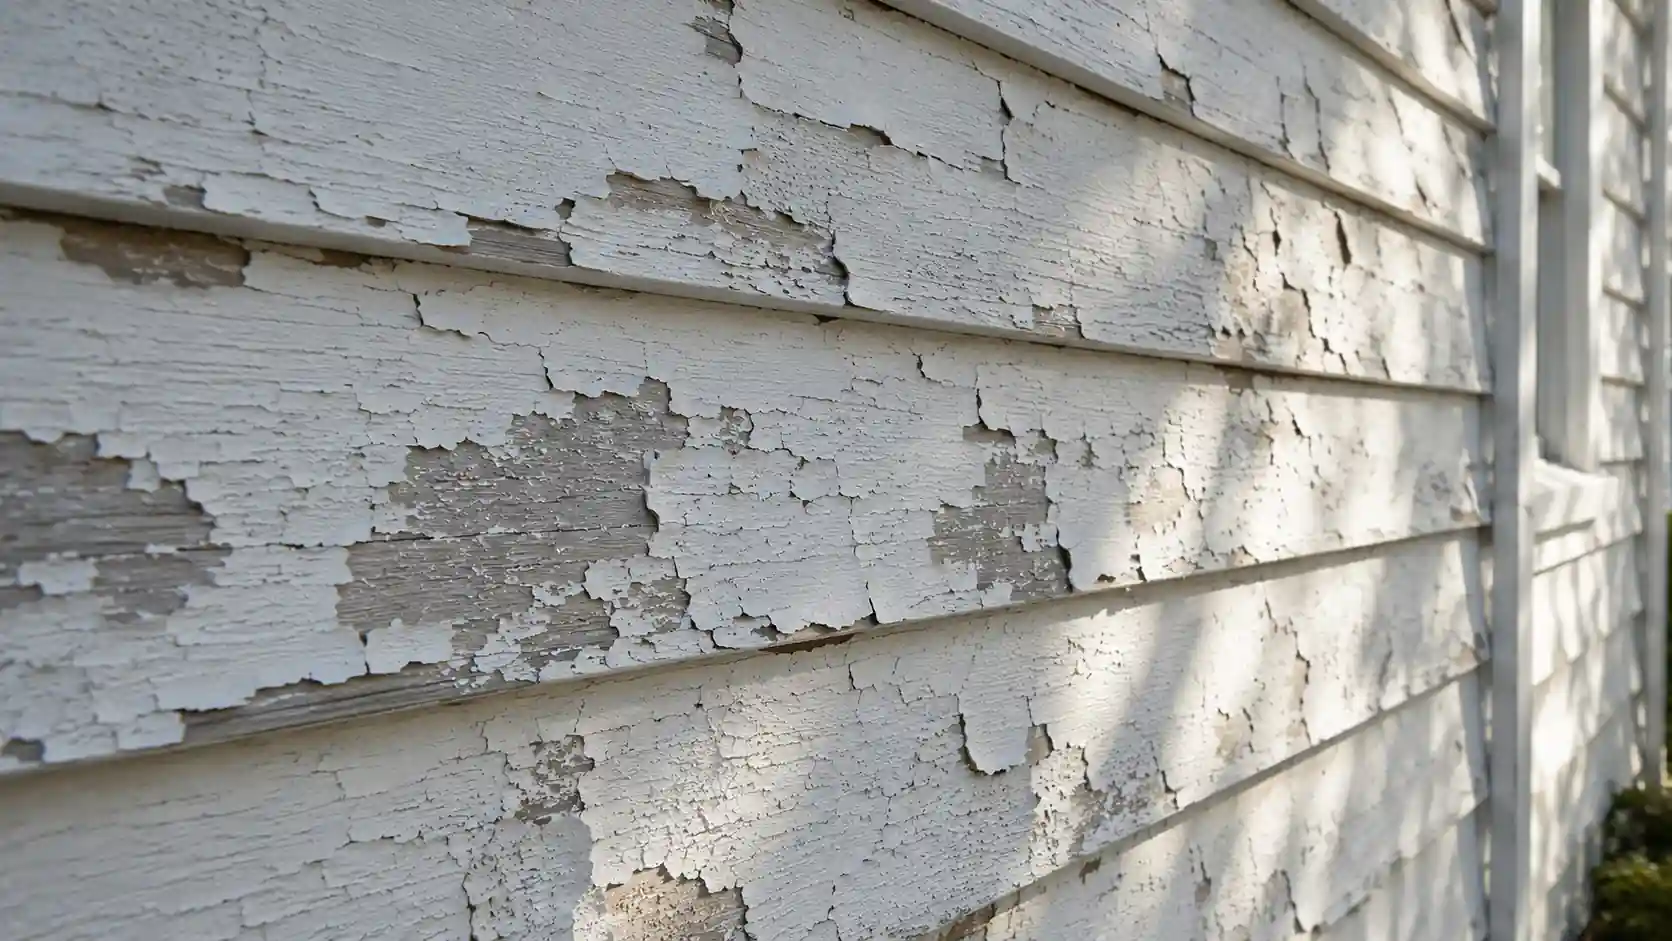
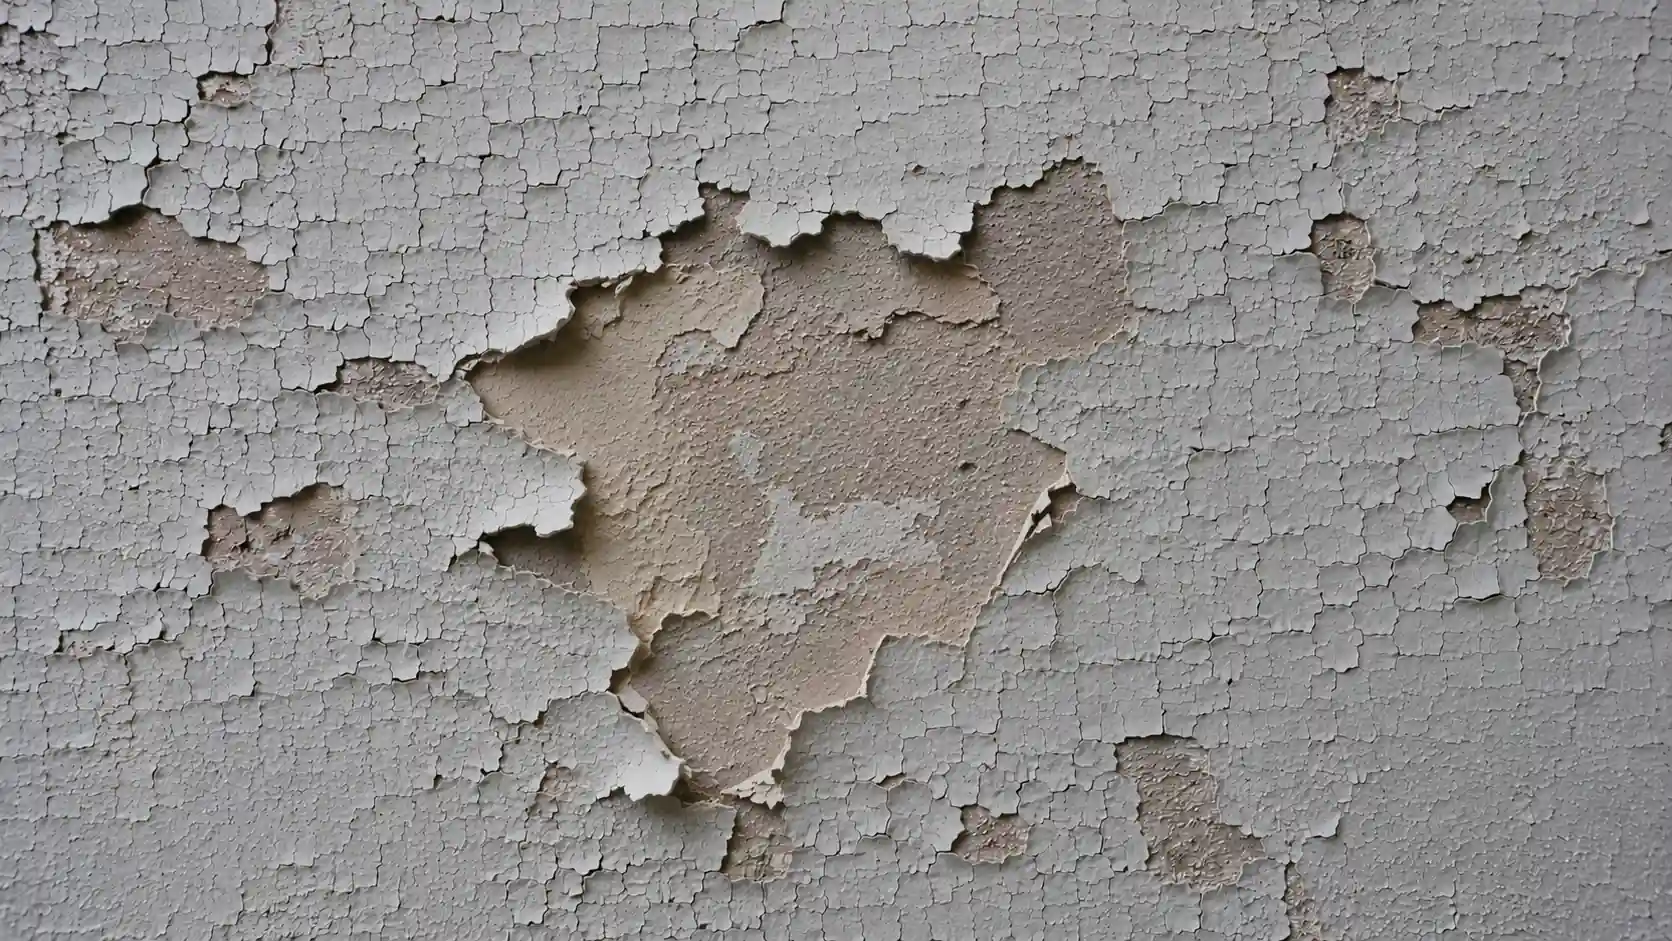
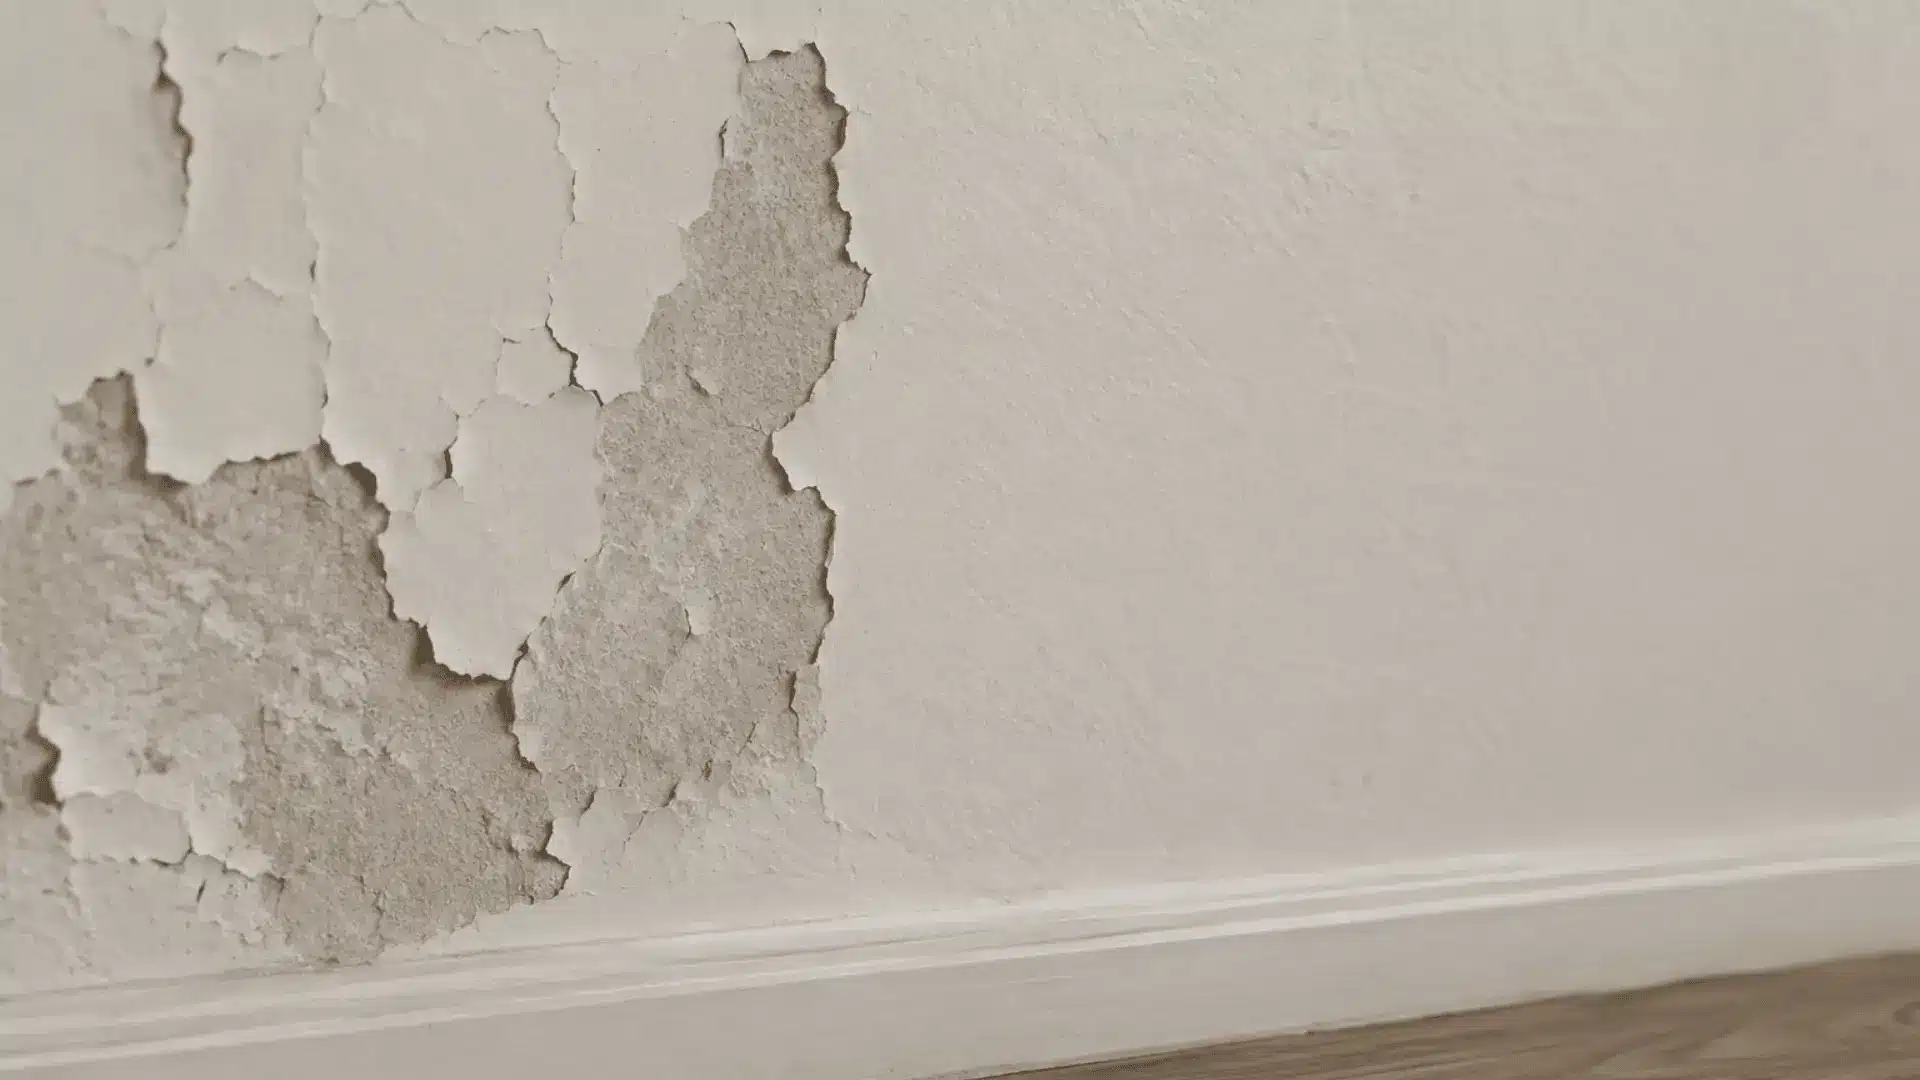
1. Peeling paint
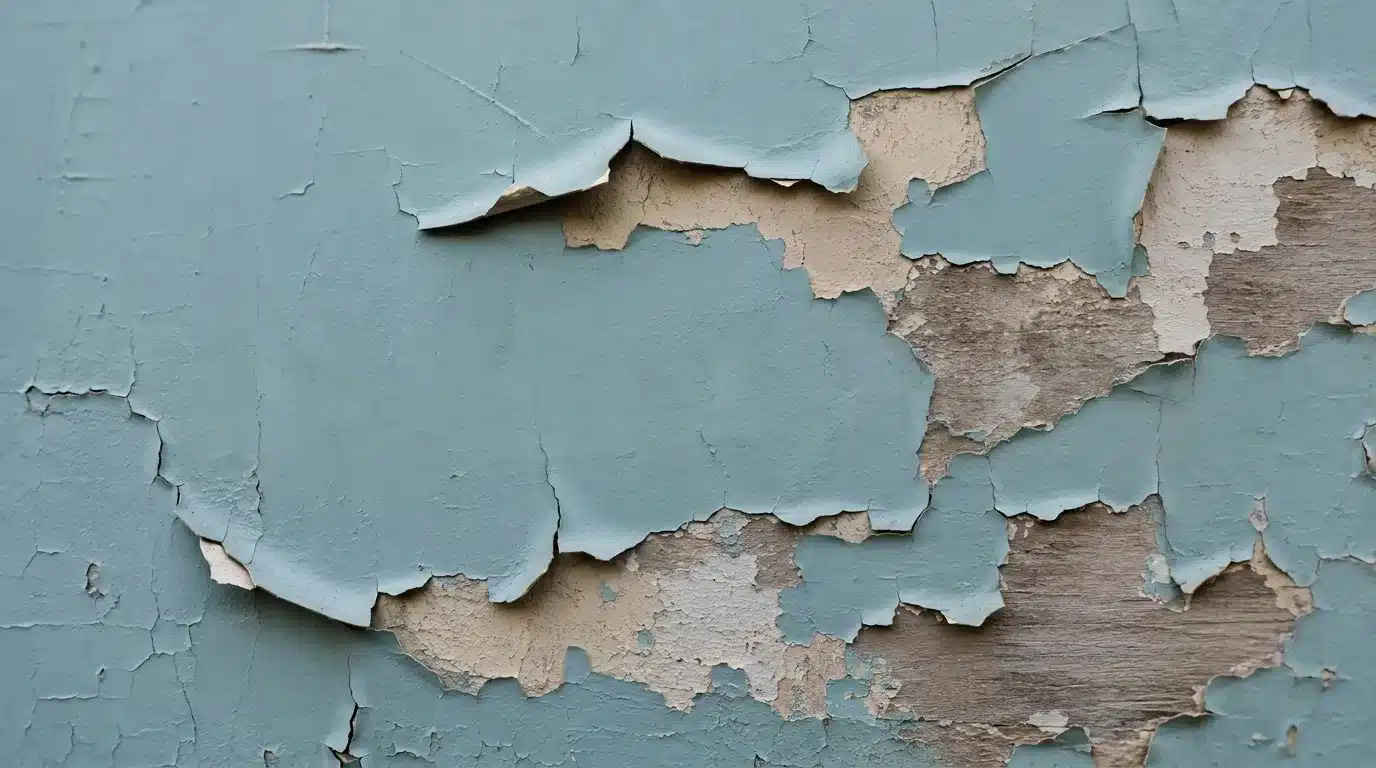
Peeling paint lifts away from the surface in long, curling strips or full sheets. The separation happens at the bond line between the paint film and the surface beneath it.
You can often see bare wood, drywall paper, or an older layer of paint once it pulls away. It usually starts at the edges or corners and spreads outward as the bond continues to weaken.
- What it looks like: Curling strips or large sheets lifting off the surface
- Common causes: Moisture intrusion, painting over a wet surface, adhesion failure
- Commonly found on: Bathroom walls and ceilings, exterior siding, areas near windows
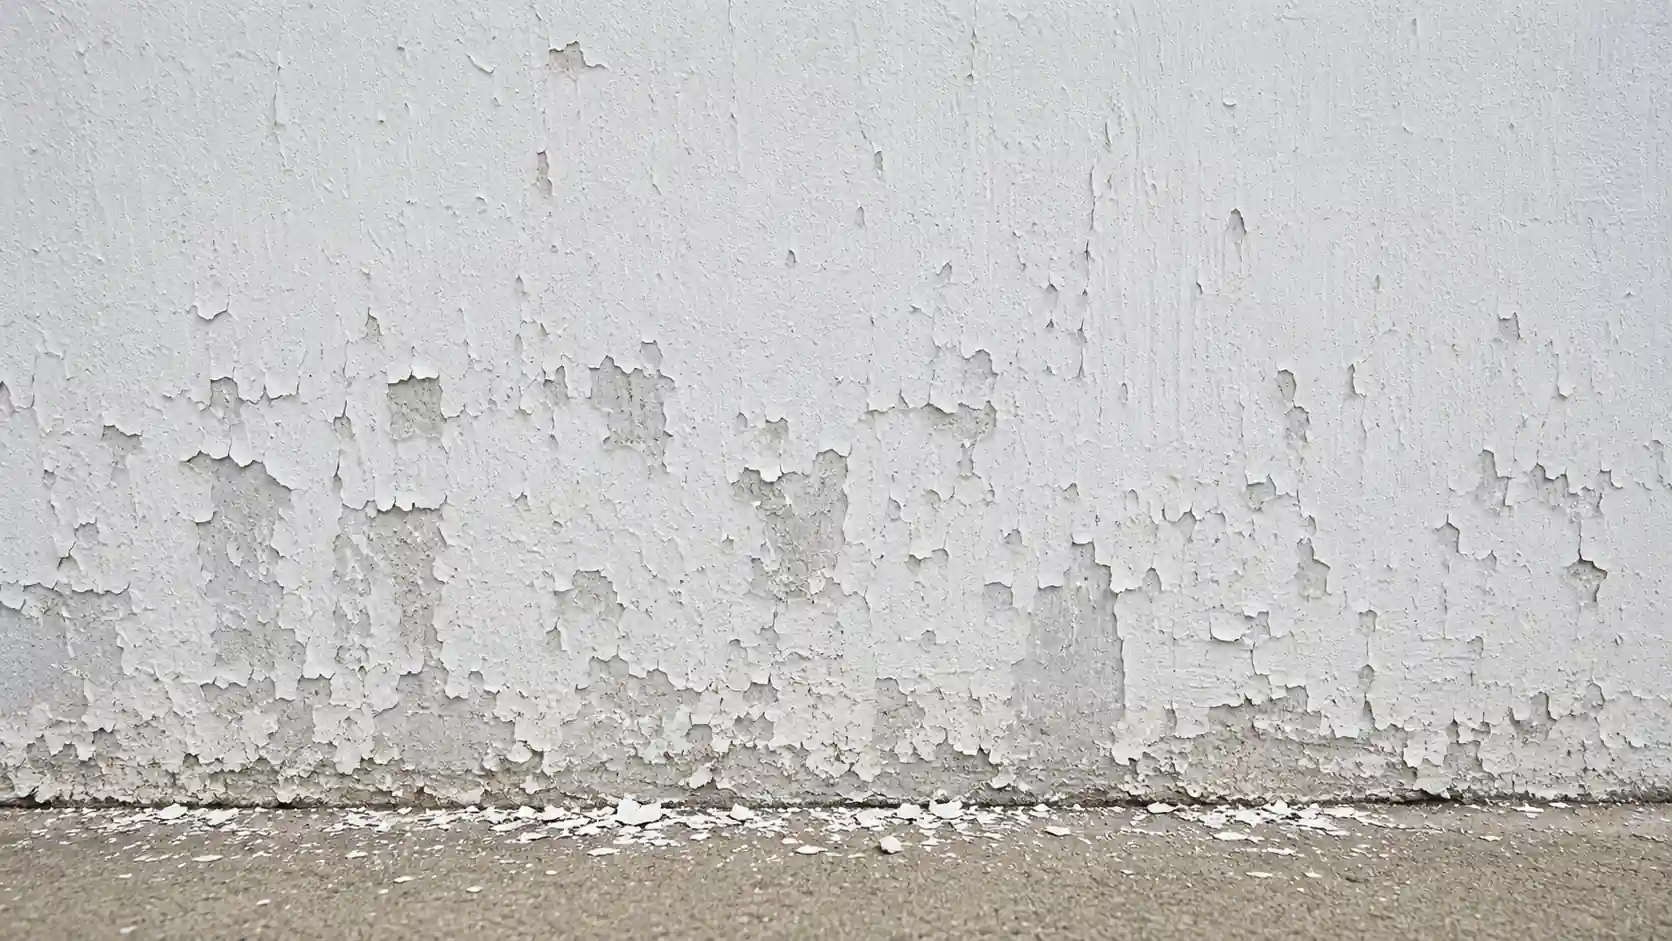
2. Flaking Paint
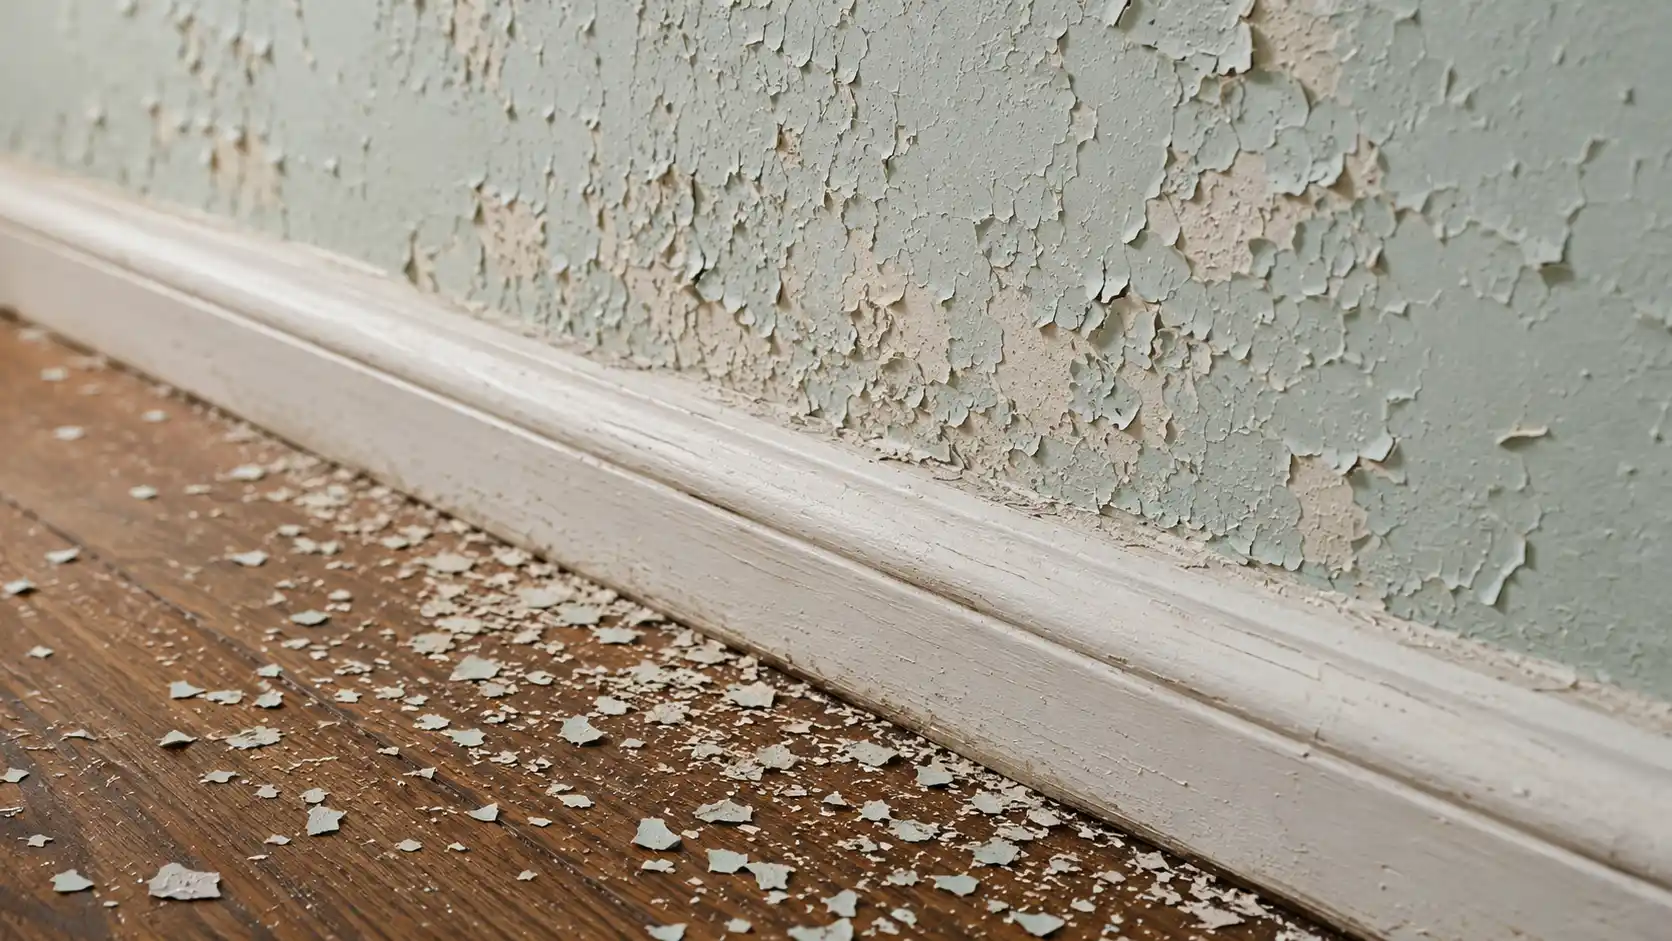
Flaking paint breaks away from the surface as small, thin pieces rather than large sheets. It happens when the paint film becomes brittle over time and loses its ability to hold together.
Cracking and flaking usually start as thin, hairline cracks in the paint film that grow over time, gradually breaking off into loose chips.
If you are dealing with this type of damage, the process for repairing chipped paint follows many of the same steps as fixing a full peel.
It often looks like small fragments dusting the floor beneath a wall or baseboard.
- What it looks like: Small chips or thin flakes detaching from the surface
- Common causes: Aging oil-based paint, applying a rigid coating such as alkyd enamel over a more flexible undercoat
- Commonly found on: Older walls, ceilings in older homes, and wooden trim
3. Blistering Paint
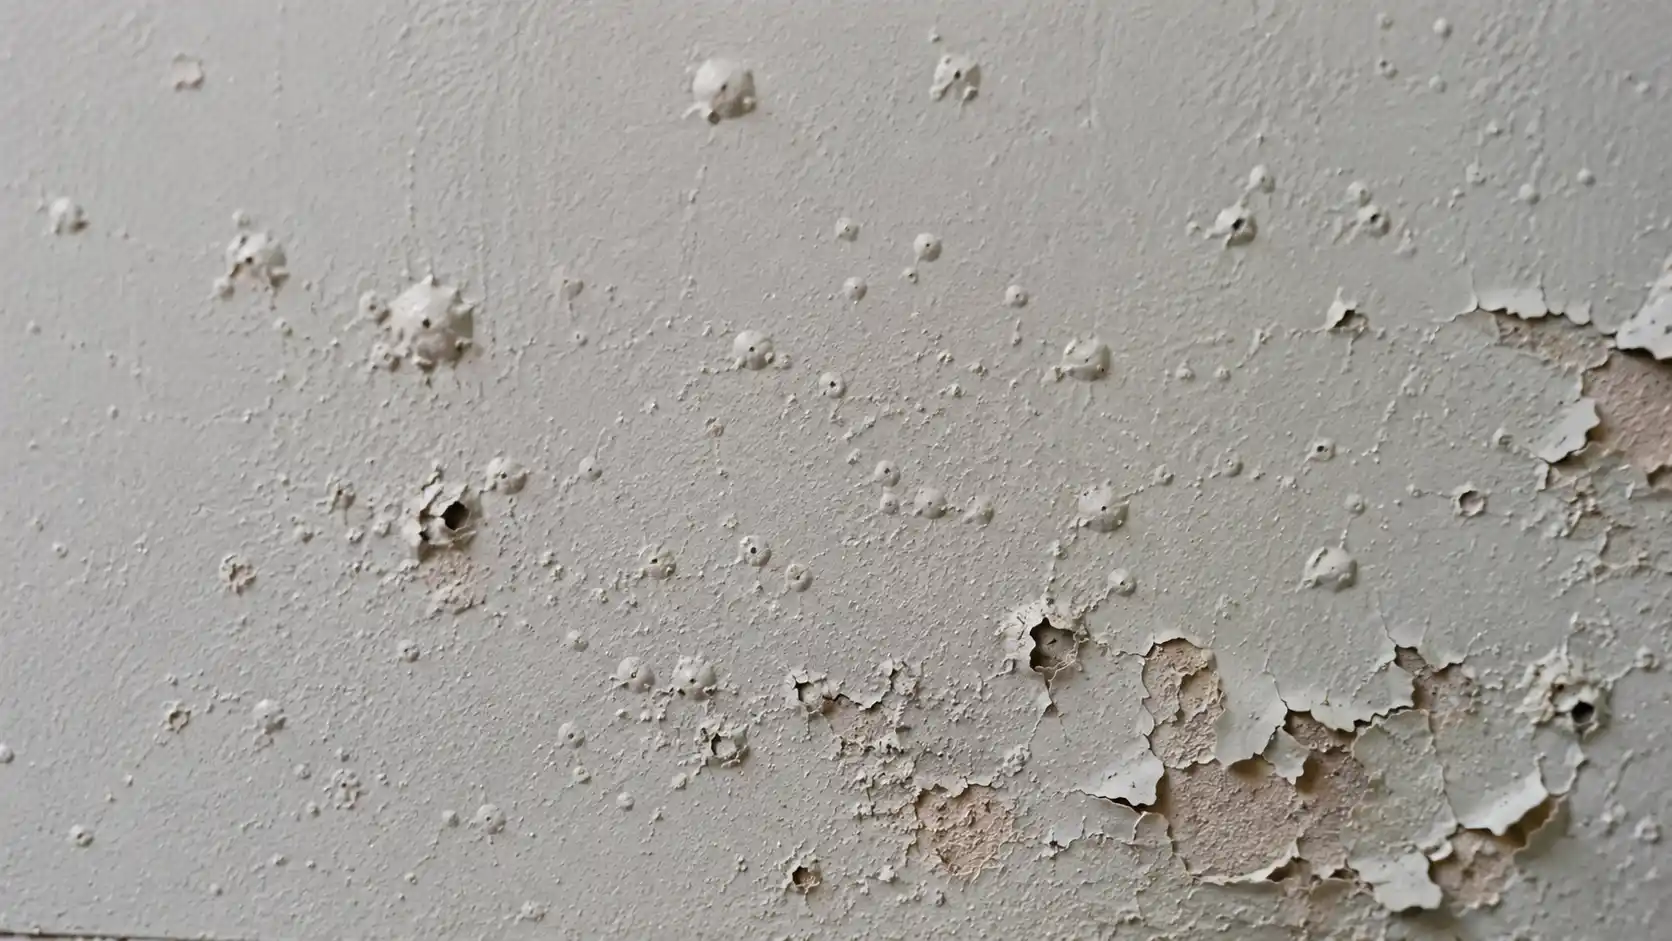
Blistering is the appearance of raised, bubble-like bumps on the paint surface that may pop on their own over time.
Blisters are usually caused by moisture, which can come from several sources, including high ambient humidity or high surface temperatures when painting.
It is also common when oil-based paint is used and the second coat is applied before the first coat has dried enough, trapping solvents between the layers. The bumps leave a rough, cratered texture once they break.
- What it looks like: Round raised bumps that may pop and leave pitted marks
- Common causes: Painting in direct sun or high heat, solvent vapors trapped in film
- Commonly found on: Exterior wood siding, decks, doors painted in direct sunlight
4. Bubbling paint
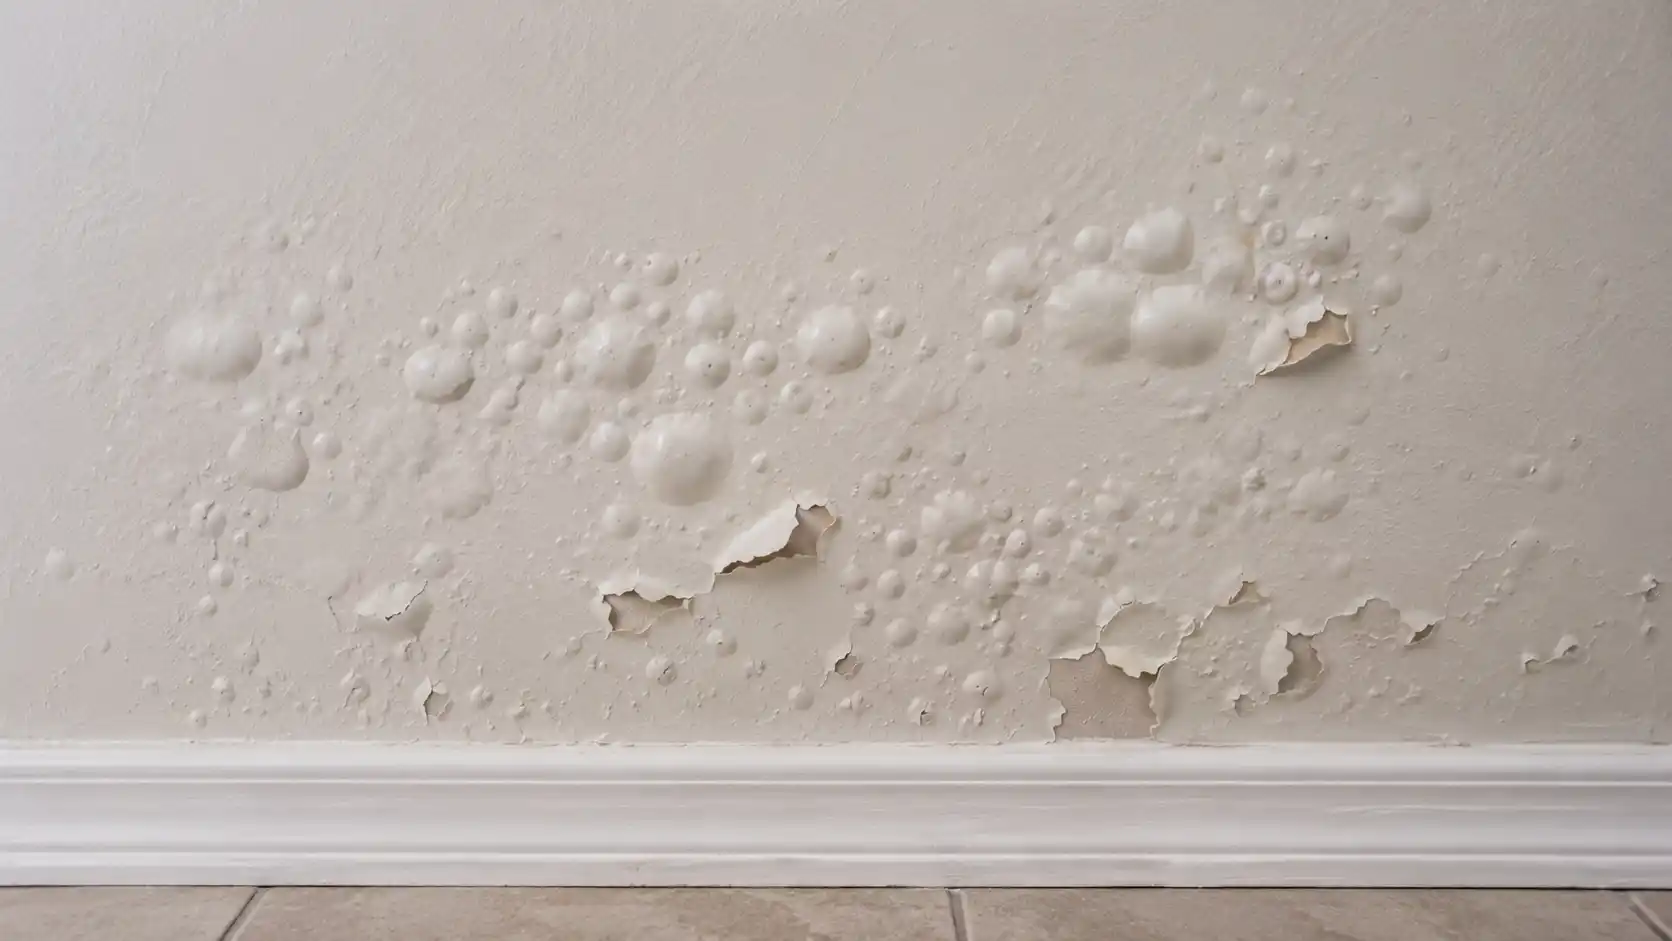
Bubbling looks similar to blistering but is far more common on interior surfaces.
Soft, raised pockets form under the paint film and can sometimes be pressed down temporarily before they break.
When moisture gets under the surface of the paint, it can start pushing the paint away from the wall, resulting in bubbling or peeling paint. Left unaddressed, bubbling almost always leads to full peeling.
- What it looks like: Soft raised bubbles on the wall or ceiling surface
- Common causes: Moisture behind the wall, painting over a damp surface
- Commonly found on: Bathroom ceilings, walls near plumbing, basement walls
5. Cracking Paint
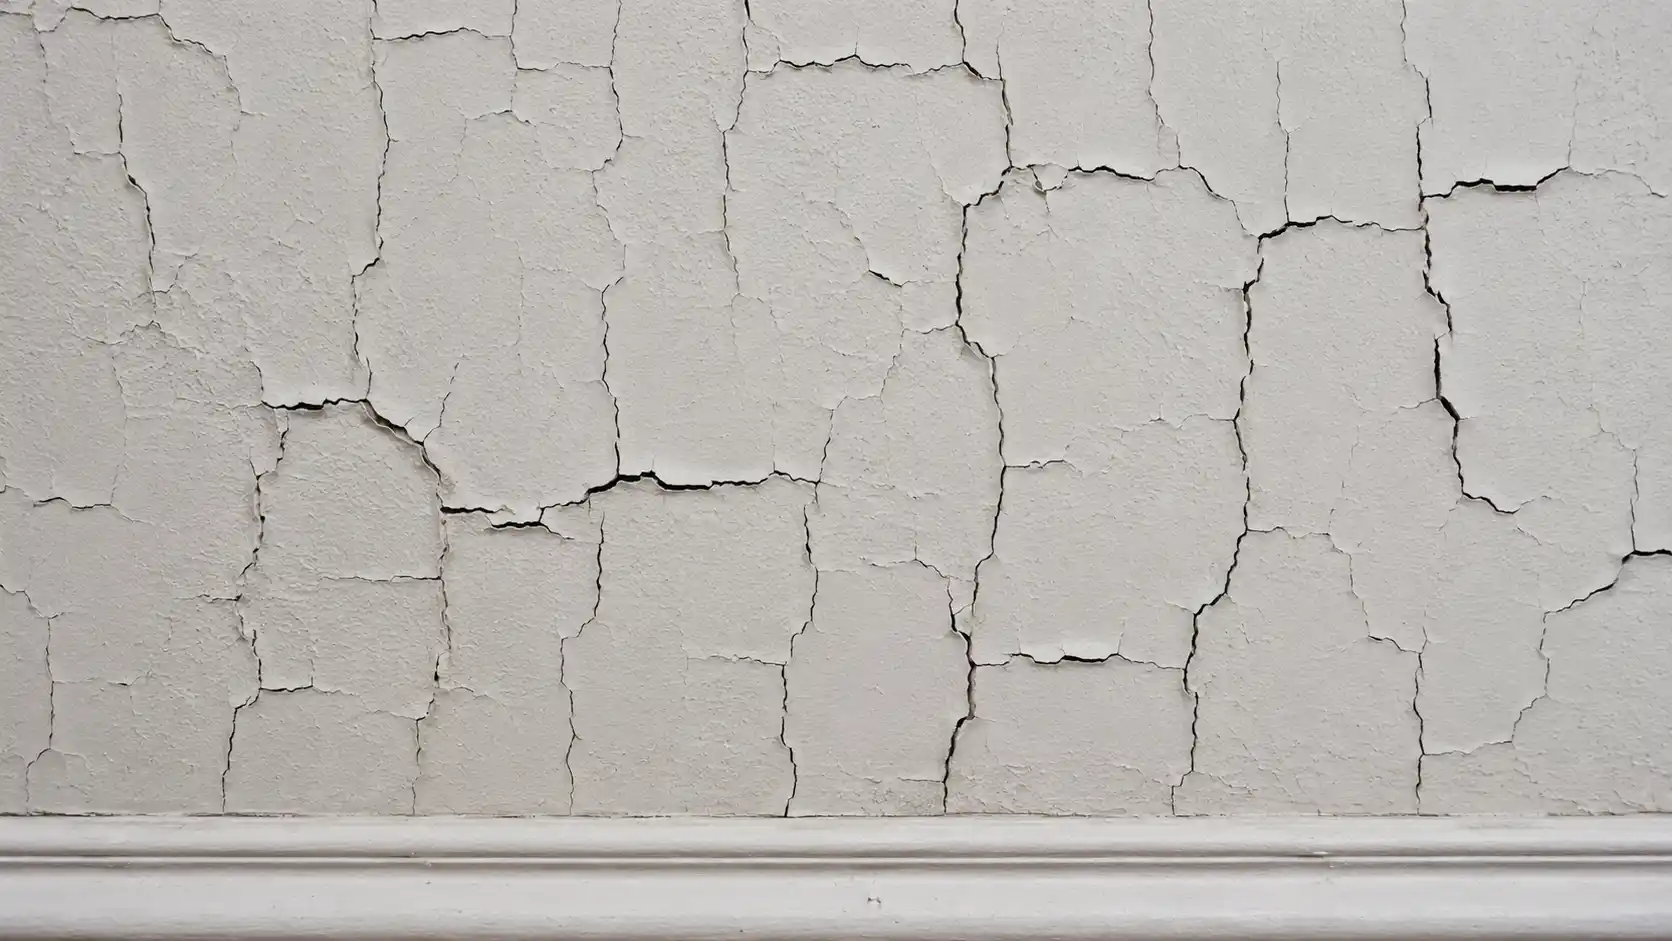
Cracking forms visible lines or fractures across the paint surface. It can start as fine hairline cracks and grow into deep splits over time, depending on how much stress the paint film is under.
This happens when paint dries too quickly, often caused by high temperatures, low humidity, or improper application techniques.
Applying a second coat before the first has fully hardened is another common trigger that stresses the paint film and causes it to split.
- What it looks like: Lines or fractures running across the painted surface
- Common causes: Second coat applied too soon, paint applied too thick, extreme temperature shifts
- Commonly found on: Ceilings, exterior surfaces with wide temperature swings
6. Alligatoring Paint
Alligatoring creates a pattern across the paint surface that closely resembles the scaly skin of an alligator, with deep, irregular cracks forming raised blocks.
When the softer undercoat expands and contracts with temperature changes, the top layer, which is not as flexible, cracks.
It is a sign that the paint film has lost all flexibility and the surface needs to be fully stripped before repainting.
- What it looks like: Cracked, scaly surface resembling alligator skin
- Common causes: Old lead-based paint, applying hard oil paint over flexible paint layers
- Commonly found on: Older homes, exterior wood surfaces, walls with multiple old paint layers
7. Chalking Paint
Chalking turns the outer surface of paint into a loose, powdery layer that rubs off on contact. As house paint ages, a small amount of chalk is expected.
However, when low-quality paints with cheap resins are used, this aging occurs too quickly, and the surface becomes highly chalky, meaning the paint film no longer serves as a proper barrier.
- What it looks like: Powdery white or colored residue that rubs off the surface
- Common causes: UV breakdown of the paint binder, low-quality exterior paint
- Commonly found on: Exterior painted surfaces, older masonry walls, south-facing walls with high sun exposure.
Paint failure often starts with subtle warning signs, but the appearance can reveal a lot about the underlying problem.
Once you know what you’re dealing with, you can choose the most effective repair method and reduce the chances of the problem returning.
Paint Failure Quick Reference Chart
Not every paint problem looks the same, and misreading the signs often leads to the wrong repair. Use this chart to match what you see on your wall to the most likely cause before you start any fix.
| Paint Problem | What It Looks Like | Main Cause |
|---|---|---|
| Peeling | Large sheets lifting off | Moisture or poor adhesion |
| Flaking | Small chips falling away | Aging paint |
| Bubbling | Raised soft bubbles | Trapped moisture |
| Cracking | Split lines across the surface | Paint film stress |
| Alligatoring | Scaly, crocodile-skin pattern | Old or incompatible layers |
| Chalking | Powder residue on the surface | UV damage |
Once you match the problem to its cause, fixing it becomes much more straightforward. The sections below cover each cause in detail and walk you through the appropriate repair steps for each.
What Causes Peeling Paint
Peeling paint usually starts when the paint loses its grip on the surface beneath it. These common causes can help you spot the problem before repairing it.
- Water leaks and trapped moisture: Roof leaks, plumbing issues, window gaps, or damp walls can break the paint bond, causing peeling.
- High humidity and poor ventilation: Bathrooms, kitchens, and basements often hold moisture in the air, which slowly weakens paint on walls and ceilings.
- Poor surface preparation: Skipping primer, painting over dust, or applying paint to glossy surfaces can stop the new paint from sticking properly.
- Wrong paint or thick coats: Incompatible paint types, heavy coats, or applying latex over unprimed oil paint can cause cracking, lifting, and peeling over time.
- Bad drying conditions: Painting too soon between coats, or in extreme heat, cold, or humidity, can trap moisture and cause adhesion failure.
Peeling paint often results from more than one issue. Fixing the root cause first gives your repair a better chance of lasting.
Tools You’ll Need
|
How to Fix Peeling Paint
Fixing peeling paint is straightforward when you follow the right order. Skipping steps is the main reason repairs fail, and the peeling comes back. Take your time with preparation, and the final result will hold up for years.
Step 1: Remove Loose Paint
Use a putty knife or paint scraper to remove all paint that is lifting, loose, or soft. Do not just scrape the areas that are already peeling; press gently around the edges to find paint that is beginning to separate but has not yet fully let go.
All of that needs to come off. On larger areas, a wire brush or paint scraper works well.
Use a scraper or putty knife to remove loose paint, then clean the wall to remove dust, mould, and grease. Wear a dust mask throughout this step, especially in older homes.
Pro Tip: Score the edges of stubborn paint with a utility knife before scraping. This gives you a cleaner break and prevents tearing into sound paint nearby.
Step 2: Repair Damaged Surfaces
Once the loose paint is gone, inspect the surface underneath for cracks, holes, dents, or soft spots. Fill any thick cracks or holes with a wall filler or spackling compound.
Allow this to dry completely before moving forward. If the drywall paper is torn or the wood is soft and damaged, those areas need to be repaired or replaced before painting.
You cannot paint over structural damage and expect it to hold.
Pro Tip: Apply spackling compound in thin layers rather than one thick pass. Thick fills shrink as they dry and may crack again before you even prime.
Step 3: Sand Edges Smooth
Where the old paint ends and the bare surface begins, there is a raised edge. If you paint over it without sanding, the edge will show through the finished coat as a visible ridge.
Use medium-grit sandpaper (80–120 grit) to feather these edges down until the transition from old paint to bare surface is smooth to the touch.
Light sanding smooths any patched areas for an even base that the paint can grip properly. Wipe away all dust with a damp cloth before the next step.
Pro Tip: Run your hand flat across the sanded area with your eyes closed. If you can still feel a ridge, keep sanding. Touch catches imperfections that eyes miss.
Step 4: Prime the Area
Priming is not optional. Bare drywall, spackle patches, and any areas where moisture was a factor all need a coat of primer before paint goes on.
A high-grade primer seals the area and helps the new paint bond firmly to the surface. For moisture-prone rooms like bathrooms, use a moisture-resistant or mold-blocking primer.
For previously glossy surfaces, use a bonding primer. Let the primer dry fully according to the label before painting.
Pro Tip: Tint your primer close to the final paint color. This reduces the number of topcoats needed and helps the finished color look more even across patched and unpatched areas.
Step 5: Repaint Properly
Apply paint in thin, even coats. Thin coats dry properly from the inside out, creating a stronger bond than thick ones.
Follow the manufacturer’s dry times before recoating to avoid adhesion problems.
Paint sometimes feels dry to the touch before it has hardened, but applying a second coat too soon can soften the first coat and weaken the bond.
Use the right product for the room: moisture-resistant paint for bathrooms and kitchens, exterior paint for outdoor surfaces.
Pro Tip: Always paint in the same direction as your final stroke. Crossing wet paint with a loaded brush in different directions leaves visible lap marks once the surface dries.
A proper repair done in the right order will last far longer than a quick coat of paint over a problem area.
Each step builds on the one before it, and cutting any of them short puts the whole job at risk. Address the source of the failure first, follow the steps above, and the repaired area should last as long as the rest of the wall.
How to Prevent Peeling Paint
Preventing peeling paint starts before the first coat goes on. Fix leaks, improve bathroom ventilation, and seal gaps around windows, doors, and exterior trim before painting.
Always clean the surface well so dust, grease, mildew, and loose paint do not weaken adhesion. Use primer on bare drywall, patched areas, new wood, and glossy surfaces, since paint needs a solid base to grip.
Choose the right paint for the area, such as exterior paint outside and moisture-resistant paint in bathrooms or kitchens.
Follow the drying time on the paint label and avoid painting in extreme heat, cold, or high humidity.
When moisture, prep, primer, paint quality, and drying time are handled properly, peeling is much less likely to return.
Peeling Paint Troubleshooting Chart
The chart below covers the most common scenarios homeowners encounter. Treating the surface without addressing the cause of the failure will always lead to the same result.
| If You See | Most Likely Cause | Recommended Fix |
|---|---|---|
| Peeling near windows | Water intrusion through seals or the frame | Check and replace window caulking |
| Ceiling peeling | Roof leak or moisture from above | Inspect the attic and fix the leak before repainting |
| Bathroom peeling | High humidity and poor ventilation | Install or improve the exhaust fan, reprime, and repaint |
| Exterior peeling | Weather exposure and moisture cycling | Scrape, prime, and repaint with exterior paint |
| Fresh paint peeling | Adhesion failure from poor prep or skipped primer | Strip paint, reprime the surface, and repaint |
Use the chart as a starting point, not a final diagnosis. If you fix the listed cause and the peeling returns, a deeper inspection may reveal a secondary issue, such as hidden water damage or incompatible paint layers from a previous job.
When to Call a Professional
Peeling paint is not always a simple surface problem. In some cases, it indicates moisture damage, mold, or older paint that requires careful handling. Call a professional painter or contractor if:
- The peeling affects a large area (more than a few square feet)
- There is visible mold on the wall behind the paint
- The home was built before 1978, and you suspect lead paint
- Structural water damage is present behind the walls
- The problem keeps coming back after repair
A professional can find the cause before repainting begins. This helps prevent wasted time, unsafe cleanup, and another round of peeling paint later.
Final Thoughts
Dealing with peeling paint is frustrating, but it is completely fixable when you know what caused it and follow the right steps.
I have seen walls that looked beyond saving come back looking completely fresh after proper prep, priming, and painting.
The key is not just covering the problem but removing the reason it happened in the first place.
Fix the moisture, clean the surface, prime correctly, and use the right paint for the right space. Do that, and the repair will last for years rather than months.
Frequently Asked Questions
Can You Paint Directly Over Peeling Paint
No. Painting over peeling paint leads to poor adhesion and more peeling. Always scrape, sand, prime, and stabilize the surface first.
How Long Does a Peeling Paint Repair Last
A properly repaired surface with proper prep and priming should last several years. Skipping prep work shortens that significantly.
Does Peeling Paint Lower Home Value
Yes. Appraisers may lower the property value due to peeling paint, particularly in homes built before 1978, when lead-based paint testing may be required.
How Long Should You Wait Before Applying a Second Coat
Always follow the manufacturer’s label. Applying a second coat too soon softens the first coat and weakens the bond, causing early peeling.
What Type of Primer Works Best on Peeling Paint Areas
Use a bonding primer on glossy surfaces and a moisture-resistant primer in bathrooms or kitchens. Match the primer to the surface and environment.