You’ve cleaned your windows, and they still look dirty. There’s no smear you can point to, no obvious streak, just a dullness that wasn’t there before.
For most people, the problem isn’t the product they used. It’s the technique. Professional window cleaners don’t have access to a secret formula.
What they have is a method: a specific order of steps, the right tools, and habits that eliminate the most common causes of streaks before they happen.
The best way to clean windows isn’t about scrubbing harder; it’s about starting correctly, working efficiently, and finishing thoroughly. Let’s find out exactly how professionals do it.
What is the Best Way to Clean Windows?
Skipping any step, especially the first two, is the most common reason windows look worse after cleaning than before. |
Why Professional Window Cleaning Looks Better
Most people have noticed the difference between their own results and what a professional leaves behind.
The glass looks different, not just cleaner, but clearer. The U.S. window-cleaning industry was valued at $2.9 billion in 2024, according to IBISWorld, underscoring that professional results consistently outperform DIY attempts. The gap comes down to four habits that professionals follow without exception.
- Remove dust, pollen, cobwebs, and loose dirt before spraying.
- Use only a light, even mist to avoid drips and streaks.
- Remove moisture with a squeegee, then dry the edges.
- Check streaks while the glass is still damp.
- Clean frames, sills, tracks, and screens so dirt does not transfer back.
Best Ways to Clean Windows Easily
Not every window needs the same approach. A greasy kitchen pane, a second-floor exterior, and a track packed with dirt all call for something different. Here’s how the most common methods compare:
| Method | Best For | Streak-Free? | Cost |
|---|---|---|---|
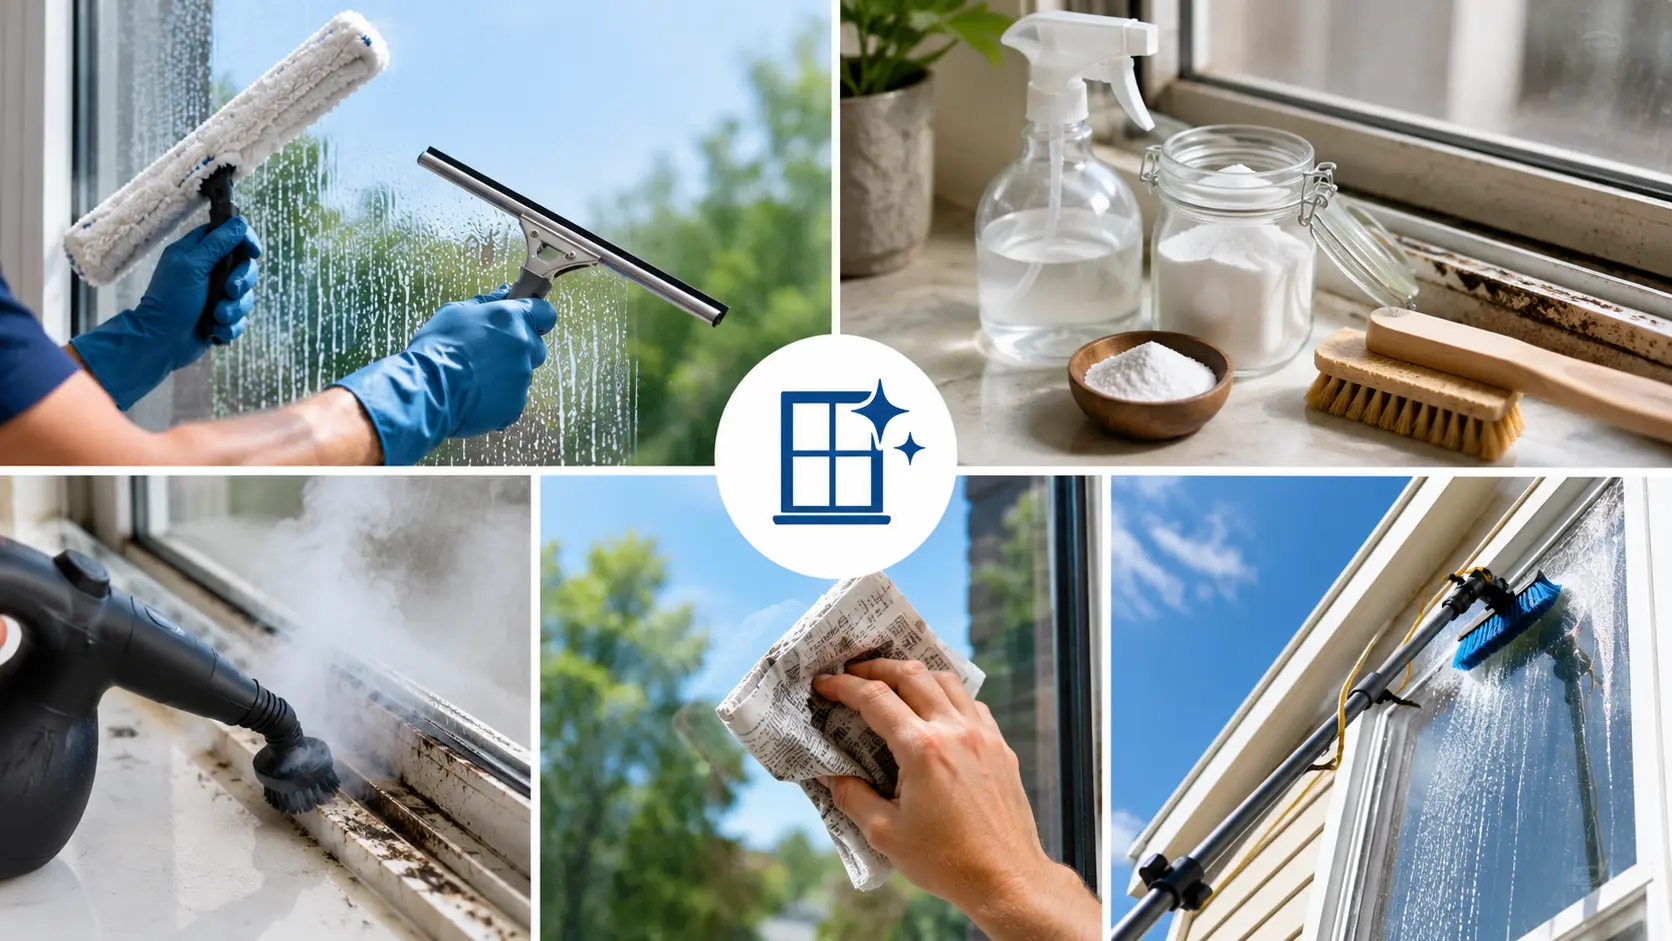
| Squeegee + applicator | All glass surfaces, professional results | Yes, best results | Low (tools reusable) |
| Vinegar + baking soda | Dirty tracks, frames, stubborn buildup | Yes, on glass | Very low |
| Steam cleaner | Tracks, frames, mould, and chemical-free cleaning | Yes, no residue | Medium (equipment needed) |
| Newspaper + vinegar solution | Light cleaning, budget option | Yes, with uncoated newsprint only | Near zero |
| Pure water-fed pole | Upper-story exterior windows | Yes, air dries spot-free | High (professional setup) |
Squeegee + Applicator: The professional standard. A T-bar applicator evenly wets the glass, and the squeegee removes water in one pass. No lint, no streaks. The method is fully covered in the step-by-step section above.
Vinegar + Baking Soda: Best on tracks and frames, not glass. Sprinkle baking soda, spray vinegar, let it fizz, then scrub with a stiff brush. On the glass itself, use a straight vinegar-and-distilled-water solution; baking soda residue leaves a white film.
Steam Cleaner: Best for stubborn grime on tracks and frames. Steam above 200°F loosens buildup instantly and sanitizes without chemicals. Use distilled water in the tank to prevent mineral buildup in the machine. Finish the glass with a dry microfiber cloth.
Newspaper Method: Works well with traditional uncoated newsprint, which is lint-free and absorbent. A modern glossy newspaper can transfer ink and streak. Crumple into a ball, wipe in circular motions, finish with straight strokes.
Pure Water Fed Pole: Used by professionals for upper-story exterior windows. Purified water is pumped from the ground through a telescoping pole and brush head. According to WindowCleaner.com, it reduces ladder use by around 80%.
Tools Professionals Use for Streak-Free Windows
The right tools make the technique work. None of these are hard to find; most are available at any home improvement store.
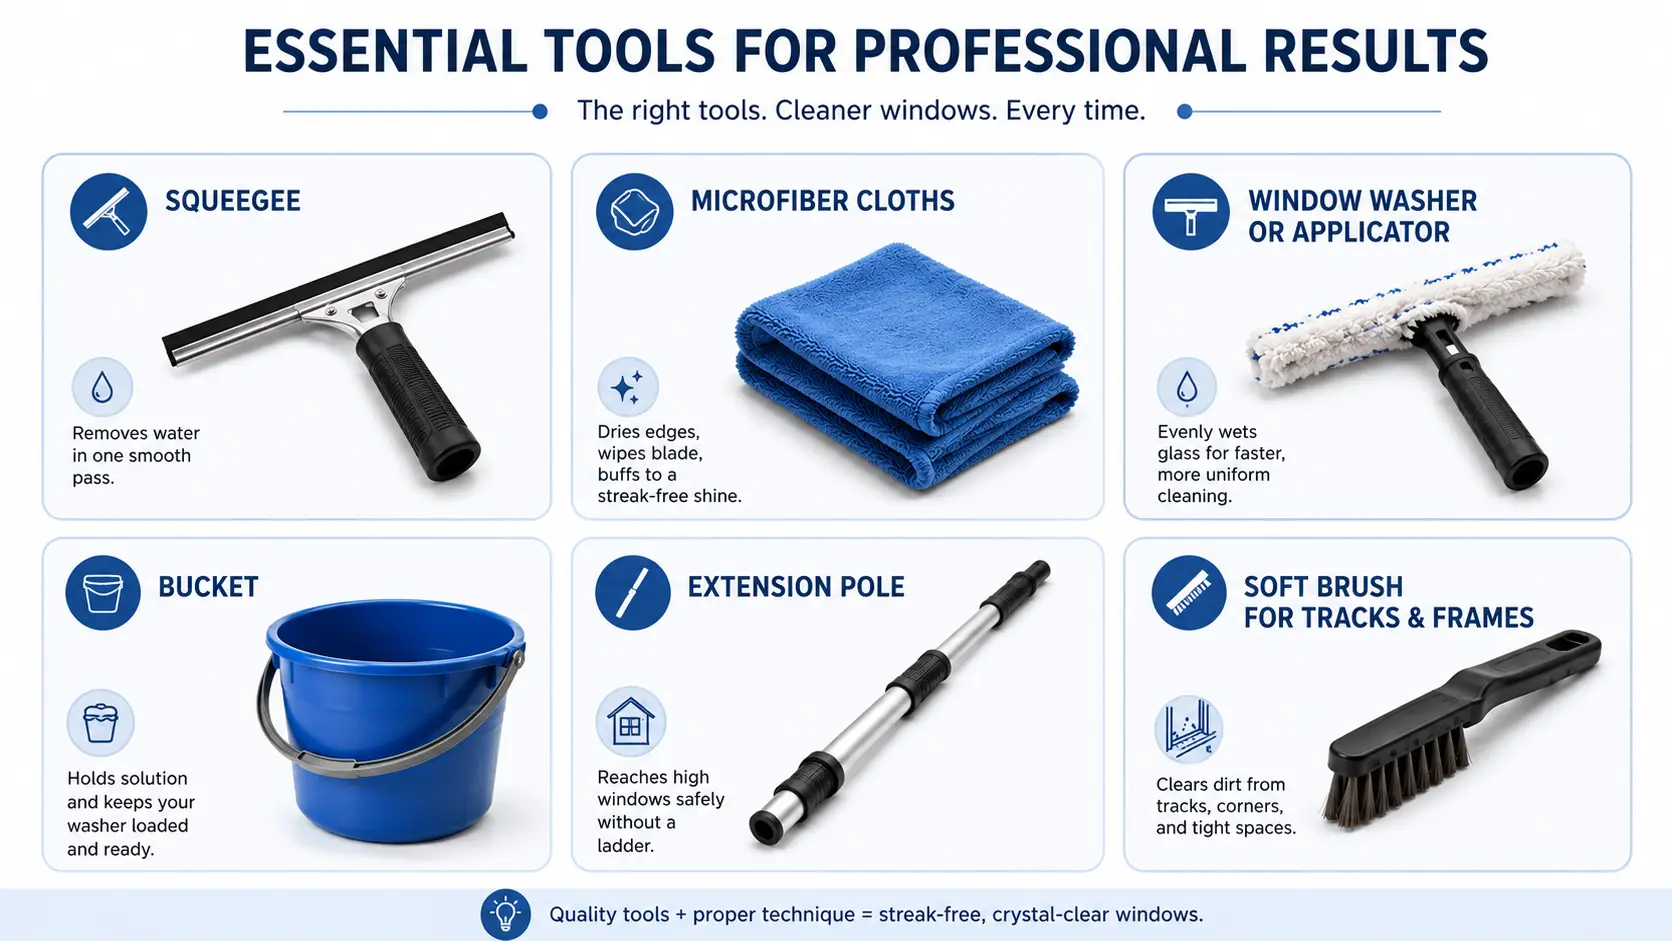
Squeegee
A squeegee is the single most effective tool for cleaning glass. It physically removes water from the surface in a single smooth motion, leaving no lint, fibers, or residue.
Look for one with a replaceable rubber blade; a nicked or worn blade is the most common cause of squeegee streaks.
According to Unger Global, a leading supplier of professional window cleaning equipment, the rubber blade should be sharp and free of nicks to ensure full contact with the glass on every pass.
Microfiber Cloths
Used for drying edges, wiping the squeegee blade between passes, and buffing any remaining moisture. According to ISSA (the Association for Cleaning and Facility Solutions), microfiber fibers are typically 1.0 denier or thinner, which allows them to trap dirt and moisture that cotton fibers push around.
Window Washer or Applicator
A T-bar applicator with a microfiber sleeve is used by professionals to evenly wet the glass before squeegeeing. It covers more surface area faster than a spray bottle and applies solution more uniformly.
Bucket
A standard 2–3-gallon bucket holds your cleaning solution and keeps the applicator loaded. Some professional setups use a bucket with a built-in wringer to control how much solution stays in the sleeve.
Extension Pole
For upper-story windows and large panes, an extension pole attaches to both the squeegee and the applicator. It eliminates the need for a ladder on most ground and second-floor windows and significantly reduces the safety risk of working at height.
Soft Brush for Tracks and Frames
A stiff-bristle or detail brush clears dirt from window tracks and corners before cleaning begins. Compressed air works well for deep track channels where a brush can’t reach.
How to Clean Windows Like a Professional: Step-by-Step
This is where technique makes the biggest difference. Each step below serves a specific purpose.
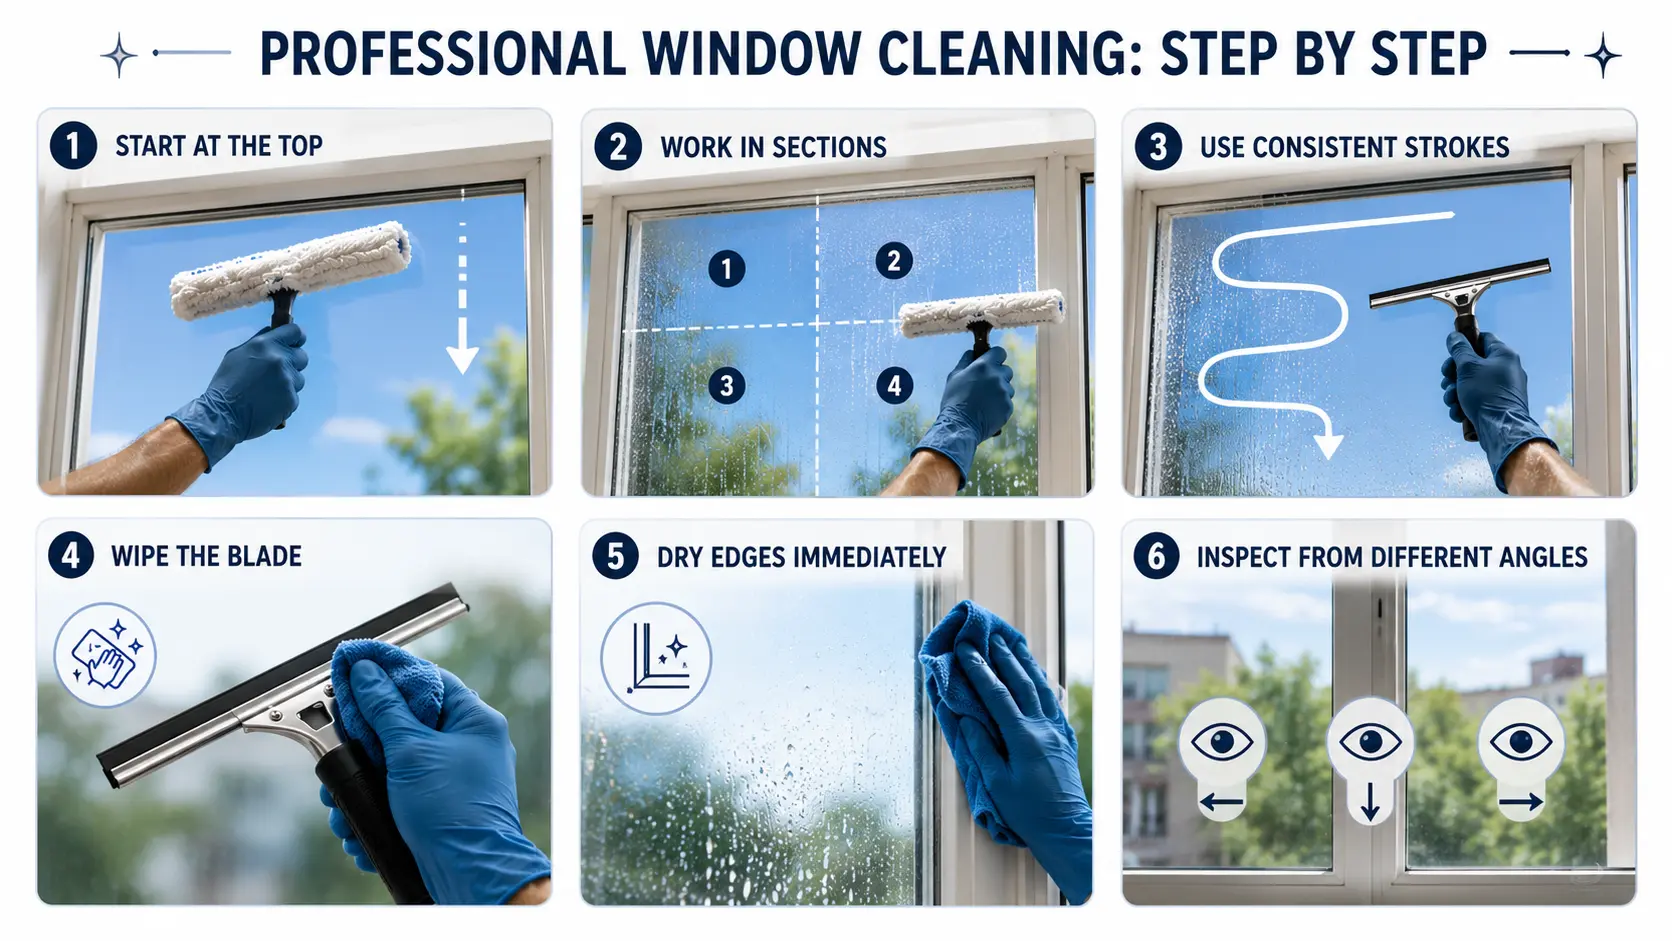
Start at the Top of the Window
Always begin at the top and work down. Cleaning solution drips. Dirty water runs. Working from the top ensures that anything falling down lands on glass you haven’t cleaned yet, not glass you just finished.
Work in Manageable Sections
On large windows and patio doors, divide the glass into sections rather than trying to cover the whole surface in one pass.
Each section gets wet, squeegeed, and dried before moving to the next. Working in sections keeps the solution from drying on the glass before you reach it, which is exactly when streaks form.
Use Consistent Squeegee Strokes
For most windows, the S-stroke is the most effective technique. Place the squeegee in the top-left corner, angle the blade slightly downward so water flows toward the unclean side, and move it across in a smooth, continuous S-shaped motion from top to bottom.
According to professional window-cleaning training resources, the S-stroke is the industry standard for good reason: it removes water in a single unbroken pass without lifting the blade and creating lap marks.
Wipe the Blade After Each Pass
This step separates professional results from average ones. After every stroke, wipe the squeegee blade clean with a lint-free microfiber cloth.
A dirty blade drags grime back across clean glass on the next pass, creating the exact streaks you’re trying to prevent.
Dry Edges Immediately
The squeegee doesn’t reach all the way to the frame. Those last few millimeters at every edge hold moisture that dries into a visible line.
As soon as you finish squeegeeing each section, run a folded microfiber cloth along all four edges before the water dries.
Inspect from Different Angles
Before moving to the next window, step back and look at the glass from two or three angles. Streaks that are invisible from straight on become obvious when light hits the glass at an angle.
This final check takes seconds and catches the 5% of the surface that needs a quick buff before it dries.
Best Time of Day to Clean Windows
The best time to clean windows is on a cloudy, mild day. Direct sun and extreme cold can both make streaks harder to avoid.
- Cloudy days work best: The cleaner stays wet long enough to wipe or squeegee off properly.
- Avoid direct sunlight: Heat can dry the solution too fast and leave streaks.
- Skip freezing weather: Water-based cleaners can ice on the glass before you finish.
- Aim for mild temperatures: Above 40°F is a safer range for better drying.
- Clean seasonally: Exterior windows usually need cleaning in spring and fall.
- Clean interiors more often: Every 1–3 months is ideal for most homes, especially in kitchens and other high-traffic areas.
- Clean more often if needed: Homes near roads, trees, coastlines, or heavy pollen may need extra exterior cleaning.
Timing makes a big difference, but the cleaning solution matters too. You can also opt for a diy window cleaner that can be made by using some simple ingredients available at home.
Professional Tips for Crystal-Clear Windows
Small adjustments in technique can make a noticeable difference in the final result. These professional habits help reduce streaks, save time, and keep windows looking cleaner for longer.
| Pro Tip | Why It Works |
|---|---|
| Clean one side horizontally, the other vertically | If a streak appears, the stroke direction tells you instantly which side it’s on, no re-cleaning both sides to find it |
| Change microfiber cloths every 2–3 windows | A cloth that absorbs moisture and frame grime transfers dirt back to the glass instead of removing it |
| Always work top to bottom | Dirty water runs down, working from the top means it falls onto uncleaned glass, not the glass you just finished |
| Replace squeegee blades when worn | A nicked blade loses full contact with the glass, leaving a water trail on every pass. Most replacement blades cost under $5 |
These tips take only a few extra seconds but can greatly improve the clarity of your windows. When cleaning outside windows, the right tools and techniques help deliver results that look professionally cleaned.
It’s a Wrap!
Most streaky windows are not caused by the cleaner alone. They usually come from the wrong order, dirty clothes, too much liquid, skipped frames, or cleaning while direct sunlight is drying the glass too fast.
Once you fix the sequence, the whole job gets easier. Start by removing loose dirt, then clean the frames and tracks, and finally wash the glass from top to bottom.
Use a squeegee to remove most of the moisture, and finish the edges with a clean microfiber cloth.
The tools are simple, but the method matters. When you clean the full window, not just the glass, you stop old dirt from transferring back onto the pane. That small change helps your windows look clearer and stay clean longer.
Frequently Asked Questions
What Do Professional Window Cleaners Use?
Professionals use a T-bar applicator with a microfiber sleeve to wet the glass, a squeegee with a sharp replaceable blade to remove water, and lint-free microfiber cloths to dry edges.
How Do Professionals Avoid Streaks on Windows?
They wipe the squeegee blade after each stroke, work from top to bottom, apply the solution sparingly, and inspect at an angle before moving on. The condition of the blade matters as much as the technique.
Is a Squeegee Better Than a Cloth?
Yes. A squeegee removes water from the glass in a single pass, which helps prevent streaks and lint. Microfiber cloths are best used for drying edges, touch-ups, and polishing the finished glass.