

Learning how to sew a button is one of those skills that feels intimidating until the first attempt proves otherwise.
Many people assume it takes special training, but the repair is straightforward once the basics are clear.
All it needs is a needle, thread, a little patience, and steady hands. A button popping off a shirt right before it is needed no longer has to mean a trip to the tailor.
The same basic method works across different garments, making it useful well beyond a single fix.
It is a small skill that pays off repeatedly in everyday life, saving time and money on minor clothing repairs simple enough to handle at home.
Tools You’ll Need
|
How to Choose the Right Needle and Thread
The thread used to attach a button has a bigger effect on durability than most people expect. Choosing correctly from the start means the button stays in place longer.
On thread color: matching thread color to the button or garment fabric keeps the repair looking clean and nearly invisible. Contrasting thread works well on casual clothing or denim.
For needle selection, thinner fabrics need a finer needle (sizes 9 to 11), while thicker fabrics like denim or canvas need a sturdier needle (sizes 14 to 16). For knitwear and stretchy fabrics, use a ballpoint needle; the rounded tip slides between loops instead of snagging them.
Double-threading adds extra strength for coats and heavy shirts. Before threading, run the thread along tailor’s beeswax and press briefly with a warm iron; this strengthens the thread and prevents tangling.
How to Sew a Button on a Shirt
Sewing a button on a shirt is a straightforward repair that takes just a few minutes once the steps are clear. The key is to work carefully through each stage rather than rushing. Follow the steps below, and the button will sit correctly and hold firmly through regular wear and washing.
Step 1: Find the Correct Button Placement
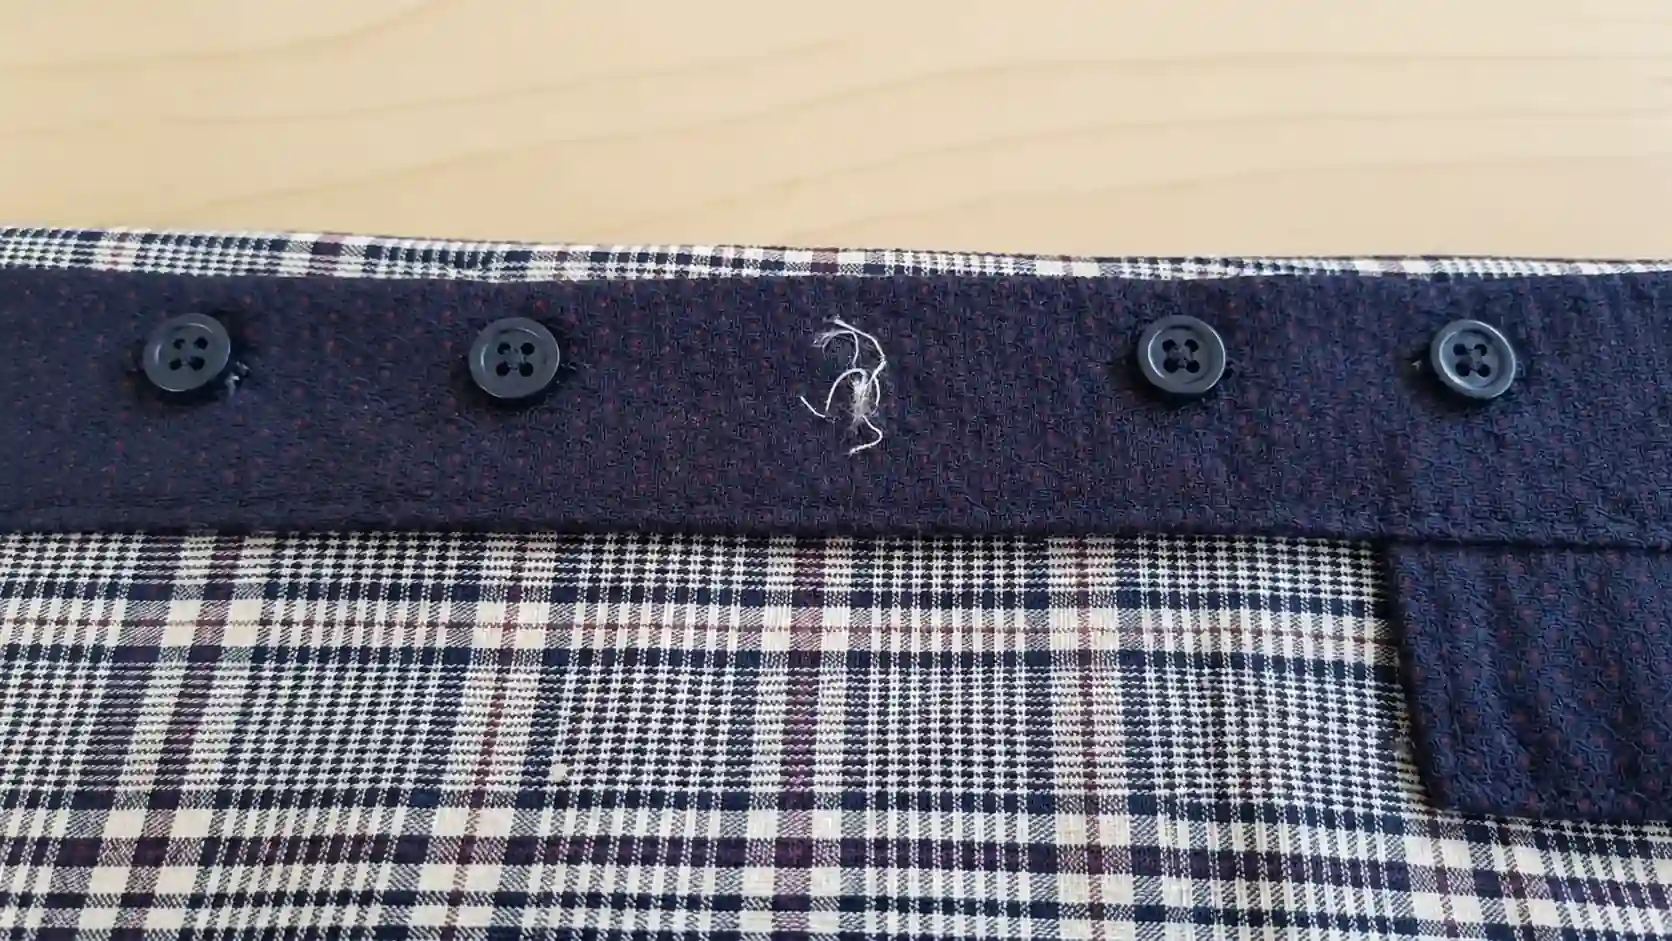
Before threading anything, the button needs to go in exactly the right spot. Look closely at the fabric where the old button was attached.
There will usually be small thread marks or a slight indentation left behind, and this is the correct placement. If the marks are hard to see, line up the buttonhole over the area and mark the center point with a fabric marker, chalk, or pencil.
Check that the placement lines up with the other buttons on the shirt by measuring the spacing between them. Once the mark is made, the button will have a clear target to sit on.
Pro Tip: Hold the shirt up and button the other buttons to check the natural fall of the fabric. The correct spot for the missing button will become obvious by where the fabric naturally wants to close.
Step 2: Thread the Needle and Tie a Knot
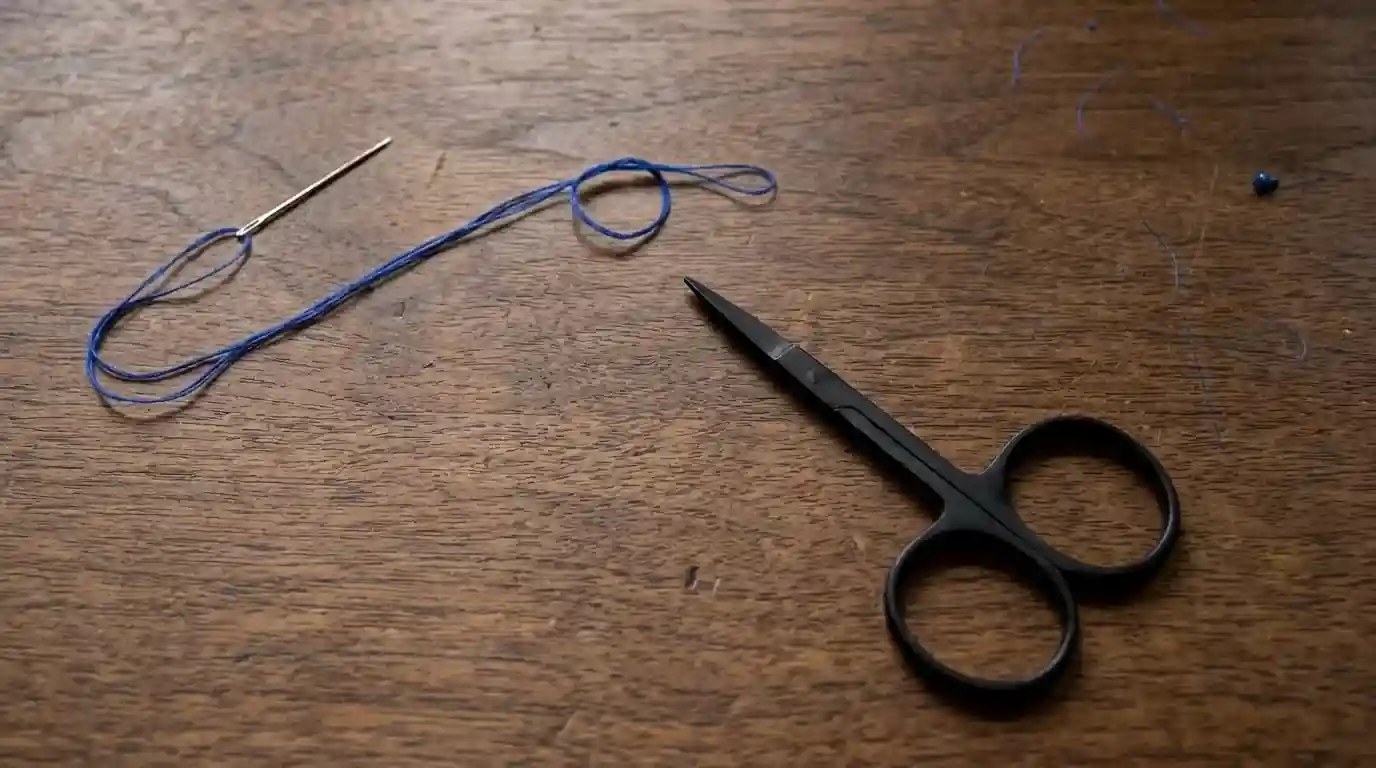
Cut about 24 inches of thread. For a shirt button, a single thread works fine, but doubling the thread by folding it in half and threading both ends through the needle adds extra strength.
Pull the thread through the needle eye until the needle sits near the middle of the length. At the tail end, tie a knot by looping the thread two or three times around your finger and rolling it off to form a tight, small knot.
The knot should be large enough that it will not pull straight through the fabric when stitching begins.
Pro Tip: Lick the end of the thread lightly before pushing it through the needle eye. This seals the fibers together and makes threading much easier, especially with fine thread.
Step 3: Anchor the Thread to the Fabric
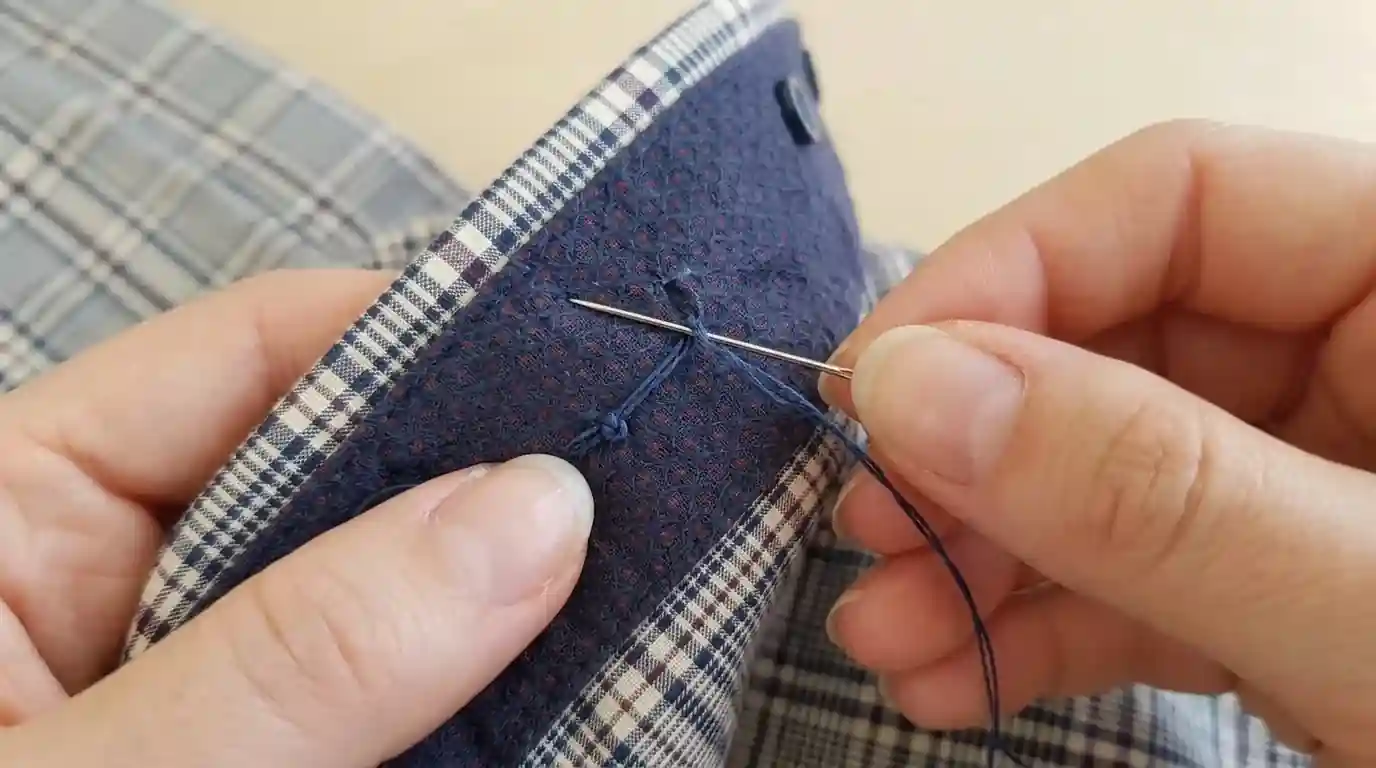
Start from the inside of the garment, pushing the needle up through the fabric at the marked spot.
Pull the thread all the way through until the knot sits snug against the underside of the fabric. Then push the needle back down, close to where it came up, to make a tiny stitch.
Bring it back up through the same spot again. This small anchor stitch locks the thread in place before the button is added.
Keep these initial stitches small, so they stay hidden under the button once it is in position.
Pro Tip: Make the anchor stitch in the shape of a small X on the right side of the fabric. This reinforces the attachment point and gives the button a firmer base.
Step 4: Position the Button
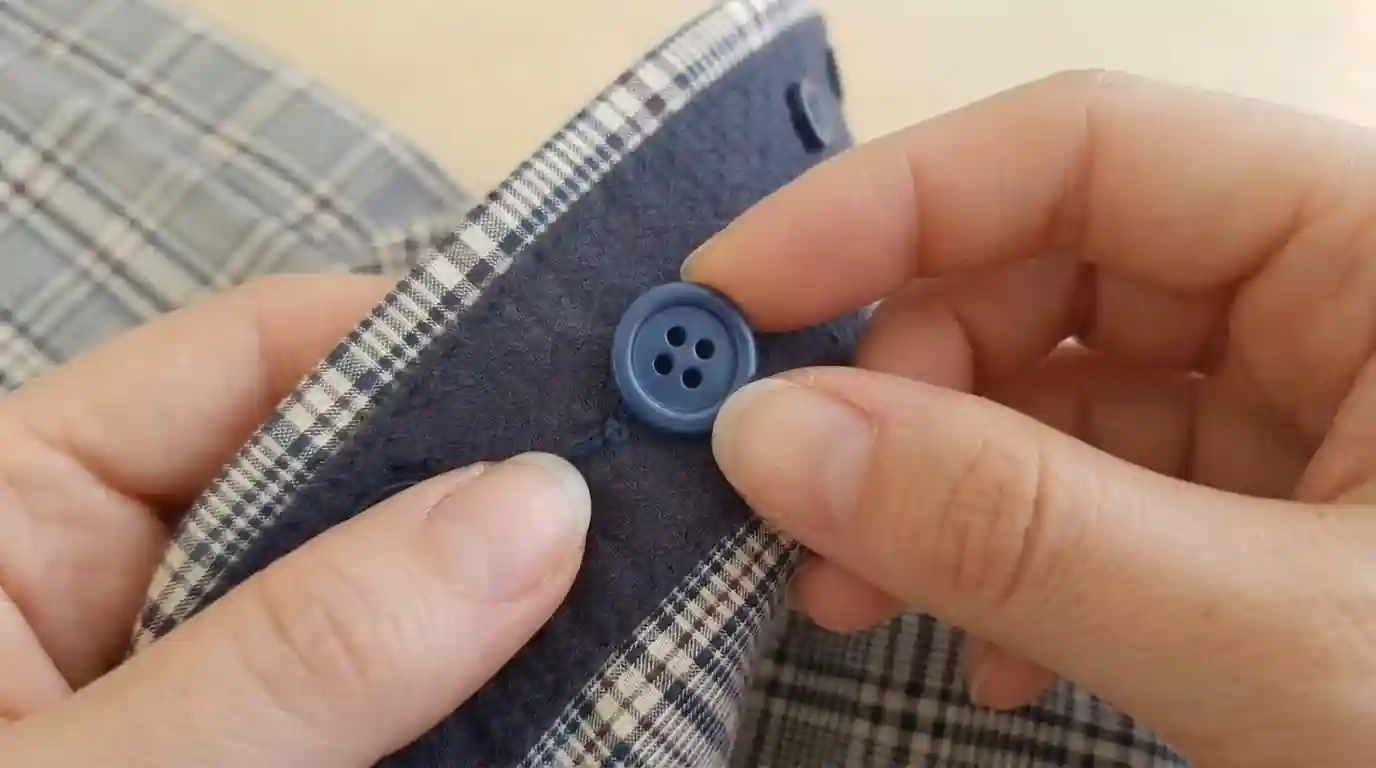
Place the button directly over the marked spot on the fabric with the holes aligned flat.
For a two-hole button, the holes should run parallel to the shirt placket. For a four-hole button, all four holes should be accessible. Hold the button steady with a fingertip while starting to sew.
If the button keeps shifting, a small piece of clear tape over the button before stitching holds it in place, and the tape peels off cleanly once the stitching is done.
Pro Tip: Before committing to the position, slip the button through its corresponding buttonhole once to check that the placement feels right and the fabric lays flat.
Step 5: Sew Through the Button Holes
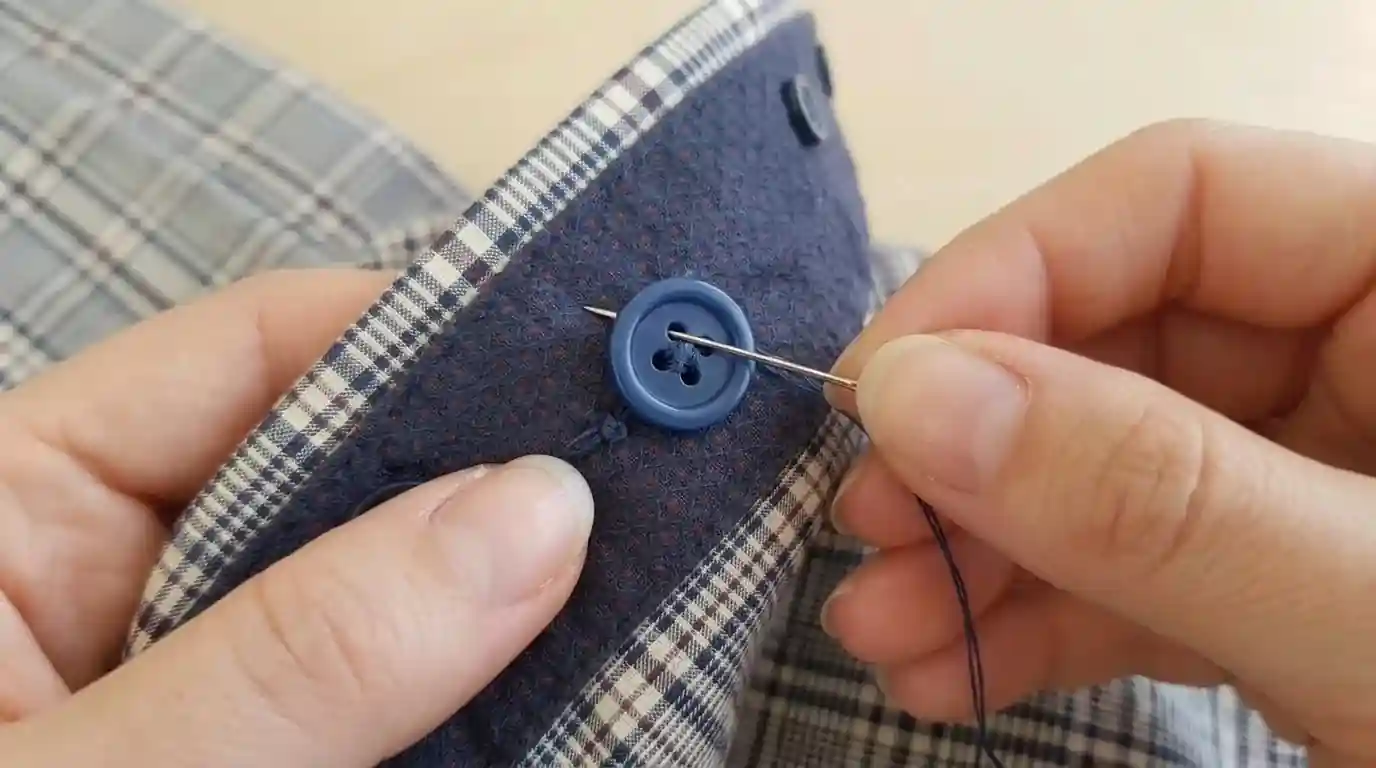
Bring the needle up through the fabric and through one hole of the button, then back down through the opposite hole and through the fabric.
Pull the thread through smoothly each time without yanking. Repeat this motion at least five to six times through the same pair of holes to build a strong hold.
Five to six stitches through the holes give a secure result without pulling the fabric too tight. Too tight will pucker the fabric; too loose will make the button wobble.
Pro Tip: Place a toothpick flat across the button while stitching, sewing over it with each pass. This keeps the thread from pulling the button too close to the fabric and naturally creates space for the shank in the next step.
Step 6: Create a Thread Shank
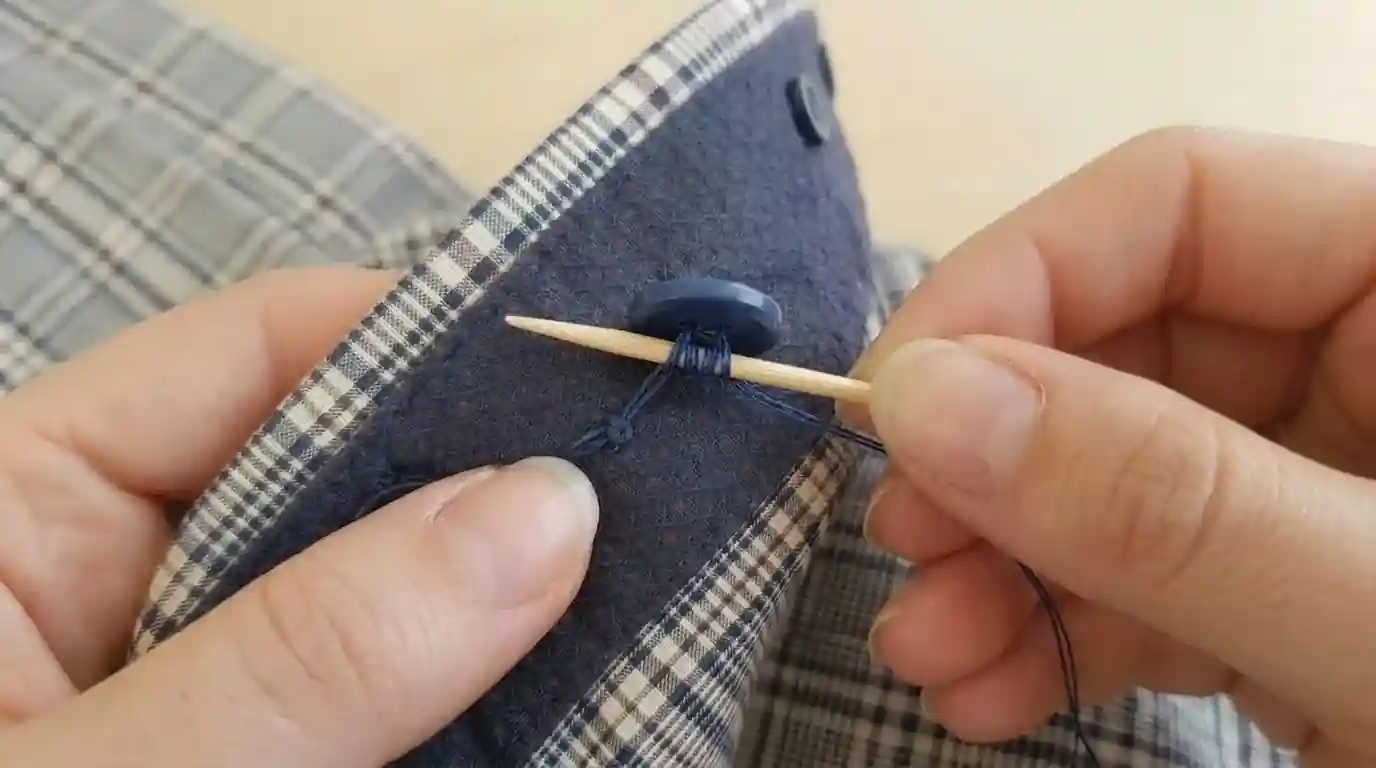
Shirt buttons need a small amount of space between the button and the fabric so the button can pass through the buttonhole without pulling or straining.
This space is called a thread shank. A toothpick or a spare needle placed under the button while stitching adds the right amount of height.
After the stitches are done, remove the toothpick and bring the needle back up through the fabric, but not through the button holes.
Wrap the thread firmly around the stitches between the button and the fabric four to six times. This wrapping forms the shank and keeps the button lifted at the right height.
Pro Tip: The thicker the shirt placket, the longer the shank needs to be. On a standard dress shirt, wrapping four times is usually enough. On a heavier flannel or twill shirt, wrap six times.
Step 7: Secure the Thread and Trim the Excess
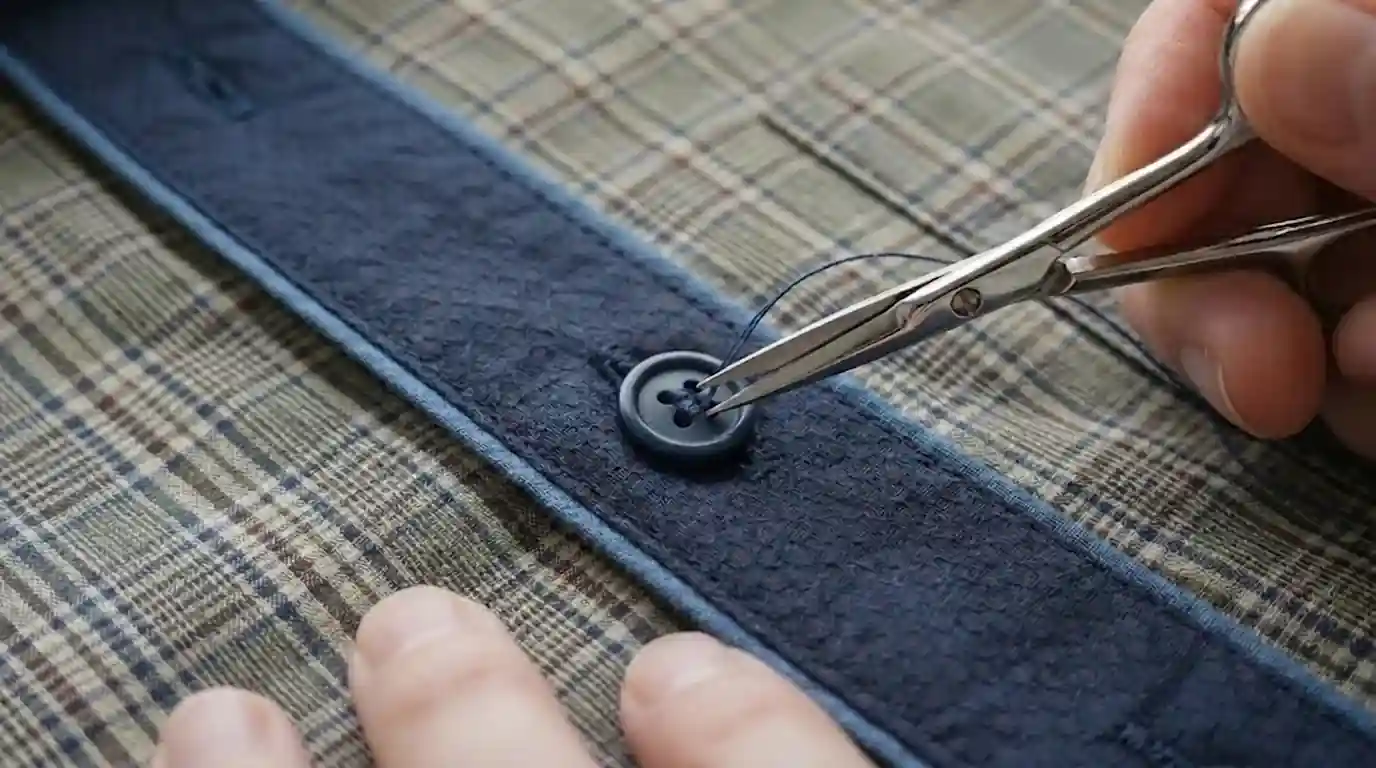
To finish, push the needle through to the back side of the fabric. Loop the thread around one of the existing stitches on the underside two or three times to form a locking knot.
Pull it tight so the knot sits flat against the fabric. Trim the excess thread close to the knot with scissors, leaving about a quarter inch so the knot does not unravel over time.
Before putting the shirt on, slide the button through the buttonhole a few times to test that it holds firmly and that the shank gives enough ease for comfortable use.
Pro Tip: After trimming, run a finger over the knot on the inside of the shirt. If it feels secure and does not move when tugged gently, the repair is finished correctly.
With all seven steps complete, the button is attached cleanly and built to last through regular washing and daily use. This same process applies to most shirt styles, from casual button-downs to dress shirts, and can be repeated any time a button comes loose.
Watch: How to Sew a Button on a Shirt
Reading through the steps is helpful, but watching someone work through the motion in real time makes everything click faster.
Search YouTube for “how to sew a button by hand” to find beginner-friendly tutorials that cover two-hole, four-hole, and shank buttons.
Look for videos that walk through needle placement, threading, stitching technique, and how to finish the knot cleanly.
Having a video open on your phone while you work through the repair for the first time makes the process easier to follow.
Thanks to Treasurie for the helpful tutorial featured above.
Different Methods for Sewing a Button
Not all buttons are the same, and the method for attaching them varies slightly depending on the button type.
Flat buttons with two holes, flat buttons with four holes, and shank buttons each have a slightly different attachment process. Knowing which method to use makes the repair cleaner and more durable.
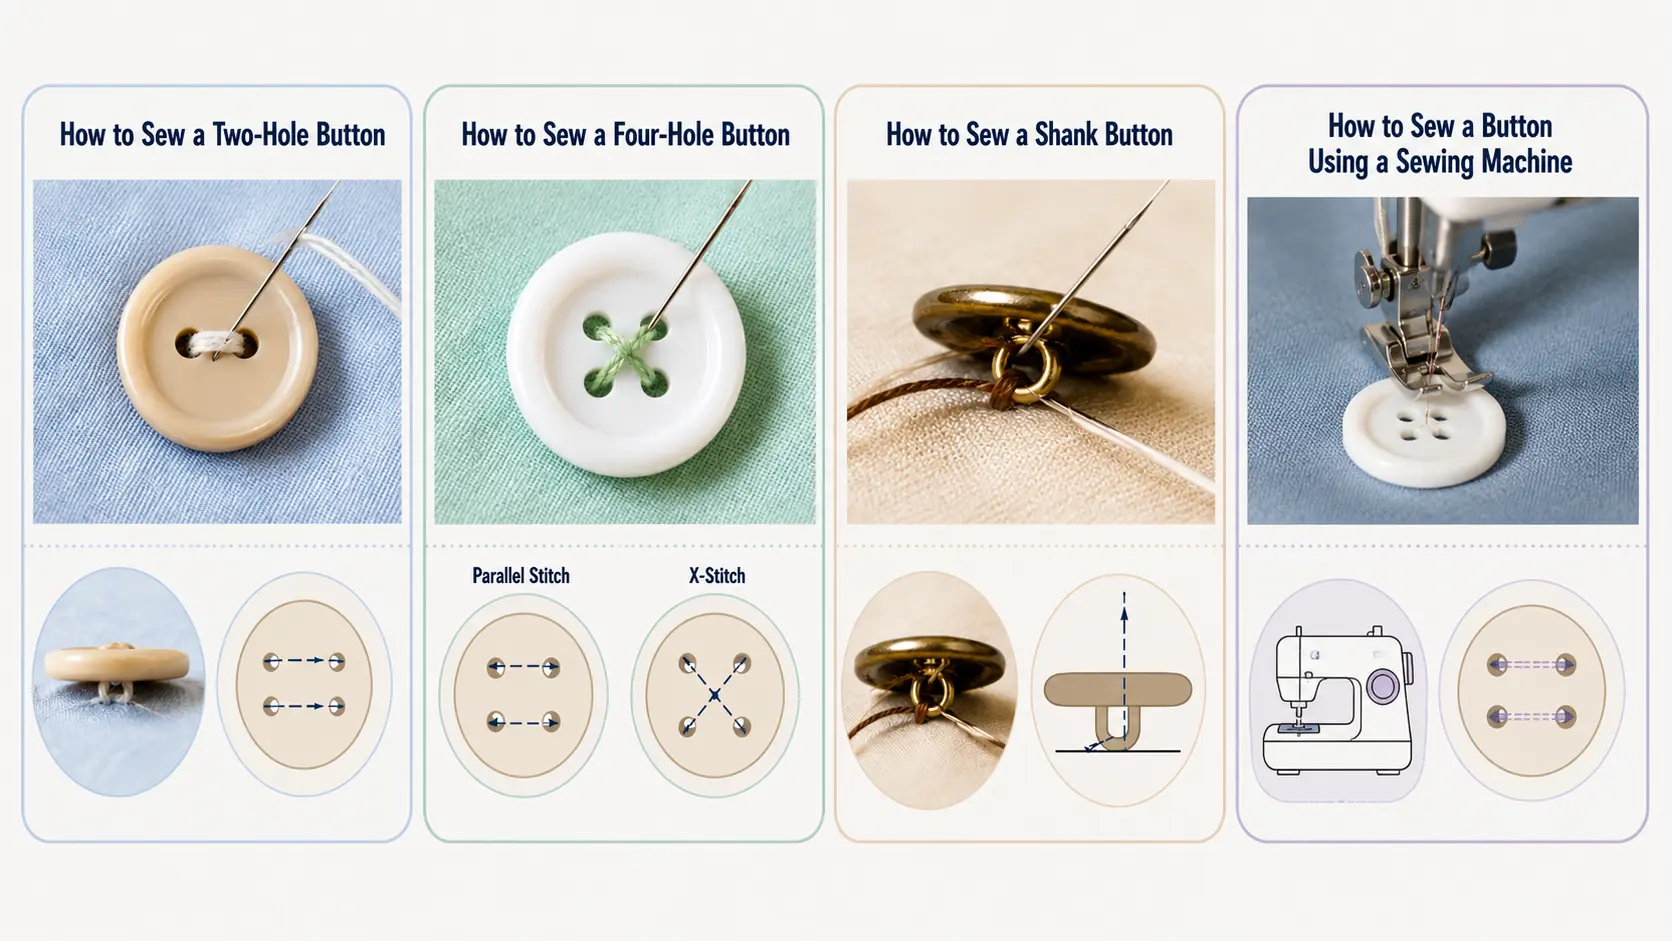
1. How to Sew a Two-Hole Button
A two-hole button has two openings across the center and is common on blouses, lightweight shirts, and children’s clothing. Anchor the thread, bring the needle up through one hole, then down through the other. Repeat six to eight times for a firm hold. Keep the thread tension even so the fabric does not pucker.
2. How to Sew a Four-Hole Button
A four-hole button can be sewn with parallel stitches or an X-shaped pattern. Parallel stitches work well for dress shirts because they sit flatter and look cleaner. X stitches can add grip on heavier garments. Sew through each pair of holes the same number of times so the button sits evenly and holds securely.
3. How to Sew a Shank Button
A shank button has a small loop on the back instead of holes on the face. Since the shank is built in, you do not need to create one with a thread. Sew through the fabric and loop six to eight times, then knot and trim. These buttons work well on coats, blazers, and thicker fabrics.
4. How to Sew a Button Using a Sewing Machine
Set the machine to a zigzag stitch with stitch length at zero. Match the stitch width to the distance between button holes. Attach a button-sewing foot and place the button underneath. Hand-turn the flywheel first to confirm needle alignment. Sew 10 to 12 stitches slowly, then knot the thread tails by hand on the back.
Each button type has a clear best use, and matching the method to the button ensures the repair looks and performs at its best.
Common Mistakes When Sewing a Button
Even a simple repair can go wrong when a few basic steps are skipped. Small errors like using the wrong thread or placing the button off-center can undo the repair within a few wears. Knowing what to watch for makes every repair cleaner and longer-lasting.
- Pulling the thread too tight draws the fabric inward, causes visible puckering around the button, and puts extra stress on the stitches during regular wear.
- Skipping the thread shank on shirt buttons causes the button to sit flush against the fabric, making it hard to button and leading to the buttonhole tearing over time.
- Using weak or old thread breaks down faster under regular wear and washing, causing the button to fall off sooner, especially on high-use garments.
- Sewing the button in the wrong position throws off the alignment of the entire shirt, creating an uneven fit that pulls or bunches at the front placket.
- Not securing the final knot allows the stitching to unravel from the last stitch outward, meaning the button loosens after just a few uses, even if the repair looked solid at first.
Taking an extra minute to check each of these points before finishing the repair prevents the need to redo the work. A button sewn with care and the right technique will stay in place far longer than one done in a rush.
Button Sewing Chart by Clothing Type
The right combination of button type, thread, and shank technique changes depending on the garment being repaired. The chart below gives a quick reference for the most common clothing types.
| Clothing Item | Button Type | Thread Type | Thread Shank Needed |
|---|---|---|---|
| Dress Shirt | Two-hole or Four-hole | Polyester | Yes |
| Blouse | Two-hole | Fine Polyester | Yes |
| Sweater | Four-hole | Polyester | Usually |
| Coat | Large Flat Button | Heavy-Duty Thread | Yes |
| Blazer | Shank Button | Heavy-Duty Thread | No |
| Jeans | Metal or Shank Button | Heavy-Duty Thread | No |
Use this chart as a starting point when gathering supplies. Matching the thread type to the garment weight is the single most important variable for a repair that holds up over time.
How to Make a Sewn Button Last Longer
Once a button is sewn back on correctly, a few simple habits keep it secure for much longer. Start by reinforcing buttons that are used frequently, such as the top button on a shirt or the waistband button on pants.
A small extra stitch or two when first attaching these buttons reduces the chance of early loosening.
Catching a loose thread early means a quick resew rather than a full replacement. Replace worn or fraying thread on an older button before it snaps entirely.
When buying new clothing, check the inside hem or care tag for spare buttons sewn on by the manufacturer and store them in a small, labeled bag.
Keeping spares on hand means a replacement is always ready. Resewing is always the better choice over glue or tape, which breaks down quickly with washing and does not hold under stress.
Conclusion
I’ve always found that the most useful sewing skills are often the simplest ones.
Learninghow to sew a button may seem like a small repair, but it can extend the life of your favorite shirts, save money on replacements, and help you handle clothing mishaps without stress.
After practicing the steps a few times, the process becomes surprisingly quick and natural.
When I need to sew a button on a shirt, I focus on proper placement, even stitches, and a secure thread shank.
Those small details make a big difference in how long the repair lasts. The next time a button comes loose, grab a needle and thread instead of setting the garment aside.
Frequently Asked Questions
How Many Stitches Does It Take to Sew a Button Securely?
Most buttons need at least five to six stitches through each set of holes. For heavier garments like coats or jeans, aim for 8 stitches for a firm, lasting hold.
Can a Sewing Machine Be Used to Sew a Button?
Yes. Set the machine to a zigzag stitch with the stitch length at zero, then align the needle with the button holes and sew slowly for best results.
What Is the Best Way to Remove an Old Button Before Replacing It?
Use small scissors or a seam ripper to carefully cut the threads holding the button in place. Remove any leftover thread from the fabric and button area before attaching the replacement.
Does the Size of the Button Matter When Replacing One on a Shirt?
Yes. The replacement button must fit through the existing buttonhole without being too loose or too tight. A snug fit through the hole keeps the shirt from closing properly during wear.
How Do You Sew a Button on a Thick Fabric Without Damaging It?
Use a heavy-duty thread and a larger needle sized for thick fabrics. Sew slowly, apply steady pressure, and use a thimble if the needle is difficult to push through cleanly. Create a slightly longer thread shank as well, since thicker fabrics need extra space for the button to fasten.