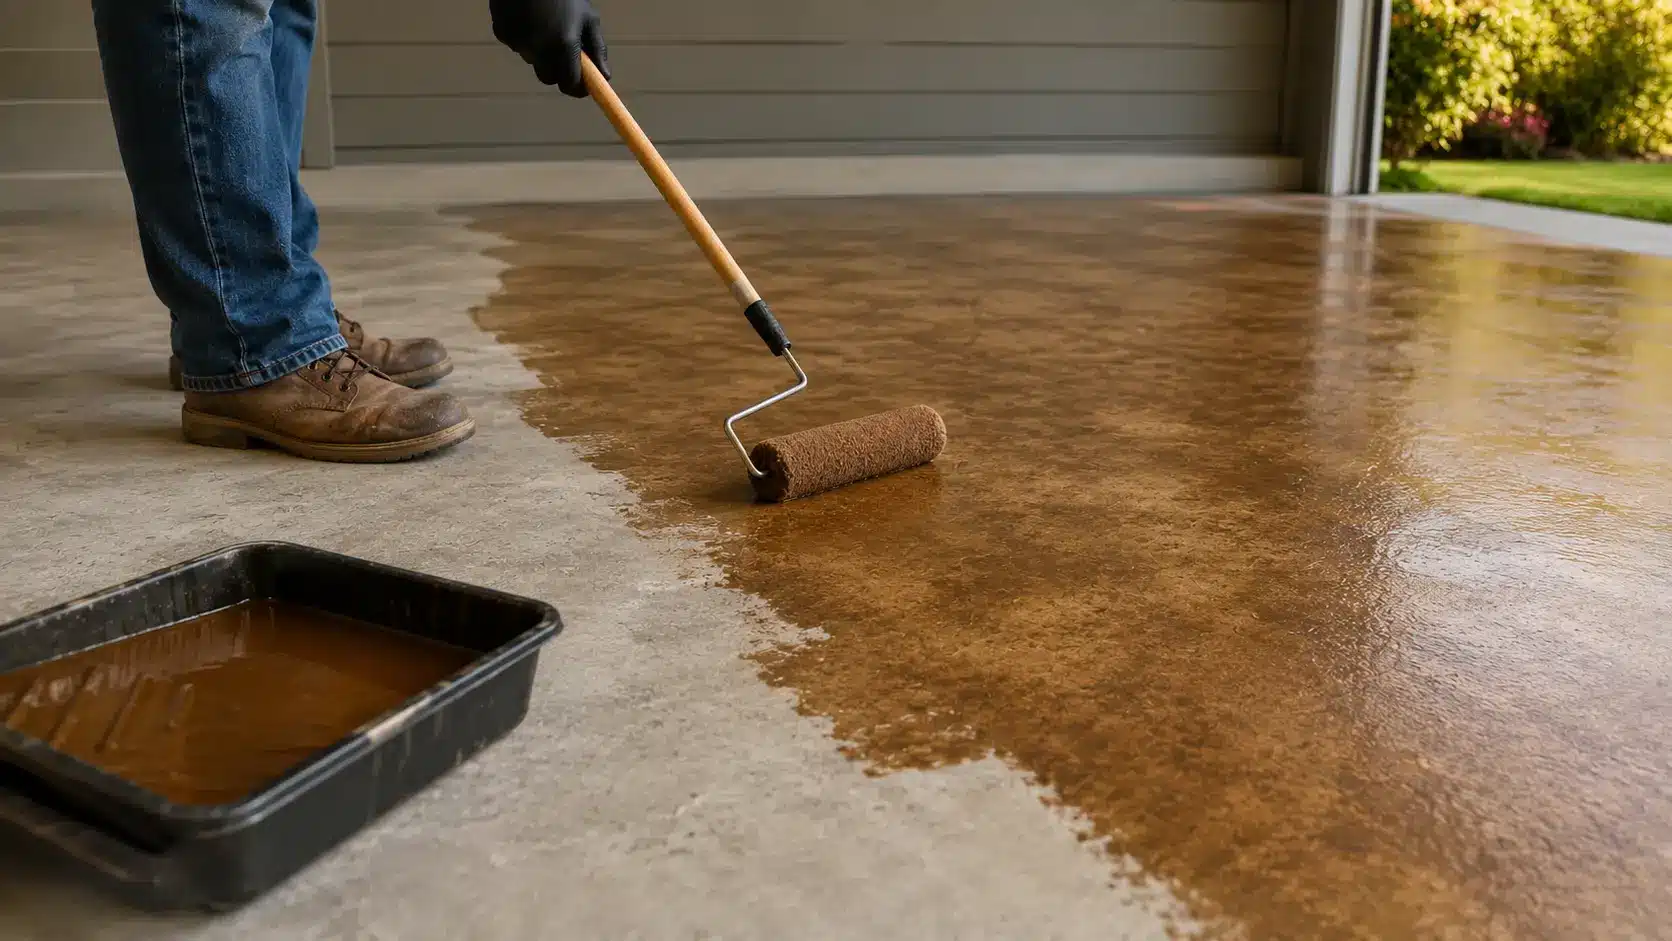
Learning how to stain concrete transformed my approach to home renovation, and my first attempt started with very little experience.
Years spent working in hospitality and event planning helped me appreciate how staining concrete floors can improve the appearance of a space without a major renovation budget.
When I later learned how to stain a concrete patio, I realized the same careful process delivers equally impressive results outdoors.
Concrete stain penetrates deep into the surface rather than sitting on top like paint, helping it last longer under regular foot traffic.
With the right preparation and sealing process, stained concrete performs well in basements, garages, patios, and driveways. Over time, I learned that patience during prep work makes the biggest difference in the final result.
What is Concrete Stain?
Concrete stain is not paint. Paint sits on top of the surface and chips or peels over time. Stain soaks into the concrete and bonds with the material, creating a color that does not flake off.
The result is a permanent finish with natural variation and depth that looks far more interesting than a solid painted surface.
Concrete stain works on virtually any concrete surface: floors, basements, garages, driveways, patios, pool decks, and walkways.
Concrete staining creates a durable, long-lasting finish that can handle daily wear with minimal upkeep.
Properly sealed stained concrete resists moisture and UV damage, making it ideal for both indoor and outdoor spaces. It is also a cost-effective alternative to tile, stone, bamboo flooring, or hardwood when budget is a priority.
Types of Concrete Stains
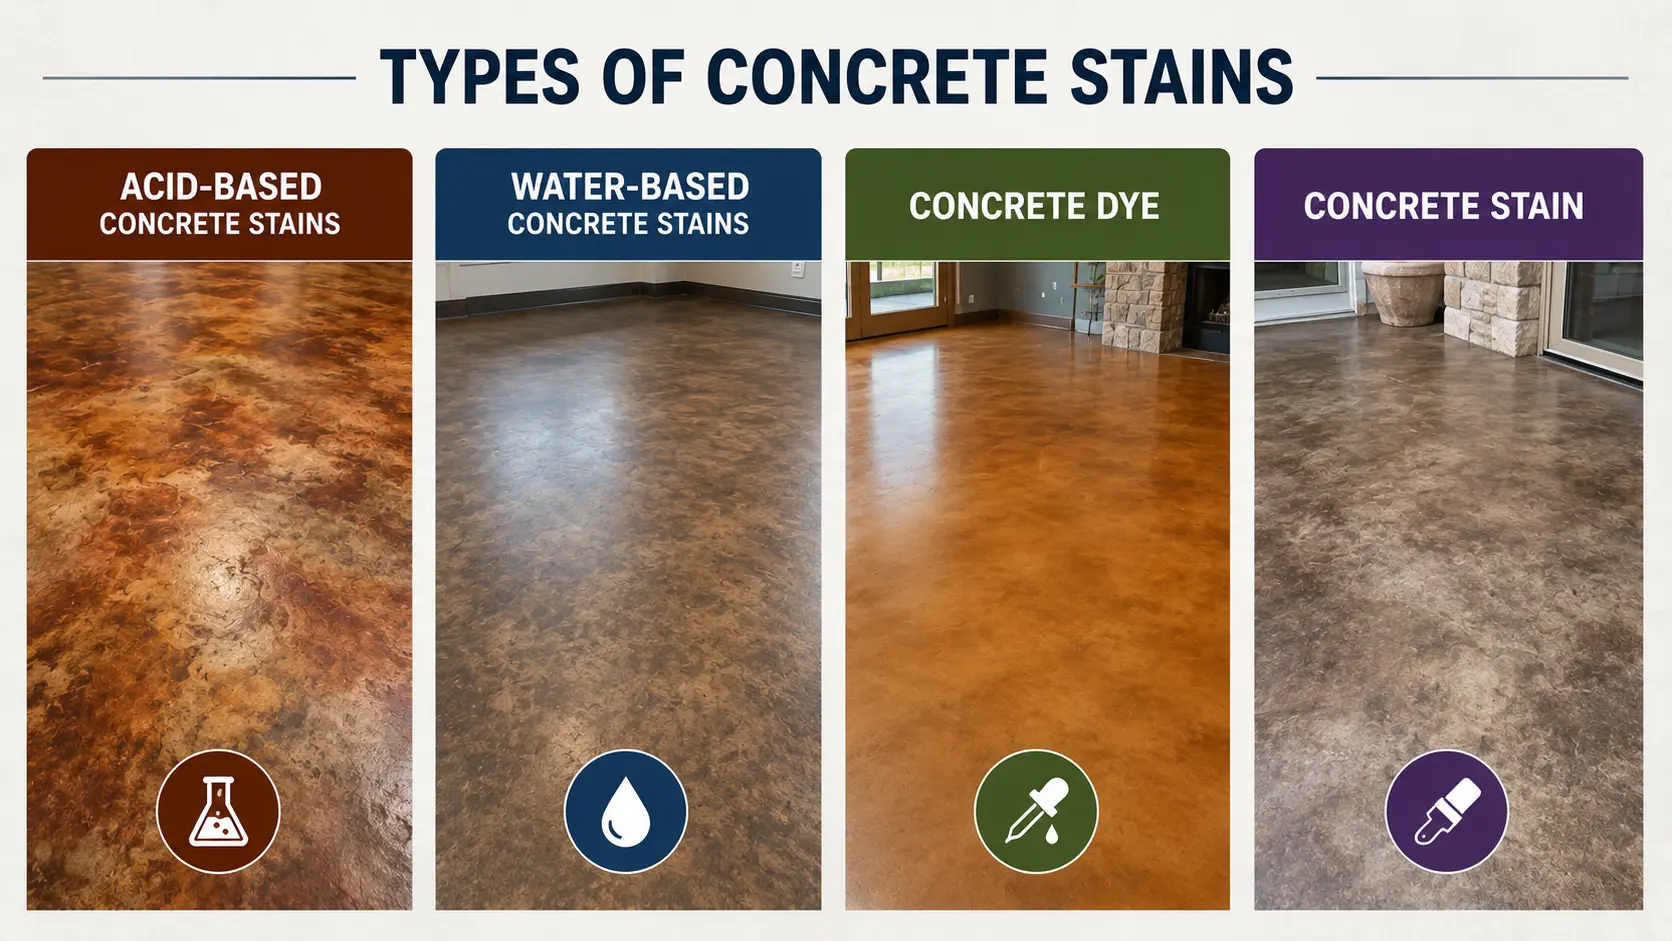
There are two main categories of stains used by DIYers. Your choice depends on the look you want, where the Surface is located, and how much prep work you are willing to do.
1. Acid-Based Concrete Stains
Acid stains work through a chemical reaction with the minerals already in the concrete. That reaction produces a mottled, variegated finish with earthy tones like brown, tan, rust, and dark green.
No two acid-stained floors look the same. The color is permanent because it becomes part of the concrete itself.
Acid stains are best for rustic and natural-looking finishes on garage floors, driveways, and decorative interiors. They require careful handling since they contain corrosive ingredients.
2. Water-Based Concrete Stains
Water-based stains offer a much wider range of colors, including bold blues, greens, reds, and neutrals. They dry faster, produce less odor, and are easier to apply without specialized equipment.
Water-based stains bond to the Surface rather than reacting chemically, so they are a better fit for beginner DIYers.
They are commonly used on basement floors and indoor spaces where a consistent color is the goal.
3. Concrete Dye vs Concrete Stain
Concrete dye is not the same as concrete stain. Dye uses much smaller particles that penetrate deeper and dry much faster, but it is not UV-stable and will fade outdoors.
Dyes are strictly for indoor use. Stains, both acid and water-based, can be used indoors or outdoors and hold up better over time, especially when sealed correctly.
Choosing the right concrete stain depends on the finish you want, the location of the Surface, and your DIY experience level.
Acid stains create rich, natural variation, while water-based stains offer easier application and more color choices. For long-lasting results, always pair your stain with proper surface prep and a quality sealer.
Best Concrete Stain for Your Project
Concrete surfaces in different areas of the home face different challenges, from heavy foot traffic to constant sun exposure.
Picking a stain designed for that environment helps achieve better color retention and finish quality.
| Project Type | Recommended Stain |
|---|---|
| Basement floors | Water-based |
| Garage floors | Acid stain |
| Patios | UV-resistant water-based |
| Decorative interiors | Acid stain |
Acid stain gives a premium look; water-based is easier for first-timers. The right combination of stain and sealer can completely change the look of plain concrete. With proper application, even older surfaces can gain a cleaner, more polished appearance.
Essential Tools and Materials
|
Before You Start: Test the Concrete Surface
Before staining concrete, make sure the Surface can absorb the stain properly. A simple water test can help identify old sealers or coatings that block penetration.
Common problems like oil stains, paint, adhesive residue, and efflorescence can prevent even color from being absorbed, leading to poor results.
Moisture inside the slab may also cause peeling or sealer failure over time. Most concrete surfaces can still be stained after proper cleaning and repairs.
Small cracks and chips should be patched before starting the project. If the concrete is severely damaged or flaking, applying a thin overlay to resurface the concrete can restore a smooth, durable base ready for stain or sealer.
How to Prepare Concrete for Staining
Preparation is the most important part of this project. Rushing through prep leads to patchy, uneven color or stain that peels within months.
- Clean the Surface Thoroughly: Remove dirt, grease, dust, and debris with a concrete cleaner and a stiff-bristle brush. Pressure washing helps clean outdoor concrete more effectively before staining.
- Repair Cracks and Imperfections: Fill cracks and smooth out rough spots to create a level surface. Proper repairs help the concrete stain absorb evenly and improve the final appearance.
- Strip Existing Sealers or Paint: Remove old paint, sealers, or coatings completely since concrete stain cannot penetrate sealed surfaces. Test absorbency again after stripping the concrete.
- Let Concrete Dry Completely: Allow the concrete to dry fully after cleaning or repairs. Excess moisture can prevent proper stain penetration and reduce sealer performance over time.
Good preparation makes everything that follows go more smoothly. Taking an extra day on prep is worth it every time.
How to Stain Concrete Floors
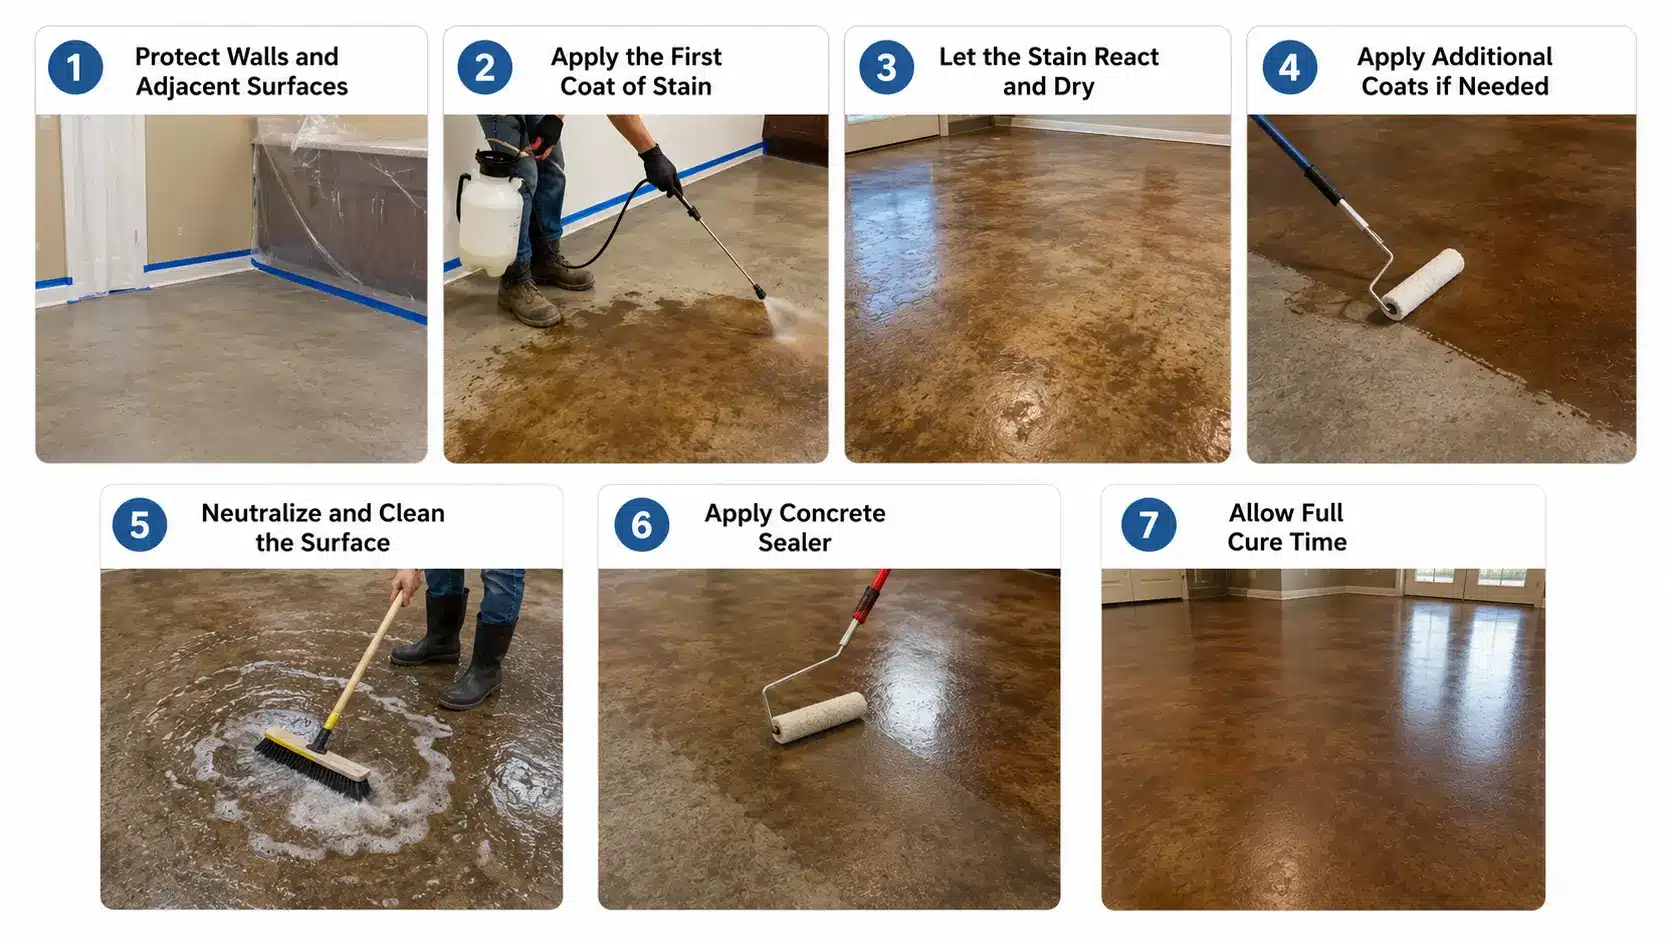
Staining concrete floors takes about two days from start to finish, including drying time between coats. Work in sections and keep a wet edge at all times to avoid visible overlap lines.
Step 1: Protect Walls and Adjacent Surfaces
Apply painter’s tape along the base of walls, door frames, and any trim that borders the floor.
Hang plastic sheeting over walls and cabinets near the work area. Once a stain lands on a wall or wood surface, it is very difficult to remove.
What to Watch Out For: Seal and tape off walls at least 12 to 18 inches above the concrete. Acid stain mist travels further than expected and will permanently mark anything it lands on.
Step 2: Apply the First Coat of Stain
Wear protective gloves and goggles throughout the application process, as removing the stain from skin after it sets can be difficult and time-consuming.
For acid stains, fill a pump sprayer and mist the Surface in a circular or figure-eight pattern. This creates natural-looking variation.
Avoid walking on a wet stain. For water-based stains, a paint roller with a 3/8-inch nap gives even, controlled coverage. Work in 4-by-4-foot sections and maintain a wet edge to blend coats.
What to Watch Out For: Pre-existing stains from oil, pet urine, grease, and rust are sometimes invisible when the floor is dry; they can block absorption and appear as light patches once the stain is applied.
Step 3: Let the Stain React and Dry
Acid stain needs time to complete its chemical reaction with the concrete. Allow 8 to 24 hours before moving to the next step.
Water-based stains dry much faster, typically 2 to 4 hours between coats. Do not rush this step. Color continues to develop as the stain dries.
What to Watch Out For: Temperatures below 50°F slow the chemical reaction and prevent proper color development, while temperatures above 90°F cause the stain to dry too fast and streak. Work in conditions between 50°F and 90°F for the best results.
Step 4: Apply Additional Coats if Needed
Most floors benefit from two coats of stain. A second coat deepens the color and fills any light or uneven spots from the first application.
Allow the first coat to dry fully before applying the second. For richer results, some DIYers apply a third coat in targeted areas.
What to Watch Out For: Applying stain over overly wet concrete dilutes the stain and leads to streaks or uneven color. Always confirm the first coat is bone dry before adding another.
Step 5: Neutralize and Clean the Surface
For acid stains, mix 1–2 tablespoons of baking soda with 1 gallon of water (or use a diluted ammonia solution) and apply it to the entire floor.
This stops the chemical reaction and removes residual acid. Scrub lightly and rinse thoroughly.
Water-based stains do not require neutralizing, but a clean rinse is still recommended to remove any surface residue.
What to Watch Out For: Wipe the floor with a white cloth after rinsing. If residue still shows, rinse and dry again, and repeat until the cloth comes away clean before moving to the sealer.
Step 6: Apply Concrete Sealer
Once the floor is fully dry, apply a concrete sealer. Choose a matte finish for a natural look or a glossy finish for a polished appearance.
Apply in thin, even coats with a roller or applicator pad. Two coats of sealer are standard. Sealer protects the stain from foot traffic, moisture, and abrasion.
What to Watch Out For: Excessive agitation when applying the sealer can cause streaks or an uneven surface. Roll it on with steady, consistent strokes, and let the product settle without going back over it repeatedly.
Step 7: Allow Full Cure Time
The sealer needs time to harden before the floor is ready for use. Wait at least 24 hours before walking on it.
Wait 72 hours before moving furniture back in. Heavy items like appliances should wait a full week.
What to Watch Out For: Many people assume the project is finished once the stain is down and skip the sealer entirely. Without it, the color wears away fast, and the surface has no protection against moisture or abrasion.
With the right preparation and patience, staining concrete floors can completely change the look of a room without replacing the flooring.
Taking time between coats and allowing proper cure time helps create a more durable finish.
Once sealed, stained concrete floors develop a durable surface that withstands everyday wear, similar to other long-lasting options, such as polished concrete floors for homes, which combine durability with a clean, refined look.
How to Stain Concrete Patios
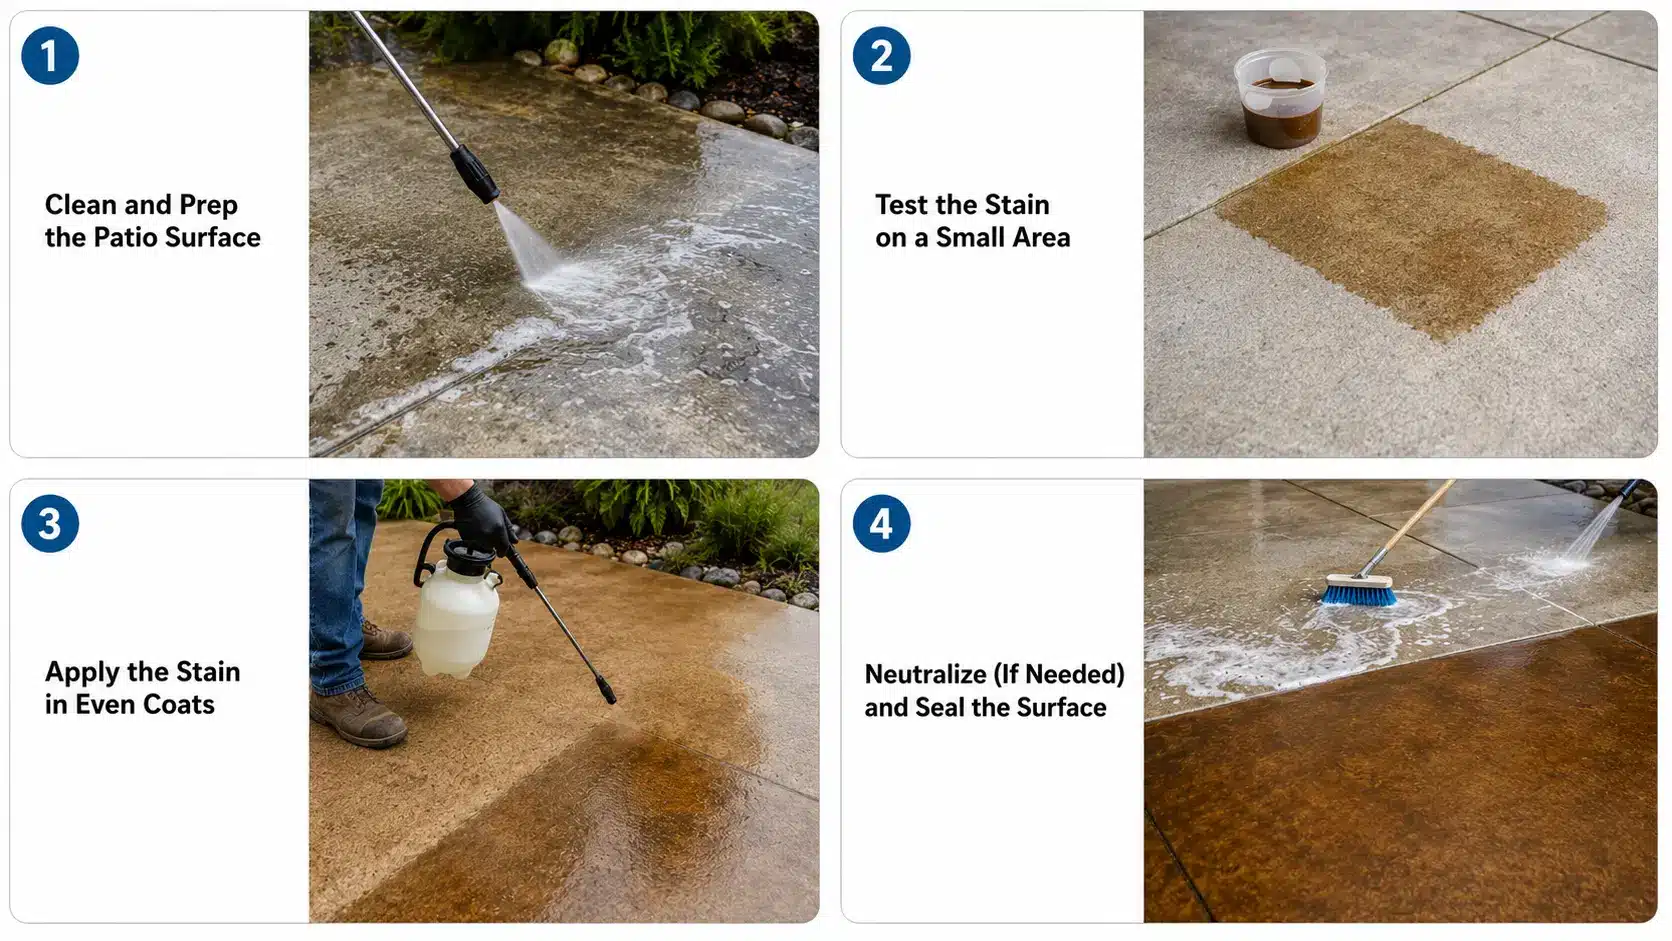
Staining a concrete patio is one of the best ways to give your outdoor space a fresh, finished look without spending a lot of money. The process takes about two days from start to finish, including dry time between steps.
Getting each stage right, from cleaning to sealing, is what separates a result that holds up for years from one that fades or peels within months.
- Step 1: Clean and prep the Patio Surface. Pressure wash the surface to remove dirt, mold, and debris. Scrub stubborn stains with a concrete cleaner. Fill cracks, let them dry, and avoid staining in direct sunlight or wind.
- Step 2: Test the Stain on a Small Area. Pour water on the concrete first. If it soaks in, the surface is ready. If it beads up, strip the old sealer before applying any stain.
- Step 3: Apply the Stain in Even Coats. Use a pump sprayer or a 3/8-inch nap roller. Work in sections, keep a wet edge, and let the first coat dry fully before adding a second.
- Step 4: Neutralize (If Needed) and Seal the Surface. For acid stains, apply an ammonia-water solution, then rinse well. Once dry, apply two coats of a UV-resistant, slip-resistant exterior-grade concrete sealer.
Staining a concrete patio is a simple weekend project that can greatly improve the look of an outdoor space. Proper preparation, drying time, and regular resealing help maintain the color and protect the surface for years.
How Long Does Concrete Stain Last?
The lifespan of stained concrete depends on the type of stain, the surface location, and how well the Surface is maintained.
| Stain Type | Indoor Lifespan | Outdoor Lifespan | Notes |
|---|---|---|---|
| Acid-based | 20–30 years | 5–20 years | Very durable, UV fade possible |
| Water-based | 8–15 years | 3–5 years | Easy upkeep, may need resealing |
| Concrete dye | 5–10 years | Not recommended | Indoor use only, fades outdoors |
If stained concrete looks faded, rough, or covered with scuff marks that no longer clean off, it is usually time to reseal the surface.
Another common sign is when water stops beading on the concrete and starts soaking in instead. Resealing at the right time prevents more serious damage and extends the life of the stain by years.
Common Concrete Staining Mistakes to Avoid
Getting the process wrong is easy if you skip steps or rush. These are the mistakes that most often show up in DIY staining projects.
- Skipping Surface Prep: Dirt, grease, and old coatings impede stain absorption, leading to uneven results. Thorough cleaning and proper prep are essential before staining concrete floors.
- Applying Stain Over Sealed Concrete: Concrete stain cannot properly penetrate sealed or painted surfaces. Remove existing coatings completely, and first confirm absorption with a simple water test.
- Using Too Much Stain: Heavy application of stain causes puddles, dark spots, and uneven coloring. Thin, even coats create a cleaner and more natural-looking stained concrete finish.
- Sealing Before Concrete Fully Dries: Trapped moisture under the sealer can cause peeling, bubbling, or cloudy patches. Allow the concrete to dry long enough before applying any protective sealer.
Avoiding these mistakes puts most DIY staining projects on track for a good result.
How Much Does It Cost to Stain Concrete?
Staining concrete yourself costs significantly less than hiring a professional. The main trade-off is time and skill level.
| Item | Estimated Cost |
|---|---|
| Concrete cleaner/degreaser | $15–$30 |
| Concrete stain (per gallon) | $35–$60 |
| Concrete sealer (per gallon) | $25–$50 |
| Pump sprayer | $20–$40 |
| Roller, brushes, tools | $20–$35 |
| Crack filler | $10–$20 |
| Estimated DIY Total | $125–$235 for 200 sq ft |
One gallon typically covers 200–300 square feet, depending on the stain type and the surface’s porosity. For two coats, plan for 200 sq ft per gallon. Larger areas will need multiple gallons. The sealer adds cost but is not optional; it protects the stain and significantly extends its lifespan.
Is DIY Concrete Staining Worth It?
From my experience working on home and event spaces, I have found that DIY concrete staining is a practical and budget-friendly way to upgrade worn concrete floors or patios.
For simple projects with one stain color and a well-prepared surface, most homeowners can achieve solid results without hiring a contractor.
The preparation stage takes the most effort but also has the greatest impact on how the stain looks and how long it lasts.
I usually recommend professional help for large decorative designs or multi-color patterns since those projects require more precision.
For standard patios, basements, or garage floors, DIY concrete staining can save a significant amount of money while still delivering a clean and durable finish.
Concrete Stain Maintenance Tips
Stained concrete stays attractive for years when maintained with simple cleaning and regular resealing.
Proper maintenance is especially important for patios, garages, and high-traffic indoor floors. Small preventive steps can greatly extend the life of stained concrete surfaces.
- Sweep stained concrete floors regularly to remove dirt and grit that can scratch the sealer and gradually dull the surface finish.
- Clean with warm water and a pH-neutral soap solution. Avoid bleach, vinegar, ammonia, and acidic cleaners, as they weaken protective sealers.
- Reseal indoor stained concrete every three to five years. Outdoor patios and driveways usually need resealing every one to two years.
- Use felt furniture pads and entry mats in busy areas to reduce surface scratches, scuffs, and long-term wear on sealed concrete floors.
- Watch how water reacts on the surface. If water absorbs quickly instead of beading, the concrete likely needs a fresh sealer coat.
Routine maintenance keeps stained concrete looking clean, polished, and durable without requiring expensive upkeep. Regular resealing and gentle cleaning products help preserve both the color and protective finish.
Final Thoughts
Concrete staining is one of the most practical ways to upgrade old floors, patios, and driveways without paying for full replacement.
With proper preparation, the right stain, and a durable sealer, concrete surfaces can maintain their color and finish for many years with minimal upkeep.
Throughout my experience working with home and event spaces, I have seen how stained concrete can completely improve the appearance of both indoor and outdoor areas while staying budget-friendly.
The process takes patience, especially during cleaning and prep work, but the results are worth the effort.
I always recommend starting with a small test area and following each step carefully. A well-stained concrete surface adds durability, character, and long-term value to any space.
Frequently Asked Questions
Can You Stain Concrete That Has Already Been Painted?
All paints, sealers, waxes, and glues must be fully stripped from the surface first. Stain cannot penetrate through paint. Remove all coatings completely before applying any stain product.
How Many Coats of Concrete Stain Do You Need?
You can apply multiple coats of stain, but you can only go darker, never lighter. Two coats are standard. Always let the surface dry fully between coats.
Does Concrete Need to Be Etched Before Staining?
Do not acid etch before applying acid stain. The stain needs the lime layer in the concrete to react with it. Acid etching removes it and can cause stain failure. Water-based stains, however, may benefit from light etching to open the pores; always check the product label.