How to measure and mark the top, bottom, and edge tiles |
 |
Welcome to the fifth part of our tiling guide.
In this section we show you how to measure the top, bottom and edge pieces to finish off the wall.
continued from: Part 4
|

|
This page is © Copyright 2001-2014 helpwithdiy.com |
|

Please note: We will accept no responsibility for any damage or injury as a result of following this guide.
For further information please see our disclaimer, a link to which can be found at the bottom of this page.
|

Measuring & marking the top tiles |
 |
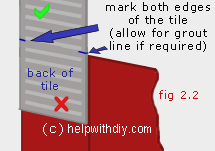
Each top tile must be measured individually to ensure a perfect fit, take a new tile and place it face down on top of the tile in the row beneath (see fig 2.2).
Slide the tile up to the top of the surface, if you want a grout line at the top then lower the tile a spacer's width from the top, also, if you are using spacers between your rows (grout lines) then leave enough space when marking the tile.
|
When you are happy with the position of the tile, use a felt pen to mark the edge of the tile on both sides using the top of the lower tile for a guide (see fig 2.2).
Notice we have placed a tick on the piece of tile which is to be used and an X on the piece to discard, this can avoid getting the tile pieces mixed up.
If you are measuring and cutting all of the tiles before you start laying them, then it is a good idea to number them so you know where each piece of tile goes when you come to lay them.
|
|
|

Measuring & marking the edge tiles |
 |
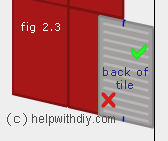
Like the top tiles, the edge tiles must be measured individually to ensure a perfect fit, take a new tile and place it face down on top of the full tile at the edge of the tile field (see fig 2.3).
Slide the tile over to the adjoining wall, check the tile is level and then mark the back of the tile (allowing a spacer's width if required) in two positions, using the adjacent tile as a guide (see fig 2.3).
To mark the piece for the opposite side of this row of tiles, simply do the reverse of the above.
|
|

Measuring & marking the bottom tiles |
 |
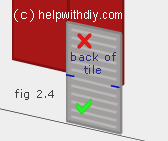
The bottom tiles also need to be measured individually, place a new tile face down on the tile in the row above.
Lower it to the bottom of the wall/surface, if you want a grout line then lift the tile a spacer's width back up.
Mark the tile on the back in the two positions showed in fig 2.4 (allowing the extra space for a grout line if required).
Again we have added a tick and an X to distinguish between the two pieces of tile once they have been cut.
|
|

Finishing off the markings |
 |
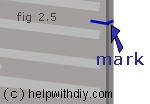
Once you have made your initial marks, use the pen to follow the marks around from the back of the tile to the edges, then mark round to the face of the tile.
Take a straight piece of batten or a steel rule and join the two lines together across the face of the tile, which should give you a precise cutting line.
|
|

|
In part 6 we will show you how to cut the tiles using different methods.
|


|
|
|
