
Silicone sealant - How to seal a bath, sink or basin
Welcome to our guide to using silicone sealant.
Whether you are doing a new bathroom/kitchen installation or your existing sealant is old and needs replacing, at some point using silicone sealant may be necessary.
In this section we take you through the process of sealing a bath, sink, or basin with a sealant gun.
First, we show you how to easily remove old silicone and then take you step-by-step through the application to get the perfect seal and finish.
Please note: We will accept no responsibility for any damage or injury as a result of following this guide.
For further information please see our disclaimer, a link to which can be found at the bottom of this page.
For further information please see our disclaimer, a link to which can be found at the bottom of this page.

Take extra care when using sharp blades.
Silicone sealant fumes can be harmful, so do not inhale.
Silicone sealant fumes can be harmful, so do not inhale.
Silicone gun overview
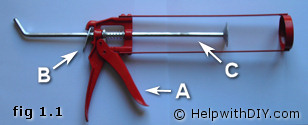
In fig 1.1 is a typical silicone sealant gun, or applicator, which can be purchased from the majority of hardware stores. They are inexpensive and usually bundled with a tube of silicone.
We have pointed out the main parts of the gun:
We have pointed out the main parts of the gun:
- The trigger (A in fig 1.1)
- The release tab (B in fig 1.1)
- The pressure rod (C in fig 1.1)
Preparing the silicone tube
First, cut the end off the applicator nozzle.
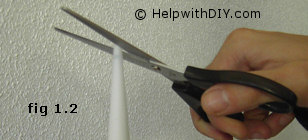
Measure the gap/joint to be sealed and cut the nozzle according to the size of the gap.
For best results cut the applicator nozzle at a slight (30-45° degree) angle, this will allow you to keep the nozzle tight against where the two surfaces meet (see fig 1.2).
Then, trim the end off the silicone sealant tube with either a pair of sharp scissors or a craft knife. Attach the nozzle to the tube by screwing it clockwise onto the thread of the tube. Take care not to cross-thread it.
Loading the silicone gun
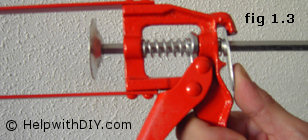
Press the release tab on the gun (see fig 1.3), and pull the pressure rod back to allow you to insert the silicone tube.
Load the sealant tube into the gun, then squeeze the trigger gently until the pressure rod goes into the base of the tube.
Keep squeezing the trigger gently until the rod makes contact with the diaphragm. Don't squeeze the trigger too hard or the silicone will leak out of the nozzle.
Load the sealant tube into the gun, then squeeze the trigger gently until the pressure rod goes into the base of the tube.
Keep squeezing the trigger gently until the rod makes contact with the diaphragm. Don't squeeze the trigger too hard or the silicone will leak out of the nozzle.
Removing Silicone Sealant
Advertisements
Removing old silicone sealant can be tricky depending on the surface. These days there are some great tools as well as some removal gels which make the job so much easier.
However, another more time-consuming method is to use the blade of a craft knife, which is the method we will cover here.
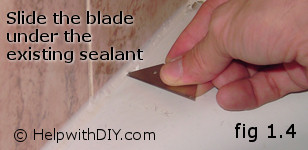
Carefully hold the knife blade and slide it under the silicone with the blade against the surface (fig 1.4), then, using the same method, slide the blade behind the sealant with the blade flush against the wall. Take care not to scratch the surfaces.
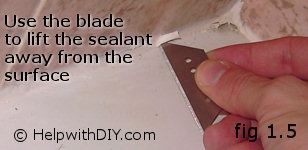
After slicing the sealant at both surfaces, use the blade to cut the silicone into sections to make it easier to remove. Place the blade back under the sealant and then lift it away from the surface (see fig 1.5).
Grab the loose end of the sealant and pull it gently, you should be able to lift the section of sealant away fairly easily.
You can remove any remaining remnants of silicone by gently scraping it off with the knife blade. Try using the whole length of the blade and sliding it along the surface scraping the sealant as you go.
However, another more time-consuming method is to use the blade of a craft knife, which is the method we will cover here.
Carefully hold the knife blade and slide it under the silicone with the blade against the surface (fig 1.4), then, using the same method, slide the blade behind the sealant with the blade flush against the wall. Take care not to scratch the surfaces.
After slicing the sealant at both surfaces, use the blade to cut the silicone into sections to make it easier to remove. Place the blade back under the sealant and then lift it away from the surface (see fig 1.5).
Grab the loose end of the sealant and pull it gently, you should be able to lift the section of sealant away fairly easily.
You can remove any remaining remnants of silicone by gently scraping it off with the knife blade. Try using the whole length of the blade and sliding it along the surface scraping the sealant as you go.
Applying the silicone to the surface
Always make sure that all surfaces are dry and free of any old silicone, debris or dust.
Sealing a bath
For best results, fill the bath with water before you apply the silicone, as some baths give slightly when they are in use. If you seal the bath without water in it, then when you use the bath, it may stretch the silicone and eventually lose its seal.
Sealing a bath
For best results, fill the bath with water before you apply the silicone, as some baths give slightly when they are in use. If you seal the bath without water in it, then when you use the bath, it may stretch the silicone and eventually lose its seal.
Advertisements
Applying the Silicone.
Position the applicator nozzle against the surface, then gently squeeze the trigger until the silicone starts to come out.
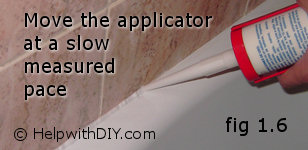
While applying gentle pressure to the trigger, move the applicator nozzle along the surface at a measured pace (fig 1.6).
Try to cover the whole surface in one stroke.
Putting a finish on the silicone sealant
The simplest way to get a nice finish is to either use your finger or a finishing tool. If you have a finishing tool then follow the simple instructions which came with it, although they are a fairly obvious tool to use.
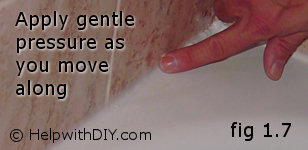
If you do not have a finishing tool, wet your finger first to stop the silicone sticking to it, use a bit of saliva or some washing up liquid. Run your finger along the sealant to leave a smooth even coat (fig 1.7).
(you can also use a piece of rubber pipe or similar object)
To remove the excess silicone from your finger, use a sheet of paper towel.
Trying to get silicone off your hands with water just makes things worse! Use soap and water to clean your hands only after you have got the majority off with the paper towel.
Position the applicator nozzle against the surface, then gently squeeze the trigger until the silicone starts to come out.
While applying gentle pressure to the trigger, move the applicator nozzle along the surface at a measured pace (fig 1.6).
Try to cover the whole surface in one stroke.
Putting a finish on the silicone sealant
The simplest way to get a nice finish is to either use your finger or a finishing tool. If you have a finishing tool then follow the simple instructions which came with it, although they are a fairly obvious tool to use.
If you do not have a finishing tool, wet your finger first to stop the silicone sticking to it, use a bit of saliva or some washing up liquid. Run your finger along the sealant to leave a smooth even coat (fig 1.7).
(you can also use a piece of rubber pipe or similar object)
To remove the excess silicone from your finger, use a sheet of paper towel.
Trying to get silicone off your hands with water just makes things worse! Use soap and water to clean your hands only after you have got the majority off with the paper towel.
Advertisements