
How to cut ceramic tiles
Welcome to our guide to cutting tiles.
This page describes how to use different tools for cutting tiles, including how to use a tile scriber and a standard tile cutter. We also cover how to measure, mark and cut tiles around any pipes you may encounter.
If you have not yet marked your tiles for cutting then see tiling a wall.
This page describes how to use different tools for cutting tiles, including how to use a tile scriber and a standard tile cutter. We also cover how to measure, mark and cut tiles around any pipes you may encounter.
If you have not yet marked your tiles for cutting then see tiling a wall.
Please note: We will accept no responsibility for any damage or injury as a result of following this guide.
For further information please see our disclaimer, a link to which can be found at the bottom of this page.
For further information please see our disclaimer, a link to which can be found at the bottom of this page.

When working with ceramic tiles always wear safety goggles and thick work gloves!
Ceramic tiles can be extremely sharp when trimmed or cut.
Ceramic tiles can be extremely sharp when trimmed or cut.
Cutting tiles with a tile scriber
After marking the tile for cutting, place it face up on a solid surface.
Place a steel rule (or suitable straight edged guide) on the tile and line the ends up with your cut marks.
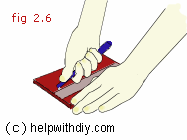
When you are happy with the positioning, use the tile scriber to firmly score the tile from top to bottom.
Some thicker tiles may need extra attention paid to the edges, score these independently if required.
Once you have scored the tile, get to hand a chopping board (or similar) and a piece of thin wire. Place the piece of wire onto the board in a perfectly straight line, it is better to attach the wire to the board if you are making a lot of cuts.
Position the tile face up onto the board, lining up the wire with the score mark at the top and bottom of the tile.
Once positioned correctly, apply pressure to both edges of the tile at the same time.
The tile should break along the score mark leaving a clean cut.
Place a steel rule (or suitable straight edged guide) on the tile and line the ends up with your cut marks.
When you are happy with the positioning, use the tile scriber to firmly score the tile from top to bottom.
Some thicker tiles may need extra attention paid to the edges, score these independently if required.
Once you have scored the tile, get to hand a chopping board (or similar) and a piece of thin wire. Place the piece of wire onto the board in a perfectly straight line, it is better to attach the wire to the board if you are making a lot of cuts.
Position the tile face up onto the board, lining up the wire with the score mark at the top and bottom of the tile.
Once positioned correctly, apply pressure to both edges of the tile at the same time.
The tile should break along the score mark leaving a clean cut.
Cutting tiles with a tile cutter
Advertisements
If you are cutting a lot of tiles then a tile cutter can be invaluable.
Line up the tile by moving the carriage towards you and checking the position of the blade on your marks, at both edges of the tile. When you are ready to cut, move the carriage to the mark nearest you.
Place the blade (bit) on the edge of the tile, then using a forwards motion score the tile all the way along.
If needed have a few practices with some scrap or old tiles.
You should only need to score the tile once (with a decent blade), but you may find you need to score it again. You will find some tiles score easier than others, depending on the finish.
Before you snap the tile, ensure it is still in position on the tile cutter. To snap the tile, bring the handle down towards you firmly, and the tile should snap cleanly.
How to cut around pipes
When tiling your bathroom or kitchen there is a good chance you will come across a pipe or two! To cut a tile around a pipe is not as difficult as it may seem, with a little practice you will be cutting tiles in no time.
There are several ways to achieve a similar result, your choice of technique will depend on what tools you have at your disposal and your current DIY skill level.
note: do not apply tile adhesive until you have cut and tested the position of the tile against the pipe. Tile adhesive becomes unusable after a short time.
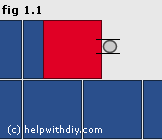
1. Position the tile as shown in fig 1.1 (tile of interest shown in red). Ensure it is aligned correctly using the other tiles as a guide (don't forget to take into account the tile spacer on the top of the row of tiles below).
2. Using your felt-tip or pencil mark the tile twice, once level with the top of the pipe and once level with the bottom of the pipe (see fig 1.1).
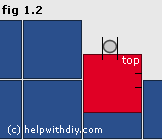
3. Next align the tile as shown in fig 1.2. Line it up with the tile in the row below it, leave enough room for a spacer between it and what will be the neighbouring tile.
4. Mark the tile as before except make vertical marks inline with the left and right of the pipe.

There are several ways to achieve a similar result, your choice of technique will depend on what tools you have at your disposal and your current DIY skill level.
note: do not apply tile adhesive until you have cut and tested the position of the tile against the pipe. Tile adhesive becomes unusable after a short time.
1. Position the tile as shown in fig 1.1 (tile of interest shown in red). Ensure it is aligned correctly using the other tiles as a guide (don't forget to take into account the tile spacer on the top of the row of tiles below).
2. Using your felt-tip or pencil mark the tile twice, once level with the top of the pipe and once level with the bottom of the pipe (see fig 1.1).
3. Next align the tile as shown in fig 1.2. Line it up with the tile in the row below it, leave enough room for a spacer between it and what will be the neighbouring tile.
4. Mark the tile as before except make vertical marks inline with the left and right of the pipe.
Advertisements
5. Mark the top of the tile so you know which way up it will eventually go.
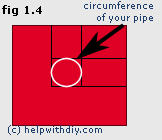
6. Using your set-square lengthen and join the lines as shown in fig 1.3. This will give you a square which will be the diameter of the pipe.
7. The next step is to draw the circle which will be the circumference of the pipe (fig 1.4). There are a few ways to achieve this, the easiest being to use an off-cut of the pipe that you are tiling around. If an off-cut is not available you could use a compass to draw the circumference of the pipe. Remember that you want to leave a small gap (around 5mm) between the pipe and the tile, which will be grouted.
8. The next stage is to cut out the circle from the tile, there are several ways to do this.
One way is to drill the tile several times within the circle and then use a tile saw and tile-file to trim the inside of the circle until you have the desired circumference. (this option is only suitable when the tile can be slid over the pipe)
Another option is to cut the tile horizontally into two pieces, with the cut going straight through the centre of the circle. After cutting, use the tile saw to remove the excess tile.
You can use a tile file to perfect the circular cut, when you are happy with the cut, the next step is to position the tile (or two pieces of tile depending on which option you chose to cut the tile).
When you are satisfied that the tile fits nicely around the pipe, apply tile adhesive either to the surface area or the back of the tile (whichever you find easier). Firmly place the tile into position and remove any excess adhesive from the face and edges of the tile.
Advertisements