
How to replace a cracked tile
Ceramic tiles can crack fairly easily, but fortunately, replacing them is fairly straghtforward providing you have the correct tile. In this section we will take you through the process of removing the old cracked/damaged tile and laying the replacement.
Please note: We will accept no responsibility for any damage or injury as a result of following this guide.
For further information please see our disclaimer, a link to which can be found at the bottom of this page.
For further information please see our disclaimer, a link to which can be found at the bottom of this page.

When working with ceramic tiles always wear safety goggles and thick work gloves!
Ceramic tiles can be extremely sharp when trimmed or cut.
Ceramic tiles can be extremely sharp when trimmed or cut.
To complete this task you will need:
- Replacement tile/tiles
- Tile Adhesive
- Tile grout (ready mixed is easier)
- Masking tape
- Electric drill with 5mm masonry bit
- Cold chisel
- Wood chisel
- Tile adhesive spreader
- Tile Spacers
- Grout spreader
- Grout rake
- Plastic grout finishing tool
- Safety goggles, appropriate work gloves
Removing the cracked tile
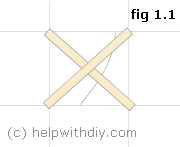
Place the masking tape in two strips diagonally to form an X shape on the tile as shown in fig 1.1
Advertisements
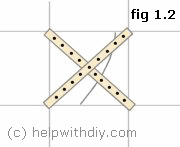
Using the 5mm bit drill holes at intervals along each strip of masking tape as shown in fig 1.2 this will help stop the drill bit slipping, only drill the depth of the tile, you could wrap a piece of masking tape around the drill bit at the required depth to use as a guide.
Next using the grout rake remove all the old grout from around the tile, ensuring not to damage the surrounding tiles.
Now get your cold chisel and hammer and chip away at the tile starting from the middle and work your way out to the edges along the masking tape.
Next remove the masking tape, you may find that most of the tile comes away with the tape, use the wood chisel bevel side down to remove any bits of tile that are left taking care not to damage the surrounding tiles.
When you have removed all of the tile remove any old grout that may be left.
Replacing the tile
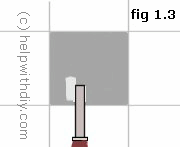
Now gently remove the old tile adhesive from the wall taking care not to slip with the chisel (see fig 1.3) and damage any of the other tiles, leave yourself with a nice flat surface for applying the tile adhesive.
To give yourself a guide place the tile into the space to see if it fits and to make sure it is even, if the tile rocks then the surface is not even. This will also give a guide as to how much tile adhesive will need to be applied.
Next take the replacement tile and apply the adhesive to the back of the tile using the adhesive spreader, use sparingly as the tile has to sit flush.
Now carefully put the tile into place, making sure all sides/corners are flush with the surrounding tiles. When you are happy that the tile is flush, clean all adhesive from the face of the tile and the surrounding areas.
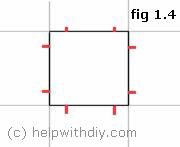
Use your tile spacers to get an even spacing around the tile as shown in fig 1.4 and leave for 24 hours or however long the tile adhesive manufacturer recommends.
Once the tile is securely fixed in position remove the tile spacers and grout around the tile. Use your plastic grout finishing tool to give the grout a smooth finish.
When the grout has dried simply polish off with a dry cloth.
To give yourself a guide place the tile into the space to see if it fits and to make sure it is even, if the tile rocks then the surface is not even. This will also give a guide as to how much tile adhesive will need to be applied.
Next take the replacement tile and apply the adhesive to the back of the tile using the adhesive spreader, use sparingly as the tile has to sit flush.
Now carefully put the tile into place, making sure all sides/corners are flush with the surrounding tiles. When you are happy that the tile is flush, clean all adhesive from the face of the tile and the surrounding areas.
Use your tile spacers to get an even spacing around the tile as shown in fig 1.4 and leave for 24 hours or however long the tile adhesive manufacturer recommends.
Once the tile is securely fixed in position remove the tile spacers and grout around the tile. Use your plastic grout finishing tool to give the grout a smooth finish.
When the grout has dried simply polish off with a dry cloth.
Advertisements