
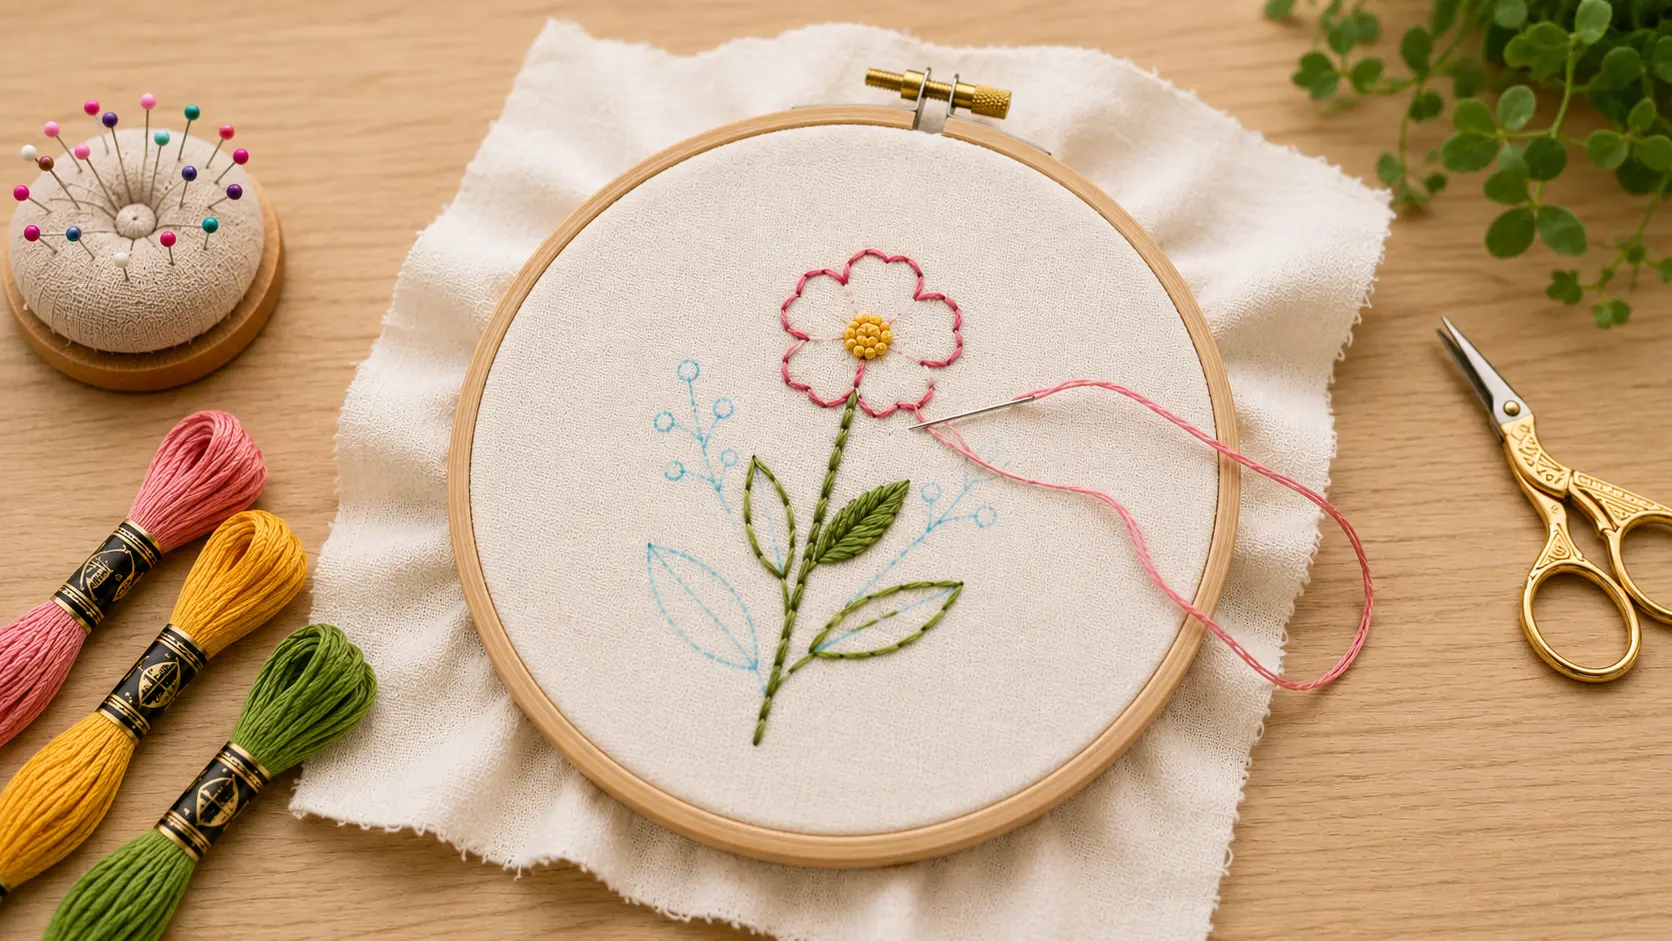
I came to embroidery late, and I wish I hadn’t waited so long. For years, I assumed it was one of those crafts that required great skill before you could make anything worth looking at.
Then one afternoon, I picked up a needle, threaded it with DMC floss, and stitched a small daisy onto the pocket of a linen shirt. It took about 20 minutes.
Once you understand how to embroider on clothes, you can personalize a plain t-shirt, refresh a denim jacket, monogram a tote bag, or rescue a garment with a small imperfection you want to hide.
Today, I walk through everything from choosing your first fabric to finishing your thread on the back so it never unravels in the wash.
If you follow the steps here, you will finish your first piece before the end of the week and will be all set to showcase your embroidery creations.
| Supply | Why You Need It |
|---|---|
| Embroidery hoop | Keeps fabric tight and prevents puckering while you stitch |
| Embroidery floss | The thread that creates all your stitches and shapes |
| Embroidery needle | Carries the thread through the fabric cleanly |
| Fabric marking pen | Transfers your design so you have a line to follow |
| Stabilizer | Supports the fabric and keeps stitches from distorting |
| Small scissors | Cuts thread neatly without fraying |
Step-by-Step Method for How to Embroider on Clothes
Once your supplies and embroidery kit are ready and your fabric is prepped, the actual stitching part is more straightforward than most people expect. Here is exactly how I do it, in the exact same order, every single time.
Step 1: Choose the Right Garment
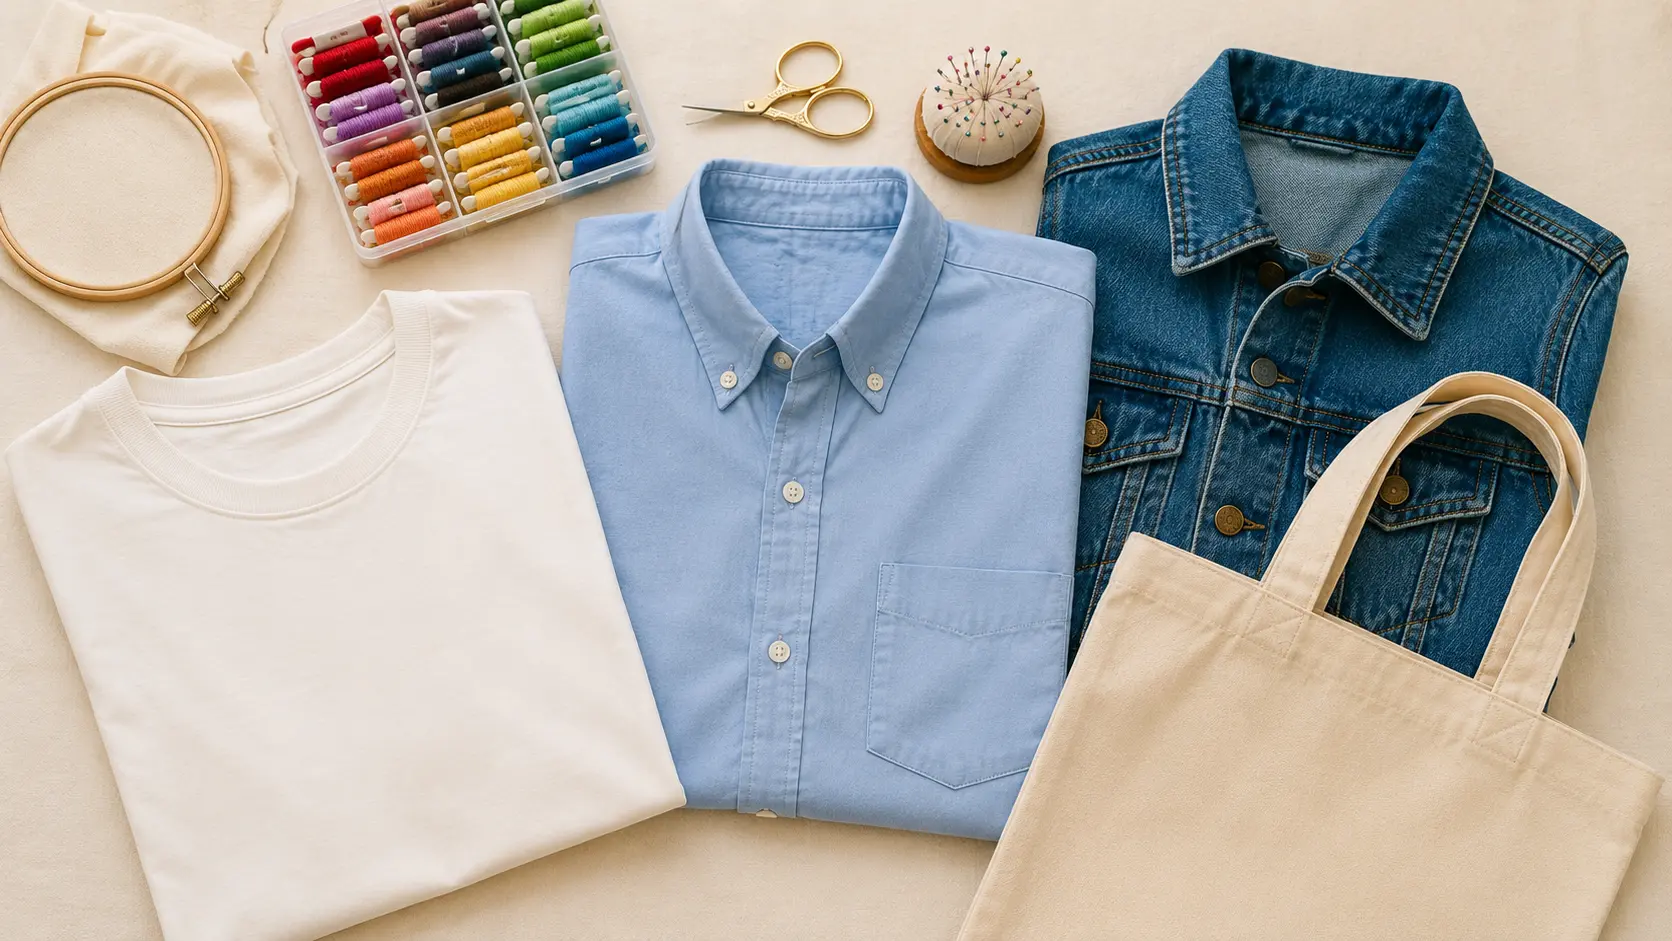
For your first project, go with a woven cotton garment. Good choices are a plain cotton t-shirt, a button-up shirt, a denim jacket, or a canvas tote bag.
Avoid garments with many seams or pockets in the area you want to embroider. Stitching over a seam is genuinely difficult and is not where you want to start.
The easiest fabrics to stitch are cotton, linen, denim, canvas, and chambray because they stay firm in the hoop. Avoid very hard, thick, slippery, or stretchy fabrics for your first project, as they are harder to control and can cause puckering.
Step 2: Add Stabilizer Behind the Fabric
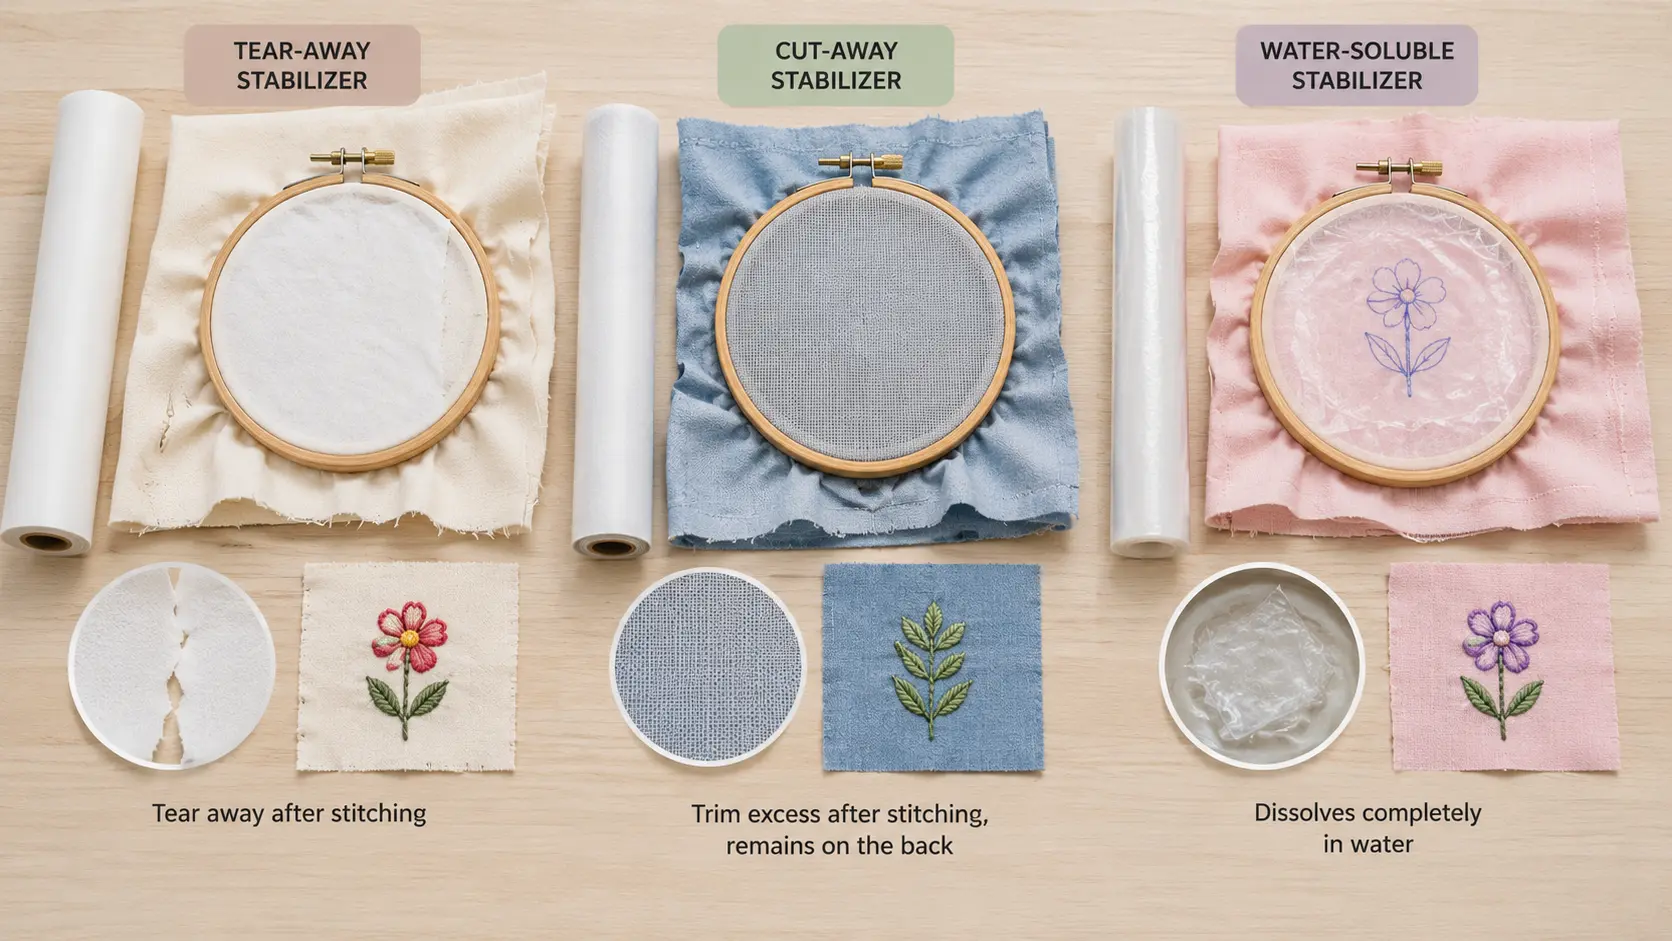
Stabilizer sits on the back of the fabric before you hoop it. It prevents the fabric from pulling or distorting under the stitches.
Tear-away stabilizer is a stiff paper-like material you place against the back of the fabric. After you finish stitching, you tear it away around the design.
Cut-away stabilizer is a soft mesh that stays permanently attached to the back of the garment. You trim the excess after stitching.
This type is better for stretchy fabrics like jersey or knit, because it prevents the fabric from stretching and distorting over time.
A water-soluble stabilizer dissolves completely when you soak the finished garment. It can double as a design transfer method: print or trace your design onto it, apply it to the front of the fabric, stitch through it, then wash it away.
Step 3: Transfer the Design
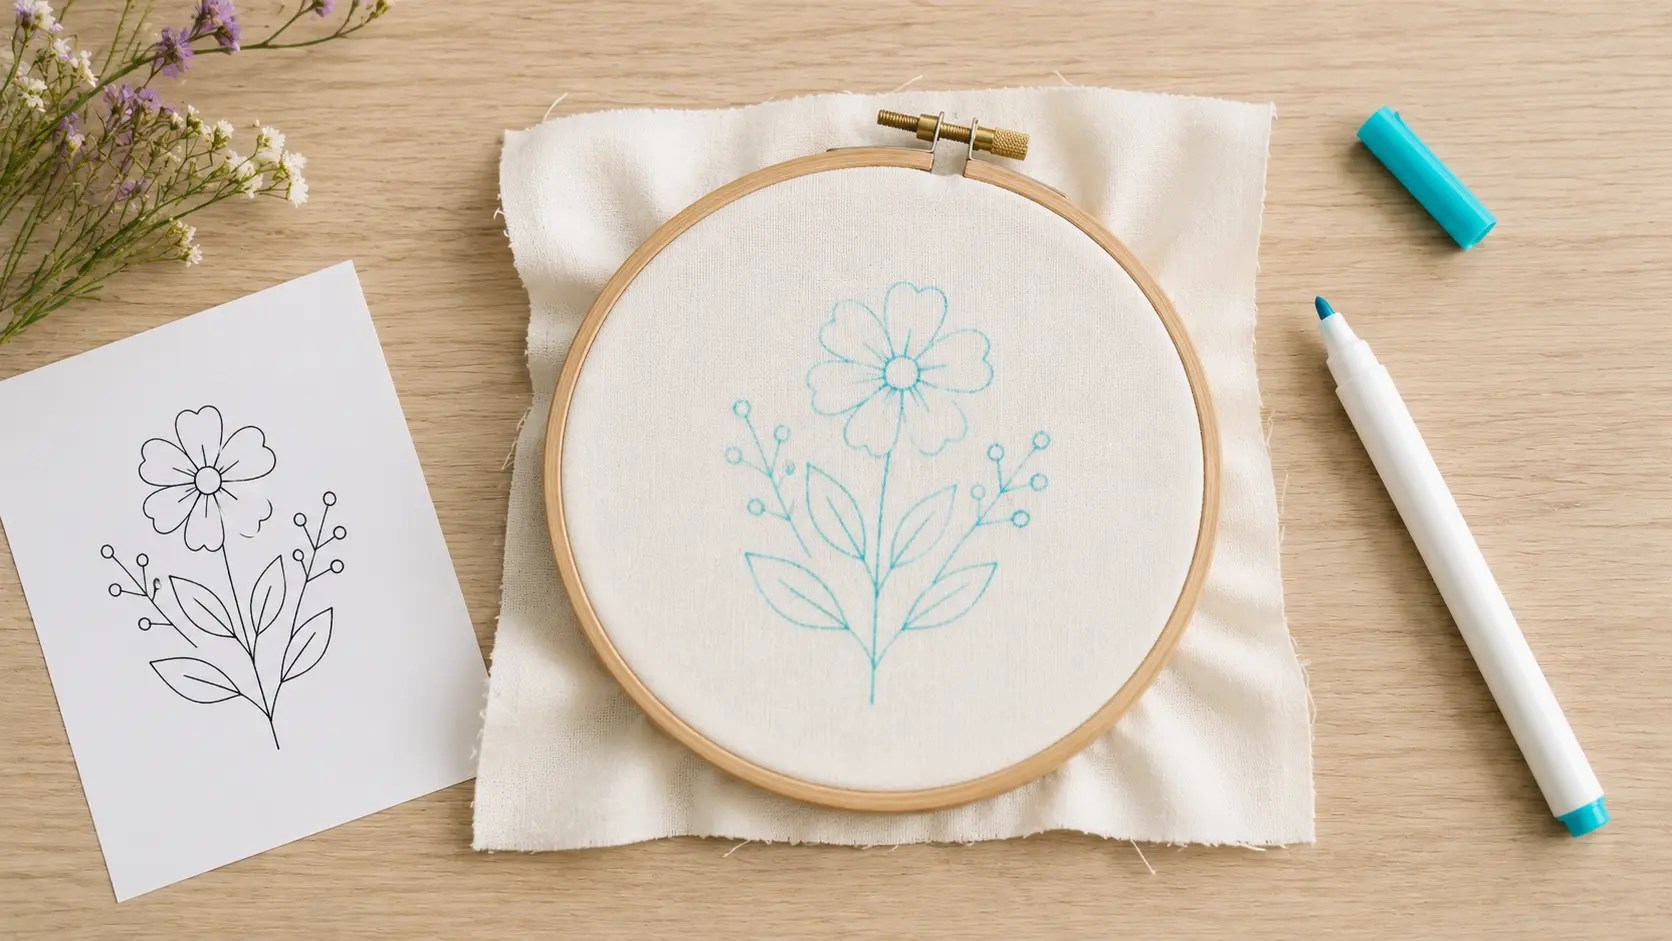
The simplest approach is to draw directly onto the fabric with a water-soluble pen using your design as a guide. For more precise transfers, see the dedicated section on transfer methods below.
Step 4: Place Fabric in the Hoop

Follow the hooping steps from the preparation section above. The fabric should be drum-tight with no wrinkles or slack areas. The design should be centered in the hoop with at least an inch of fabric around all sides.
Step 5: Start Stitching
Begin with the outline of your design using back stitch, then fill in any solid areas. Work from the center of the design outward where possible so you do not smudge the markings with your hand as you go.
Keep your thread tension consistent. Pulling too tight puckers the fabric; too loose and the stitches will sag.
Step 6: Secure the Thread on the Back
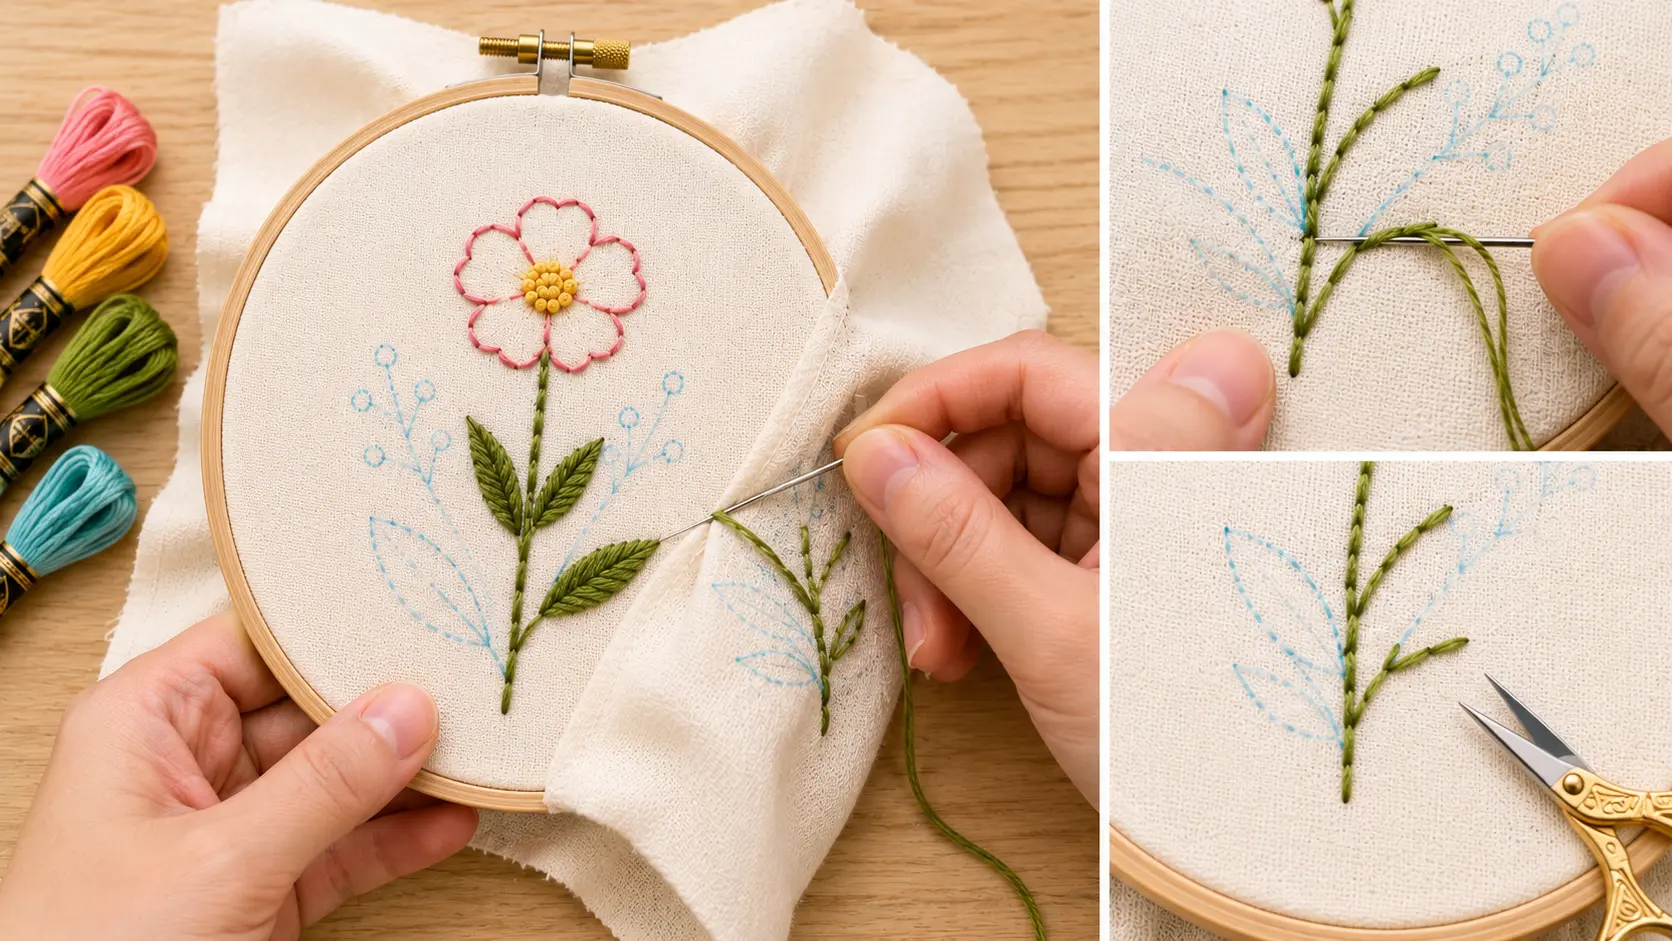
When your thread runs short or you finish a section, do not tie a bulky knot on the back. Instead, run the needle under several existing stitches on the back of the work two or three times to anchor the thread, then trim the tail close to the fabric.
Step 7: Remove Markings and Stabilizer
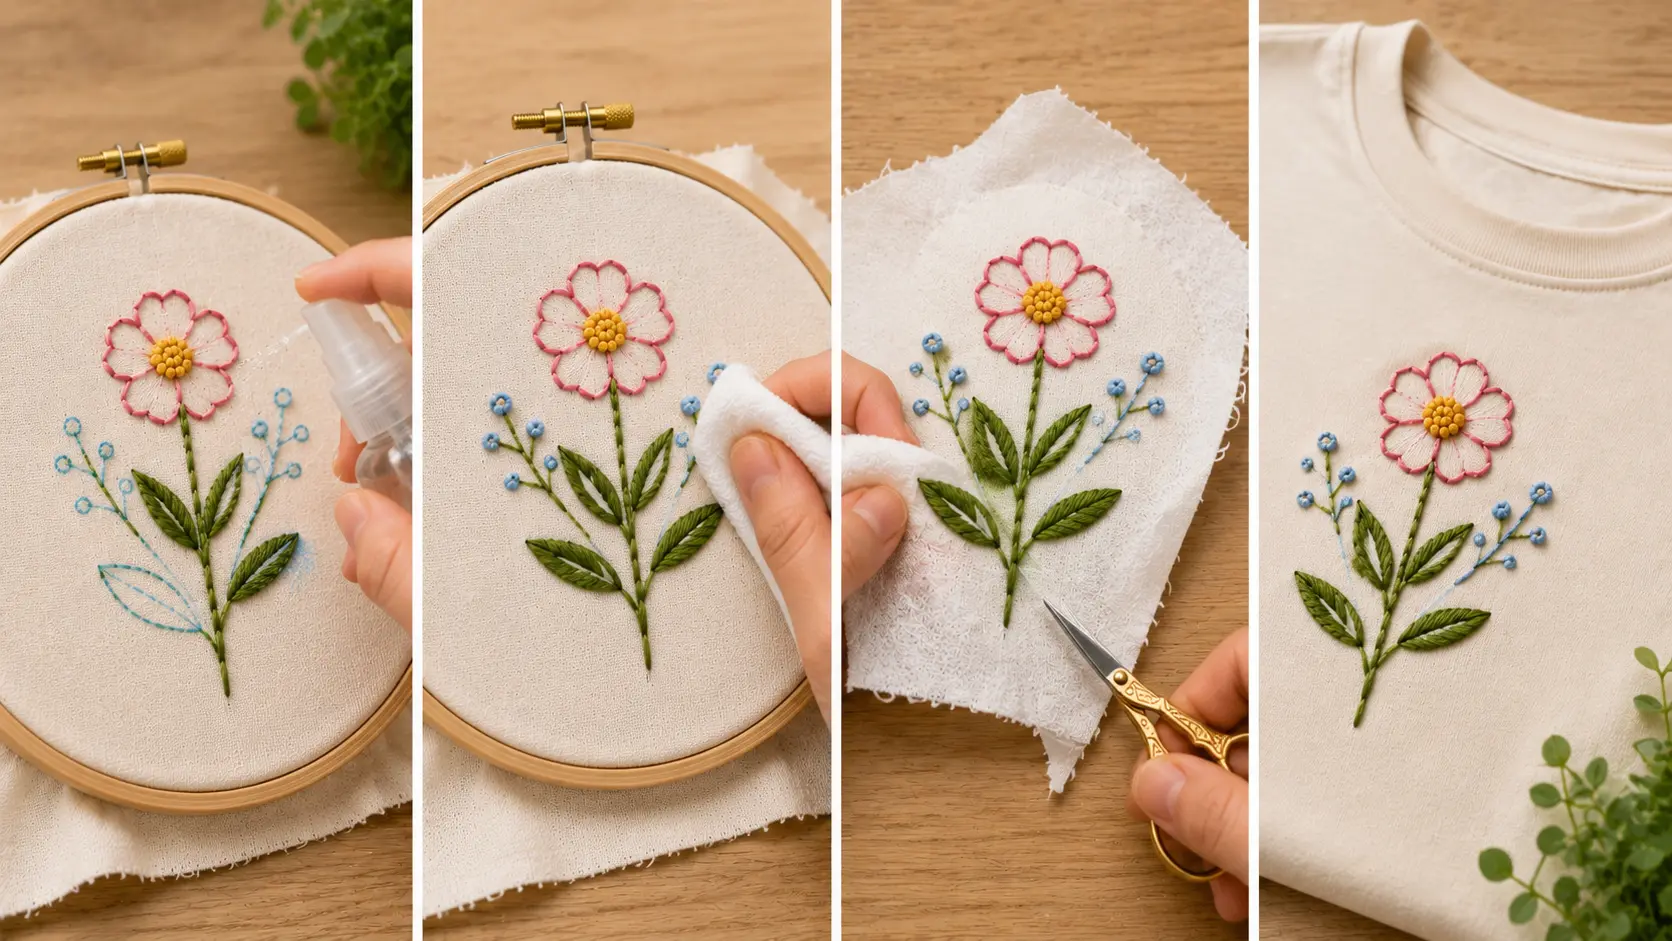
Spritz the design lightly with clean water or use a damp cloth to remove any remaining water-soluble pen marks. Tear away or trim the stabilizer neatly around the stitching. Let the garment dry flat.
Which Embroidery Stitch Should You Use
This table is what I wish I had found on day one. Most beginner guides skip it entirely.
| Project Goal | Recommended Stitch | Why It Works |
|---|---|---|
| Outlines and shapes | Back Stitch | Creates a solid, continuous line with no gaps |
| Names and letters | Split Stitch | Follows curves well and gives text a neat, raised look |
| Filling in petals or solid shapes | Satin Stitch | Covers the fabric surface smoothly and completely |
| Decorative borders | Chain Stitch | Produces a bold, linked line with visible texture |
| Small dots and texture | French Knot | Sits raised on the fabric and adds depth and dimension |
| Simple patterns and light lines | Running Stitch | Fast to work and gives a clean, minimal look |
For most beginner clothing projects, the backstitch handles the outlines, and the satin stitch fills the shapes. Those two stitches alone will get you through 80% of what you see on embroidered garments.
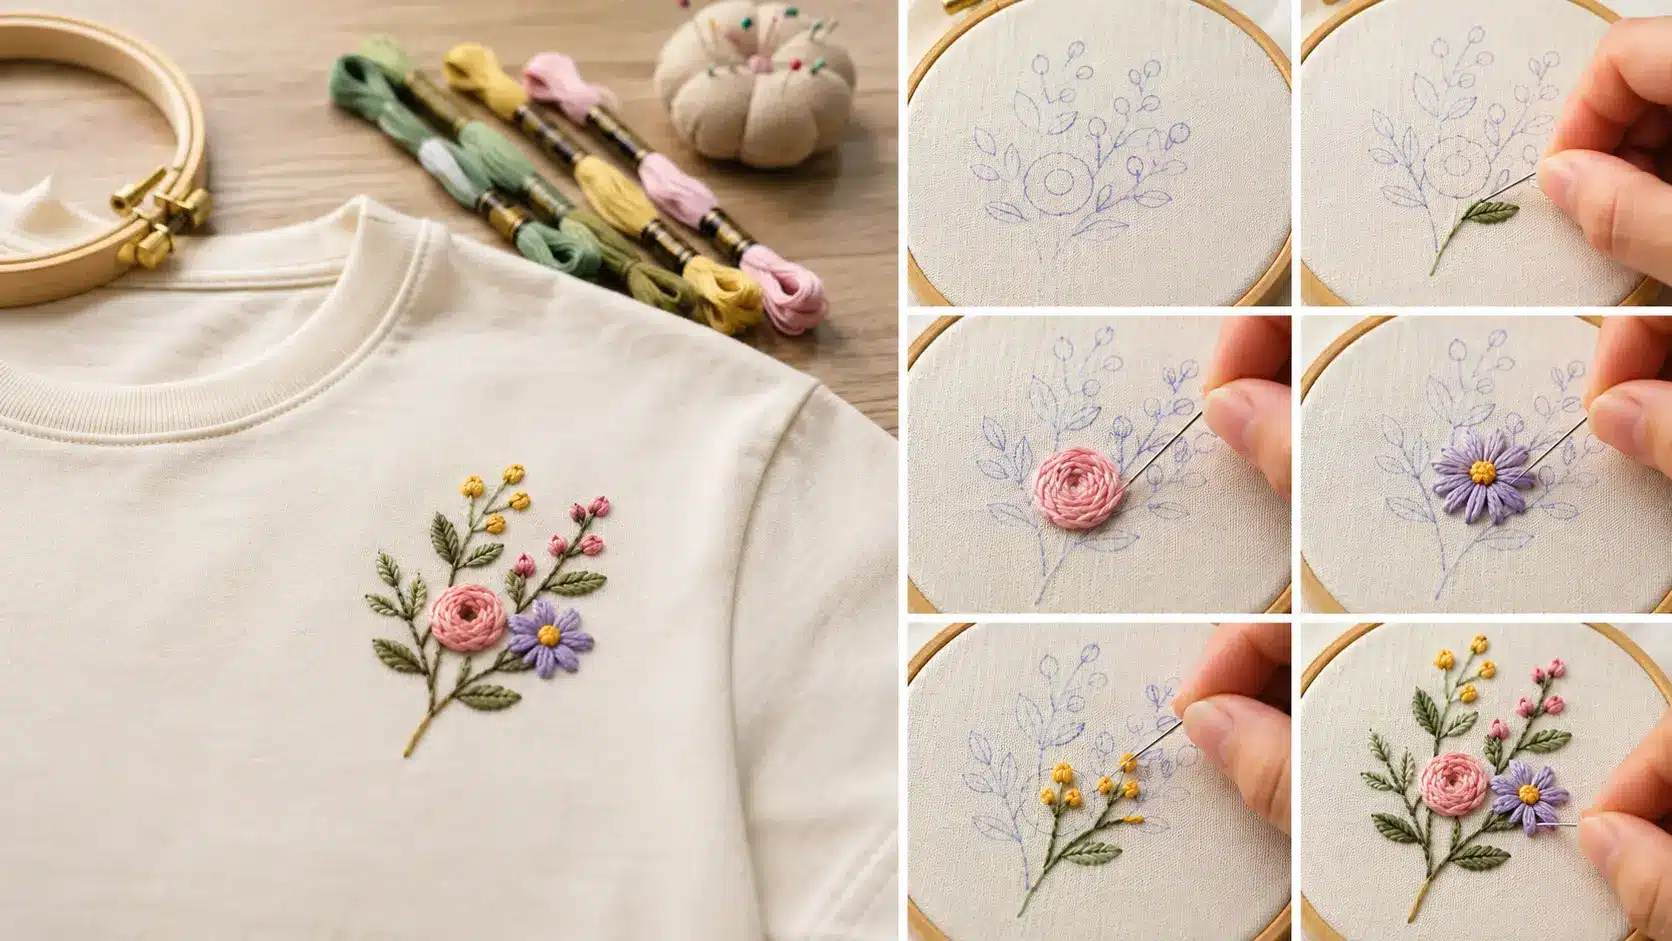
My First Beginner Embroidery Project: A Simple Floral Design
This is the project I recommend to anyone who has never embroidered before. It covers the most useful stitches and produces something genuinely wearable when finished.
What you will make: a small stem-and-flower motif, roughly the size of your palm, on the chest area of a cotton shirt or the front of a tote bag.
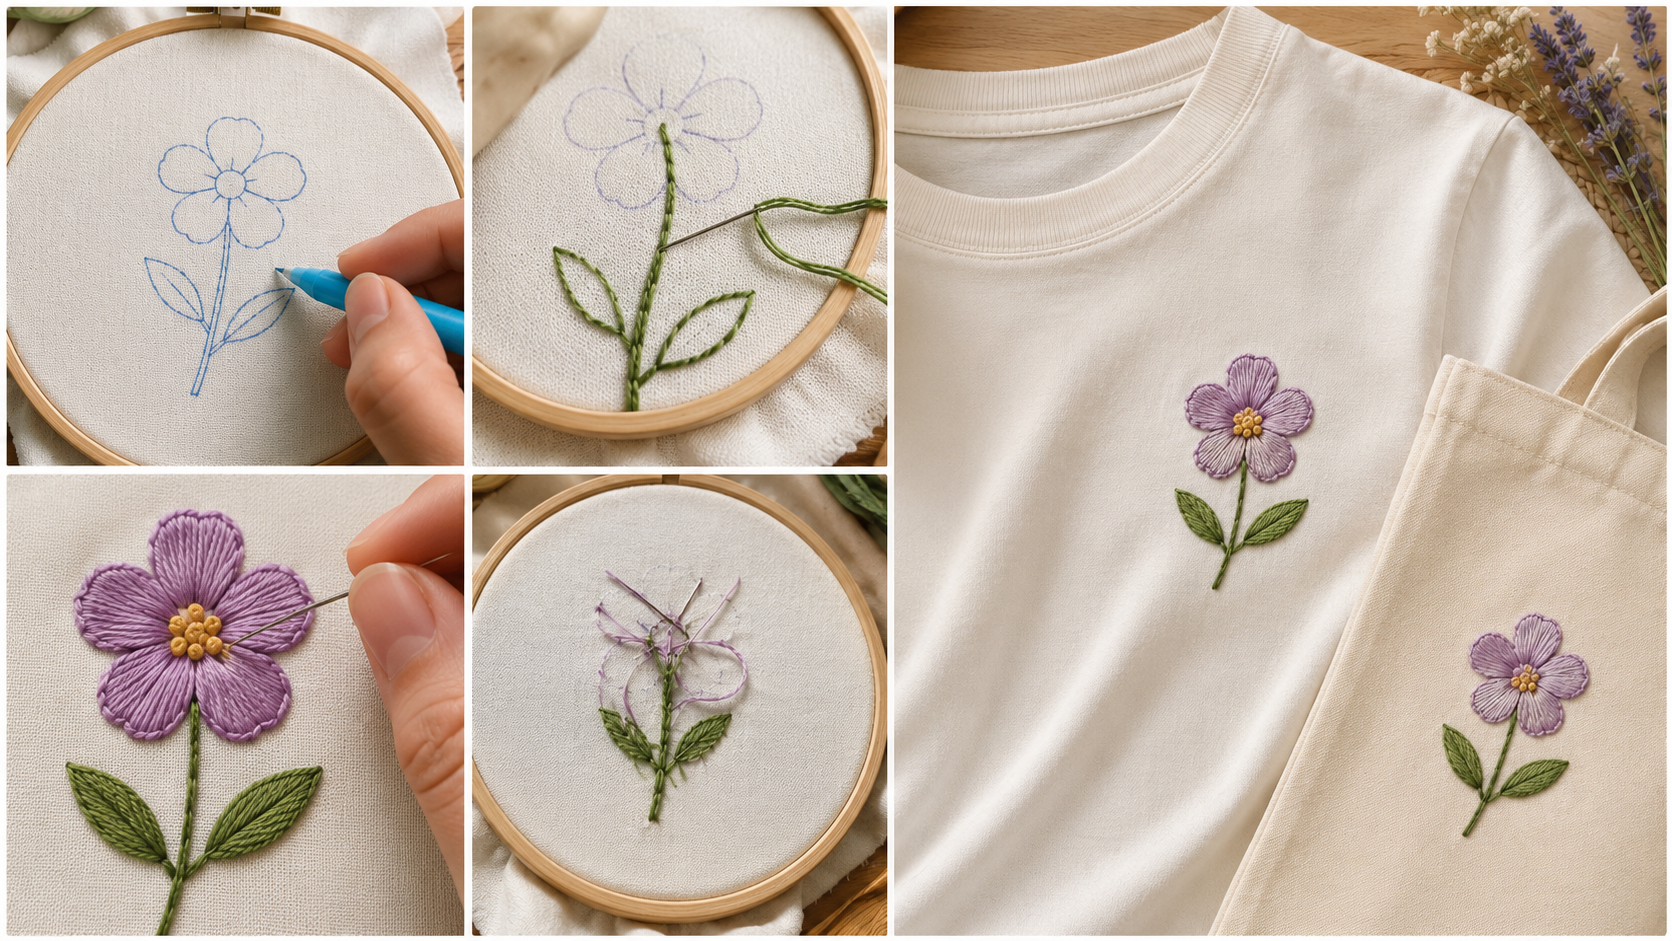
Step 1: Draw the flower
Sketch a simple five-petal flower on paper first. Transfer it to your fabric using a water-soluble pen. Add a stem and two small leaves. Keep the whole design within a 3-inch circle so it fits comfortably in a 4-inch hoop.
Step 2: Stitch the stem
Use back stitch with two strands of green floss. Work from the base of the stem upward, keeping each stitch about 4mm long.
Step 3: Add the petals
Outline each petal in back stitch with two strands. Once all five petals are outlined, fill each one with satin stitch. Keep your stitches parallel and close together so no fabric shows through.
Step 4: Fill the center
Use three or four French knots clustered in the center of the flower. Try a contrasting color for the knots so the center pops against the petals.
Step 5: Finish and trim threads
Secure all thread ends on the back by running them under existing stitches. Trim close. Remove any visible pen marks with water. Remove the stabilizer.
How Long Does It Take to Learn Embroidery First day: You will spend most of your time getting comfortable with threading the needle, setting up the hoop, and working out how tight to pull your stitches. First week: By the end of a week of regular practice, even just 20 to 30 minutes a day, most beginners have a back stitch and a satin stitch they are reasonably happy with. First completed project: Most beginners finish a small wearable project within their first two or three sessions. Once you have one completed piece, everything clicks into place. Building confidence: After three or four finished projects, you will find yourself choosing fabrics and designs without consulting a guide for every step. The stitches become muscle memory. |
Hand Embroidery vs Machine Embroidery
A basic hand embroidery kit costs very little and allows you to learn the core skills without a large investment. Once you find yourself regularly decorating clothes, making gifts, or creating multiple projects each month, an embroidery machine may start to make sense.
| Feature | Hand Embroidery | Machine Embroidery |
|---|---|---|
| Cost to start | Low | High |
| Learning curve | Beginner-friendly | Requires machine setup and software knowledge |
| Speed | Slower | Much faster |
| Design flexibility | Highly customizable | Limited to programmed designs |
| Texture and character | More organic and handmade | More uniform and consistent |
| Best for | Personalized projects, gifts, and creative designs | Logos, bulk orders, and repeated patterns |
For many hobbyists, hand embroidery remains their preferred method because they enjoy the slower, creative process and the unique character it brings to a garment.
| Expert Tip: If your goal is to add small flowers, names, or decorative details to clothing, hand embroidery is often faster than setting up an embroidery machine. Machines become most useful when you need to stitch the same design repeatedly on multiple garments. |
It’s a Wrap: Start Simple, Stitch Often
Learning how to embroider on clothes is less about talent and more about repetition.
If I had one piece of advice for anyone starting out with clothing embroidery, it would be this: start smaller than you think you should.
A single flower on a pocket teaches you more than a full back-panel design, and you finish it fast enough to feel genuinely motivated to try the next one. That second project will be noticeably better than the first. The third is better still.
You do not need more supplies or more technique. You need a needle, some floss, and a spare afternoon.
Frequently Asked Questions
What is the Easiest Embroidery Stitch for Beginners?
The running stitch. It is a simple in-and-out motion that produces clean dashed lines and teaches needle control fast.
Can I embroider directly onto Clothing?
Yes. Use a stabilizer on the back to prevent puckering. Cotton and linen garments work best for beginners.
Do I Need a Hoop to Embroider?
Not always. A hoop helps on most fabrics, but some tight garment areas, like collars, are easier to work with without one.
Can I Wash Clothes After Embroidering Them?
Yes. Hand wash in cool water with mild detergent, lay flat to dry, and avoid bleach and tumble drying.