

Noticed those tiny scratches on your hardwood floors? The ones that catch your eye every time you walk by? You’re not alone. Most homeowners battle these pesky marks that seem to appear out of nowhere.
Good news! Your kitchen already has a secret weapon against these scratches – simple vinegar. This humble ingredient works like magic on wood, and you don’t need to call professionals or spend a fortune.
This guide shows you exactly how to use vinegar to fix scratches and make your floors look smooth again. It’s quick, cheap, and actually works. No fancy products are needed—just practical steps that anyone can follow.
Ready to say goodbye to those annoying scratches? Let’s get those floors looking good again.
Understanding Hardwood Floor Scratches
Hardwood floors add beauty to any home, but they are susceptible to scratches over time. Understanding what causes these scratches and the different types can help in effective maintenance and repair.
A variety of everyday activities and items typically cause scratches on hardwood floors. Common culprits include:
- Furniture: Moving furniture without protective pads can leave scratches or scuffs.
- Pets: Dogs and cats with sharp nails can easily scratch the surface of hardwood floors while running or playing.
- High Heels: The pointed tips of high heels can create dents and scratches if weight is applied to a small surface area.
- Rough Cleaning: Using abrasive cleaning tools or harsh chemicals can wear down the floor’s finish, leading to scratches.
Types of Scratches
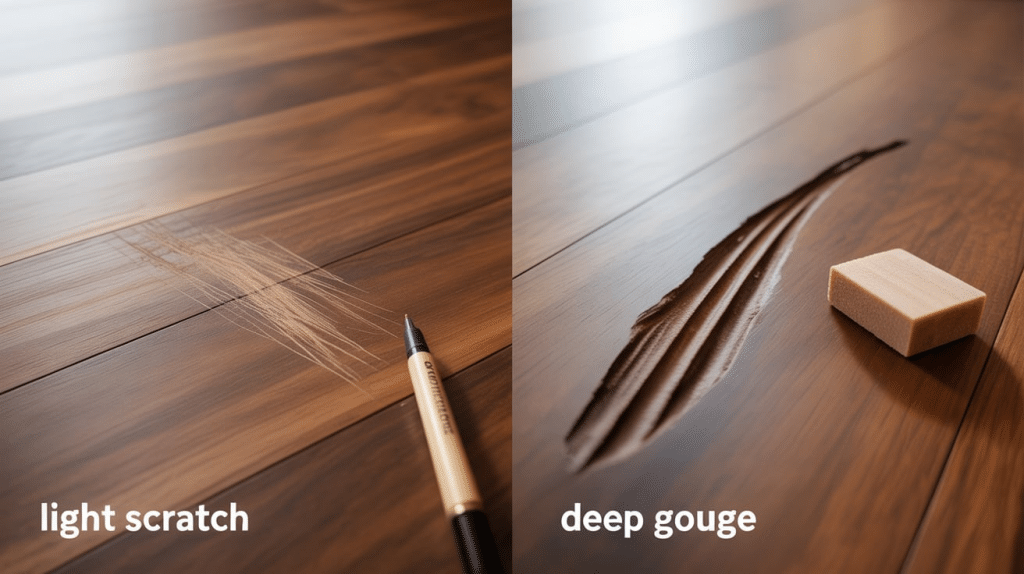
Not all scratches are created equal. There are different levels of damage that vary in severity:
- Light Surface Scratches: These are shallow marks that affect only the finish of the wood, not the wood itself. They are usually less noticeable and can be repaired easily with a simple touch-up.
- Deeper Gouges: Gouges go beyond the finish and into the actual wood, causing more significant damage. These require more intensive repair methods, such as sanding and refinishing.
Materials You’ll Need
Before you start removing scratches from your hardwood floors, it’s important to gather the right materials. Here’s a list of essential supplies, along with a few optional items for extra care.
List of Items:
- Vinegar: Helps to clean and reduce minor scratches.
- Water: To dilute the vinegar and avoid excessive acidity.
- Soft Cloth: For gently cleaning and buffing the surface without causing further damage.
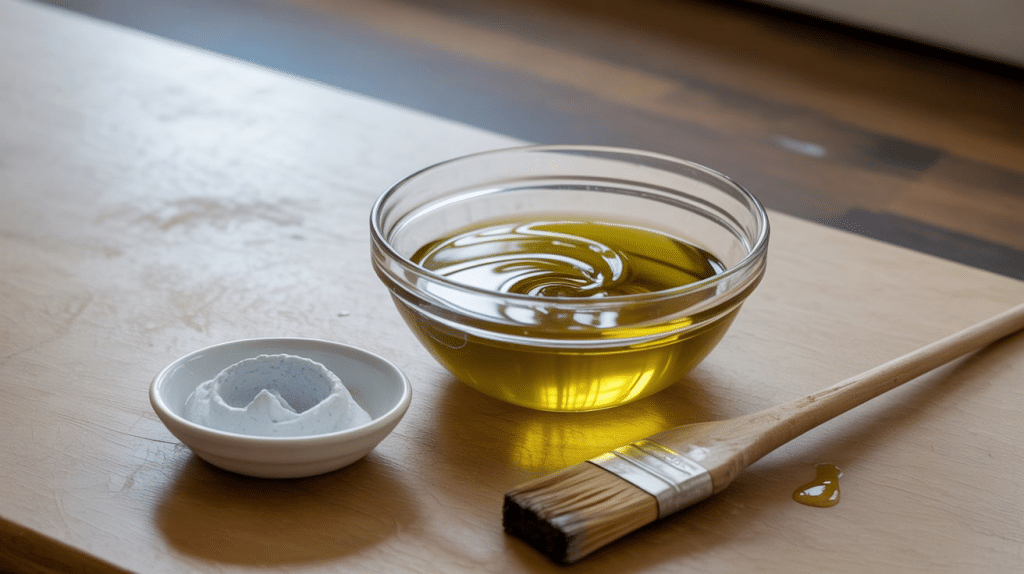
- Olive Oil: Adds moisture and shine to the wood, helping to hide light scratches.
Optional Items for Extra Care:
- Small Bowl: For mixing the vinegar and water solution.
- Wood Polish: To apply after cleaning for added protection and shine.
Step-by-Step Guide to Removing Scratches
Follow this simple, step-by-step guide to remove scratches from your hardwood floors effectively. With a few easy-to-find materials, you can restore the beauty of your floors.
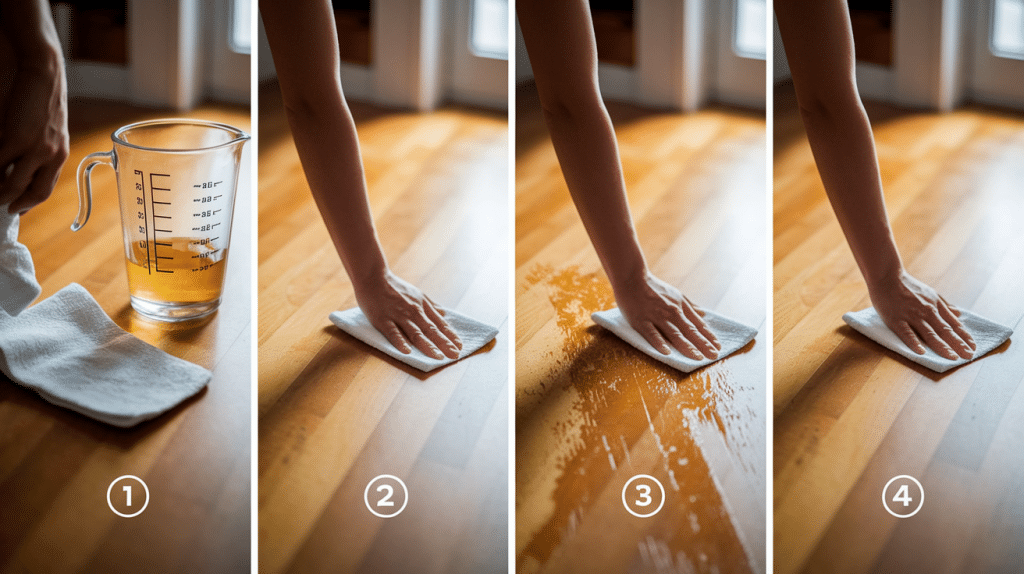
Step 1: Prepare the Vinegar Solution
Mix equal parts of vinegar and water (1:1 ratio) in a small bowl. This diluted solution helps to clean the surface and reduce the appearance of minor scratches without damaging the wood.
Step 2: Clean the Scratched Area
Before applying the vinegar solution, clean the area using a damp cloth to remove any dirt or debris. This step ensures no particles will interfere with the scratch removal process and keeps the area safe for treatment.
Step 3: Apply the Vinegar Solution
Dampen a soft cloth with the vinegar solution, ensuring it’s not soaking wet. Gently rub the cloth over the scratched areas, applying light pressure to work the solution into the scratches.
Step 4: Buff and Polish the Floor
After applying the vinegar solution, buff the floor with a clean, dry, soft cloth. Rub in circular motions to restore the shine and help the solution penetrate deeper, minimizing the appearance of scratches.
Extra Tips for Tougher Scratches
These helpful tips can make a big difference for tougher scratches that need extra attention. For a more effective solution, try using olive oil with vinegar or baking soda paste.
Using Olive Oil with Vinegar
For deeper scratches, try adding a small amount of olive oil to your vinegar solution. This will not only help moisturize the wood but also fill in deeper scratches, making them less noticeable and adding a nice shine to the floor.
Baking Soda Method
If the vinegar solution doesn’t work for tougher scratches, mix baking soda with vinegar to create a paste. Apply the paste to the scratches, gently rub it in, and wipe off the excess to reveal a smoother surface.
How to Prevent Future Scratches
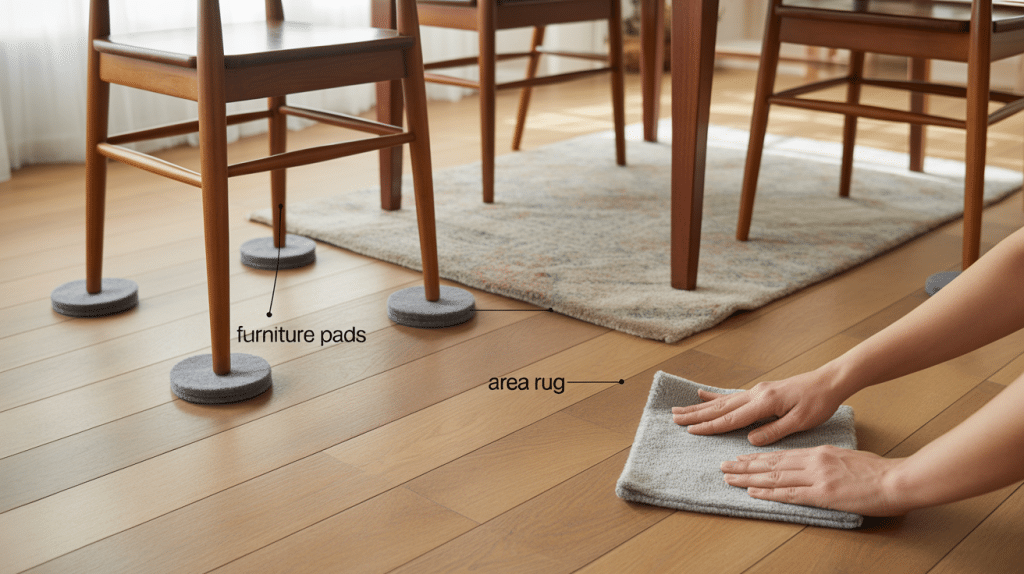
Prevention is key to keeping your hardwood floors looking beautiful and free from scratches. These simple protective measures and maintenance tips will help preserve the integrity of your floors for years to come.
Protective Measures:
- Use furniture pads under legs and corners to prevent scratches from moving furniture.
- Place area rugs in high-traffic areas to protect floors from wear and tear.
- Clean regularly to remove dirt and debris that can cause scratches.
Maintenance Tips:
-
Apply a protective wax coating periodically for an extra layer of protection.
-
Perform regular touch-ups on minor scratches to keep the floor looking pristine.
Conclusion
Got stubborn scratches on your beautiful hardwood floors? No worries! Vinegar is your budget-friendly hero.
This simple kitchen staple works wonders on annoying marks without harsh chemicals. Mix it with olive oil, dab on the scratch, let it sit, and wipe clean. For deeper scratches, try the warm vinegar method we covered.
Your floors will thank you! This fix saves you money and keeps your home free from toxic cleaners.
Try these tips today and see the difference yourself. Have you had success with vinegar on your floors?
Share your results in the comments! Need help with other household fixes? Check out our other handy guides.