

Building a playhouse is a fun and rewarding project that provides your children with a special place to play and grow. Proper planning is essential to ensure the playhouse is safe, functional, and durable.
Start by choosing the right location—ensure it’s flat, level, and free from hazards. Consider the size based on your children’s needs and future growth.
Designing the layout with ample space, windows for light, and easy access will improve the playhouse experience.
Personalize the space by involving your kids in color and theme choices. Budgeting wisely, utilizing cost-effective materials, and implementing proper planning will result in a beautiful playhouse that lasts for years.
Follow this guide to turn your vision into reality and create a magical space your children will love!
Planning Your Playhouse
Building a playhouse for kids takes careful planning. A well-made playhouse can bring years of fun while a poorly planned one might sit unused. Let’s look at what you need to think about before you start building.
- Choose the Right Size Select a size that fits your yard without overwhelming it. Most family playhouses range from 4×4 to 8×8 feet. The playhouse should allow kids to move freely inside.
- Pick a Good Spot Choose a location visible from your home for easy supervision. Find flat ground for simpler construction. Consider sun exposure and nearby trees.
- Set a Budget Playhouses cost from hundreds to thousands of dollars. Pre-made kits often cost less than building from scratch. Simple designs save money.
- Choose Materials Wisely Wood is common – cedar and redwood last longer but cost more. Treated pine is cheaper but needs more maintenance. Plastic requires less care.
- Think About Safety Plan for smooth edges and safe doors/windows. Ensure floors can support adults. Add handrails to steps or ladders.
- Plan for Growth Build with growing kids in mind. Taller ceilings and doors help the playhouse remain useful longer.
- Check Local Rules Many areas have regulations about backyard structures. You might need permits or face size restrictions.
With good planning, your playhouse will be a hit with the kids for years to come. Take your time at this stage to avoid problems down the road.
DIY Playhouse Project: A Step-by-Step Guide
Tools and Materials Needed
| Tools | Approx. Price | Materials | Approx. Price |
|---|---|---|---|
| Circular saw or miter saw | $120-200 | Rough-sawn timber | $150-200 |
| Drill with screwdriver bits | $80-150 | 150mm wide weatherboards | $120-180 |
| Measuring tape and pencil | $15-25 | 100mm x 100mm bearers | $40-60 |
| Spirit level | $20-30 | 100mm x 25mm timber for facings | $30-50 |
| Square | $15-25 | 150mm x 25mm timber for the door | $25-40 |
| Jigsaw | $60-120 | T-hinges, slide bolt, and handle for the door | $30-50 |
| Clamps | $30-60 | 100mm bugle screws | $15-25 |
| Safety equipment (eye protection, gloves) | $25-40 | 50mm screws | $10-20 |
| Ridge cap for the roof | $25-40 |
Step 1: Prepare the Floor Frame
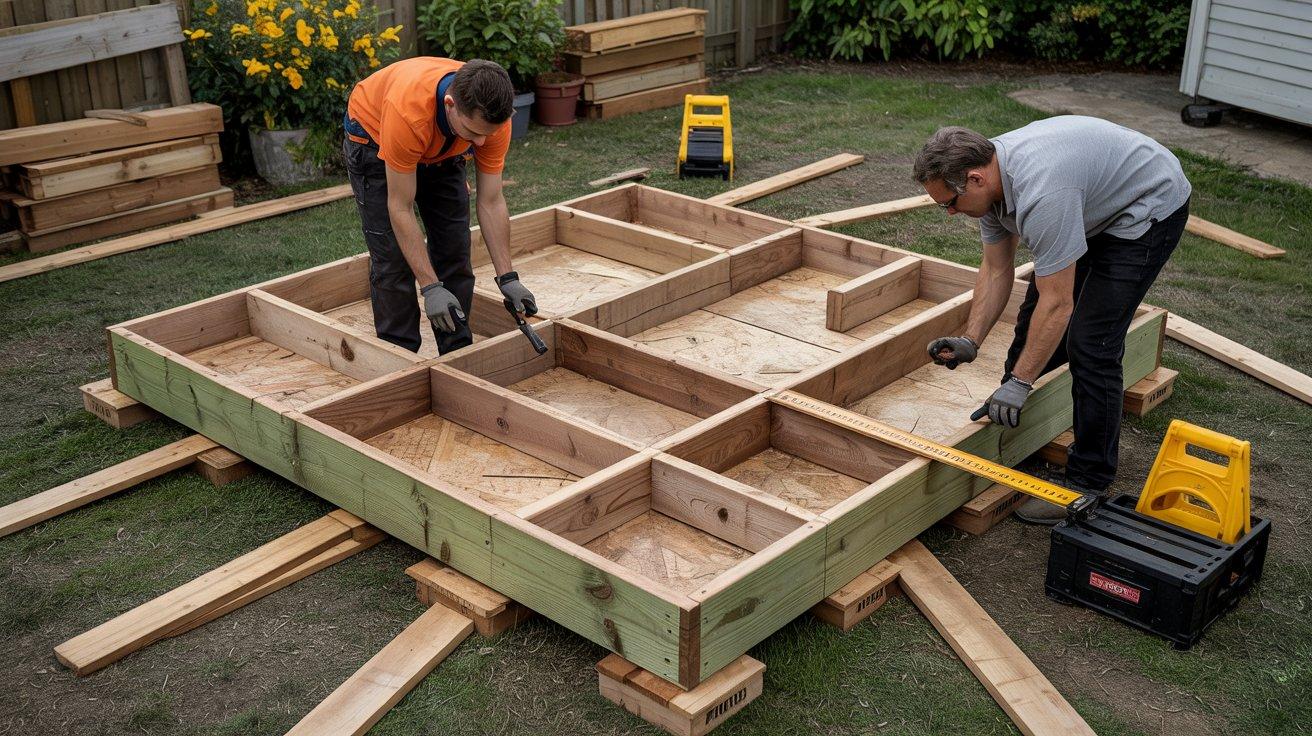
Start with a flat, level surface for your playhouse. Cut two boundary joists at 2.4 meters for the floor length and five internal joists at 1480mm (placed at 600mm centers).
Mark joist positions carefully, then assemble the frame with 100mm bugle screws. Ensure the frame is square by measuring its diagonals to verify its alignment.
Place the frame on 100mm x 100mm bearers, positioned 200mm inward from the outer edges, and secure it in place. This will form a stable base for your playhouse.
Step 2: Install the Flooring
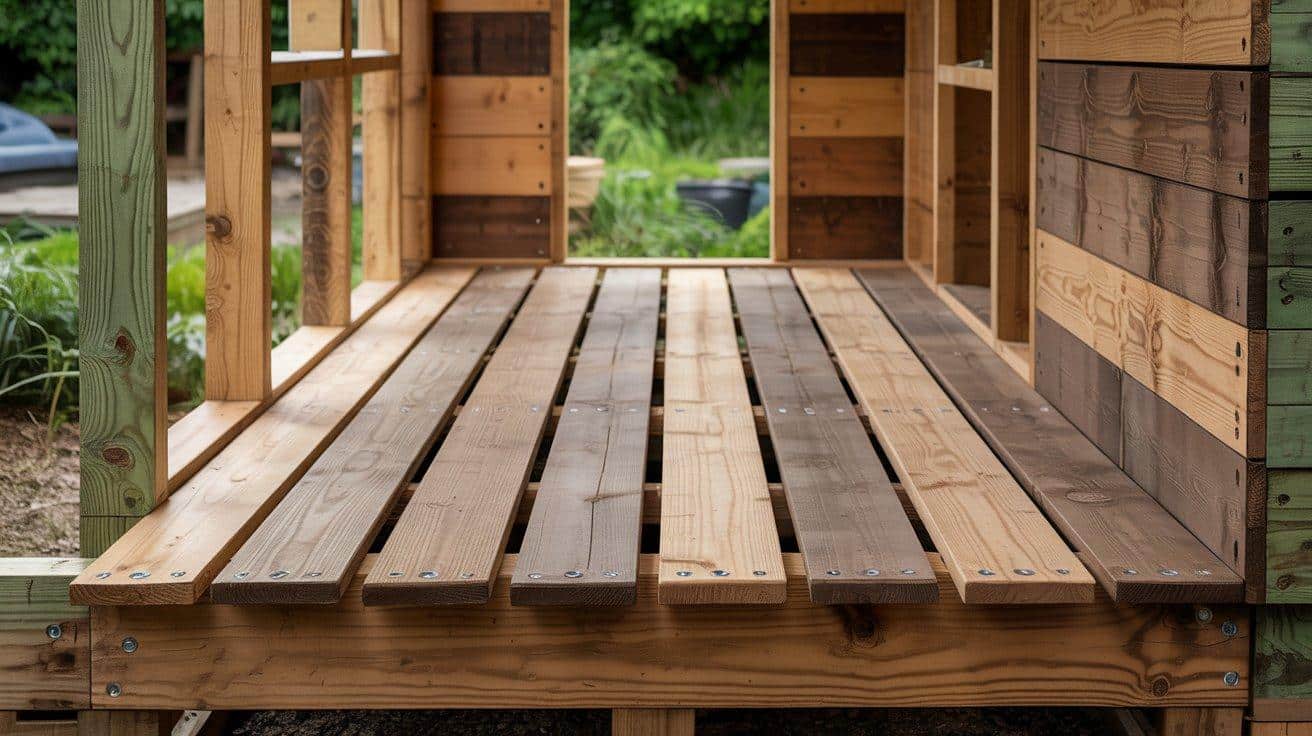
Lay the first floorboard flush with the frame edges and secure with two screws at each joist crossing point. Continue adding boards across the width, staggering joints for strength and ensuring each board fits tightly against the previous one.
The rough-sawn timber provides a rustic appearance perfect for an outdoor playhouse while creating a solid foundation. Maintain level alignment throughout the installation process. Once completed, you’ll have a sturdy platform ready for wall construction.
Step 3: Build the Back Wall Frame
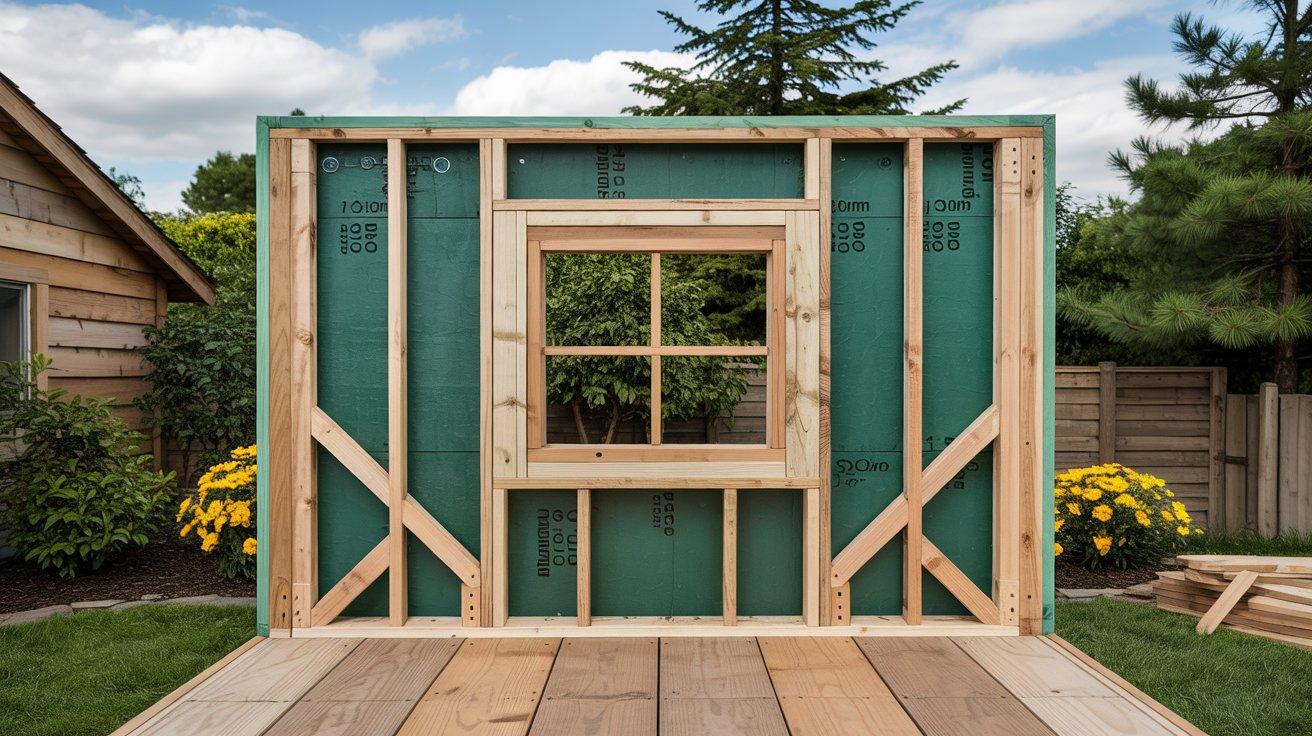
For the back wall, cut the top and bottom plates at 1,585 mm and four vertical studs at 1,300 mm. Mark a 900mm space in the center for the window, which should be positioned 750mm from the floor.
Install a jack stud and 200mm nog for the window. Assemble the frame, securing the studs to the plates, and complete the window framing with the proper seal plates.
Step 4: Create the Roof Trusses
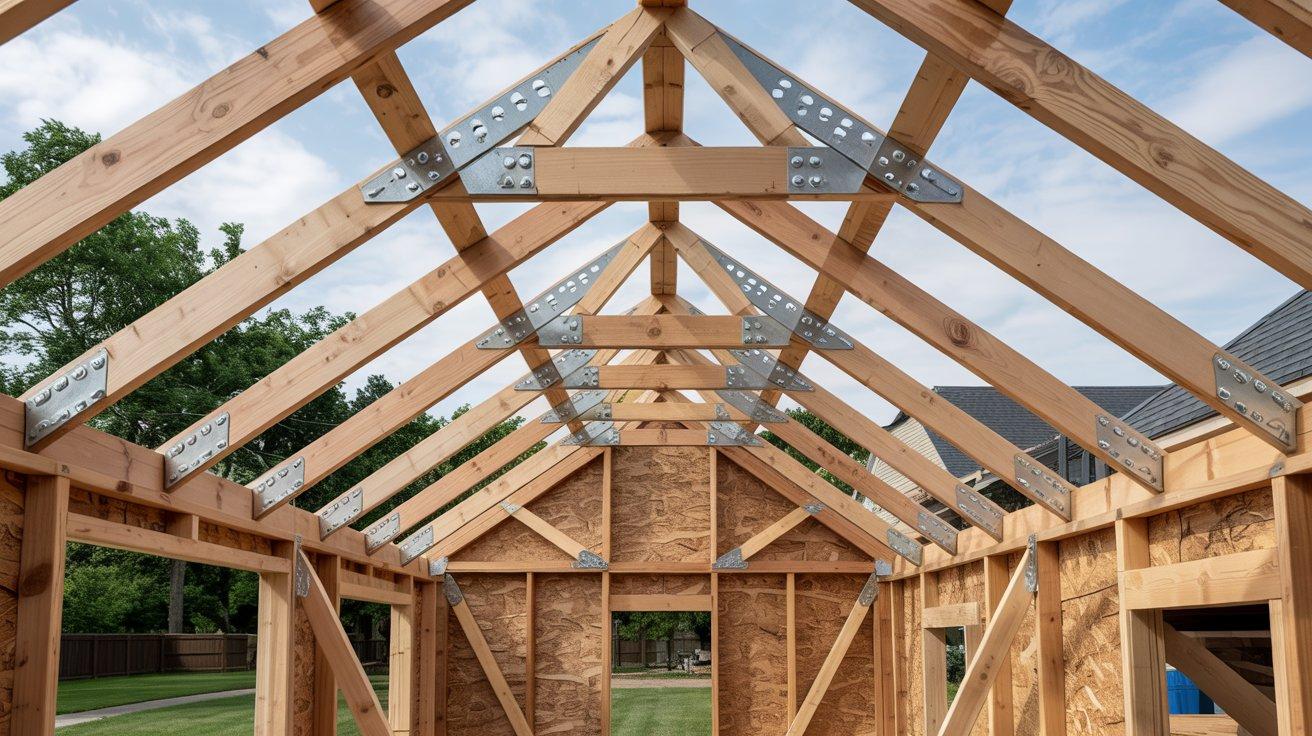
Cut the roof truss timber to 974mm, with a 34-degree miter at the top and 55-degree angles at the ends. Make truss braces from 405mm lengths, with 90-degree top angles and matching 34-degree angles at the ends.
Assemble the pieces into triangular trusses, securing them at the peak with a 25mm overlap. Prepare identical trusses for the front and back walls, as well as a mid-truss for additional roof support.
Step 5: Apply Weatherboards to the Back Wall
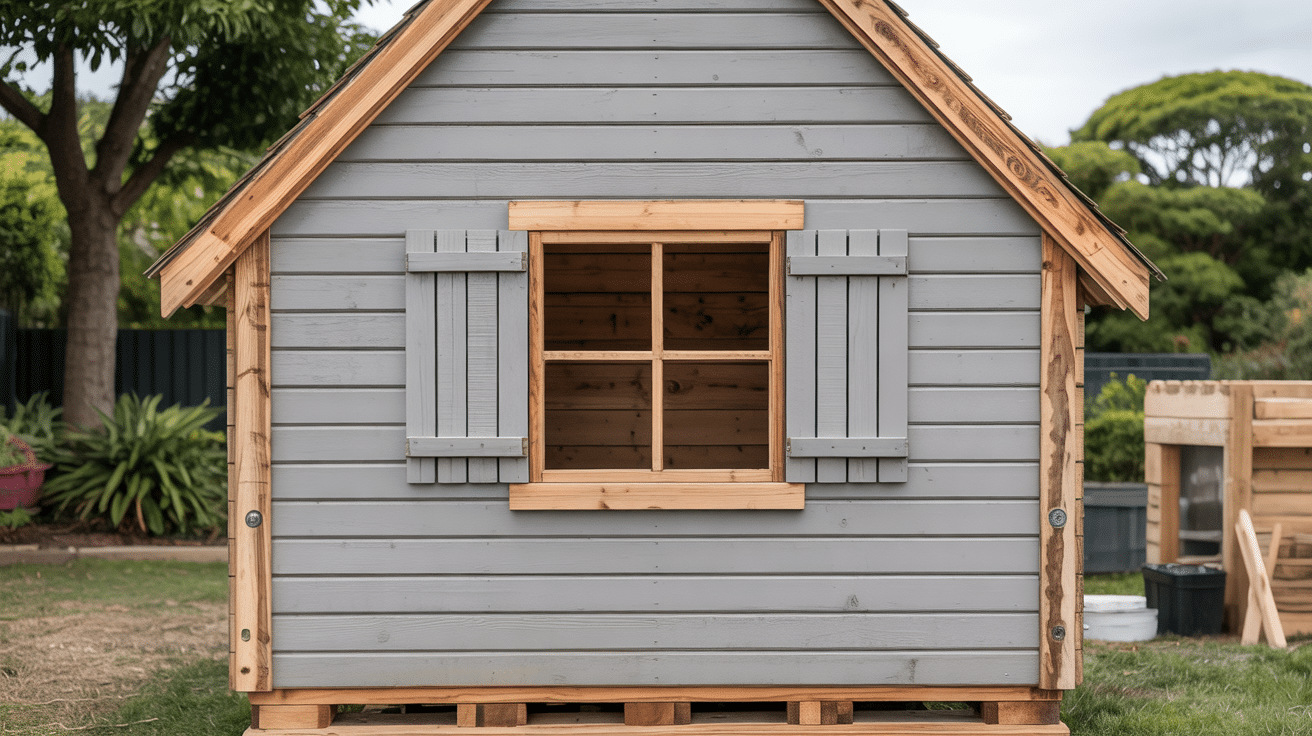
Use a story rod with 125mm increments to mark weatherboard positions, allowing a 25mm overlap. Start at the bottom, securing the first board at an angle. Work upward, cutting boards to fit around the window.
Secure the boards with screws at both ends, leaving space for expansion. Trim boards that intersect the window, ensuring a secure fit against the studs and noggin.
Step 6: Erect the Walls
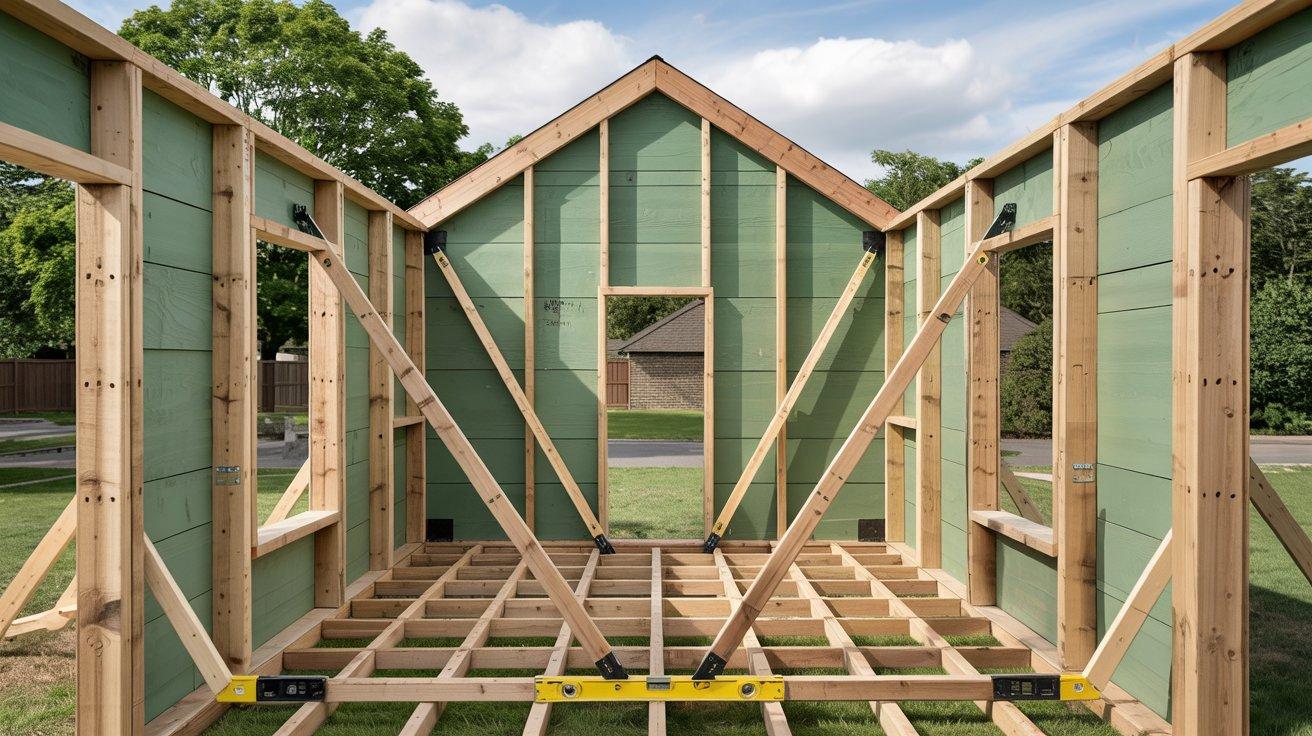
With help, position the back wall on the floor frame and ensure it’s plumb using a spirit level. Secure the wall with temporary braces, then fix it to the floor with 100mm bugle screws.
Step 7: Install the Roof Structure and Cladding
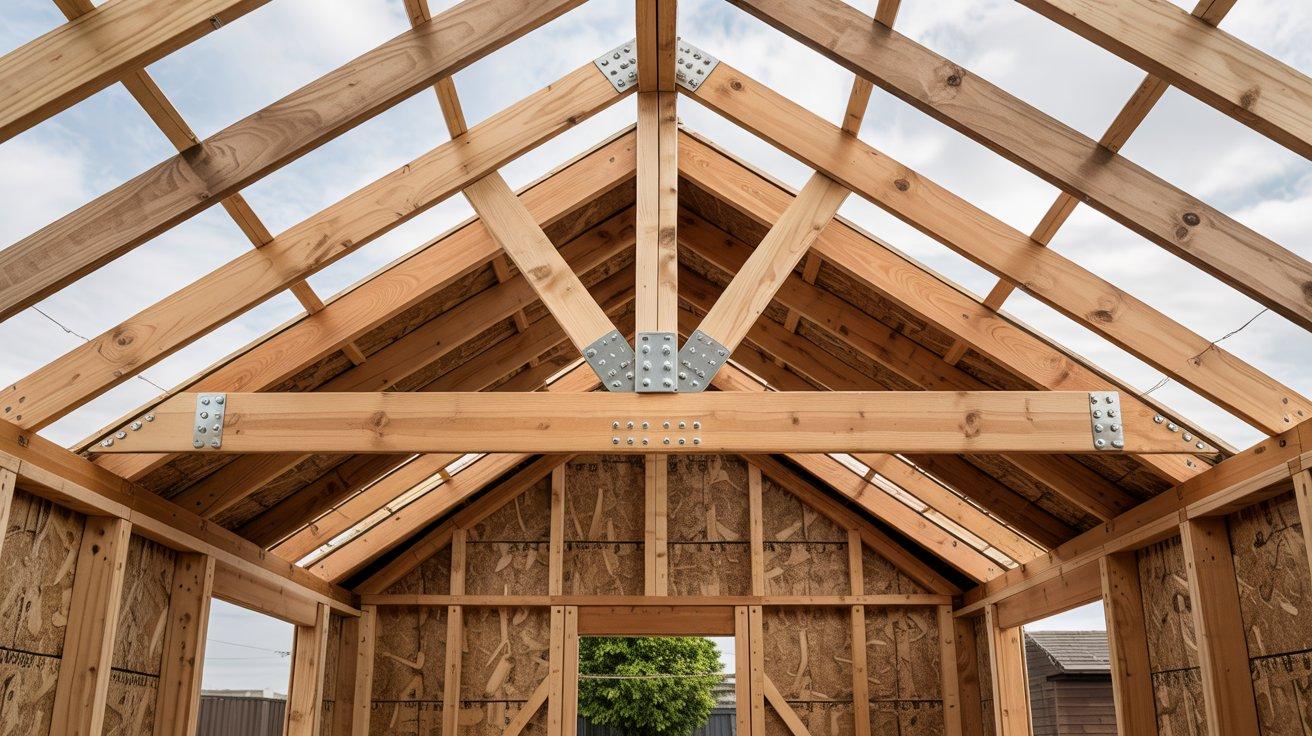
Position the mid-truss above the back wall stud and secure with 200mm bugle screws—Mark 125mm increments from the roof peak down all sides.
Attach the roof cladding, starting from the highest point, and align it with the marks. Work upward, ensuring boards are flush with the back wall cladding.
Cut a 1835mm ridge cap to cover the apex, securing it with screws for added weather protection.
Step 8: Add Finishing Touches
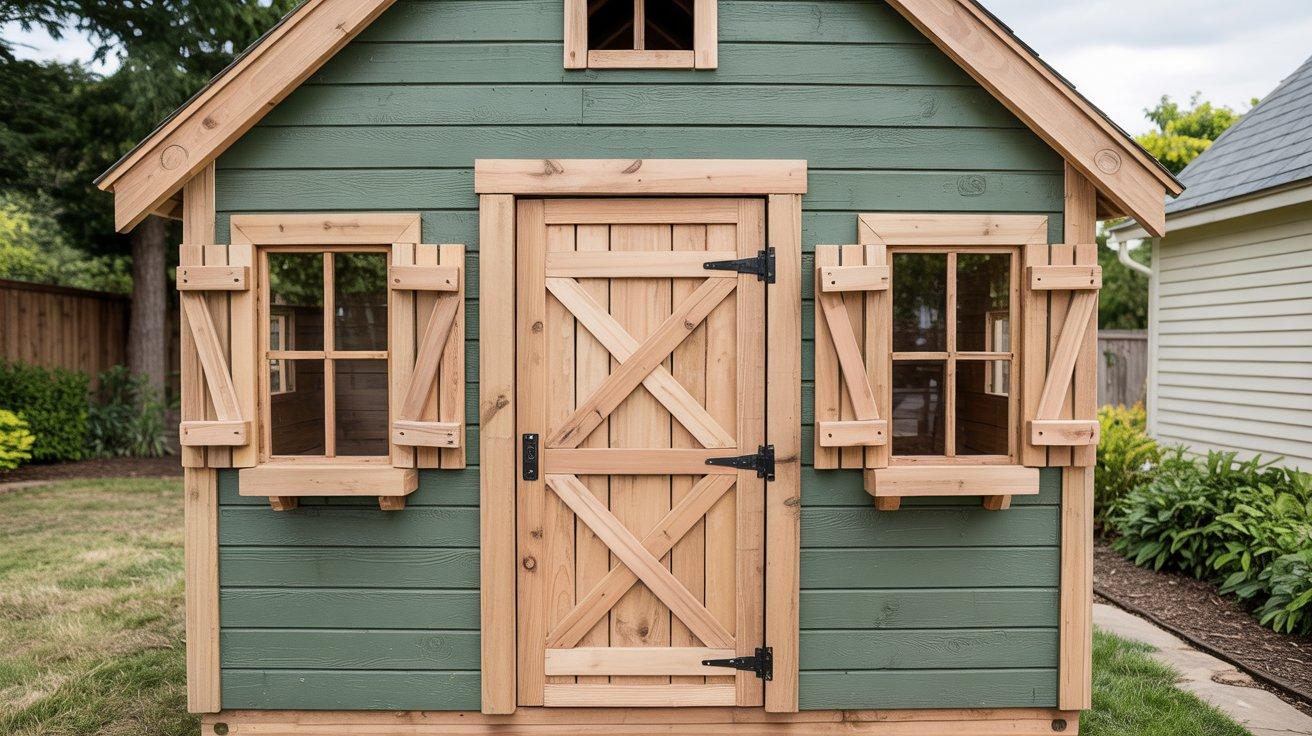
Install fascia boards with 34-degree cuts for a slight overhang. Add corner boxes, adjusting angles for a flush fit. For the door, use four 150mm x 25mm timber pieces with cross-pieces and diagonal braces.
Construct window frames with 100mm x 25mm timber, then install T-hinges, a slide bolt, and a handle. The box-frame windows fit neatly into the wall openings, completing the charming look of your playhouse.
Video Tutorial
Special thanks to Mitre 10 New Zealand for providing valuable insights in their video, which I referenced while creating this guide.
Lighting and Power Ideas for Your Playhouse
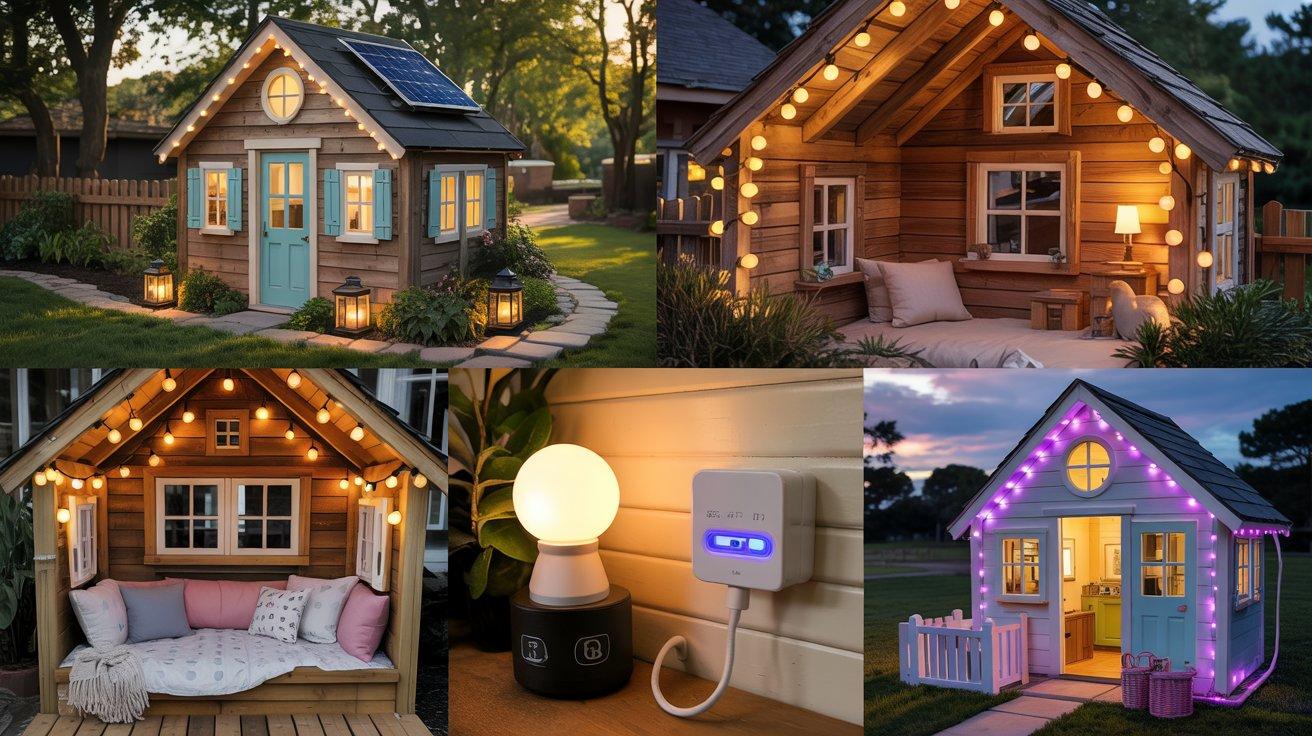
Adding lighting and power to your playhouse can make it even more magical and functional. Here are some ideas to brighten up the space:
1. Solar-Powered Lights
-
Solar String Lights: These are perfect for adding a soft, decorative glow around windows or the roofline. They charge during the day and automatically turn on at night.
-
Solar Lanterns: A great option to place inside the playhouse or around the perimeter for an ambient, cozy light.
-
Motion Sensor Solar Lights: These can be added outside the playhouse for added safety and to illuminate the area when kids enter or leave.
2. Battery-Operated Lights
-
Battery-Operated LED String Lights: These are easy to install and come in a variety of colors. Perfect for creating a fun, twinkling atmosphere inside.
-
Battery-Powered Lamps: Consider adding a small lamp or lantern for interior lighting, especially if your playhouse will be used after dark.
3. Electric Lights (If You Have Power Access)
-
Low-Voltage LED Fixtures: If your playhouse is located near your home and you have access to electricity, consider installing low-voltage, energy-efficient LED lights for consistent lighting.
-
USB Charging Stations: Add a small, solar-powered USB charger inside the playhouse for fun gadgets or to power small devices, such as a portable fan or fairy lights.
4. Fairy Lights and Decorative Lamps
-
Fairy Lights: Wrap fairy lights around beams or place them along shelves for a soft, whimsical glow.
-
Decorative Lamps: Add kid-friendly, fun lamps or lanterns with colorful designs for added charm and function.
These lighting options will help create a fun and inviting atmosphere in the playhouse, making it the perfect spot for imaginative play, day or night!
Tips for Maintenance and Care of a Playhouse
Regular Cleaning
- Remove leaves, dirt, and debris from the roof and floor monthly
- Wipe down walls and surfaces with mild soap and water twice a year
- Clean windows with non-toxic glass cleaner to keep them clear
- Sweep out cobwebs from corners and hidden spaces
- Check for and clean any bird nests or insect homes
Structural Care
- Check for loose screws, nails, or bolts every three months
- Test all door hinges and window latches for smooth operation
- Look for warped wood or bent metal parts that need fixing
- Fix small issues before they become major problems
- Inspect the foundation or base for signs of shifting
Weather Protection
- Apply fresh paint or sealant every 2-3 years to wooden surfaces
- Check roof integrity before rainy seasons start
- Clear snow from the roof after heavy winter storms
- Make sure drainage works well around the playhouse base
- Add weather stripping around doors and windows as needed
DIY Playhouse: Common Mistakes to Avoid
| Issue to Avoid | Reason | Alternative |
|---|---|---|
| Indoor-grade timber | Rots quickly outdoors | Use rough-sawn or pressure-treated lumber |
| Skipping diagonal bracing | Creates an unstable structure | Install proper braces on the door and walls |
| Driving screws through overlapping boards | Causes splitting during expansion | Fix boards individually |
| Building directly on the soil | Accelerates rot | Use concrete pavers or a gravel bed |
| Regular interior hinges | Will rust outdoors | Use exterior-grade T-hinges |
| Poor ventilation | Causes mold and heat buildup | Include windows that open |
| Toxic paints or stains | Health hazard for children | Choose child-safe, low-VOC finishes |
| Sharp corners | Risk of injuries | Round off corners or add protective edging |
| Ignoring local regulations | May violate building codes | Verify requirements before building |
Conclusion
You’ve done it! That pile of timber has converted into a charming playhouse that’ll be the envy of the neighborhood.
This simple yet sturdy design offers endless possibilities for customization—paint it, add window boxes, create themed interiors, or even install solar-powered fairy lights.
The flat-pack construction means you can take it with you if you move homes. As children grow, this space grows from a pretend kitchen to a secret clubhouse to a teenage retreat.
The skills you’ve gained constructing this playhouse will serve you in countless future projects. Most importantly, you’ve created more than just a wooden structure—you’ve built a magical space where childhood memories will be born.
Time to step back, admire your handiwork, and watch the joy unfold!
Frequently Asked Questions
Is It Cheaper to Build Your Playhouse?
Yes, building your playhouse can be more cost-effective than buying a pre-made one, especially if you use affordable materials and do the work yourself.
How Big Should a Playhouse Be?
A playhouse should be at least 4-6 feet tall and approximately 6-8 feet wide, providing sufficient space for children to move, play, and store their toys comfortably.