

Sick of paying premium prices for hardwood floors? Plywood might be the game-changer you never considered.
This overlooked material stands as the secret weapon of savvy homeowners who demand style without breaking the bank.
We’re talking about floors that cost a fraction of traditional options while delivering stunning visual impact and remarkable longevity.
The best part? With basic tools and weekend time, you can install it yourself. No contractor fees, no scheduling headaches, just professional-looking results on your timeline.
In this guide, I’ll walk you through exactly how to select, prepare, install, and finish plywood flooring that will have guests questioning if you splurged on designer planks.
Ready to challenge everything you thought you knew about affordable flooring? Let’s get started.
Why Choose Plywood Flooring?
Plywood flooring stands out as an incredibly practical option for homeowners looking to maximize value without sacrificing style.
Unlike traditional hardwood that can cost $8-15 per square foot, quality plywood runs about $1-3 per square foot, instantly cutting your material costs by 70% or more.
This budget-friendly alternative delivers surprising benefits beyond just savings:
- Remarkable durability: With proper sealing, plywood floors withstand heavy foot traffic for years
- Design flexibility: Choose from various grades, cuts, and finishes for a customized look
- Easy maintenance: Simple cleaning routines keep these floors looking fresh with minimal effort
- DIY-friendly installation: No specialized tools or professional skills required
- Quick turnaround: Complete an average room in a single weekend
The natural wood grain patterns in plywood create visually interesting floors that bring warmth and character to any space while providing a stable foundation that resists warping better than some traditional flooring options.
Make Your DIY Plywood Flooring
Looking for flooring that combines character with affordability? Plywood delivers both with striking results.
This DIY approach puts luxury within reach without the premium price tag. Using readily available materials and straightforward techniques, you’ll create floors that stand out for all the right reasons.
No specialized skills are required; simply follow our step-by-step instructions to achieve professional-level results.
Your new floors won’t just save money; they’ll showcase your craftsmanship and personal style. Get ready to master a skill that pays dividends in both home value and satisfaction.
Tools Required
Having the right tools ready from the start will make each step, cutting, fitting, nailing, and finishing, more accurate, faster, and safer.
| Tool | Purpose |
|---|---|
| Table saw or circular saw | Cutting plywood into planks |
| Random orbit sander | Smoothing edges and surfaces |
| Miter gauge | Ensuring precise angled cuts |
| Brad nailer (16-gauge) | Securing planks to subfloor |
| Tape measure | Accurate measurements |
| Chalk line | Guiding straight plank installation |
| Wood chisel | Cleaning subfloor imperfections |
| Safety gear (mask, goggles) | Protecting during sanding and cutting |
Materials Required
Before you start cutting and laying your plywood flooring, gather all these materials to ensure your project goes smoothly without last-minute hardware store trips.
| Material | Purpose |
|---|---|
| ½-inch birch plywood sheets | For cutting into flooring planks |
| Wood glue | Bonding plank edges |
| 1¼-inch brad nails | Securing planks to subfloor |
| Wood filler | Filling gaps between planks |
| 150-grit sanding block | Final surface smoothing |
| Water-based polyurethane | Sealing and protecting the floor |
| Applicator pad or sponge | Applying polyurethane finish |
Step 1: Cutting Plywood into Strips
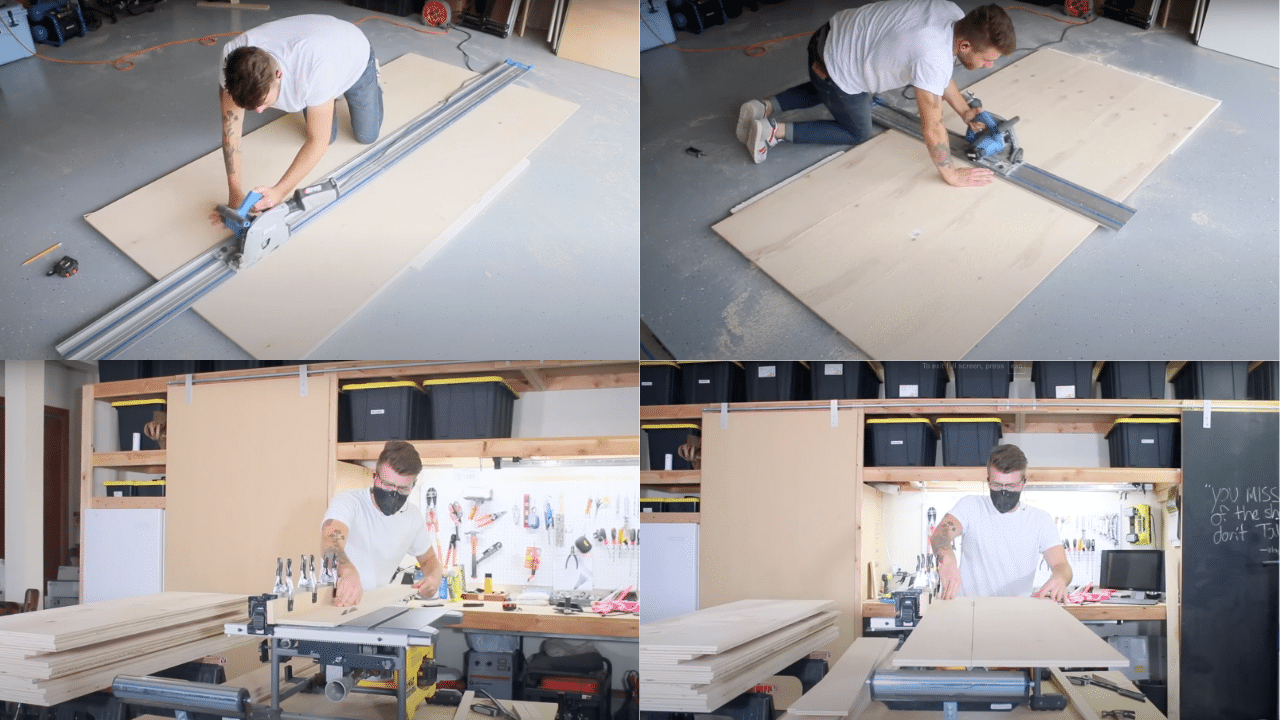
Begin by breaking down ½-inch birch plywood sheets into manageable pieces using a track saw. Then, cut these pieces into 6-inch-wide strips with a table saw, ensuring all cuts are precise and consistent.
- Utilize a track saw for initial breakdowns to maintain control and safety.
- Set up a table saw with a temporary fence extension for uniform strip widths.
- Ensure the saw blade is square to the table and fence for accurate cuts.
- Wear a dust mask to protect against sawdust during cutting.
Tip: Double-check your measurements and saw settings before cutting to ensure consistency across all strips.
Step 2: Creating Hexagonal Pieces
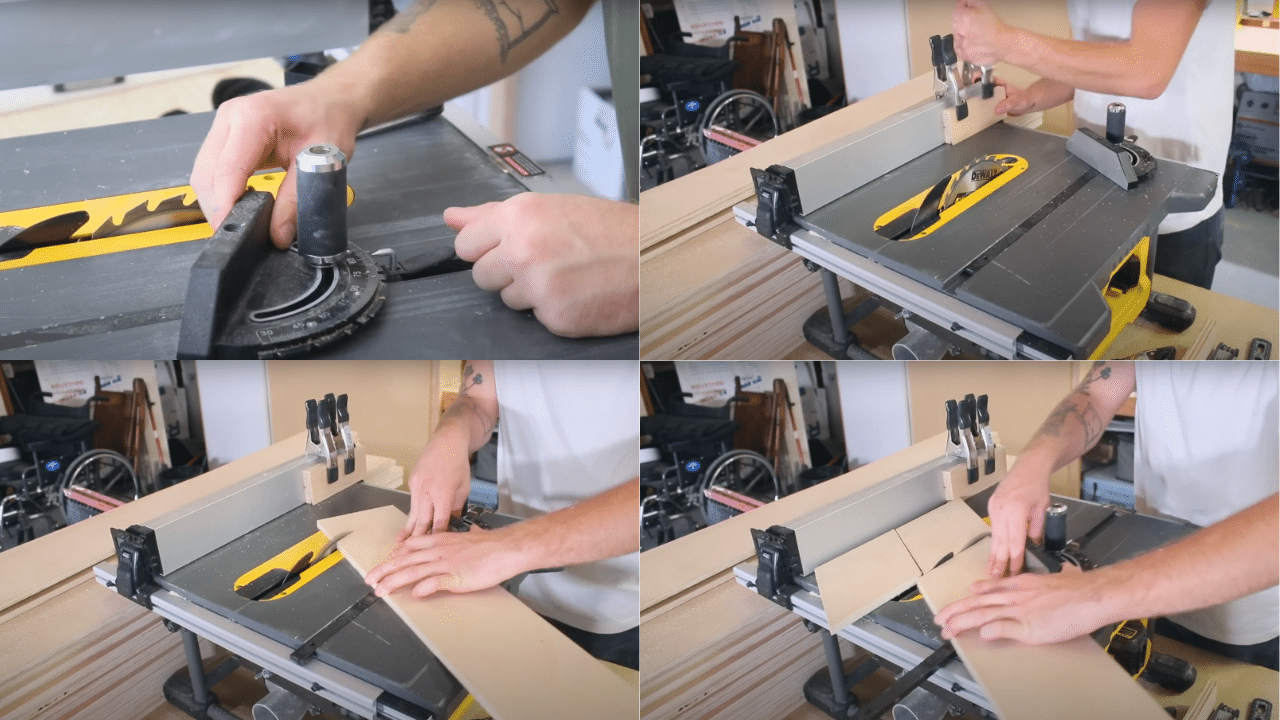
Transform the 6-inch strips into parallelograms with 60-degree angles using a miter gauge and a stop block setup. These pieces will fit together to form hexagonal patterns.
- Adjust the miter gauge to a precise 60-degree angle using a digital angle finder.
- Attach a stop block to the fence to ensure uniform piece lengths.
- Cut each piece carefully, maintaining consistent angles and lengths.
- Stay focused during repetitive cuts to avoid mistakes and ensure safety.
Tip: Regularly check the angle and length of your cuts to maintain the integrity of the hexagonal pattern.
Step 3: Preparing the Subfloor and Layout
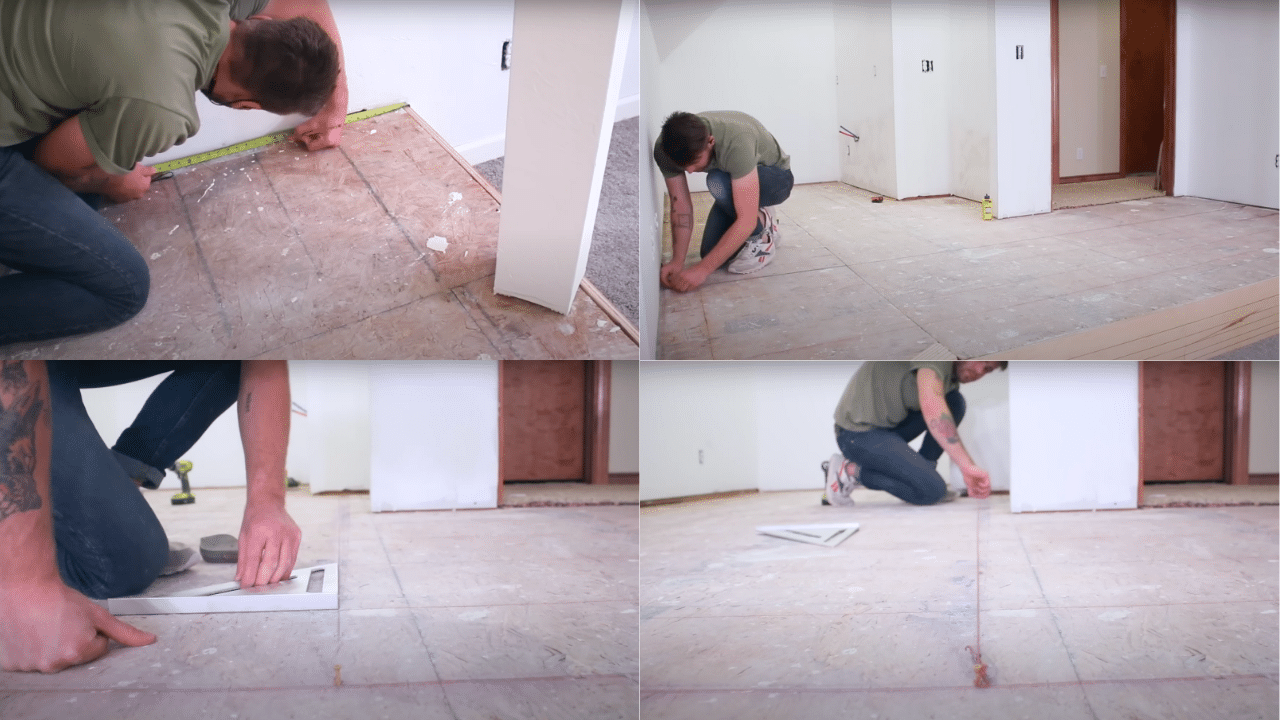
Prepare the installation area by cleaning the subfloor and snapping chalk lines to guide the placement of the hexagonal pieces. This ensures a straight and aligned layout, especially in irregularly shaped rooms.
- Clean the subfloor thoroughly, removing any debris or uneven spots.
- Measure the room and mark reference lines with chalk for accurate alignment.
- Start the layout from the center of the room to accommodate irregular wall angles.
- Ensure the chalk lines are perpendicular and evenly spaced for consistency.
Tip: Taking the time to establish accurate reference lines will simplify the installation process and enhance the final appearance.
Step 4: Installing the Hexagonal Flooring
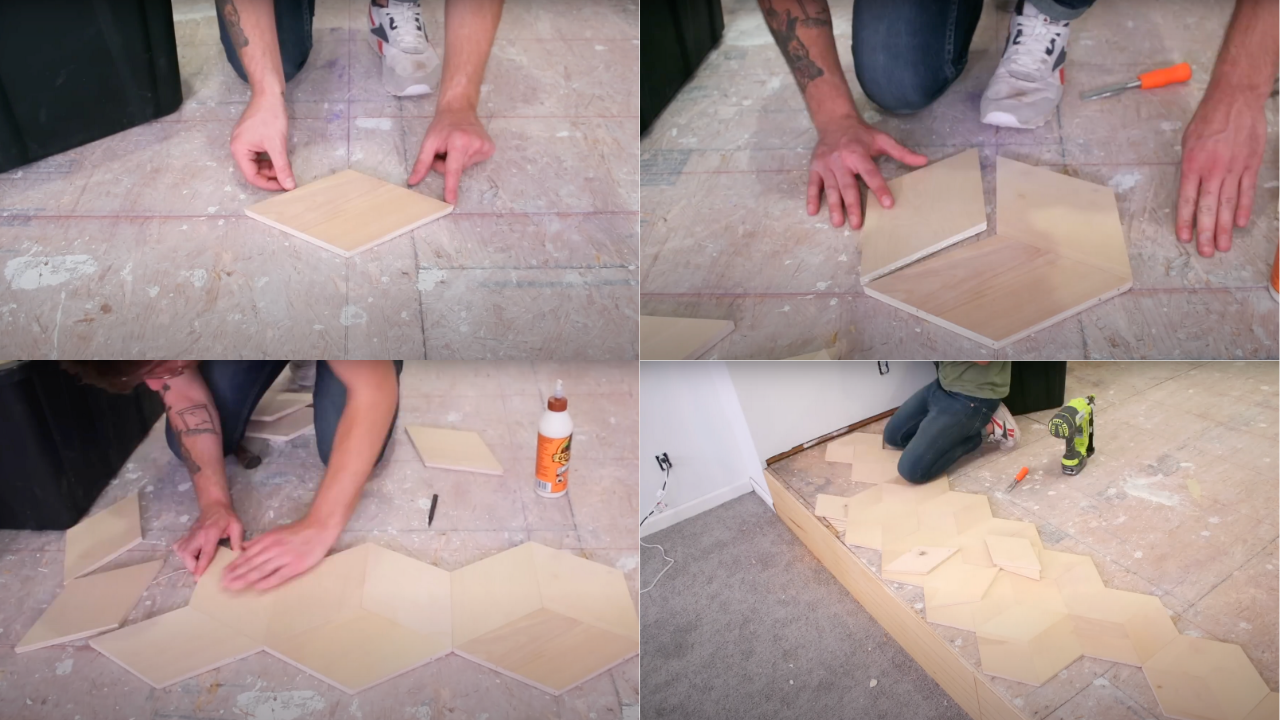
Begin installing the hexagonal pieces by applying wood glue to the edges and securing them to the subfloor with a 16-gauge brad nailer. Assemble full hexagons before nailing to ensure tight joints and a seamless pattern.
- Apply a thin bead of wood glue to the edges of each piece to bond them together.
- Use a brad nailer to toenail the pieces into the subfloor securely.
- Assemble complete hexagons before nailing to maintain alignment and reduce gaps.
- Keep a chisel handy to remove any debris or high spots on the subfloor during installation.
Tip: Regularly check the grain orientation and pattern alignment to maintain a consistent and visually appealing floor design.
Step 5: Filling Gaps and Sanding
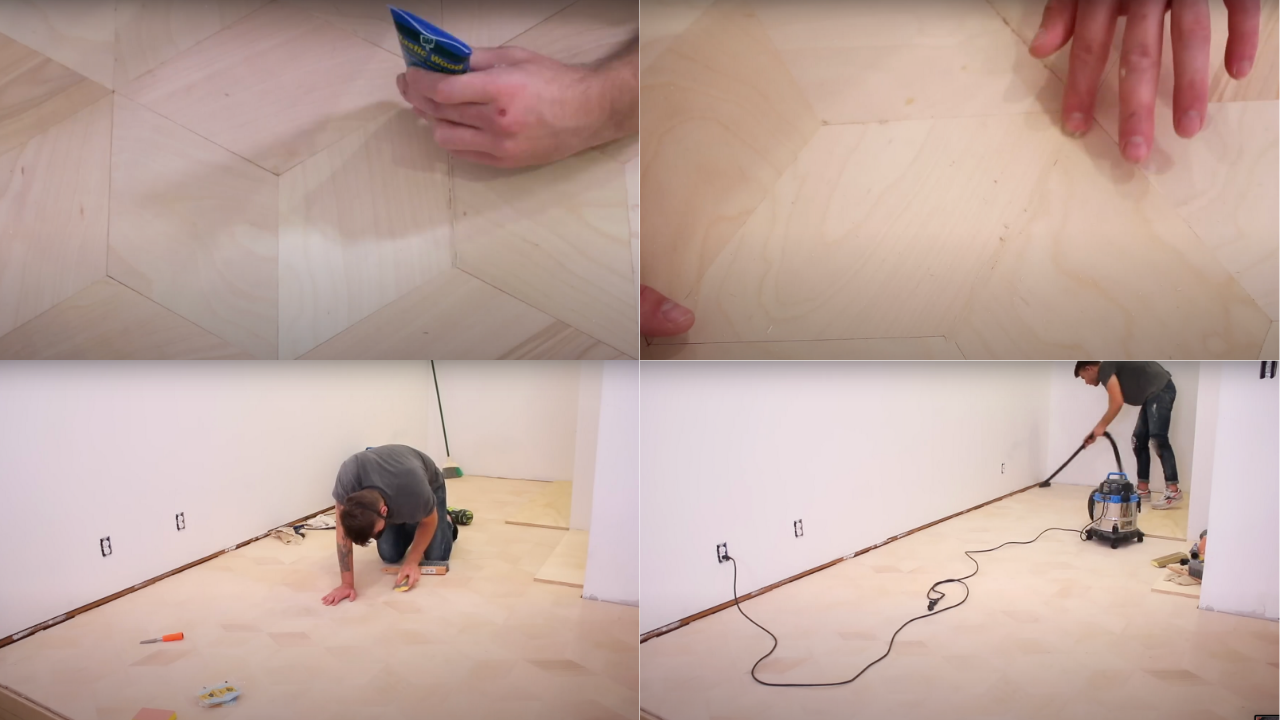
After installing the flooring, fill any small gaps with wood filler that closely matches the plywood color. Once the filler dries, sand the entire floor to smooth out any uneven edges and prepare for finishing.
- Choose a wood filler that is slightly lighter than the plywood to minimize visible seams.
- Apply the filler to gaps and seams, then wipe off excess with a damp rag.
- Use a sanding block or orbital sander with 150-grit sandpaper to smooth the surface.
- Pay special attention to areas where plywood edges meet to ensure a flat, even surface.
Tip: Sanding at a 45-degree angle across the seams can help blend the pieces and create a more uniform appearance.
Step 6: Applying the Finish
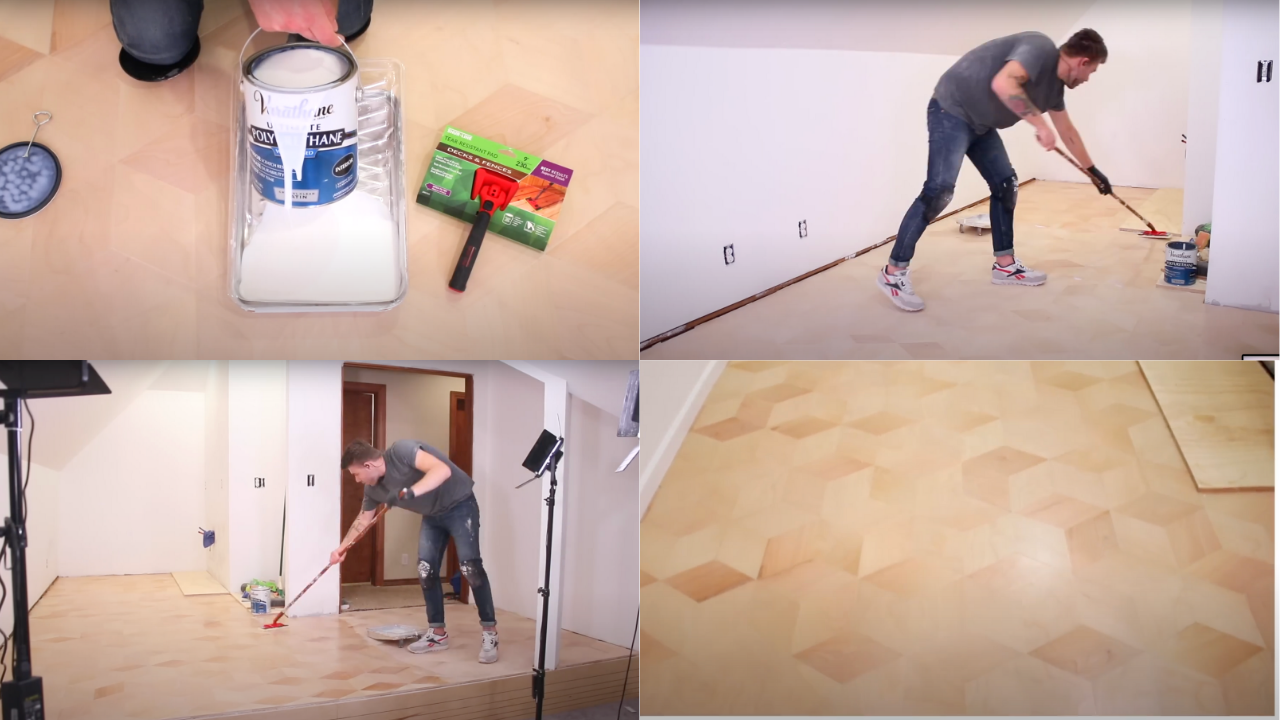
Protect and enhance the plywood floor by applying multiple coats of water-based polyurethane. This finish adds durability and brings out the natural beauty of the wood without yellowing over time.
- Choose a water-based polyurethane to prevent ambering and maintain the wood’s natural color.
- Apply the finish using a large sponge applicator or brush, following the wood grain.
- Allow each coat to dry thoroughly before applying the next, lightly sanding between coats if necessary.
- Apply at least four coats to ensure a durable and long-lasting finish.
Tip: Ensure the room is well-ventilated during application and drying to facilitate proper curing of the finish.
Video Tutorial
Check out this full walkthrough on YouTube: Modern Builds
Important Safety Precautions
Stay safe and make your DIY plywood flooring project smooth by keeping these key tips in mind:
- Wear safety glasses and a dust mask when cutting or sanding plywood to protect your eyes and lungs.
- Keep your work area clear and clutter-free to prevent trips, slips, and tool accidents.
- Always clamp your plywood securely before cutting to avoid sudden shifts and kickbacks.
- Use push sticks or guides when cutting narrow pieces to keep your hands safely away from the blade.
- Work in a well-ventilated space when applying finishes like polyurethane to avoid breathing in harmful fumes.
Choosing the Right Plywood for Your Project
Not all plywood is created equal, and selecting the right type dramatically impacts your floor’s appearance, durability, and installation process:
- Cabinet-Grade Plywood (A/B Grade): The premium choice for flooring projects.
The A-side features smooth, knot-free surfaces with attractive grain patterns, making it ideal for visible flooring. At $45-70 per sheet, it delivers professional results worth the investment. - Sanded Plywood (BC Grade): A solid mid-range option with one relatively smooth side and minor imperfections that can add character.
Priced at $30-45 per sheet, it offers an excellent balance of quality and affordability. - Baltic Birch Plywood: Known for exceptional stability and strength with its multiple thin, void-free layers.
Its light, consistent appearance works beautifully in modern spaces. Typically costs $50-80 per sheet but justifies the price with superior performance. - Marine-Grade Plywood: Consider this moisture-resistant option ($65-90 per sheet) for bathrooms, kitchens, or basements where water exposure is likely.
Its waterproof glue prevents delamination in humid conditions.
Pro Tip: Purchase plywood from the same manufacturing batch to ensure consistent color and grain patterns throughout your floor. Always inspect each sheet for warping, delamination, or damage before purchase.
Final Thoughts: Your Beautiful Floors Await
The verdict is clear: plywood flooring delivers exceptional value for budget-conscious homeowners unwilling to compromise on style or durability.
You’ve now got all the techniques, tips, and insider knowledge to tackle this project with confidence.
Proper sealing is the crucial final step, separating amateur attempts from professional results that last for years. The satisfaction of walking across your installed floors brings pride unmatched by store-bought solutions.
I’d love to see how your plywood flooring project turns out! Drop a photo in the comments below and share any clever modifications you made to the process.
Check out more DIY guides on our site for your next home improvement project!