That big black TV screen on your wall can look a bit out of place when it’s not turned on, right? Many homeowners face this exact problem.
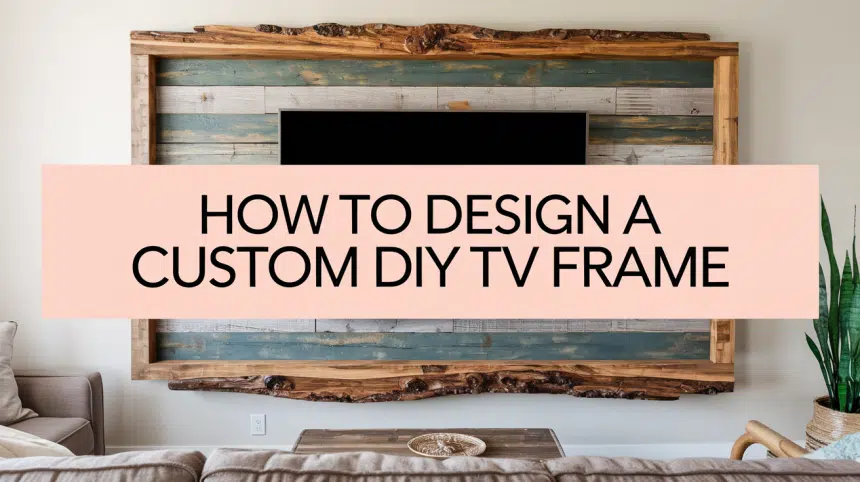
A custom TV frame transforms that dark rectangle into a piece that fits perfectly with your room’s style. The good news? You don’t need to be a master carpenter to make one yourself.
With some basic tools, a bit of patience, and this step-by-step guide, you can create a TV frame that looks like it came from an expensive design store—at a fraction of the cost.
From rustic wood to sleek modern designs, the options are endless. And the satisfaction of saying “I made that” when guests compliment your TV? That feeling alone is worth the effort.
Ready to turn that eyesore into a showpiece? Let’s build something great together!
Why Make a DIY Frame for Your TV?

Framing your TV isn’t just a fun weekend project—it’s a smart way to enhance your space without spending a fortune. Here’s why more people are doing it:
-
Makes your TV look more like art
A well-designed frame helps your television blend in with your wall decor, making it look like a piece of art rather than a black box. This is especially great in living rooms or bedrooms where you want a softer, more curated aesthetic. -
Covers up the black bezel for a clean look
Most TVs have a thick black border that draws attention. A frame hides that bezel, creating a seamless and elegant finish that instantly elevates the space. -
A budget-friendly alternative to buying a Frame TV
Frame TVs are beautiful, but they come with a hefty price tag. A DIY frame gives you a similar high-end look for under $30. -
Customizable to fit any interior style
Whether your home is farmhouse, modern, coastal, or vintage, you can choose trim, stain, or paint that matches your vibe. It’s a completely flexible project that’s easy to personalize.
What Materials Do You Need to Make a DIY TV Frame?
Gather these simple, budget-friendly supplies to build a custom TV frame that fits your style and screen perfectly.
| Material | Purpose |
|---|---|
| Decorative trim/molding | Forms the outer frame around the TV for a custom, polished look |
| Measuring tape | Ensures accurate screen measurements for a perfect frame fit |
| Corner hinges | Secures the corners of the frame tightly together |
| Wood filler | Fills gaps or imperfections in the frame corners for a smooth finish |
| Sandpaper | Smooths the wood surface and filled areas before staining or painting |
| Stain or paint | Adds color and enhances the visual appeal of the frame |
| Elastic straps | Helps attach the frame securely to the TV without damaging the screen |
| Staple gun (or adhesive) | Used to fasten elastic straps to the back of the frame |
Cost Breakdown (Approximate)
Here’s an updated (Approximate) cost breakdown table that includes both the cost and quantity required for your DIY TV frame project:
| Item | Quantity Needed | Estimated Cost |
|---|---|---|
| Trim pieces | 4 pieces (Top, Bottom, Left, Right) | $17 |
| Elastic band | 2–3 strips (long enough to stretch across the back) | $3 |
| Hinges | 4 corner hinges | $4–$5 |
| Stain/glue | Small can (already on hand) | On hand |
| Total | — | ~$25 |
Step-by-Step: How to Build a DIY TV Frame
Let’s discuss each step in your DIY TV frame project in more detail to help you tackle it confidently and get the best results.
Step 1: Measure Your TV Screen (Not the Bezel)

Before you do anything, grab your measuring tape and carefully measure only the visible screen area, not the plastic or metal border (called the bezel) that surrounds it.
- Why skip the bezel? The frame will sit on top of that border—you want the frame to cover it, not overlap or hang awkwardly.
- Take your time and write down the width and height—for example, 43 1/4” wide by 24 1/4” tall.
- Double-check your measurements. A tight, accurate fit will make the frame look polished and intentional.
Step 2: Choose and Label Your Trim

Now it’s time to select your trim or molding. This will form the face of your frame, so go with a design that suits your space.
- Options: Simple flat wood for a modern look or decorative carved molding for a traditional vibe.
- Label each piece before cutting: write “Top,” “Bottom,” “Left,” and “Right” on the back of the wood. This will help you visualize the layout and avoid mistakes.
- Tip: If your molding has a pattern or texture, make sure the direction is consistent before cutting.
Step 3: Cut and Assemble the Frame

Cut your trim pieces precisely and secure them with the right hardware to create a strong, seamless frame structure.
- Use a miter saw (or ask your hardware store for help) to cut each trim piece at a 45° angle on both ends. This ensures the corners fit together neatly, like a picture frame.
- Lay out the labeled pieces (Top, Bottom, Left, and Right) on a flat surface to check the fit and orientation before assembling.
- Attach the corners using corner hinges or metal L-brackets on the back side of the frame. These keep the frame square and hold everything in place tightly.
- Use wood glue along the edges before attaching hinges for extra strength.
- If the pieces shift while assembling, use clamps to hold them steady until secured.
Step 4: Fill and Sand the Corners

Smooth out any gaps or rough edges to get a flawless, professional-looking finish before staining or painting.
- Inspect all frame corners for small gaps or uneven joints.
- Apply wood filler to cracks, seams, or dents using a putty knife.
- Let the filler dry completely (usually a few hours or overnight).
- Sand the entire frame, especially the corners and filled areas, using fine-grit sandpaper (180–220 grit).
- Wipe off dust with a damp cloth to prep the surface for staining or painting.
Step 5: Stain or Paint the Frame

Now for the fun part—giving your frame color!
- If you want a warm, natural look, go with a gel stain. It provides rich coverage and depth.
- Prefer a pop of color? Go for a matte or glossy paint instead.
- Apply your finish with a foam brush or lint-free cloth, following the grain of the wood.
- Allow at least 48 hours of dry time before handling, especially if you’re using stain.
Step 6: Add Elastic to Attach the Frame

To attach the frame to your TV, use elastic straps on the back of the frame. This allows you to mount the frame securely without damaging your screen.
- Cut two or more strips of elastic long enough to stretch across the width.
- Pull them slightly taut and staple them to the back edges of the frame using a staple gun.
- Make sure the elastic can slip over your TV but isn’t so loose that the frame droops.
- Check the back of your TV for any obstacles (vents, ports, or stands) that the elastic might need to avoid.
Step 7: Test the Fit and Remote Function

Now, it’s time to make sure your frame fits well and doesn’t interfere with how your TV works.
- Carefully slide the frame over your TV, positioning the elastic straps around the back. Go slowly to avoid scratching the screen or damaging the frame.
- Check if the frame sits evenly against the bezel and looks centered from all angles. It should cover the TV border but not block the actual screen.
- Make sure the fit is snug but not too tight. If the frame presses into the screen or won’t sit level, try adjusting the elastic or lightly trimming the frame edges.
- Test the remote control to confirm the signal still reaches the TV sensor. Surprisingly, many remotes work fine even with the sensor partially covered. If yours doesn’t, trim the bottom portion of the frame or reposition it slightly.
Video Tutorial
Special thanks to This Girl at Home for providing valuable insights in this guided video on how to make DIY Frame for TV.
Tips to Make Your Frame Look High-End
Once your basic DIY TV frame is complete, you can take it to the next level with a few simple upgrades. Here are some stylish enhancements to consider:
- Add crown molding for drama: Want a frame that truly stands out? Add a layer of crown molding or stacked trim for a bold, architectural look. This works well with traditional or farmhouse decor, giving your TV frame the polish of custom furniture.
- Try gold or black finishes for a luxe look: Change your stain or paint for a refined look. Matte black adds a modern edge, while brushed gold or antique brass brings warmth. These finishes suit contemporary and traditional spaces.
-
Use Velcro strips instead of elastic for easier removal: If you want the frame to be removable for cleaning or adjusting, try using heavy-duty Velcro strips instead of elastic bands. Stick one side to the back of the frame and the other to the TV’s bezel or wall mount. This provides a snug hold without the hassle of stretching elastic over the screen.
Conclusion
Creating your own DIY TV frame is a simple, affordable, and incredibly rewarding project.
With just a few tools and materials, you can transform a basic screen into a stylish focal point that complements your space beautifully.
This frame is completely customizable to match your style, whether you favor sleek, contemporary designs or a more rustic, classic feel.
Plus, it’s much cheaper than investing in a Frame TV or custom mount—and the remote still works like a charm!
This project proves that a little creativity goes a long way when it comes to home decor.
Don’t worry if it’s not perfect; the charm is in the handmade look.
So grab your trim, stain, and staple gun—it’s time to frame your TV in style and make your living space feel a little more you.