
How to paper a ceiling

Welcome to our guide to decorating a ceiling.
In this section we will take you through the process of decorating a ceiling, the step-by-step instructions can be applied to hanging both lining paper and the top covering.
First we look at how to work out how many rolls you will need for your project, we then go onto preparing the ceiling and then cutting and hanging the ceiling covering.
Please note: We will accept no responsibility for any damage or injury as a result of following this guide.
For further information please see our disclaimer, a link to which can be found at the bottom of this page.
For further information please see our disclaimer, a link to which can be found at the bottom of this page.
To complete this task you will need:
- Ceiling Covering
- Lining Paper
- Appropriate Paste
- Stanley Knife (trimming knife)
- Pair of suitable Scissors
- Sponge
- Tape Measure
- Paste Brush
- 2 Trestle tables (or step ladders) and two scaffold boards
- Paperhanging brush
- Decorating table (pasting table)
- 1 Bucket for the Paste
- 1 Bucket of Clean Water
- Wooden Stick (to mix the paste)
- Wallpaper Seam Roller
- Soft nib Pencil
- Broad knife Trimming Tool
- Rule

When working at heights, always ensure that the structure is safe and secure.
Never stretch out, always get down and re-position the scaffold or trestle.
Never stretch out, always get down and re-position the scaffold or trestle.
A note about lining paper
The extra effort of using lining paper can help to achieve a better finish, especially if the ceiling has imperfections that may protrude underneath the final covering.
Lining paper needs to be hung at a 90° angle (perpendicular) to the final covering paper, this stops the edges of both papers lining up and protruding, it also reduces the risk of the final covering upseating the first.
Roll calculation
First, we need to decide how many rolls of paper we need.

So we need 3.5 rolls (4 rolls).
Advertisements
Take your tape measure and measure the run of the room, in this case the length of the room, and add 10cm (100mm) onto this measurement. Now, measure the width of the room (remember to take into account any alcoves you may have).
Next, note the width and length of the lining paper, these measurements are usually stated on the packaging.
Note: We are hanging lining paper in our example, so we are running it along the length of the room. The reason is so when we hang the top covering at 90°, it will be running from the window eliminating shadows along the joins.
Next, note the width and length of the lining paper, these measurements are usually stated on the packaging.
- Divide the roll length by the run length, to give the number of lengths per roll --call this A--
- Divide the width of the room by the roll width, to give the number of lengths required --call this B--
- Divide B by A to give the number of rolls required, it is better to go slightly over than under.
Note: We are hanging lining paper in our example, so we are running it along the length of the room. The reason is so when we hang the top covering at 90°, it will be running from the window eliminating shadows along the joins.
For example purposes we will presume that our rolls of paper have the following dimensions:
- Roll Length: 10m
- Roll Width: 50cm (500mm)
- Room Length = 4.5m + 10cm (100mm) waste = 4.6m run length
- Room Width = 3.5m
- Divide 10m (roll length) by 4.6m (run length) = 2.1 runs to a roll (approx, it is always best to allow a bit).
- Divide 3.5m (room width) by 0.5 (roll width) = 7 pieces (runs) are needed.
- Divide 7 by 2.1 = 3.5 rolls.
So we need 3.5 rolls (4 rolls).
Preparing the ceiling for application
First, make sure your trestles and boards are set at the right height and are safe and secure.
In fig 2.0 on the right we see the one side of a trestle setup. The ideal height means that you can stand on the board and put the palm of your hand against the ceiling with your arm slightly bent. Always confirm that the structure is safe and secure.
If the ceiling has an old covering then remove it, make sure you get rid of every piece (pay close attention to light fittings, paper tends to get caught underneath).
Wash down the ceiling with sugar soap (or similar) to remove any grease, check for loose plaster and replace where necessary.
Remove any loose paint and fill any holes or cracks in the ceiling. If the plaster has a gloss finish then sand it down with a suitably abrasive sandpaper (glasspaper).
Advertisements
Marking-out and measuring the lengths
It is best to get a guideline marked on the ceiling which can guide you when you hang your first piece.
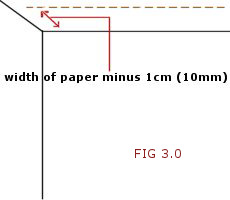
To achieve this, decide which end of the room you are going to start hanging the paper, take your tape measure and measure the width of the paper (or see the packaging), then deduct 1cm (10mm/0.4in) and mark this distance out from the wall at each end of the run. See fig 3.0 for an example.
You can then take a chalk line and chalk a line between the 2 marks. If you don't have a chalk line then you can place marks at intervals to guide you when you hang the paper.
Next, it's time to mix the paste, paste normally takes around 15-20 minutes to develop the right consistency. If we mix the paste now, then it should be ready by the time we are ready to use it, although always follow the manufacturer's time guidelines.
Note: if this is the first time you have hung wallpaper or lining paper, leave the task of mixing the paste until you have cut and prepared the paper.
Cutting the paper into lengths
The next task is to cut the paper, measure the lengths of paper (remembering to add 10cm (100mm/4in) extra) and cut as many runs as you need.
Note: If you are using patterned paper, check the manufacturer's instructions for any special pattern matching information.
When you have cut each run, check the time to make sure you have allowed sufficient time for the paste to be the right consistency. Lay the runs onto the table with the face of the paper down, you will probably find it helpful if you have some clips to clamp the paper to the table while you work.
When you paste, work the brush from the middle of the paper out towards the edges (see fig 4.0).
When you have completed the section on the pasting table, pull the unpasted section up onto the table. To make the paper easier to work with, fold the pasted section in a concertina effect (never crease along the fold) as you are pulling the dry section onto the table, this also makes things a lot easier when you come to hang it!
Now, leave the paper to soak (see manufacturer's instructions).
Hanging the paper
Now we can hang the first piece, you will need your scissors, craft knife (Stanley knife) and wallpapering brush (to smooth the paper).
It is important to get the first piece in position pefectly, as this piece will dictate the position of the rest of the runs.
Unfold the paper to a comfortable size to work with, starting at the end furthest from the window (if it is the top covering) or the opoosite end to the window (if it is lining paper). Place the paper against the ceiling in line with the guide marks you made earlier, allow around 5cm (50mm/2in) overhang at the end.
Now, slowly moving along the plank, smooth and align the paper as you unfold it, making sure you remove all the trapped air with your wallpapering brush as you go.
Advertisements
If you are going to paper the walls next then when you reach the other end of the room leave around an 8mm overhang. If you are not papering the walls, then run a pencil along the edge, then pull the paper back enough for you to trim it to the pencil line, now smooth out the paper with your wallpapering brush. Repeat at each end.
Now repeat the process with another section, this time butt it against the first piece, the first piece will now be your guide line. If you are hanging patterned wallpaper then ensure the pattern is matched correctly (see manufacturer's instructions).
Now hang the remaining lengths, the last piece you hang will probably be narrower than the width of the roll. In this case, measure how wide you need the piece and add on 5cm (50mm/2in), then cut a run to that width measurement. Paste it and hang it, butting up to the last piece you hung, then simply trim the piece using a pencil and scissors.
After the paper has dried slightly, go along the edges with your seam roller to smooth them down. If you are hanging an embossed covering, try using a clean, dry paint roller instead, as this will not flatten the paper as much.
When you have smoothed all the edges, take a damp sponge and lightly clean the paper to remove any excess paste at the joins.
If you have followed this guide to hang the lining paper, then to hang your top covering simply follow the instructions through again, but this time start with the run going away from the window. Allow 24 hours for the lining paper to dry.