
How to remove a radiator for decorating
Welcome to our guide to how to remove a central heating radiator quickly and easily.
This tutorial is for when you need to remove a radiator temporarily, for instance, to paint or decorate. However, it can also be used as a guide for when you are replacing the radiators in your home.
This tutorial is for when you need to remove a radiator temporarily, for instance, to paint or decorate. However, it can also be used as a guide for when you are replacing the radiators in your home.
Please note: We will accept no responsibility for any damage or injury as a result of following this guide.
For further information please see our disclaimer, a link to which can be found at the bottom of this page.
For further information please see our disclaimer, a link to which can be found at the bottom of this page.
To Complete this task you will need:
- 2 Adjustable Spanners
- 1 Radiator Key (Bleed Key)
- Old sheets/towels or equivalent for water spillage
- A bowl (small enough to fit under the radiator)
- A Bucket
If you are only removing the radiator to paint the walls, consider buying some radiator rollers. These are small paint rollers used in conjunction with a long handle, they allow you to get right behind the radiator. Click here for a great selection from Amazon® (aff).
Overview of the radiator
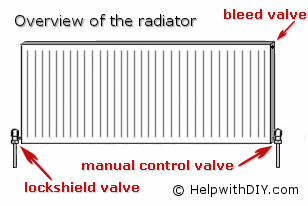
First, let's take a look at the radiator, there are 3 points of interest:
The Manual Control Valve is the valve you use to control the temperature of the radiator.
The Lockshield Valve has a removable plastic cover over the top.
- The Bleed Valve
- The Lockshield Valve
- The Manual Control Valve.
The Manual Control Valve is the valve you use to control the temperature of the radiator.
The Lockshield Valve has a removable plastic cover over the top.
Removing a Radiator
Advertisements
- First of all turn (using your hand) the Manual Control Valve clockwise until tight to close the valve.
- Next, remove the plastic cap off the Lockshield Valve and turn the spindle clockwise (with an adjustable spanner). Make a note of how many turns it takes to close, so you can open it later to the same setting.
- Pull the floor covering (if any) away from the radiator and place old sheets/towels on the floor around the Manual Control Valve. Place a small bowl directly underneath the Manual Control Valve to catch the water.
- Next, using the radiator key (bleed key), loosen off the Bleed Valve, this will allow the water to exit.
- Now, take both adjustable spanners and place one on the Manual Control Valve to stop it moving, and use the other spanner to loosen the cap nut that holds the Manual Control Valve onto the radiator. As the nut is loosened, water will escape so be ready with your bowl. When the bowl is full, tighten the cap nut again to stop the water flow, empty your bowl and then loosen the cap nut again, repeat until the water flow has stopped.
- Now undo the other cap nut that holds the Lockshield Valve onto the radiator, use both spanners as before.
- Next, carefully lift the radiator off its supports, and empty any remaining water into a large bucket.
- If you are going to paint or decorate while the radiator is removed, then it is advisable to cover the exposed pipes, with for instance, a plastic carrier bag.
Putting the Radiator back
- Carefully place the radiator back onto its supporting brackets, making sure the valves line up with the radiator.
- Tighten both cap nuts to reconnect the valves to the radiator.
- Next, using the Radiator key (bleed key), close the Bleed valve fully.
- Using an adjustable spanner turn the Lockshield Valve spindle, using the same amount of turns as before only anti-clockwise.
- Now turn the Manual Control Valve anti-clockwise to open the valve.
- As the radiator fills up use the radiator key (bleed key) to release any trapped air by opening the Bleed Valve.
Advertisements