
Cross-lining - How to hang lining paper on a wall
Welcome to our guide to hanging lining paper.
In this part we will take you through the process of cross-lining a wall to provide a better surface for the top wallcovering. Including roll calculation, preparing the walls, pasting and hanging.
Why use lining paper?
The benefits of hanging lining paper far outweigh the work involved, especially if you are going to hang expensive or embossed wallcoverings. Lining paper hides any imperfections on the wall and gives an ideal surface onto which to hang your wallcovering.
Please note: We will accept no responsibility for any damage or injury as a result of following this guide.
For further information please see our disclaimer, a link to which can be found at the bottom of this page.
For further information please see our disclaimer, a link to which can be found at the bottom of this page.
NOTE: This guide is intended for cross-lining, if you intend to hang the lining paper vertically (for painting) then please see our guide to hanging wallpaper.

When working at heights, always ensure that the structure is safe and secure.
Never stretch out, always get down and re-position the scaffold or trestle.
Never stretch out, always get down and re-position the scaffold or trestle.
To complete this task you will need:
- Lining paper
- Suitable wallpaper paste
- Wallpaper pasting brush
- 2 trestle tables (or step ladders) and two scaffold boards.
- Suitable filler (if required) along with a suitable applicator
- Tape measure
- Spirit level
- Blunt pencil
- Paperhanging brush
- Suitable scissors
- Decorating table (pasting table)
The lining paper should be hung horizontally (across the wall) if you are going to hang a top covering, as this stops the edges of the lining paper and the wallcovering falling in the same place and protruding. It also reduces the risk of the final covering upseating the first.
Roll calculation
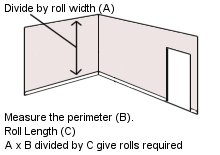
Fig 1.1
The first thing is to establish how many rolls of lining paper are required, to do this you use a simple calculation.
And finally let's say our roll of paper is 11m long.
That gives us: 48 / 11 = 4.37 (rounded up) so we need 5 rolls of lining paper.
- Divide the drop by the width of the lining paper roll.
- Multiply this figure by the perimeter of the room.
- Divide by the length of the roll.
And finally let's say our roll of paper is 11m long.
That gives us: 48 / 11 = 4.37 (rounded up) so we need 5 rolls of lining paper.
Preparing the walls
Firstly make sure your trestles and boards are set at the right height and are safe and secure.
If the walls have an old covering then remove it (see our guide to stripping wallpaper) making sure to get rid of every trace of wallpaper.
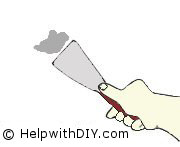
Fig 1.2
If the walls have an old covering then remove it (see our guide to stripping wallpaper) making sure to get rid of every trace of wallpaper.
Fig 1.2
Inspect the wall surfaces for cracks, holes and any loose plaster.
For small cracks use a suitable fine filler, for larger cracks and holes use a stronger more suitable filler (see manufacturer's instructions).
To check for any loose plaster, tap the wall around any suspect areas. Remove any loose plaster and repair with a suitable plaster repair product (filler if the damaged area is not too big).
When filling try and leave a nice smooth finish. It is better to leave the filled area slightly proud of the surrounding area and then sand down with a fine sandpaper until flush.
Advertisements
Prepare the lengths

Fig 1.3
First read the manufacturer's instructions on the paste packet, usually paste takes about 20 minutes until it is ready to use, if this is the case then mix the paste now and it will be ready when you need it.
Take your tape measure and pencil, measure down from the ceiling the width of the roll, mark it with your pencil and then take your spirit level and mark a guide line across the wall level with your first mark (see Fig 1.3).
Now, measure the length of the wall and add 10cm. Take the roll of lining paper and cut as many lengths as you need (remember it is the length of the wall plus 10cm) for the one wall.
Pasting the lining paper
Fig 1.4
Place one of the lengths of paper face down on the pasting table. Ensure you have allowed enough time for the paste to thicken, take your pasting brush and apply the paste to the first length.
Starting at one end, work the paste evenly over the paper working from the middle to the edges (see Fig 1.4), fold the paper into a loose concertina as you work, this will make the paper easier to work with. Allow the paper to soak for as long as instructed (see label).
Starting at one end, work the paste evenly over the paper working from the middle to the edges (see Fig 1.4), fold the paper into a loose concertina as you work, this will make the paper easier to work with. Allow the paper to soak for as long as instructed (see label).
Hanging the lining paper
Next, take the paper holding the end in one hand and the concertina section in the other. Put the paper into place butting the end into the corner and lining up the bottom edge with your guide line (see Fig 1.5), then work the paper with your paper-hanging brush ensuring not to leave any air bubbles under the paper.
Unfold the paper as you go along the wall, removing any air trapped with your paper-hanging brush.
When you reach the end, push the paper into the corner (there should be 10cm to trim) and then run a blunt pencil or the back of the scissors down the fold as a guide (see Fig 1.6). Pull the paper away from the wall and then trim the paper using the fold as a guide, then smooth the paper back onto the wall.
Take the next length and paste as before (if the paper needs a long time to soak you may wish to paste more than one at a time), butt it up against the first length and work your way along the wall as before, ensuring to remove all trapped air.
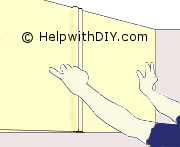
Fig 1.5

Fig 1.6
Unfold the paper as you go along the wall, removing any air trapped with your paper-hanging brush.
When you reach the end, push the paper into the corner (there should be 10cm to trim) and then run a blunt pencil or the back of the scissors down the fold as a guide (see Fig 1.6). Pull the paper away from the wall and then trim the paper using the fold as a guide, then smooth the paper back onto the wall.
Take the next length and paste as before (if the paper needs a long time to soak you may wish to paste more than one at a time), butt it up against the first length and work your way along the wall as before, ensuring to remove all trapped air.
Fig 1.5
Fig 1.6
When you hang the last length the chances are it will need trimming along the bottom of the wall. To trim, push the paper into the edge and mark along the paper with your blunt pencil, pull the paper away from the wall just enough for you to be able to trim along the line with your scissors.
Now move onto the next wall and repeat the process, once you have lined the whole room, allow the paper 24 hours to dry out before hanging the top covering.
Now move onto the next wall and repeat the process, once you have lined the whole room, allow the paper 24 hours to dry out before hanging the top covering.
Advertisements