
How to hang wallpaper
Welcome to our guide to hanging wallpaper.
Our complete guide includes roll calculation, wall preparation, order of hanging, marking out and cutting the lengths.
It also give step-by-step instructions for hanging the wall covering as well as tips on how to deal with those awkward parts, namely light sockets, electrical outlets and also door and window recesses.
If you intend to hang lining paper and haven't yet, then see our guide to hanging lining paper.
Please note: We will accept no responsibility for any damage or injury as a result of following this guide.
For further information please see our disclaimer, a link to which can be found at the bottom of this page.
For further information please see our disclaimer, a link to which can be found at the bottom of this page.
To complete this task you will need
- Wall Covering (wallpaper)
- Suitable Wallpaper Paste
- Wallpaper Pasting Brush
- Decorating table (pasting table)
- Suitable filler (if required) along with a suitable applicator
- Wallpaper Seam Roller
- Tape Measure
- Spirit Level
- Blunt Pencil
- Paperhanging brush
- Suitable Scissors

When working at heights, always ensure that the structure is safe and secure.
Never stretch out, always get down and re-position the scaffold or trestle.
Never stretch out, always get down and re-position the scaffold or trestle.
Buying wallpaper
If you have already purchased sufficient wall covering, then scroll down to the next section.
First a few notes about buying wallpaper.
When you buy a wall covering ensure that each roll is exactly the same as the rest, including batch number and shade number.
Wallcoverings come in a variety of types, including self-pasting, washable, peelable and so on. Most manufacturers use symbols to indicate wallpaper type, you can find a list of common symbols below.
 |
Free Match |
 |
Straight Match |
 |
Offset Match |
 |
Reverse alternate Lengths |
 |
Paste the wall not the paper |
 |
Pre-Pasted (ready-pasted) |
 |
Strippable |
 |
Spongeable surface |
 |
Washable Surface |
 |
Super Washable Surface |
 |
Scrubbable Surface |
 |
Moderate light Fastness |
 |
Good light Fastness |
 |
Peelable |
Roll calculation
It is important to know exactly how many rolls of wallcovering you need for your project. If you buy less than required it will interrupt your work and you may find the batch with the exact same shading has sold out. If you have too many then it is simply a waste of money.
Advertisements
It is always a good idea to have one extra roll for spare. Wallcovering can get damaged, either during the initial work or at a later date, having the extra roll gives piece of mind.
To calculate how many rolls of wall covering are needed use the following formula:
If the perimeter of the room (P) is 14m (46ft) and the width of the roll (W) is 0.6m (2ft). To calculate the lengths required (LR) we divide 14 by 0.6 which gives 24 (rounded up).
and let's say the roll length (L) is 10m (33ft) and the drop is 2.6m (8.5ft). To calculate the drops per roll (DPR) we divide 10 by 2.6 which gives 4 (rounded up).
Dividing 24 (LR) by 4.4 (DPR) gives us 5.45. So we need 6 rolls to complete the project.
To calculate how many rolls of wall covering are needed use the following formula:
- Measure the perimeter of the room
- Measure each wall (horizontally) and add the measurements together, take into account any alcoves or door/window recesses. Label this figure P.
- Note the width of the roll
- Measure the width of the roll or check the packaging for the measurement. Label this figure W.
- Calculate the amount of lengths (drops) required
- Divide the perimeter measurement (P) by the width of the roll (W). If the result is fractional then round-up to the nearest digit. Label this figure LR.
- Measure the drop
- Measure the wall from top to bottom, this is referred to as the drop. Add 10cm (4 inches) for trimming, also check the packaging for any special matching criteria that may be required. Label this figure D.
- Note the length of the roll
- Measure the length of the roll or check the packaging for the measurement. Label this figure L.
- Calculate the drops per roll
- Divide the length of the roll (L) by the drop figure (D). Label this figure DPR.
- Final calculation
- Divide LR by DPR to give the number of rolls needed.
If the perimeter of the room (P) is 14m (46ft) and the width of the roll (W) is 0.6m (2ft). To calculate the lengths required (LR) we divide 14 by 0.6 which gives 24 (rounded up).
and let's say the roll length (L) is 10m (33ft) and the drop is 2.6m (8.5ft). To calculate the drops per roll (DPR) we divide 10 by 2.6 which gives 4 (rounded up).
Dividing 24 (LR) by 4.4 (DPR) gives us 5.45. So we need 6 rolls to complete the project.
Order of hanging
Fig 1.1
Fig 1.2
The next step is to decide the best place to start hanging the wallpaper. Patterned wallpaper is best hung starting at a window, and working your way around the room (see fig 1.1).
Whether you work around the room in a clockwise or anti-clockwise direction is down to your personal preference.
To get your starting point
Let's say the window recess (RS) is 17cm and the roll width (W) is 60cm. That means our starting point (SP) will be 43cm (60cm - 17cm = 43cm) out from the window.
Use a pencil to mark your starting point, and then use either a spirit level or a chalk line to mark a vertical line to use as a guide.
Whether you work around the room in a clockwise or anti-clockwise direction is down to your personal preference.
To get your starting point
- Measure the window recess and add 2cm (1 inch) for trimming. Label this measurement RS.
- Deduct RS from the roll width W. Label the result SP.
- Then measure out from the window the amount specified by SP, this will be your starting point (see fig 1.2).
Let's say the window recess (RS) is 17cm and the roll width (W) is 60cm. That means our starting point (SP) will be 43cm (60cm - 17cm = 43cm) out from the window.
Use a pencil to mark your starting point, and then use either a spirit level or a chalk line to mark a vertical line to use as a guide.
Prepare the lengths
Advertisements
Once you have your starting point you can work out how many drops it will take to reach the nearest corner, this is how many pieces of wallpaper we need to prepare ready for hanging.
When you know how many drops you need to reach the corner, the next step is to work out how long to cut the lengths. Free match wallpaper is just a case of measuring the drop and adding 10cm for trimming, other wallpapers may need a larger surplus in order to match the pattern correctly (see manufacturer's instructions).
After working out how long to cut the lengths, take your decorating scissors and cut as many lengths as you need (always check that the pattern matches and you have 5cm at both top and bottom for trimming).
note: Usually wallpaper paste takes about 15-20 minutes (see paste packet) until it is ready to use, if you mix it just before you start cutting the lengths it should be ready when you need it.
Pasting the wallpaper lengths
Fig 1.3
If you are using a pre-pasted wall covering, then follow the manufacturer's instructions for preparation.
When your paste is ready, position one of the lengths of wallpaper face down on your pasting table, take your pasting brush and apply the paste to the first length. Starting at the bottom, work the paste evenly over the paper working from the middle to the edges (see Fig 1.3), gently fold the bottom over into a concertina (ensuring not to crease), this will make the paper easier to work with.
Allow the paper to soak for as long as instructed (see label) before hanging.
Hanging the first length
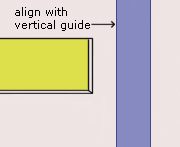
Fig 1.4
When the first length of wallpaper is ready for hanging, hold it by the top and place it loosely up against the wall, leaving about 5cm (2 inches) surplus at the top and align the edge with your vertical guideline.
Unfold the concertina and let the paper hang loosely while you check the positioning, when you are happy with the position work your way down from the top, smoothing the paper onto the wall with your paper-hanging brush, ensuring to disperse any trapped air.
Unfold the concertina and let the paper hang loosely while you check the positioning, when you are happy with the position work your way down from the top, smoothing the paper onto the wall with your paper-hanging brush, ensuring to disperse any trapped air.
Trimming
When the length is in position and you have removed any trapped air, run the back of your scissors into the crease between the wall and ceiling.
Gently pull the paper away from the wall, enough to let you trim the surplus at the top using the crease as a guide, then smooth the paper back onto the wall with your paper-hanging brush.
To trim the bottom, use the same technique as the top.
Gently pull the paper away from the wall, enough to let you trim the surplus at the top using the crease as a guide, then smooth the paper back onto the wall with your paper-hanging brush.
To trim the bottom, use the same technique as the top.
Hanging subsequent lengths
When the next length is ready for hanging, hold it in the same way as before and place it loosely up against the wall, butt it up against the previous length and ensure the pattern is matched exactly.
When you are happy with the match and the position, again work your way down from the top smoothing the paper onto the wall with your paper-hanging brush, and brush out any trapped air.
Trim the top and bottom in the same way as the first length, and then use your seam roller (unless the wallpaper is embossed) to smooth the edges between the two lengths.
Papering into the corner
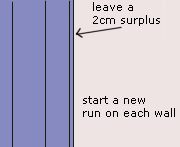
Fig 1.5
You should always trim the paper when you reach a corner and start a new run of lengths for each wall, this will stop the paper running at an angle due to unlevel walls.
To trim into the corner, run the back of the scissors down the length to make a loose crease, then gently pull the paper away from the wall and trim the paper about 2cm (1 inch) from the crease (to create a surplus see Fig 1.5). Then trim the top and bottom as before, and finally smooth the wallpaper back onto the surface with your paper-hanging brush.
To trim into the corner, run the back of the scissors down the length to make a loose crease, then gently pull the paper away from the wall and trim the paper about 2cm (1 inch) from the crease (to create a surplus see Fig 1.5). Then trim the top and bottom as before, and finally smooth the wallpaper back onto the surface with your paper-hanging brush.
Papering into a door or window recess
If you take a look at Fig 2.1 below you can see that in our example we are coming into the recess from the left hand side, the same technique is used when coming from the opposite direction as well.
First take the next length (pasted and ready to hang) and butt it up against the previous drop, using a blunt pencil mark the wall down the right hand side of the paper (see Fig 2.2), this will be your guideline. Remove the length from the wall.
Now mark the inside of the recess, level with the guideline as shown in Fig 2.3.
Now measure the depth of the recess and cut a length of paper (full width) to this measurement adding 5cm, paste the paper and allow to soak.
When the paper is ready to hang line it up with your guideline and smooth the paper into the recess, cut the paper at the corner as shown in Fig 2.4 to allow it to sit into the corner of the recess, once in position smooth the paper using your paper hanging brush ensuring to get rid of any trapped air.
Fig 2.1
Fig 2.2
Fig 2.3

Fig 2.4
Now trim the paper down on the left hand side allowing around 3cm as shown in Fig 2.5. Next give the overhanging pieces on the wall surface an uneven edge either by carefully tearing the paper or trimming with the scissors in a zig-zag motion (ensure to leave enough paper overlapping around 3cm), this will help disguise the overlap (again see Fig 1.5).
Now get the length again and hang as before, when you are happy with the position cut along the top edge of the recess as shown in Fig 2.6 (you may find it helpful to mark the back of the paper along the edge with a blunt pencil).
Next fold the paper around the corner of the recess ensuring not to leave any air trapped, smooth into position using your paper hanging brush. run the back of your scissors down the edge (by the window frame) then gently pull the paper back to allow you to trim the excess see Fig 2.7.
Finally smooth the entire length with your paper hanging brush ensuring to remove any trapped air, and wipe any paste off the window frame.
Fig 2.5
Fig 2.6
Fig 2.7
Fig 2.8
First take the next length (pasted and ready to hang) and butt it up against the previous drop, using a blunt pencil mark the wall down the right hand side of the paper (see Fig 2.2), this will be your guideline. Remove the length from the wall.
Now mark the inside of the recess, level with the guideline as shown in Fig 2.3.
Now measure the depth of the recess and cut a length of paper (full width) to this measurement adding 5cm, paste the paper and allow to soak.
When the paper is ready to hang line it up with your guideline and smooth the paper into the recess, cut the paper at the corner as shown in Fig 2.4 to allow it to sit into the corner of the recess, once in position smooth the paper using your paper hanging brush ensuring to get rid of any trapped air.
Fig 2.1
Fig 2.2
Fig 2.3
Fig 2.4
Now trim the paper down on the left hand side allowing around 3cm as shown in Fig 2.5. Next give the overhanging pieces on the wall surface an uneven edge either by carefully tearing the paper or trimming with the scissors in a zig-zag motion (ensure to leave enough paper overlapping around 3cm), this will help disguise the overlap (again see Fig 1.5).
Now get the length again and hang as before, when you are happy with the position cut along the top edge of the recess as shown in Fig 2.6 (you may find it helpful to mark the back of the paper along the edge with a blunt pencil).
Next fold the paper around the corner of the recess ensuring not to leave any air trapped, smooth into position using your paper hanging brush. run the back of your scissors down the edge (by the window frame) then gently pull the paper back to allow you to trim the excess see Fig 2.7.
Finally smooth the entire length with your paper hanging brush ensuring to remove any trapped air, and wipe any paste off the window frame.
Fig 2.5
Fig 2.6
Fig 2.7
Fig 2.8
Trimming around a socket or light switch
Papering around a socket or light switch can seem an awkward task, but it is actually fairly straightforward and can be done with a minimum of fuss.
When working with light switches or sockets ensure the power is isolated at the main fuse box.
When you hang the length where the socket/switch is located poke the scissors through the paper roughly in the middle of the socket/switch, then cut from the hole outwards to each corner of the socket/switch see Fig 1.1.
Smooth the paper onto the wall and then trim the paper leaving it overlapping the socket/switch by about 1cm (see Fig 1.2, loosen the screws enough to push the paper behind the socket/switch.
Finish the drop and then tighten the screws back up and you should be left with a perfect finish (Fig 1.3). Clean any paste off the socket/switch and allow the paper to dry before switching the power back on.
Fig 1.1
Fig 1.2
Fig 1.3
Advertisements