
How to paint an interior wall
Welcome to our guide to painting walls.
Painting is one of the easiest and most rewarding DIY tasks around the home, you can transform a room with the minimum amount of effort and in a short period of time.
In this section we will take you through the whole process including the preparation, cutting-in the ceiling and door/window frames, then applying the first and subsequent coats.
The amount of coats your wall will need depends on the colour you are using and also the existing colour. If you are simply painting on top of the same colour then 2 coats will usually suffice, however, if you are coating a light colour over a darker colour then you may need more.
Please note: We will accept no responsibility for any damage or injury as a result of following this guide.
For further information please see our disclaimer, a link to which can be found at the bottom of this page.
For further information please see our disclaimer, a link to which can be found at the bottom of this page.
To complete this task you will need:
- Suitable interior paint
- Small brush (Cutting-in)
- Large brush and kettle or roller and tray
- Filler (if required)
- Dust sheets
- Fine sand paper (if required)
- Sugar soap (or similar)

When working at heights, always ensure that the structure is safe and secure.
Never stretch out, always get down and re-position the scaffold or trestle.
Never stretch out, always get down and re-position the scaffold or trestle.
How to prepare the walls for painting
Before you begin painting it is vital that the wall surfaces are free of dust and stripped of any old wall covering. If your walls have an old covering that needs to be removed then see our guide to wallpaper stripping.
Remove curtains and any fixtures. If possible remove all of the furniture from the room, if not, place it in the middle of the room and cover carefully with dustsheets. Take down any shelving that may be present and also remove any hanging pictures from the walls.
If you do not have radiator rollers (small paint rollers with a long handle) and you have a radiator that needs removing, then please see our guide to removing a radiator.
Remove any loose floor coverings and use dustsheets to protect any other floor covering from paint splashes and dust.
Cutting-in to the ceiling
Note: To give the best finish only cut-in one wall at a time, paint that wall, then start on the next. Unless, of course, you are confident of your painting speed.
Advertisements
The next step is to cut-in around the ceiling, skirting, corners, light switches, sockets and any doors/windows.
To cut-in to the ceiling use the brush as shown in Fig 1.1. Paint along the top of the wall keeping the edge of the brush tight to the ceiling, use firm steady strokes to give yourself a nice straight edge.
Then, turn the brush and hold as shown in Fig 1.2, go over the paint again with a steady stroke to smooth the previous coat.
This time there is no need to get too close to the ceiling, but close enough to smooth the paint out nicely.
You can use this technique to cut-in around the horizontal runs of any windows, doors, sockets and light switches.
To cut-in to the skirting boards use a similar technique, holding the brush at a 90 degree angle (perpendicular) to the skirting board, then turn the brush and go over the paint again to smooth the coat.
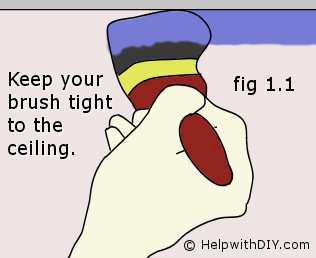
Fig 1.1
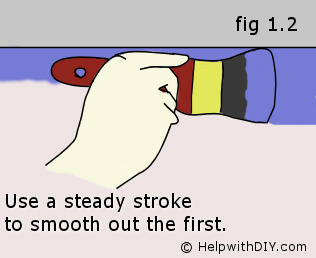
Fig 1.2
To cut-in to the ceiling use the brush as shown in Fig 1.1. Paint along the top of the wall keeping the edge of the brush tight to the ceiling, use firm steady strokes to give yourself a nice straight edge.
Then, turn the brush and hold as shown in Fig 1.2, go over the paint again with a steady stroke to smooth the previous coat.
This time there is no need to get too close to the ceiling, but close enough to smooth the paint out nicely.
You can use this technique to cut-in around the horizontal runs of any windows, doors, sockets and light switches.
To cut-in to the skirting boards use a similar technique, holding the brush at a 90 degree angle (perpendicular) to the skirting board, then turn the brush and go over the paint again to smooth the coat.
Fig 1.1
Fig 1.2
How to cut-in around windows and doors
To cut-in around the vertical runs of doors and windows use the same technique as above, but this time hold the brush as shown in Fig 1.3 below, keeping tight into the corner with the edge of the brush.
Then, using the brush as shown in Fig 1.4 below, go over the paint again with a firm steady stroke to smooth the previous coat. Again, there is no need to get too close to the corner, just enough to smooth the paint out nicely at the edge.
You can use this technique to cut-in around the vertical runs of any windows, doors, sockets and light switches.
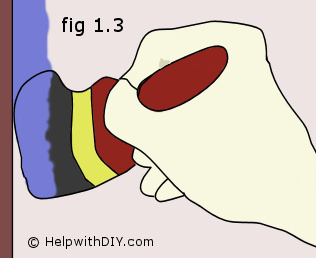
Fig 1.3
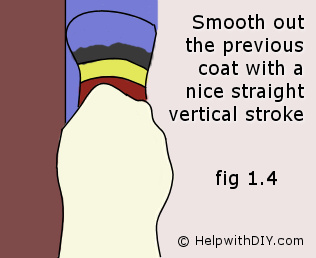
Fig 1.4
Then, using the brush as shown in Fig 1.4 below, go over the paint again with a firm steady stroke to smooth the previous coat. Again, there is no need to get too close to the corner, just enough to smooth the paint out nicely at the edge.
You can use this technique to cut-in around the vertical runs of any windows, doors, sockets and light switches.
Fig 1.3
Fig 1.4
Applying the first coat - Using a brush
When painting interior walls paint from top to bottom working away from windows as in Fig 1.5.
Using a brush
Use the biggest brush you feel comfortable with, this will allow you to cover a greater area quicker, and therefore lessen the chance of the paint drying out too quickly at any edges.

Fig 1.5
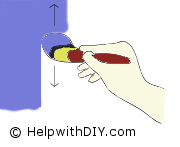
Fig 1.6
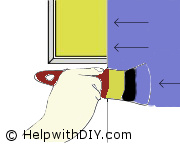
Fig 1.7
Using a brush
Use the biggest brush you feel comfortable with, this will allow you to cover a greater area quicker, and therefore lessen the chance of the paint drying out too quickly at any edges.
Advertisements
If you are using a paint kettle (recommended), then fill the kettle so it is half the depth of the bristles on your brush, this will help avoid overloading the brush.
Use the brush as shown in Fig 1.6, making a nice smooth vertical action with your wrist. Paint one section at a time, ensuring to keep any wet edges fresh as this will improve the finish.
With corners, always paint outwards over the edge as shown in Fig 1.7, this will reduce the chances of any paint collecting at the edge and forming runs.
Try to ensure you catch any runs in the paint as they happen, if you find a run that has already dried out too much to smooth with the brush, then you will need to sand it down with fine sandpaper, and then recoat.
Apply the second coat in the same way.
Fig 1.5
Fig 1.6
Fig 1.7
Applying the first coat - Using a roller
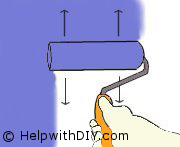
Fig 1.8
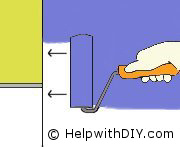
Fig 1.9
Using a roller - short pile
Fill the roller tray to a depth so that the paint doesn't rise above the pile of the roller, this will help to avoid overloading the roller.
Place the roller into the paint and then roll it back and forth, dipping it into the paint and then over the top section of the tray, until the roller pile is completely covered with evenly distributed paint.
Use smooth vertical actions with your roller to give an even coat, see Fig 1.8.
Try to keep the wet edges fresh as you do each section of the wall and finish each section with smooth strokes in one direction (down or up), this will improve the finish.
When painting to an edge, always roll to the edge of the wall, as shown in Fig 1.9. This will help avoid a build up of paint on the edge.
Apply the second coat in the same way.
Advertisements