
How to paint your ceiling

Welcome to our guide to painting a ceiling.
In this section we will take you through the whole process from preparation through to the final coat.
Painting the ceiling should normally be the first task if you are decorating a whole room, doing the ceiling first can make the subsequent tasks easier.
As with other home improvement projects, taking your time and preparing thoroughly can make the difference between a good job and an excellent job.
When it comes to painting a ceiling, preparing the surface correctly will lay the foundations for achieving that perfect finish, it is important to try to hide any blemishes on the surface.
We show you how to paint your ceiling using a brush and/or a roller. If you are new to DIY then a roller is probably the easier of these 2 options.
We show you how to paint your ceiling using a brush and/or a roller. If you are new to DIY then a roller is probably the easier of these 2 options.
Please note: We will accept no responsibility for any damage or injury as a result of following this guide.
For further information please see our disclaimer, a link to which can be found at the bottom of this page.
For further information please see our disclaimer, a link to which can be found at the bottom of this page.
To complete this task you will need:
- Suitable Interior Paint
- Small Brush (cutting-in)
- Large Brush or Roller
- Paint Kettle
- Suitable filler (if required) and Trowel
- Dust Sheets
- Sugar Soap and rag

When working at heights, always ensure that the structure is safe and secure.
Never stretch out, always get down and re-position the scaffold or trestle.
Never stretch out, always get down and re-position the scaffold or trestle.
Preparing the ceiling
Advertisements
First remove any curtains, fixtures and any light furniture.
If possible, also remove all heavy furnishings from the room, if it's not possible, place them in the middle of the room and cover with dustsheets.
Remove any loose floor coverings, use dustsheets to protect any non-removable floor covering from paint splashes and dust.
Wash down the surface with sugarsoap or a suitable detergent to remove all dust and debris. Inspect the ceiling for cracks, holes and any loose plaster.
Repair any imperfections on the ceiling using a suitable filler. Take your time preparing the ceiling, the better the surface when you start, the better the final finish will look.
Cutting-in the ceiling
The first task is to cut-in the ceiling, to do this, take the smaller paint brush and fill your paint kettle so the paint comes halfway up the bristles of the brush (to avoid overloading the brush).
Start in one corner, coat the ceiling holding the brush as shown in Fig 1.1, ensuring to get right into the corner. If you are painting or decorating the walls after, then you don't need to worry too much about getting paint on the walls.
Then, holding the brush at the angle shown in Fig 1.2, go over the paint to even out the coat.
To cut in around any light fittings, you may find it easier to isolate the electricity at the main fuse box and then remove the fitting for painting.
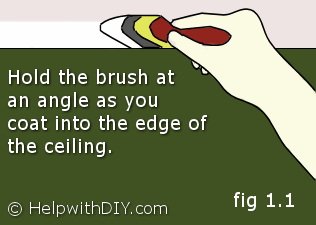
Fig 1.1

Fig 1.2
Start in one corner, coat the ceiling holding the brush as shown in Fig 1.1, ensuring to get right into the corner. If you are painting or decorating the walls after, then you don't need to worry too much about getting paint on the walls.
Then, holding the brush at the angle shown in Fig 1.2, go over the paint to even out the coat.
To cut in around any light fittings, you may find it easier to isolate the electricity at the main fuse box and then remove the fitting for painting.
Fig 1.1
Fig 1.2
Advertisements
After cutting-in the ceiling
After you have cut-in around the entire ceiling and any light fittings that may be present, it is time to start applying the main coat.
Whether you decide to use a brush or a roller to apply the coat, if you paint in 1 metre sections you will find the wet edges stay fresher and therefore improve the finish.
Whether you decide to use a brush or a roller to apply the coat, if you paint in 1 metre sections you will find the wet edges stay fresher and therefore improve the finish.
Using a Roller
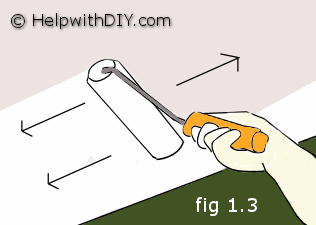
Fig 1.3
After cutting-in around the ceiling fill your roller tray to a depth so that the paint doesn't rise above the pile of the roller (to avoid overloading the roller).
Place the roller in the paint, then distribute the paint evenly by bringing the roller back and forth over the top section of the tray.
Now, start in one corner and use the roller in smooth parallel actions (see Fig 1.3), if you work in 1 metre square sections you will find it easier to keep the wet edges fresh.
Coat the entire ceiling, and then allow the paint to dry thoroughly.
Once dry, apply the second coat in the same way.
Using a paint brush
Advertisements
Take the larger of your paint brushes and load it with paint until it is around halfway up the bristles, rub the brush gently against the side of the paint tin to remove any excess paint.
Apply the paint using smooth parallel strokes, do not push too hard with the brush onto the ceiling, apply just enough pressure to put a slight bend in the bristles. Try and maintain the same amount of pressure throughout the motion of your brush stroke, this will ensure a nice even coat.
Ensure you remove any brush marks as you work your way across the ceiling, it is always best to visually check the finish from the ground before moving your ladder to the next section.
Once you have finished the first coat, allow to dry thoroughly and then repeat the process for the second coat.