
Painting ceramic tiles | Paint old kitchen & bathroom tiles
Welcome to our guide to painting ceramic tiles.
Painting ceramic tiles is a cheap and easy way to bring life back into your kitchen or bathroom, in this guide we will show you how to do it with the least amount of fuss.
We take you through preparing the tiles for painting, applying the primer and applying the gloss.
Painting ceramic tiles is a cheap and easy way to bring life back into your kitchen or bathroom, in this guide we will show you how to do it with the least amount of fuss.
We take you through preparing the tiles for painting, applying the primer and applying the gloss.
Please note: We will accept no responsibility for any damage or injury as a result of following this guide.
For further information please see our disclaimer, a link to which can be found at the bottom of this page.
For further information please see our disclaimer, a link to which can be found at the bottom of this page.
To complete this task you will need:
- Suitable tile primer
- Suitable top coat (gloss)
- Synthetic bristle brush
- Natural bristle brush
- Fine sandpaper
- Lint free cloth
- Dust sheets
- Detergent or sugar soap
- Nail brush (or similar)
Preparing the tiles for painting
Advertisements
The first thing to do (as with most DIY tasks) is the preparation.
Make sure the surrounding area is protected from any dust or paint. Splashes and stains from oil-based paint (such as the gloss we are going to use) are more stubborn to remove than their water-based counterparts, such as emulsion.
Next, take a bowl of warm water with a suitable detergent, or preferably some sugar soap, and wash down the tiles to remove all dust and grease. For the grouted areas use a nail brush or similar to get right into the joins.
If there are any cracked or chipped tiles then these need to be replaced not filled, if you need a hand with this then see our guide to replacing broken tiles.
Once you have cleaned the tiled area thoroughly, wash it down with some clean water to remove all traces of detergent or sugar soap, and then allow to dry.
Applying the primer
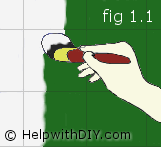
Fig 1.1
When the area is clean and thoroughly dry you can then apply the tile primer.
Take your synthetic bristle brush (or mixed-bristle) and coat the tiled area evenly with the primer, use a smooth vertical action as shown in Fig 1.1 to give an even coat, ensuring you catch any runs.
Once you have coated the entire area you will need to leave the primer to dry, normally for several hours, although always read the manufacturer's instructions on drying times.
Once dry, rub down the entire surface with a fine sandpaper, then remove all dust with a lint-free cloth.
Now apply the second coat of primer in the same way, ensuring to give a nice even finish. Again, rub down with some fine sandpaper and clean off with a lint-free cloth.
Applying the gloss
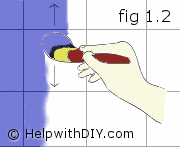
Fig 1.2
Take your natural bristle brush (or mixed-bristle) and apply the gloss in much the same way as you did the primer, although it may give a better finish if you paint the grout first. Using a smooth vertical stroke, as shown in Fig 1.2, coat the rest of the area, ensuring to catch any runs in the paint.
Once you have covered the entire area, leave the gloss to dry according to the manufacturer's instructions.
After the paint has dried, continue with the second coat using the same technique as before and leave to dry thoroughly.
Once you have covered the entire area, leave the gloss to dry according to the manufacturer's instructions.
After the paint has dried, continue with the second coat using the same technique as before and leave to dry thoroughly.
Advertisements